TextField in SwiftUI
Table of Contents
TextField in SwiftUI is a control that displays an editable text interface. It is an equivalent counterpart of UITextField in UIKit. Since a text field allows users to edit text, it needs a way to read and write text to the text field. In SwiftUI, we have a common way to do it with data binding.
Data Binding
Data binding is a core component of any SwiftUI views. I encourage you to visit my three parts series about Data in SwiftUI, Part 1, Part 2, Part 3.
In brief, data binding is a way for SwiftUI to communicate the data between the view and the one who uses it. It serves the same purpose as UITextFieldDelegate and the target-action mechanism in UITextField to report changes made during editing.
There are many ways to create a text field. We will start with the simplest form with a title and a data binding (we will use @State variable throughout this article for simplicity).
Here is an example of a text field bind to a local string variable, username.
struct ContentView: View {
    @State private var username: String = ""

    var body: some View {
        VStack {
            TextField("Username", text: $username) // <1>, <2>
        }
    }
}
<1> We set a title to "Username". Title used to describe the purpose of a text field. It looks like a placeholder in UITextField.
<2> We bind text to display and edit to username state variable.

If you tap on the title, the keyboard will show up, and you can begin editing your text.
You can easily support sarunw.com by checking out this sponsor.
Note Taking:Quickly take note using Voice, Camera, or Typing
Read text from a TextField
All the input text automatically updates to our state variable username. To read the value from the text field, all you need to do is reading it from its bound value, username. To prove that, let's add a welcome message above our text field.
struct ContentView: View {
    @State private var username: String = ""

    var body: some View {
        VStack {
            if !username.isEmpty { // <1>
                Text("Welcome \(username)!") // <2>
            }
            TextField("Username", text: $username)
        }
    }
}
<1> We check and show Text if username is not an empty string.
<2> We read value from username and put it in Text.

Write text to a TextField
Writing text to the text field is as easy as reading it. The text field is bound to the data source, username, everything change that you made to it will be picked up and show by the text field. You can directly manipulate the data source, and it will reflect in the text field.
In the following example, we create an autofill button with an action that sets a text to the username.
struct ContentView: View {
    @State private var username: String = ""

    var body: some View {
        VStack {
            if !username.isEmpty {
                Text("Welcome \(username)!")
            }
            TextField("Username", text: $username)
            Button("Autofill") {
                username = "Sarunw from autofill" // <1>
            }
        }
    }
}
<1> Add a button with an action to set the value of username to Sarunw from autofill.

onEditingChanged and onCommit
Since TextField doesn't has a delegate or target-action mechanism like UITextField, it exposes those events in the form of a callback. Right now, there are two event callbacks.
onEditingChanged: @escaping (Bool) -> VoidonEditingChanged: TextField calls onEditingChanged closure when the user begins editing text and after the user finishes editing text. The closure receives a Boolean value that indicates the editing status: true when the user begins editing, false when they finish.
onCommit: @escaping () -> Void = {})onCommit: TextField calls onCommit closure when the user presses the Return key.
In the following example, we create a text field that prints out the calling action.
struct ContentView: View {
    @State private var username: String = ""

    var body: some View {
        VStack {
            TextField(
                "Username",
                text: $username,
                onEditingChanged: { (isBegin) in
                    if isBegin {
                        print("Begins editing")
                    } else {
                        print("Finishes editing")
                    }
                },
                onCommit: {
                    print("commit")
                }
            )
        }
    }
}
If you run the app, tap on a text field, type something, then hit return to dismiss the keyboard, you will see the following output in the debug console.
Begins editing
commit
Finishes editing
Formatted text
The bound value doesn’t have to be a string. By using a Formatter, you can bind the text field to a non-string type, using the formatter to convert the typed text into an instance of the bound type.
The following example uses a DateFormatter to convert the text field's short date format to a Date instance.
struct ContentView: View {
    @State private var date = Date() // <1>

    static var df: DateFormatter { // <2>
        let df = DateFormatter()
        df.dateStyle = .short
        return df
    }

    var body: some View {
        VStack {
            TextField(
                "Date",
                value: $date, // <3>
                formatter: ContentView.df, // <4>
                onEditingChanged: { _ in

                }, onCommit: {

                })
            Text(date.debugDescription) // <5>
        }
    }
}
<1> Our data source is Date, not a string.
<2> We create a formatter to do conversion between string from the text field to our bound value and vice versa. We use a short date style, which will present the date value in MM/dd/yyyy format.
<3> We bind our date instance to the text field the same way as we do with a string.
<4> We set a formatter to the text field, so it knows how to do a conversion.
<5> A Text view shows the debug description string of the date instance.
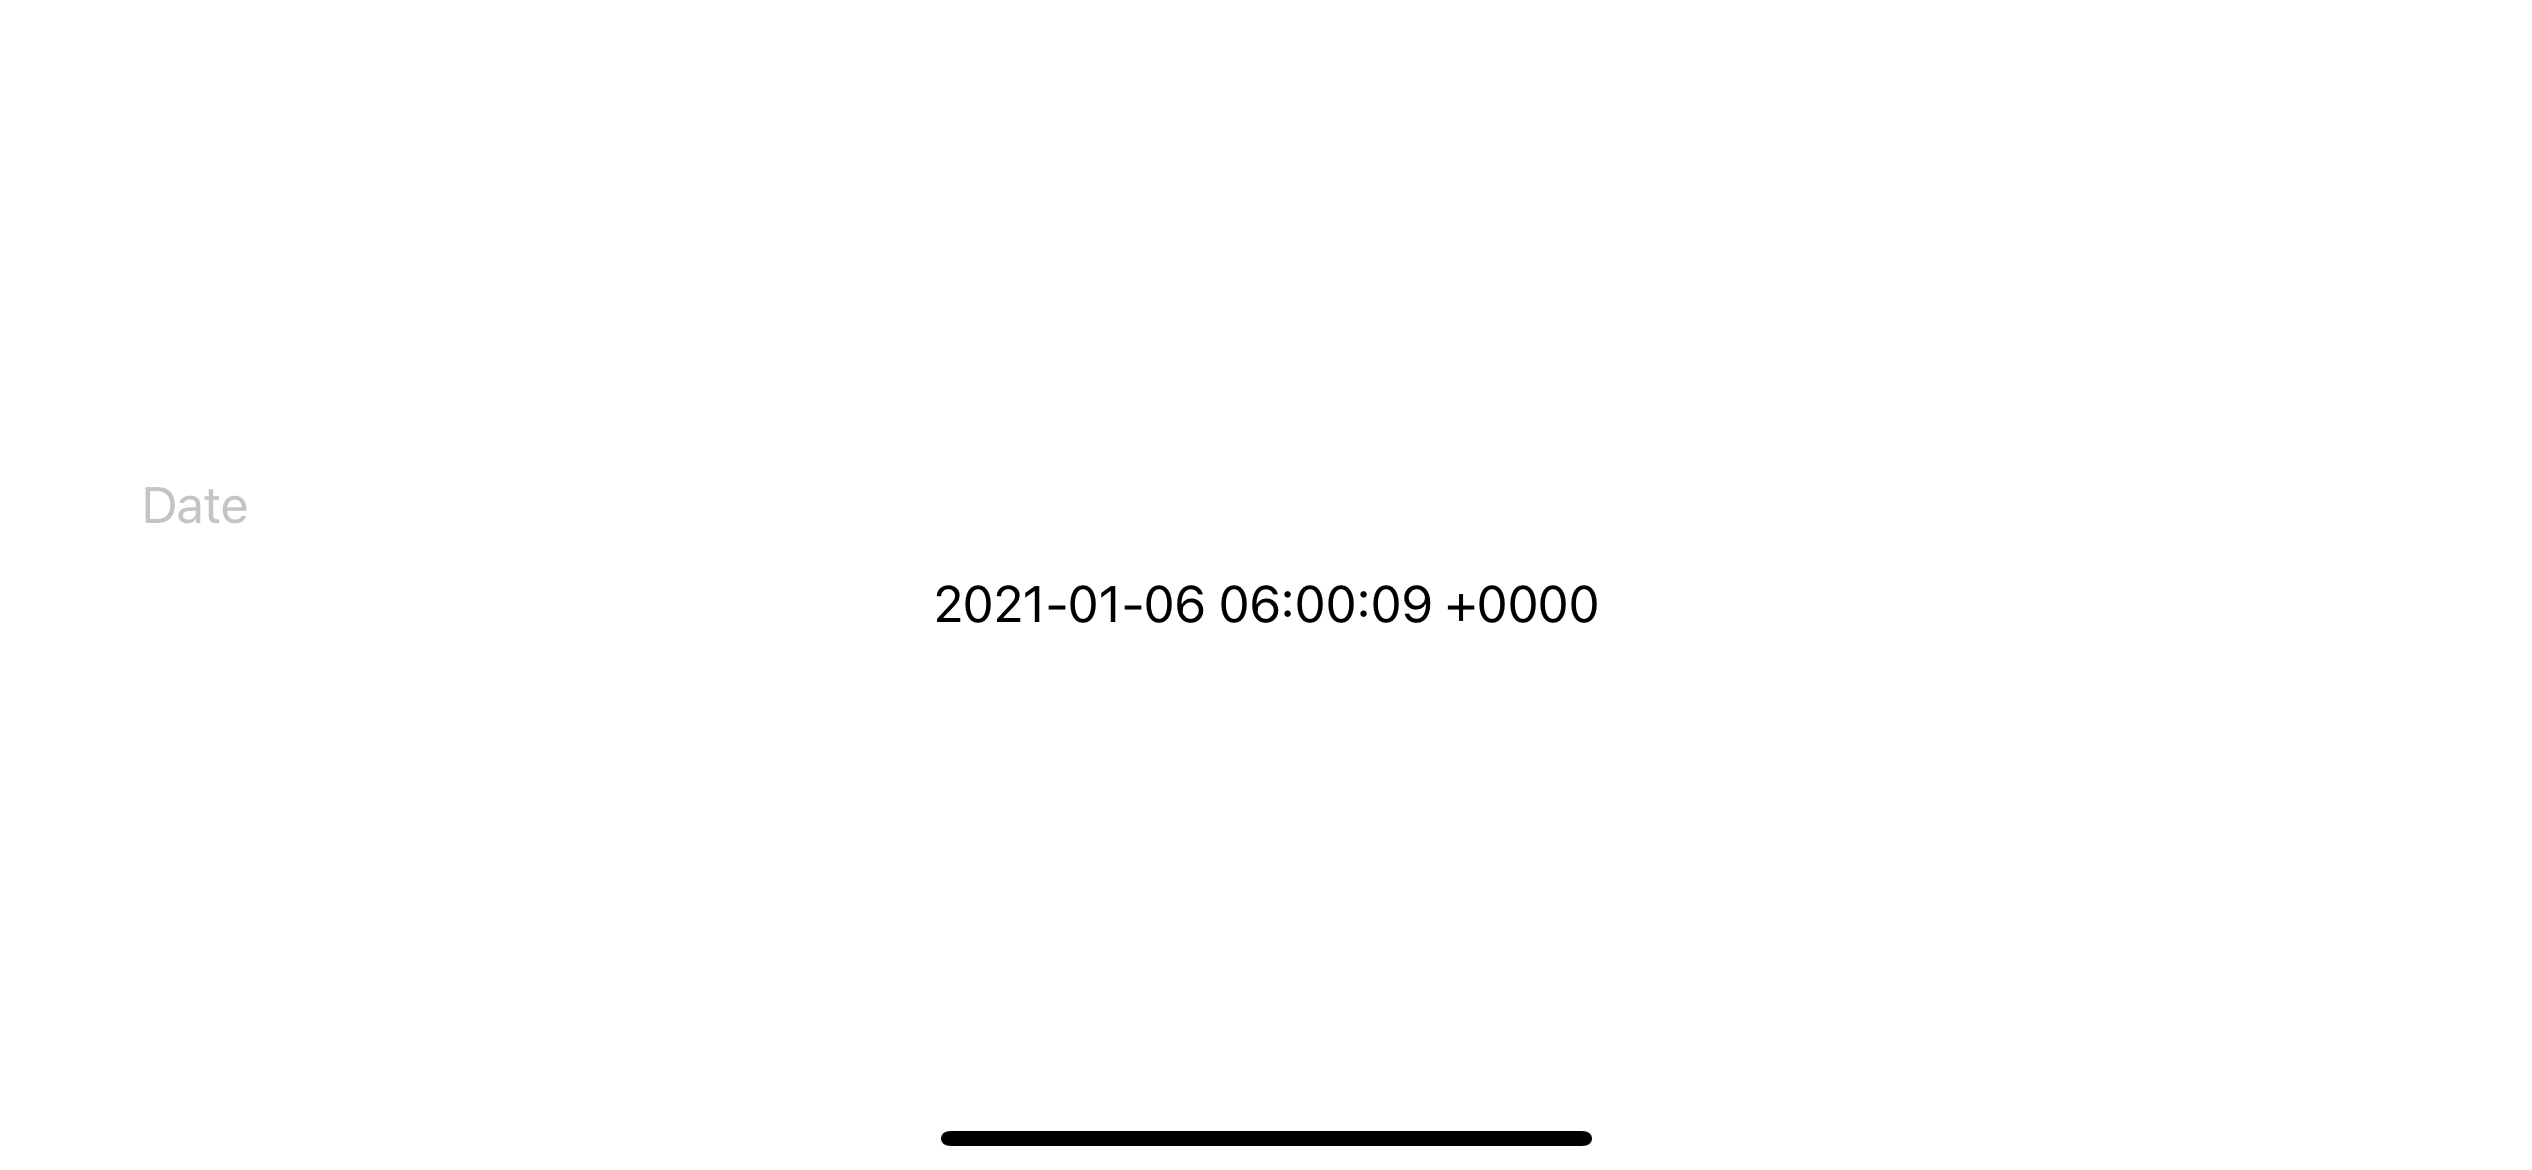
Run the app, and you will see a date in a short format in a text field.

Valid editing
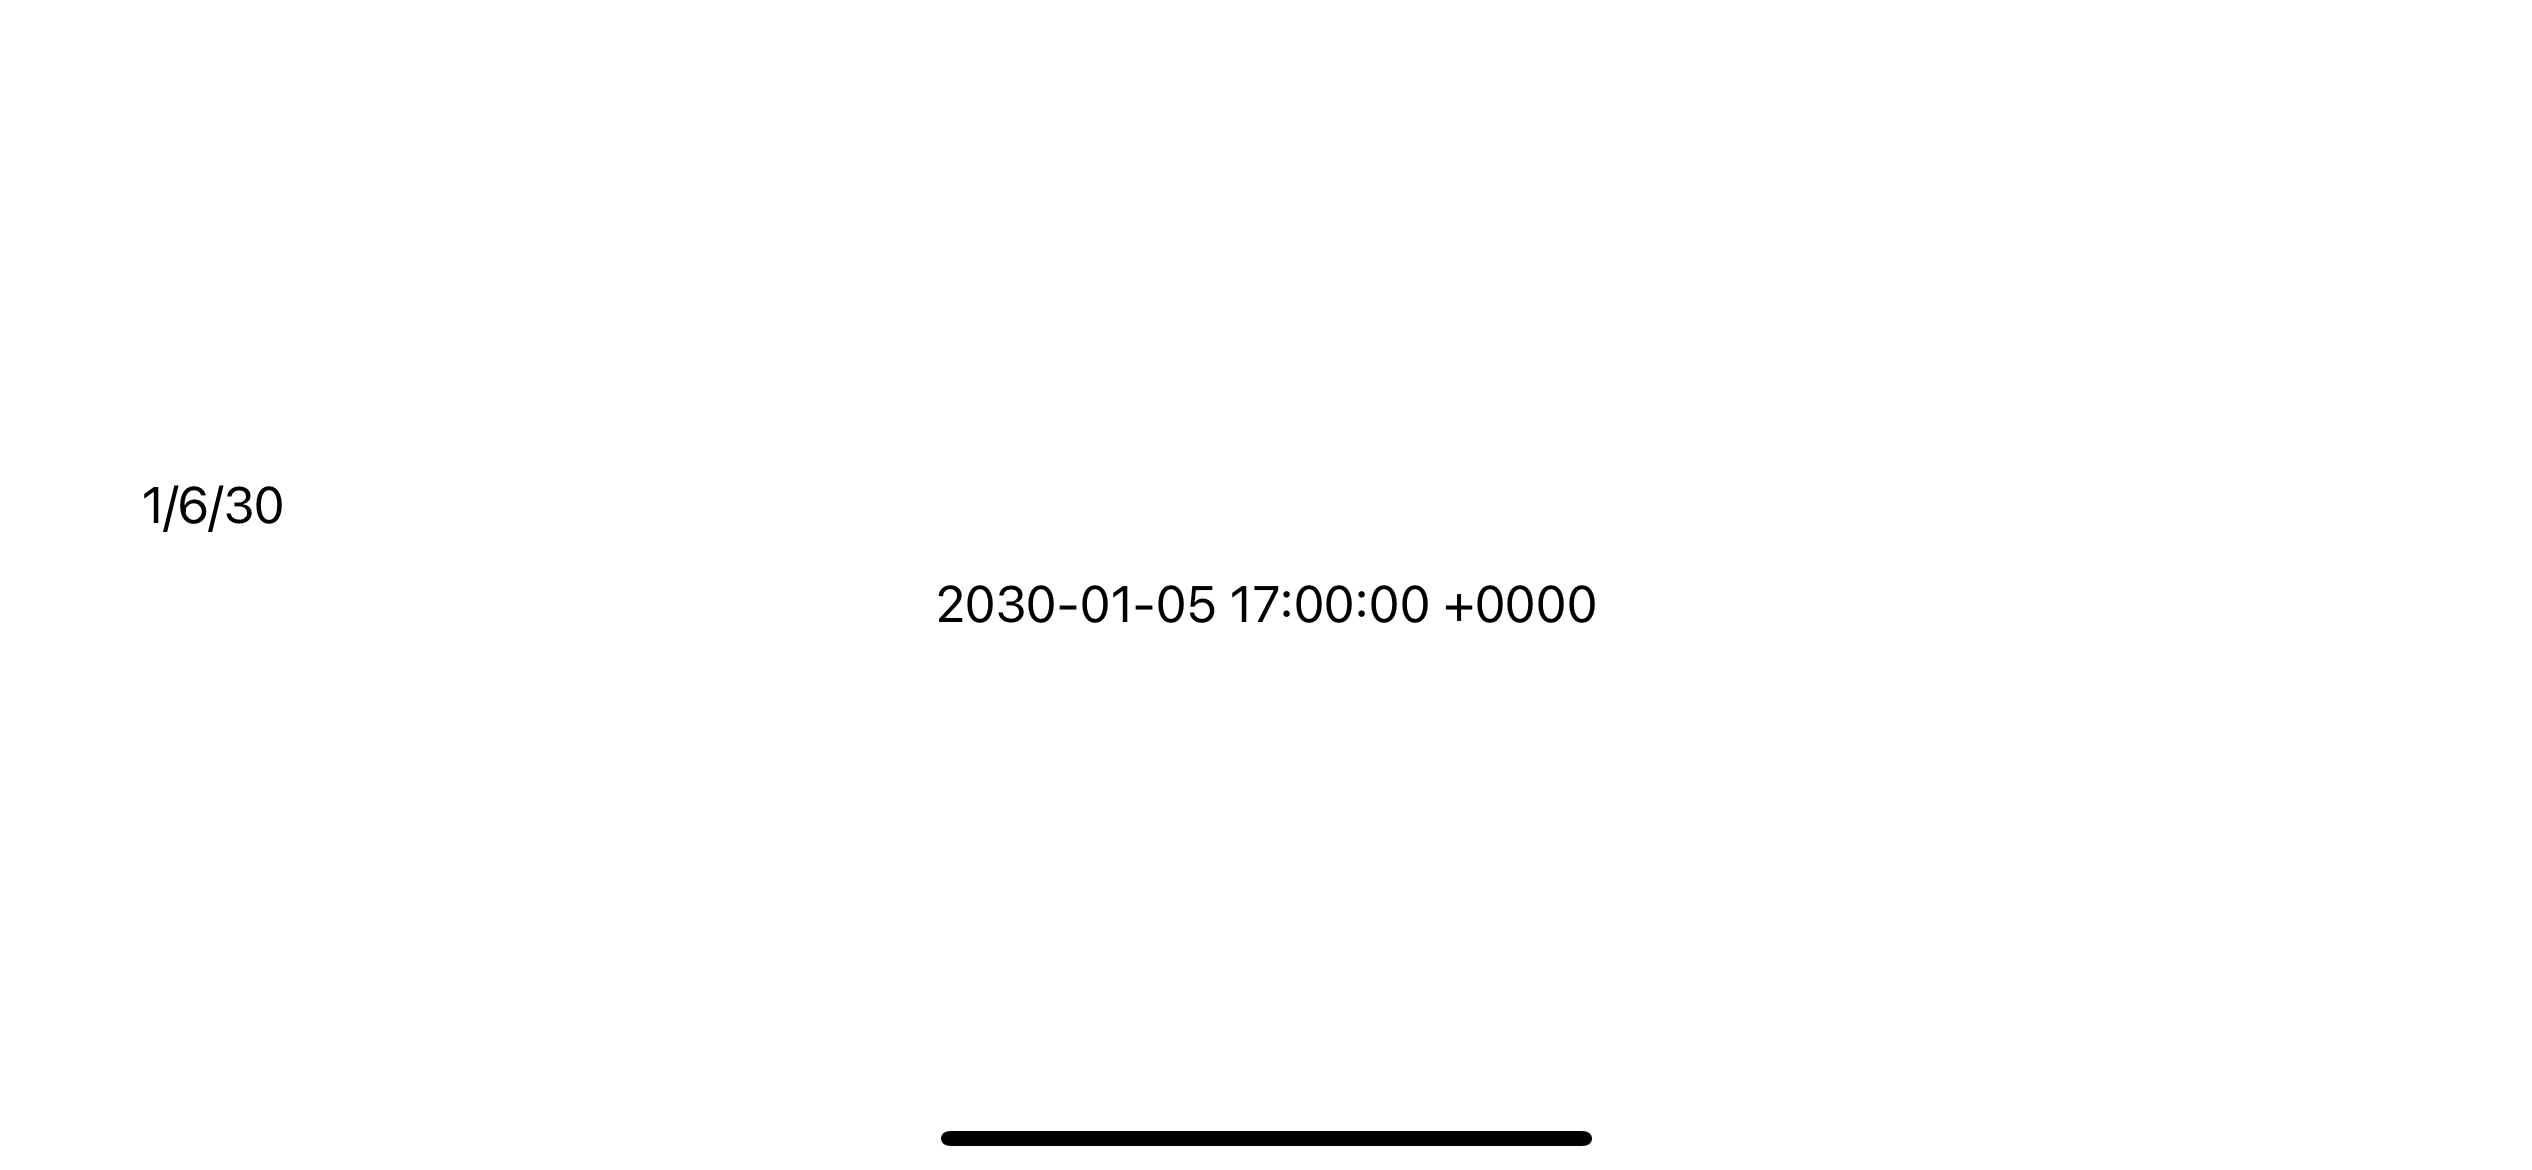
A text in which formatter can do a conversion is considered valid.
You can edit text, and the text field will automatically do the conversion and update the bound value for you. Here I edit the string to 1/6/30, you can see the date get an update, which shows in the bottom text area.
Invalid editing
If you try to put something that the formatter can't perform the conversion, the text field won't modify the binding value and reset to the last valid value.
If you try to put something like 1/6/a and hit return, the text field will be going back to its original value with the following error message in the debug console.
[SwiftUI] The value “1/6/a” is invalid.Wrong formatter
If you use a formatter that is not matched with a bounding value, the result will be the same as invalid input since the formatter can't perform the conversion.
struct ContentView: View {
    @State private var date = Date()

    static var currency: NumberFormatter {
        let formatter = NumberFormatter()
        formatter.numberStyle = .currency
        return formatter
    }

    var body: some View {
        VStack {
            TextField(
                "Date",
                value: $date,
                formatter: ContentView.currency, // <1>
                onEditingChanged: { _ in

                }, onCommit: {

                })
            Text(date.debugDescription)
        }
    }
}
<1> We use NumberFormatter, which converts between a number and a string while our bounding value is a date type.
You will get an empty text field since formatter can't convert the date to string with NumberFormatter.
Any input would result in an invalid input error. I edited the text field to 1/1/20, and this is what I got.
[SwiftUI] The value “1/1/20” is invalid.Styling
You can customize text fields' appearance using the textFieldStyle(_:) modifier, passing in an instance of TextFieldStyle.
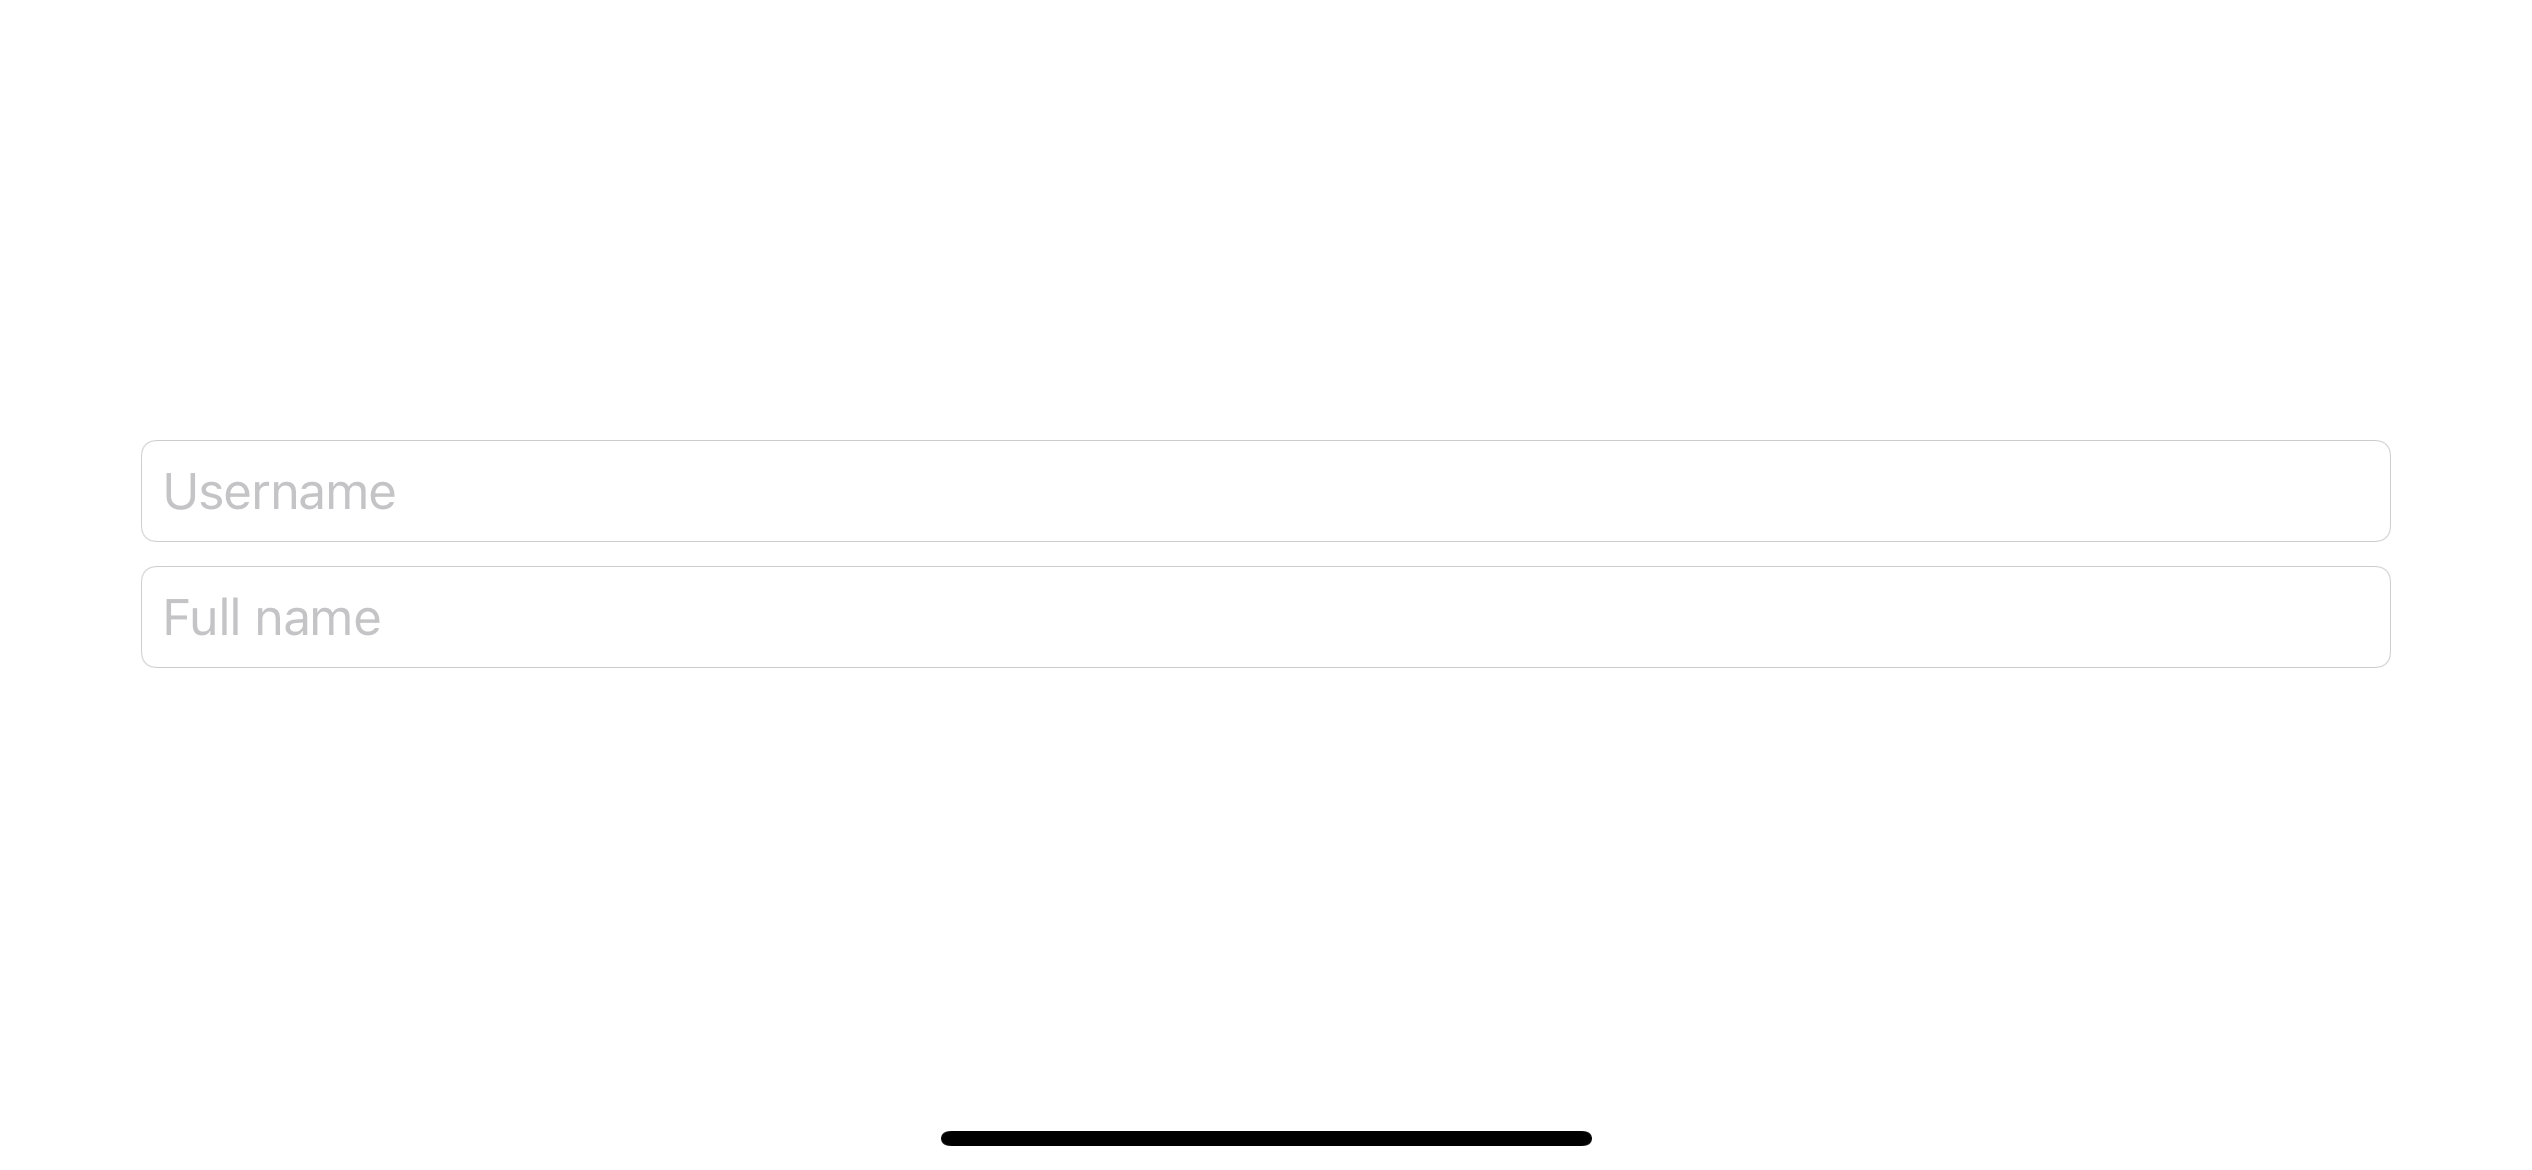
The following example applies the RoundedBorderTextFieldStyle to both text fields within a VStack.
struct ContentView: View {
    @State private var username: String = ""
    @State private var fullName: String = ""

    var body: some View {
        VStack {
            TextField("Username", text: $username)
                .textFieldStyle(RoundedBorderTextFieldStyle())
            TextField("Full name", text: $fullName)
                .textFieldStyle(RoundedBorderTextFieldStyle())
        }
    }
}
If you want every text field in a stack view style the same, you can move the textFieldStyle modifier out to their parent, VStack.
struct ContentView: View {
    @State private var username: String = ""
    @State private var fullName: String = ""

    var body: some View {
        VStack {
            TextField("Username", text: $username)
            TextField("Full name", text: $fullName)
        }.textFieldStyle(RoundedBorderTextFieldStyle())
    }
}
Custom styling
Styling that SwiftUI offers might seem very basic, but you can develop your own styling with a view modifier and compose other views together.
Here are some examples.
Change font color
TextField("Username", text: $username)
    .foregroundColor(.pink)
Change background color
TextField("Username", text: $username)
    .background(Color.pink)
With a vertical label
VStack(alignment: .leading) {
    Text("Username")
    TextField("Username", text: $username)
        .textFieldStyle(RoundedBorderTextFieldStyle())
}
With a horizontal label
HStack {
    Text("Username")
    TextField("Username", text: $username)
        .textFieldStyle(RoundedBorderTextFieldStyle())
}
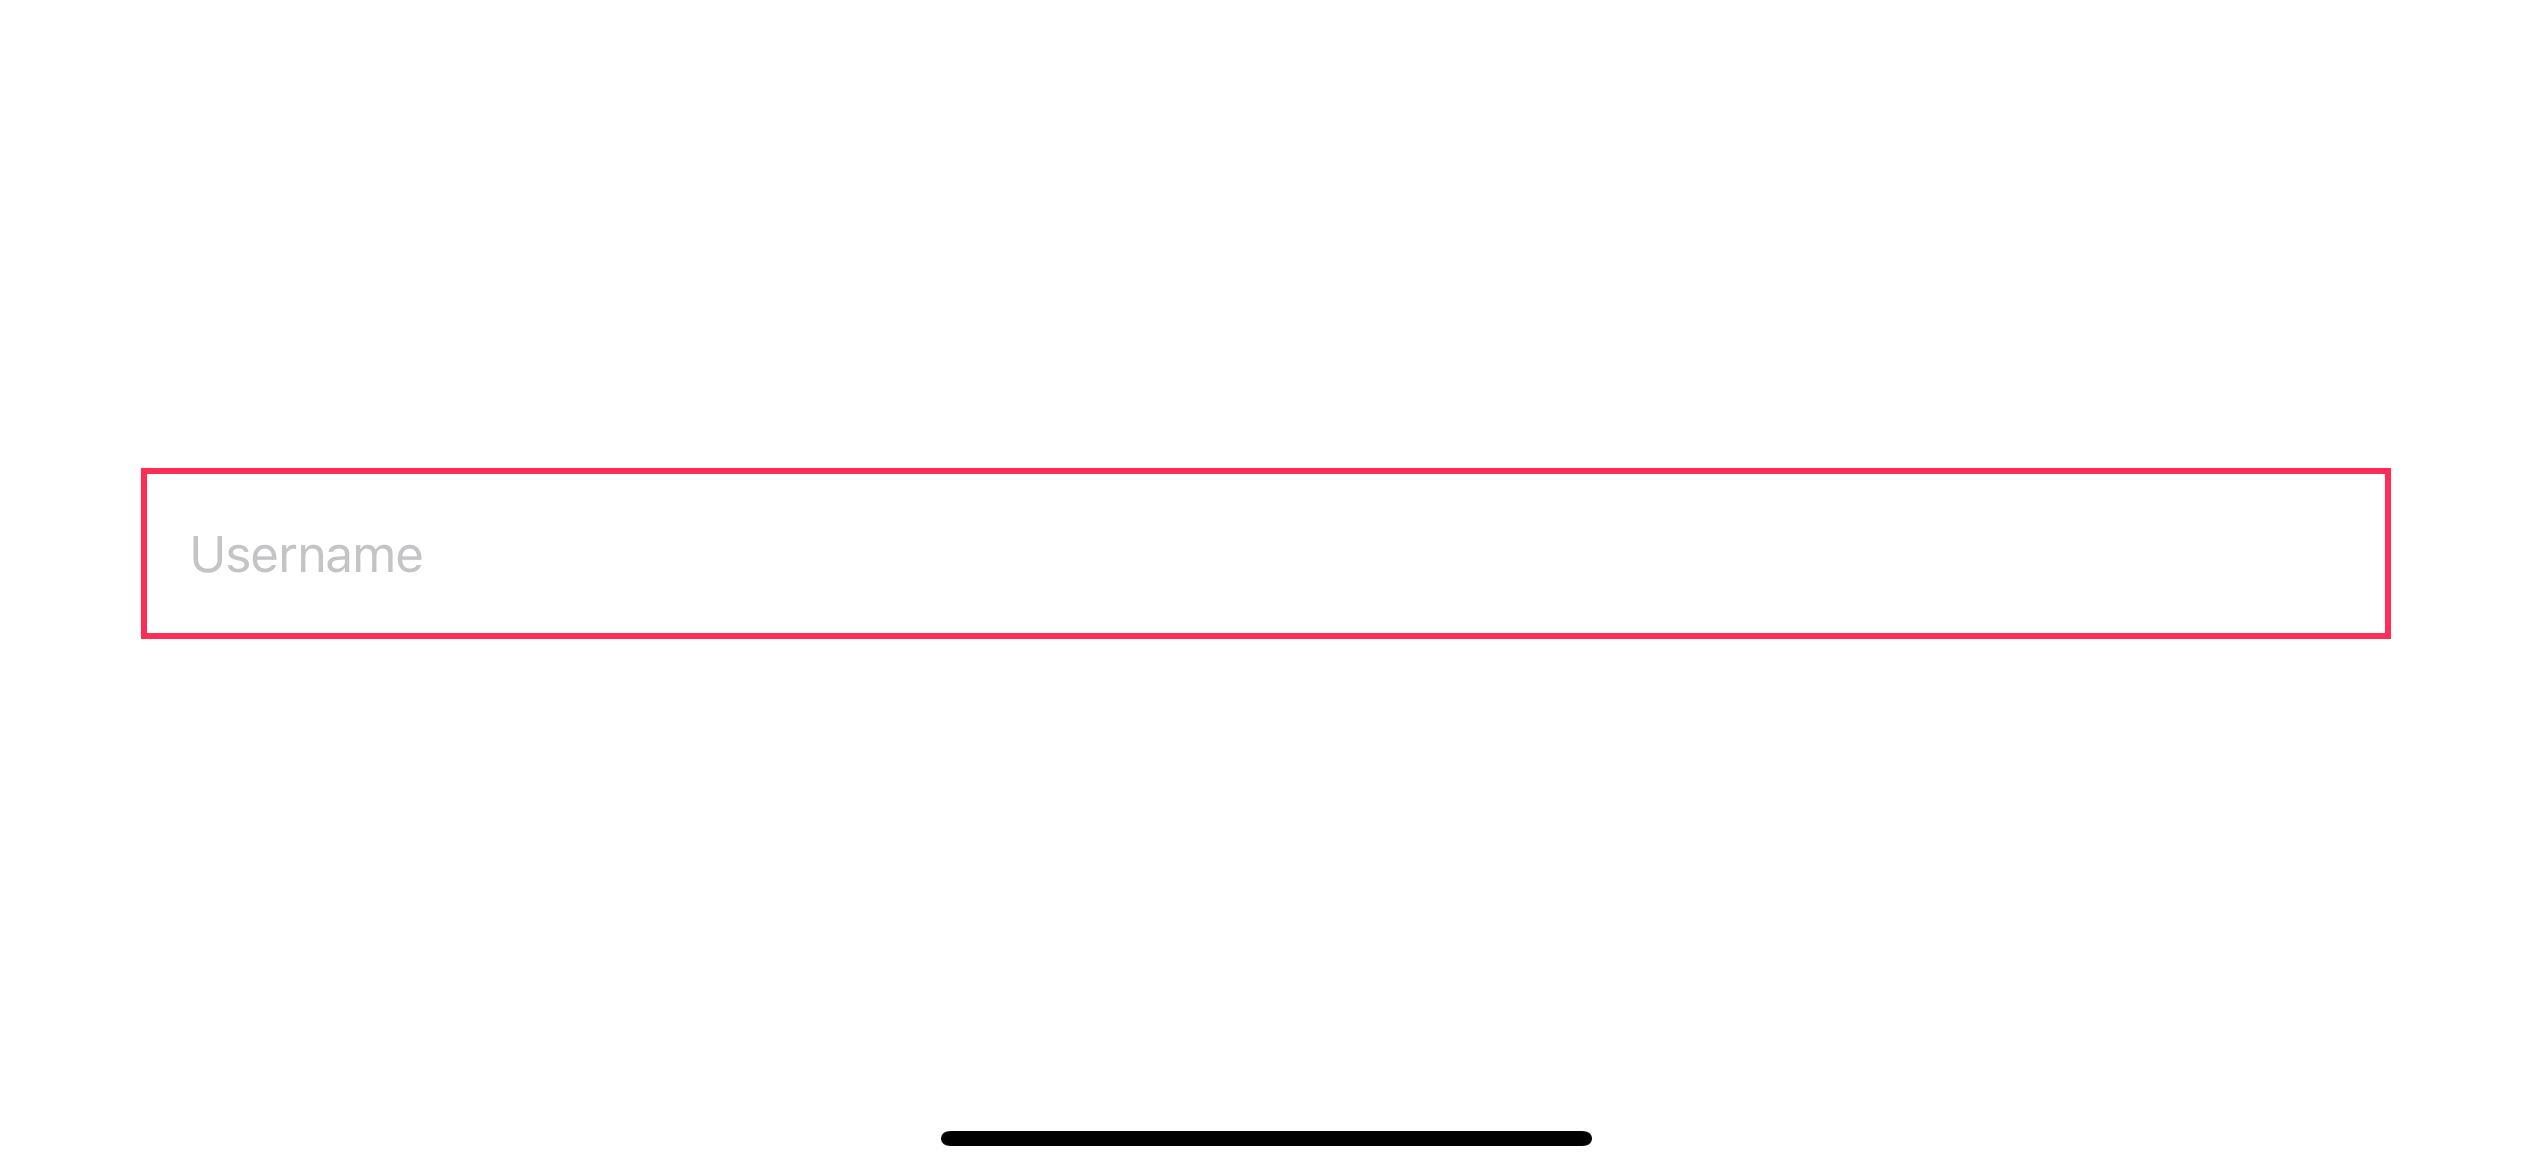
Custom border
VStack {
    TextField("Username", text: $username)
        .padding()
        .border(Color.pink, width: 2)
}
Conclusion
This is the first SwiftUI of this year. You can expect more SwiftUI content coming. If you are learning SwiftUI, subscribe to my newsletter or follow me on Twitter so you don't miss my next article.
You can easily support sarunw.com by checking out this sponsor.
Note Taking:Quickly take note using Voice, Camera, or Typing
Related Resources
Read more article about SwiftUI, TextField, or see all available topic
Enjoy the read?
If you enjoy this article, you can subscribe to the weekly newsletter.
Every Friday, you'll get a quick recap of all articles and tips posted on this site. No strings attached. Unsubscribe anytime.
Feel free to follow me on Twitter and ask your questions related to this post. Thanks for reading and see you next time.
If you enjoy my writing, please check out my Patreon https://www.patreon.com/sarunw and become my supporter. Sharing the article is also greatly appreciated.
Become a patron Buy me a coffee Tweet ShareHow to change the color of SF Symbols
SF symbols are icon sets that Apple design to work with their system font. Learn how to change its color and how to show them in multicolor style.
Different ways to compare string in Swift
String comparison is an essential operation for day to day job. Swift provides a few variations for this. We will visit them in this article.