How to request a user's location
Table of Contents
Getting a user's location is a common task that many apps do, but in the distant past (iOS 8), the process isn't as simple as it sounds. If you are still using startUpdatingLocation as a way to get a user's location, you need to refresh your knowledge right now. The method we are going to talk about is requestLocation() which requests the one-time delivery of the user's current location.
Add privacy description
Since we try to access privacy-sensitive data (location), Apple required us to provide a usage description for that data. This would be shown in the permission alert when requesting to access user's location.
Add Privacy - Location When In Use Usage Description key (NSLocationWhenInUseUsageDescription) into Info.plist file.
You can easily support sarunw.com by checking out this sponsor.
Offline Transcription: Fast, privacy-focus way to transcribe audio, video, and podcast files. No data leaves your Mac.
Desired Accuracy
After setting the usage description, we can go ahead and start coding. First, initialize CLLocationManager and set the desired accuracy. The default value is to the most accurate one. You can change this if you want less accurate value.
The other accuracies are as follows.
public let kCLLocationAccuracyBestForNavigation: CLLocationAccuracy
public let kCLLocationAccuracyBest: CLLocationAccuracy
public let kCLLocationAccuracyNearestTenMeters: CLLocationAccuracy
public let kCLLocationAccuracyHundredMeters: CLLocationAccuracy
public let kCLLocationAccuracyKilometer: CLLocationAccuracy
public let kCLLocationAccuracyThreeKilometers: CLLocationAccuracy
import UIKit
import CoreLocation
class ViewController: UIViewController {
let locationManager = CLLocationManager()
override func viewDidLoad() {
super.viewDidLoad()
locationManager.desiredAccuracy = kCLLocationAccuracyBest
}
}Request location authorization
Before we can use any location service, we need to ask for user authorization. To do that, we simply assign our view controller (or any object) as a CLLocationManager's delegate and listen for locationManager(_:didChangeAuthorization:) delegate callback.
class ViewController: UIViewController, CLLocationManagerDelegate {

    let locationManager = CLLocationManager()

    override func viewDidLoad() {
        super.viewDidLoad()

        locationManager.desiredAccuracy = kCLLocationAccuracyBest
        locationManager.delegate = self
    }

    // MARK: - CLLocationManagerDelegate
    func locationManager(_ manager: CLLocationManager, didChangeAuthorization status: CLAuthorizationStatus) {
        switch status {
        case .notDetermined:
            print("notDetermined")
            manager.requestWhenInUseAuthorization()
        default:
            break
        }
    }
}
CLLocationManager is guaranteed to call the delegate method with the app's initial authorization state and all authorization state changes. If users haven't grant or deny the permission, we will get .notDetermined status, which is where we will request for location permission.
Request user's location
After call manager.requestWhenInUseAuthorization(), user will prompt with permission alert asking to authorize location permission.
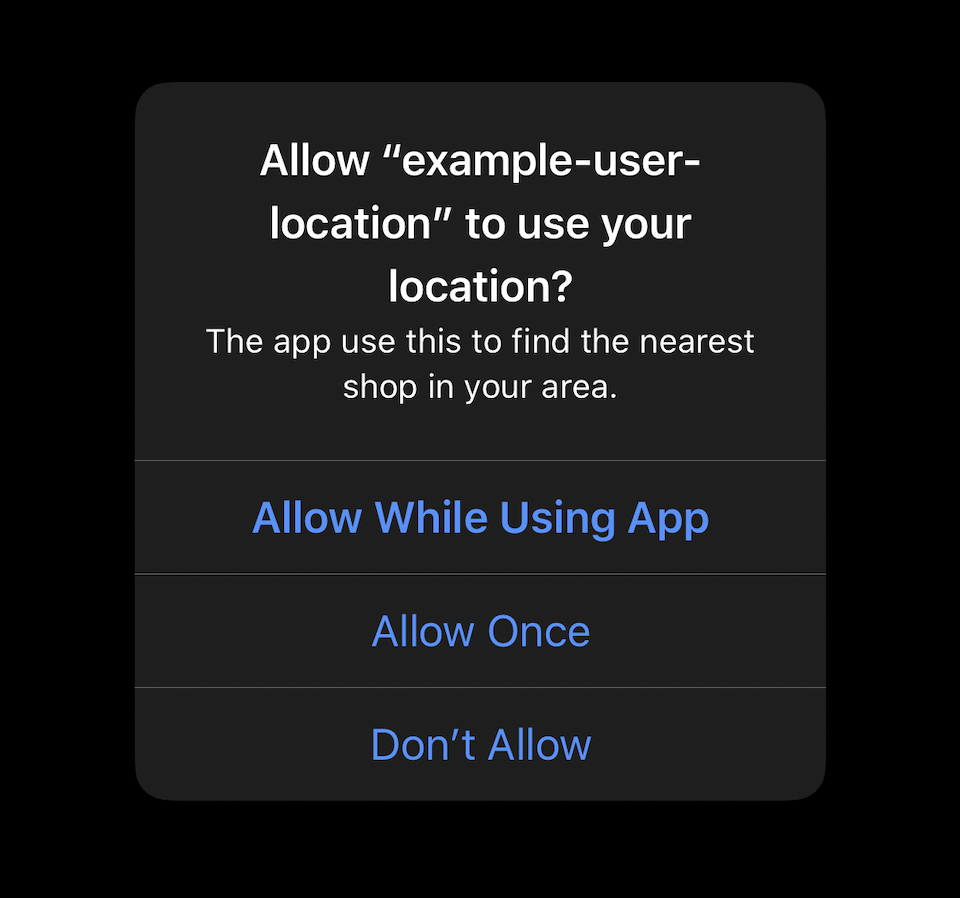
Tap Allow While Using App or Allow Once would change the status to .authorizedWhenInUse. That's where we can request for user location.
 // MARK: - CLLocationManagerDelegate
    func locationManager(_ manager: CLLocationManager, didChangeAuthorization status: CLAuthorizationStatus) {

        switch status {
        case .notDetermined:
            print("notDetermined")
            manager.requestWhenInUseAuthorization()
        case .restricted:
            print("restricted")
            // Inform user about the restriction
            break
        case .denied:
            print("deined")
            // The user denied the use of location services for the app or they are disabled globally in Settings.
            // Direct them to re-enable this.
            break
        case .authorizedAlways, .authorizedWhenInUse:
            print("authorized")
            manager.requestLocation()
        }
    }

    func locationManager(_ manager: CLLocationManager, didUpdateLocations locations: [CLLocation]) {
        print("Success \(locations.first)")
    }

    func locationManager(_ manager: CLLocationManager, didFailWithError error: Error) {
        print("Failed \(error)")
    }
CLLocationManager will start getting user's location once we call manager.requestLocation(). The result (whether success or fail) will be return in the same delegate methods as calling startUpdatingLocation(), locationManager(_ manager: CLLocationManager, didUpdateLocations locations: [CLLocation]) and locationManager(_ manager: CLLocationManager, didFailWithError error: Error).
After getting the result, the location services are automatically stopped.
Conclusion
If you have ever try to request a user's location in the past, you know that the process isn't as straight forward as this. We have to rely on startUpdatingLocation(), then manually stopUpdatingLocation() after we filter out stale locations and get a valid one.
You can easily support sarunw.com by checking out this sponsor.
Offline Transcription: Fast, privacy-focus way to transcribe audio, video, and podcast files. No data leaves your Mac.
Related Resources
Read more article about CoreLocation or see all available topic
Enjoy the read?
If you enjoy this article, you can subscribe to the weekly newsletter.
Every Friday, you'll get a quick recap of all articles and tips posted on this site. No strings attached. Unsubscribe anytime.
Feel free to follow me on Twitter and ask your questions related to this post. Thanks for reading and see you next time.
If you enjoy my writing, please check out my Patreon https://www.patreon.com/sarunw and become my supporter. Sharing the article is also greatly appreciated.
Become a patron Buy me a coffee Tweet ShareWhat is backIndicatorTransitionMaskImage
To set a custom image for the back button, we need to set an image to both backIndicatorImage and backIndicatorTransitionMaskImage, but what does backIndicatorTransitionMaskImage really mean?
Animation delay and repeatForever in SwiftUI
Explore how delay and repeatForever affect an animation.