How to Deprecate old API in Swift
Table of Contents
Deprecation is a way to tell API consumers that a deprecated method is no longer useful.
It may come from many reasons.
- Rename
- Introduce a better alternative
- No longer usable (Obsoleted)
Whatever reason you have. Swift provides a way to support all of that.
In Swift, we have many options to mark a method deprecated. Let's explore all of them.
Basic usage
We can mark a method deprecated by using the @available attribute.
This is the simplest form to mark any method deprecated.
@available(*, deprecated)The first argument indicates the platform that this method supported. Throughout this article, I will use an asterisk (*) to indicate that all platforms are supported.
The focus is on the second argument, deprecated.
The deprecated argument indicates that the declaration was deprecated.
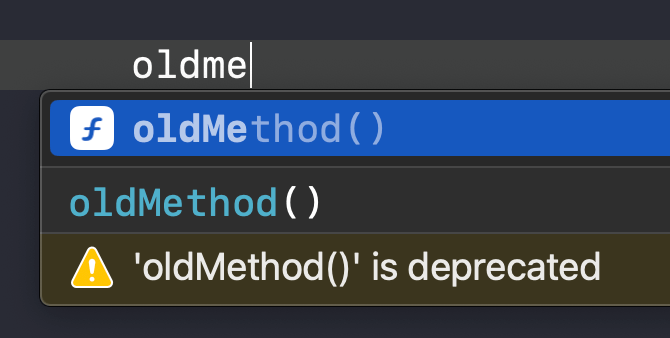
You will get a warning when trying to use a deprecated method.
@available(*, deprecated)
func oldMethod() {

}
The warning is shown both in code completion and inline.


You can easily support sarunw.com by checking out this sponsor.

AI Grammar: Correct grammar, spell check, check punctuation, and parphrase.
Deprecated version
You can specify the first version of the deprecated method by specifying the version number next to the deprecated argument.
deprecated: version number
In this example, the method was deprecated in iOS 15. Note that we need to specify the platform, which is iOS in this case.
@available(iOS, deprecated: 15.0)
func oldMethod() {

}
Deprecated message
You can add a message argument that allows us to provide more information about the deprecation.
This message will display along with the default warning or error message.
It has the following form:
message: message
Here is an example where we provide a reason for deprecation.
@available(*, deprecated, message: "Due to a security reason, this method is no longer supported")
func addAdmin() {

}
This message will display along with the default warning message.

Here is another example from SwiftUI where Apple uses the message argument to direct users to the new alternative API.
@available(iOS, introduced: 7.0, deprecated: 100000.0, message: "use NavigationStack or NavigationSplitView instead")
public struct NavigationView<Content> : View where Content : View {

}
message: "use NavigationStack or NavigationSplitView instead"
Rename
If you deprecated a method for the sake of renaming, Swift has a dedicated argument for that, rename.
It has the following form:
renamed: new name
Using rename is a good way to inform users about the new name.
Xcode will help us inform this information in two ways.
- Xcode will generate a Fix button for us. Clicking it will rename the old method to a new one.
- Xcode will add a message about the new name in the warning message, e.g., "renamed to 'newMethod'".
@available(*, deprecated, renamed: "newMethod")
func oldMethod() {

}

func newMethod() {

}
Here is another example from Apple: they rename index(of:) to firstIndex(of:) in Swift 5.
@available(swift, deprecated: 5.0, renamed: "firstIndex(of:)")
public func index(of element: Element) -> Int?
You can easily support sarunw.com by checking out this sponsor.

AI Grammar: Correct grammar, spell check, check punctuation, and parphrase.
Caveats
Marking any method deprecated doesn't prevent users from using it. Users will get a warning, but can still use them.
This might not be a problem if you deprecate a method for a minor thing, e.g., a performance issue, or introduce a new alternative.
But if the method is broken or will no longer be functional, you should use the obsoleted argument.
When a declaration is obsoleted, it’s removed from the specified platform or language, and can no longer be used.
It has the following form:
obsoleted: version number
@available(iOS, obsoleted: 15, message: "Due to a security reason, this method is no longer supported")
func addAdmin() {

}
Using the obsoleted method will show as an error instead of a warning.

Read more article about Swift or see all available topic
Enjoy the read?
If you enjoy this article, you can subscribe to the weekly newsletter.
Every Friday, you'll get a quick recap of all articles and tips posted on this site. No strings attached. Unsubscribe anytime.
Feel free to follow me on Twitter and ask your questions related to this post. Thanks for reading and see you next time.
If you enjoy my writing, please check out my Patreon https://www.patreon.com/sarunw and become my supporter. Sharing the article is also greatly appreciated.
Become a patron Buy me a coffee Tweet ShareHow to Play Haptic Feedback or Vibrate using UIFeedbackGenerator
Learn what Haptic feedback is and how to use it.