How to show multiple alerts on the same view in SwiftUI
Table of Contents
SwiftUI can't have multiple alert modifiers on the same view (the same branch in a view hierarchy, to be exact).
The only latest outermost .alert will work if you got multiple alert modifiers in the same branch in a view hierarchy.
These can be categorized into two scenarios.
- Multiple alerts on the same view.
- Multiple alerts on the same branch in a view hierarchy.
It is easier to understand the problem when you see an example. Let's see it in action.
Multiple alerts on the same view
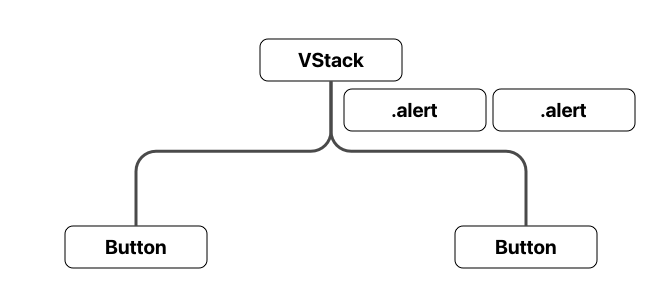
In this example, we have two buttons that trigger two different alerts. These two alerts modify the same view, VStack. The only last one will work.
struct ContentView: View {
    @State private var presentAlert1 = false
    @State private var presentAlert2 = false

    var body: some View {
        VStack {
            Button("Alert 1") {
                presentAlert1 = true
            }
            Button("Alert 2") {
                presentAlert2 = true
            }
        }
        .alert(isPresented: $presentAlert1) {
            Alert(
                title: Text("Title 1"),
                message: Text("Message 1")
            )
        }
        .alert(isPresented: $presentAlert2) { // 1
            Alert(
                title: Text("Title 2"),
                message: Text("Message 2")
            )
        }
    }
}
1 Only the last alert in the same view can be presented.
Tap the "Alert 1" button won't make the first alert presented. Only the last alert is working.

Here is a diagram of the view hierarchy. You can see that we have multiple alerts on the VStack.

You can easily support sarunw.com by checking out this sponsor.

AI Grammar: Correct grammar, spell check, check punctuation, and parphrase.
Solutions
There are two solutions (that I know) for this case.
Move each alert to a different view
Alert modifier can modify any view. So, to prevent having multiple alert modifiers on the same view, we move alert modifiers closer to the view that initiates them.
struct ContentView5: View {
    @State private var presentAlert1 = false
    @State private var presentAlert2 = false

    var body: some View {
        VStack {
            Button("Alert 1") {
                presentAlert1 = true
            }
            .alert(isPresented: $presentAlert1) { // 1
                Alert(
                    title: Text("Title 1"),
                    message: Text("Message 1")
                )
            }
            Button("Alert 2") {
                presentAlert2 = true
            }
            .alert(isPresented: $presentAlert2) { // 2
                Alert(
                    title: Text("Title 2"),
                    message: Text("Message 2")
                )
            }
        }
    }
}
1 We move the first alert closer to the button which initiates it.
2 We do the same for the second alert.
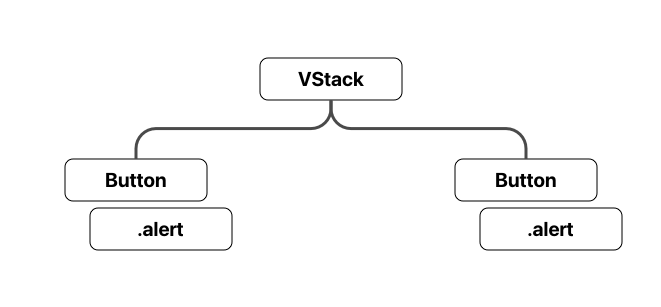
By moving each alert modifier to the button that initiates them, we make each view have only one alert. The following is a view hierarchy of our new view. Each view has only one alert in this case.

Single alert with Identifiable item
Instead of having multiple alert modifiers, we can use one alert and populate its content with different Identifiable item. You can read this in more detail in How to present an alert in SwiftUI in iOS.
In brief, an alert modifier has a way to present an alert other than isPresented boolean binding value. You can have an alert that presents based on an Identifiable item. If the item is non-nil, The system will present an alert.
Each button can share the same alert modifier and present it by setting a different Identifiable item with this method.
In this example, we create a new struct, AlertInfo, to hold a content of our alert.
// 1
struct AlertInfo: Identifiable {
    enum AlertType {
        case one
        case two
    }

    let id: AlertType
    let title: String
    let message: String
}

struct ContentView6: View {
    // 2
    @State private var info: AlertInfo?

    var body: some View {
        VStack {
            Button("Alert 1") {
                // 3
                info = AlertInfo(
                    id: .one,
                    title: "Title 1",
                    message: "Message 1")
            }
            Button("Alert 2") {
                // 4
                info = AlertInfo(
                    id: .two,
                    title: "Title 2",
                    message: "Message 2")
            }
        }
        .alert(item: $info, content: { info in // 5
            Alert(title: Text(info.title),
                  message: Text(info.message))
        })
    }
}
1 A struct that conforms to Identifiable protocol. This use as a trigger for our alert presentation.
2 We declare @State variable for our new struct.
3, 4 Each button set a different AlertInfo. After setting info to a non-nil value, the alert will be present with our info as a parameter of a content closure (5).
5 We share the same alert for both buttons. Alert content is populated from the passing info.
Multiple alerts on the same branch in a view hierarchy
Alert is counting from the current view all the way up to its ancestors. If you have multiple alerts within the same branch, the outermost one is the only functional one.
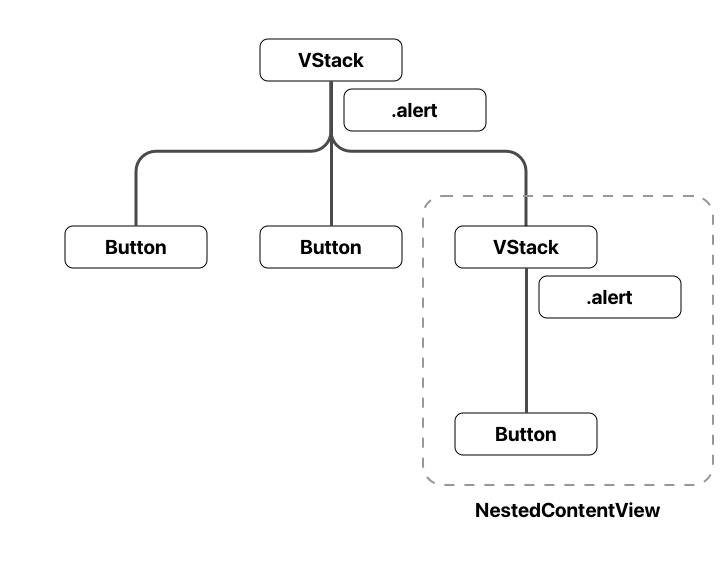
In the following example, we use the same code from the previous section. But this time, we have another view in the VStack, NestedContentView. This view also has an alert modifier.
struct AlertInfo: Identifiable {
    enum AlertType {
        case one
        case two
    }

    let id: AlertType
    let title: String
    let message: String
}

struct ContentView: View {
    @State private var info: AlertInfo?

    var body: some View {
        VStack {
            Button("Alert 1") {
                info = AlertInfo(
                    id: .one,
                    title: "Title 1",
                    message: "Message 1")
            }
            Button("Alert 2") {
                info = AlertInfo(
                    id: .two,
                    title: "Title 2",
                    message: "Message 2")
            }
            // 1
            NestedContentView()
        }
        .alert(item: $info, content: { info in
            Alert(title: Text(info.title),
                  message: Text(info.message))
        })
    }
}

// 2
struct NestedContentView: View {
    @State private var presentAlert = false

    var body: some View {
        VStack {
            Button("Nested Alert") {
                presentAlert = true
            }
        }
        .alert(isPresented: $presentAlert) {
            Alert(
                title: Text("Nested Title"),
                message: Text("Nested Message")
            )
        }
    }
}
1 VStack contains a NestedContentView.
2 NestedContentView also has its own alert.
Looking at this view hierarchy, you will see that the NestedContentView's branch got two alerts (One at VStack in NestedContentView and one at the outer VStack). Only the outermost one will work (The one in ContentView).

Tap a "Nested Alert" button won't present any alert.

Solutions
There are two solutions (again) for this case.
Move each alert to a leaf node
This is the same concept as Move each alert to a different view, but I use the term leaf node here to make it more specific and cover every case.
Leaf node[1] in a tree structure means a node that has no child nodes. In short, make sure you attach an alert modifier to a view that has no children.
We move alert to the leaf node, a button, in this case.
struct ContentView: View {
    @State private var presentAlert1 = false
    @State private var presentAlert2 = false

    var body: some View {
        VStack {
            Button("Alert 1") {
                presentAlert1 = true
            }
            .alert(isPresented: $presentAlert1) {
                Alert(
                    title: Text("Title 1"),
                    message: Text("Message 1")
                )
            }
            Button("Alert 2") {
                presentAlert2 = true
            }
            .alert(isPresented: $presentAlert2) {
                Alert(
                    title: Text("Title 2"),
                    message: Text("Message 2")
                )
            }
            NestedContentView()
        }


    }
}

struct NestedContentView: View {
    @State private var presentAlert = false

    var body: some View {
        VStack {
            Button("Nested Alert") {
                presentAlert = true
            }
            .alert(isPresented: $presentAlert) { // 1
                Alert(
                    title: Text("Nested Title"),
                    message: Text("Nested Message")
                )
            }
        }
    }
}
1 Actually, we don't need to move an alert in NestedContentView since we only have one alert there, but we follow the rule, so if we happened to add more views with an alert inside a VStack, all alerts would remain functional.
Single alert with shared Identifiable item
The concept of this solution is familiar with Single alert with Identifiable, but instead of each view having its own alert modifier and Identifiable item, we move that to the topmost app level.
Here is an example where I put the alert modifier to the top-level view and use @EnvironmentObject as a way for each view to set an Identifiable item to trigger an alert.
An ObservableObject that use as an @EnvironmentObject contains an AlertInfo that conforms to Identifiable protocol.
class AlertController: ObservableObject {
    // 1
    @Published var info: AlertInfo?
}
1 Each view set info a non-nil value to present an alert.
Everything is move to the top level view. We create AlertController and inject it via .environmentObject(alertController), then present an alert according to its Identifiable value, info.
@main
struct SampleApp: App {
    // 1
    @StateObject private var alertController = AlertController()

    var body: some Scene {
        WindowGroup {
            ContentView()
                .environmentObject(alertController) // 2
                .alert(item: $alertController.info, content: { info in // 3
                    Alert(title: Text(info.title),
                          message: Text(info.message))
                })
        }
    }
}
1 Create @StateObject to store our AlertController.
2 Inject AlertController to all views via .environmentObject.
3 Present alert using shared Identifiable item, $alertController.info.
Each view no longer has an alert modifier or maintains its own Identifiable object but references it via @EnvironmentObject.
struct ContentView: View {
    // 1
    @EnvironmentObject var alertController: AlertController

    var body: some View {
        VStack {
            Button("Alert 1") {
                // 2
                alertController.info = AlertInfo(
                    id: .one,
                    title: "Title 1",
                    message: "Message 1")
            }
            Button("Alert 2") {
                alertController.info = AlertInfo(
                    id: .two,
                    title: "Title 2",
                    message: "Message 2")
            }
            NestedContentView()
        }
    }
}
1 Reference to AlertController with @EnvironmentObject.
2 Set info when we want to show an alert.
We do this in every view, regardless of where the view is.
struct NestedContentView: View {
    @EnvironmentObject var alertController: AlertController

    var body: some View {
        VStack {
            Button("Nested Alert") {
                alertController.info = AlertInfo(
                    id: .one,
                    title: "Nested Title",
                    message: "Nested Message")
            }
        }
    }
}
You can easily support sarunw.com by checking out this sponsor.

AI Grammar: Correct grammar, spell check, check punctuation, and parphrase.
Conclusion
I think we can all agree that the alert's behavior we discussed in this article seems like a bug. And the fact that it survives two iterations of SwiftUI might be frightening to you that this behavior will stick. Luckily in iOS 15, there will be a revamp of alert API, and the good news is this behavior(bug) is gone, and you can have multiple alerts wherever you want.
In the meantime, where you still support iOS 13/14, you might have to stick with the hack. The solutions I show you today are simple guides, and you might need to tweak them to suit your needs.
External node (also known as an outer node, leaf node, or terminal node) is any node that does not have child nodes. https://en.wikipedia.org/wiki/Tree_(data_structure) ↩︎
Read more article about SwiftUI, Alert, or see all available topic
Enjoy the read?
If you enjoy this article, you can subscribe to the weekly newsletter.
Every Friday, you'll get a quick recap of all articles and tips posted on this site. No strings attached. Unsubscribe anytime.
Feel free to follow me on Twitter and ask your questions related to this post. Thanks for reading and see you next time.
If you enjoy my writing, please check out my Patreon https://www.patreon.com/sarunw and become my supporter. Sharing the article is also greatly appreciated.
Become a patron Buy me a coffee Tweet ShareHow to present an alert in SwiftUI in iOS 13/14
Learn how to show an alert (UIAlertController) in SwiftUI.
How to reference a method with the same name and parameters but a different return type in Swift
Trying to reference two methods with the same name and parameters will cause an ambiguous compile error. Learn how to resolve it.