How to present an alert in SwiftUI in iOS 15
Table of Contents
We can show alerts to the user in SwiftUI with an alert() modifier.
There are three ways to present an alert in iOS 15
The only difference between these options is the content that use to populate an alert.
Let's start with how to present an alert. Then we will go through three ways to present an alert one by one.
How to present an alert
SwiftUI has many variations of alert modifiers. Each variation accepts slightly different parameters, but they have one thing in common. All alert modifiers take a binding boolean value, isPresented. This binding represents the presentation and dismissal state of an alert.
Set the isPresented value to true will present the alert. When a user taps any alert action buttons, the alert dismisses, and isPresented is set back to false.
Here is an example use of alert.
struct ContentView: View {
// 1
@State private var presentAlert = false
var body: some View {
VStack {
// 2
Text(presentAlert ? "Presenting": "Dismissed")
Button("Alert") {
// 3
presentAlert = true
}
Spacer()
}
.padding()
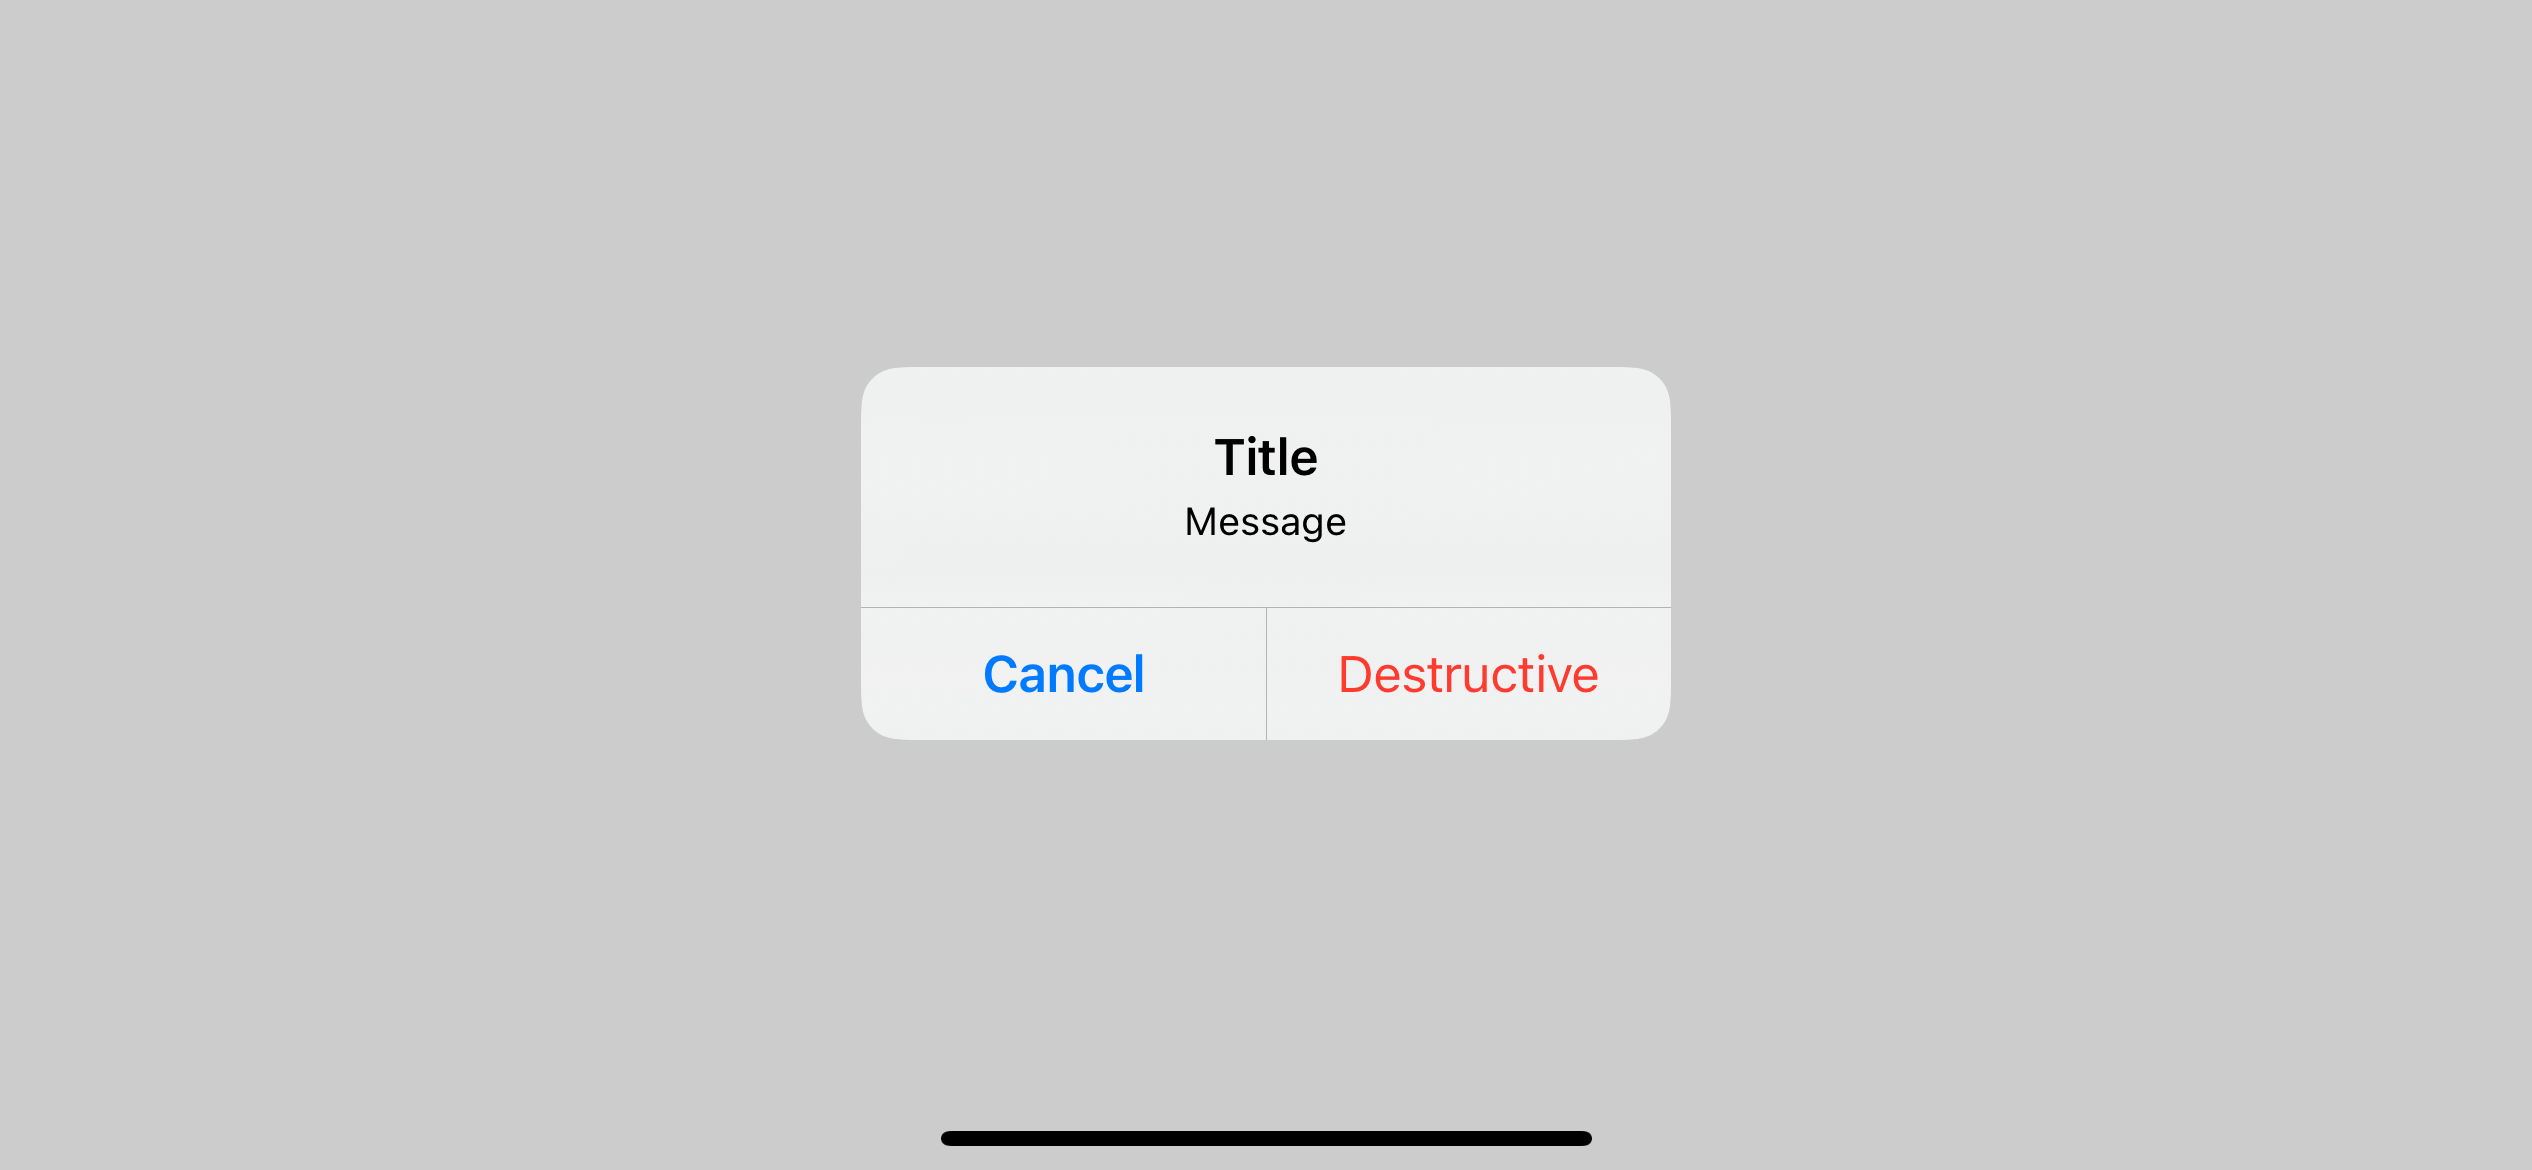
.alert("Title", isPresented: $presentAlert, actions: {}) // 4
}
}1 We declare a @State variable that will use as a binding value to control the alert presentation. We set this to true when we want to show an alert.
3 When a user taps the button, we set presentAlert to true. This will present the alert that is bound to this value (4).
2 Once the user tap "OK", the alert will dismiss and set the bound value, isPresented, back to false.

As mentioned earlier, there are many alert modifiers, but I would like to group them into three categories based on the data you want to present in an alert.
We will go through all of them one by one.
You can easily support sarunw.com by checking out this sponsor.
Screenshot Studio: Create App Store screenshots in seconds not minutes.
Alert without data
This is the simplest form of an alert. You present an alert without relying on an external source of data. This is useful for a static alert when the content is known beforehand.
Since alert without data is the simplest form, I will use this opportunity to introduce you to three components that make up an alert.
Title.
Message.
Actions.
Title Only
The is the only required field in an alert. You have to specify a title for your alert. You pass this as the first argument of an alert modifier. SwiftUI will automatically add an OK action button for you if you don't specify any actions.
struct ContentView: View {
    // 1
    @State private var presentAlert = false

    var body: some View {
        VStack {
            Button("Alert") {
                // 2
                presentAlert = true
            }
        }
        .alert("Title", isPresented: $presentAlert, actions: { // 3

        })
    }
}
1 We declare a @State variable that will use to control the presentation. We set this to true when we want to show an alert.
2 When a user taps the button, we set presentAlert to true, which will present the alert bound to this value (3).
3 We supply only title argument for this alert.

Title and Message
You can supply an optional alert body which will show under the title by setting it in the message argument. SwiftUI also added an OK action button if you don't specify any actions.
I will leave the rest of the view out and focus only on .alert modifier for brevity.
.alert("Title", isPresented: $presentAlert, actions: {
    // actions
}, message: {
    Text("Message")
})
Alert Actions
Alert also has an option for us to provide a custom action button. In our previous example, we leave this empty, and SwiftUI adds a default "OK" action for us, but it doesn't have to be this way. We can come up with our own actions.
Before we can go any further, I want to highlight an important change about alert action in iOS 15.
Alert.Button is gone / New ButtonRole
Before iOS 15, we have a dedicated structure, Alert.Button, in which we can define an action and its style, default, cancel, and destructive.
These styles dictate the appearance (color) and position of the button in an alert.
- Default: Show action in plain text.
- Destructive: Show action in red text.
- Cancel: Show action in bold and always on the left (This varies based on localization).
In iOS 15, Apple decided to remove Alert.Button and Alert altogether. They introduce a new ButtonRole struct to describe the purpose of a button and a new button initializer to assign a role to a button.
init<S>(_ title: S, role: ButtonRole?, action: @escaping () -> Void) where S : StringProtocolIn a moment, you will see how this button role replaces an Alert.Button functionality.
iOS 14 vs iOS 15
Alert used to hold title, message, and actions in iOS 14, but as title and message move into alert parameters, and Alert.Button can become just a Button, we no longer need an Alert struct anymore.
An alert modifier now expected three parameters: title, message, and an actions view builder that expected buttons.
Here is an equivalent alert in iOS 14 and iOS 15.
// iOS 14
.alert(isPresented: $presentAlert, content: {
    Alert( // 1
        title: Text("Title"),
        message: Text("Message"),
        dismissButton: .cancel()
    )
})

// iOS 15
.alert("Title", isPresented: $presentAlert, actions: { // 2
    // 3
    Button("Cancel", role: .cancel, action: {})
}, message: {
    // 4
    Text("Message")
})
1 Alert is a representation of an alert content. In iOS 15, all properties in Alert are move to different part of an alert modifier (2, 4). And we use a simple button with a new role to replace an Alert.Button (3).

Now that we understand the changes of related components let's see how to put this into use.
Alert without data (continue)
Let's continue where we left off with an alert presentation without data. We will try to add actions to our alert.
Alert with one button
As you see in the previous example, SwiftUI will automatically add an "OK" action if you don't specify any actions. To opt-out from this "OK" action, you must set any non-destructive button to the actions.
Set default role button.
.alert("Title", isPresented: $presentAlert, actions: {
      Button("Okey dokey") {}
    }, message: {
      Text("Message")
    })
Set cancel role button.
You can also set a button with cancel role to remove the default "OK" action.
.alert("Title", isPresented: $presentAlert, actions: {
      Button("Cancel", role: .cancel, action: {})
    }, message: {
      Text("Message")
    })
Set destructive role button.
The destructive button will remove the default "OK" action, but SwiftUI automatically adds a cancel action for us instead.
.alert("Title", isPresented: $presentAlert, actions: {
    Button("Destructive", role: .destructive, action: {})
}, message: {
    Text("Message")
})
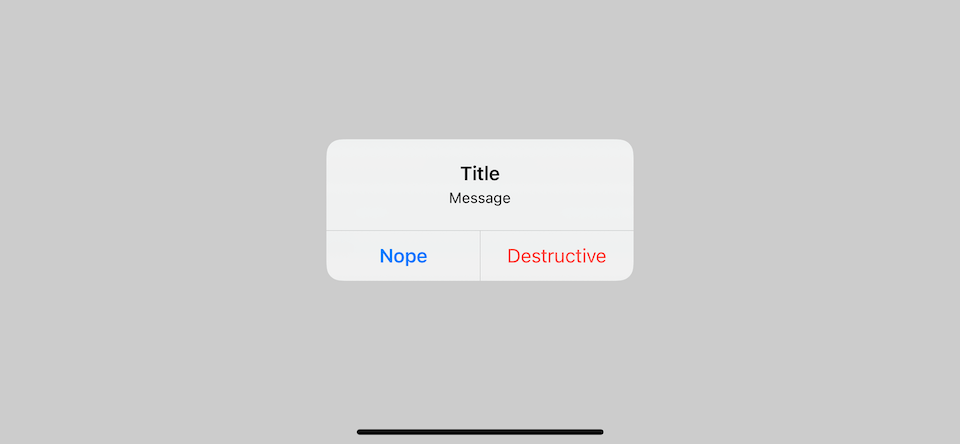
Alert with one button (Destructive)
Destructive action deserves its own section because the behavior is quite different from others, as seen in the previous section. Adding a destructive action causes SwiftUI to add a companion cancel button automatically.
Having only one destructive action means we give users no choice but to destroy something. I think that's why SwiftUI adds that cancel button for us.
We can't remove that cancel button. The best we can do is customize it. To do that, you add your version of the cancel button.
.alert("Title", isPresented: $presentAlert, actions: {
    // 1
      Button("Nope", role: .cancel, action: {})
      Button("Destructive", role: .destructive, action: {})
    }, message: {
      Text("Message")
    })
1 We add a .cancel role button to override the default one.
Alert with two or more buttons
There is no limitation on the number of buttons with this new API. The actions parameter is a view builder that turns any buttons you specified into alert actions.
Here are some behaviors you should know.
Two buttons:
- Buttons render from left to right.
- Cancel button is always on the left regardless of position.
More than two buttons (or two buttons with long title):
- Buttons render from top to bottom just like a list view.
- Cancel button is always on the bottom.
.alert("Title", isPresented: $presentAlert, actions: {
    Button("OK 1", role: nil, action: {})
    Button("Destructive 1", role: .destructive, action: {})
    Button("OK 2", action: {})
    // 1
    Button("Cancel", role: .cancel, action: {})
    Button("Destructive 2", role: .destructive, action: {})
}, message: {
    Text("Message")
})
1 Cancel button always render at the bottom regardless of view position.

That's all you need to know about the new alert. So far, we only populate alert content with static data. Let's see what other options do we have.
Alert with data
The difference between presenting an alert with and without data is, in the former, you pass a binding content value to an alert modifier. This value can be used when you populate alert contents.
We pass binding data to the presenting parameter to present an alert with content populated from the given data.
The example below shows a custom data source, PurchaseDetail, that provides data to populate the alert.
// 1
struct PurchaseDetail {
    let trackingId: String
    let numberOfItems: Int
}

struct ContentView: View {
    // 2
    @State private var presentAlert = false
    // 3
    @State private var purchaseDetail: PurchaseDetail?

    var body: some View {
        VStack {
            // 4
            Text(presentAlert ? "Presenting": "Dismissed")
            Text(purchaseDetail?.trackingId ?? "nil")
            Button("Purchase 1") {
                // 5
                purchaseDetail = PurchaseDetail(
                    trackingId: "abc",
                    numberOfItems: 1)
                // 6
                presentAlert = true
            }
            Button("Purchase 2") {
                purchaseDetail = PurchaseDetail(
                    trackingId: "def",
                    numberOfItems: 2)

                presentAlert = true
            }
            Button("Purchase 3") {
                purchaseDetail = PurchaseDetail(
                    trackingId: "ghi",
                    numberOfItems: 3)

                presentAlert = true
            }
            Spacer()
        }
        .padding()
        .alert("Thank You",
               isPresented: $presentAlert, // 7
               presenting: purchaseDetail, // 8
               actions: { detail in // 9
            Button("OK", action: {})
        }, message: { detail in // 10
            Text("Tracking ID: \(detail.trackingId)")
        })
    }
}
1 A data source that we will use to populate our alert.
2 We still need a binding boolean value for trigger presentation.
3 We need an extra @State variable as a data source for our alert.
4 I add two text view to demonstrate value of presentAlert and purchaseDetail. This is for demonstration purposes only.
5 Each button set a purchaseDetail that will use to populate an alert. Setting this value won't present an alert. You still need to manually present it by set binding boolean value (presentAlert) to true 6.
7, 8 An alert that bound to presentAlert and purchaseDetail will show up when both isPresented is true and data must not be nil.
9 actions closure will get a current data as a parameter. You can use this information to populate the alert actions.
10 message closure also get a current data as a parameter. In this example, I use trackingId to populate the alert's body.
4 When the user presses any action button, the system sets the presentAlert back to false, but purchaseDetail is untouched.

How is this different from alert without data
You might notice that you can have almost the same behavior using an alert without data.
Here is how it looks.
struct ContentView: View {
    @State private var presentAlert = false
    @State private var purchaseDetail: PurchaseDetail?

    var body: some View {
        VStack {
            Text(presentAlert ? "Presenting": "Dismissed")
            Text(purchaseDetail?.trackingId ?? "nil")
            Button("Purchase 1") {
                purchaseDetail = PurchaseDetail(
                    trackingId: "abc",
                    numberOfItems: 1)

                presentAlert = true
            }
            Button("Purchase 2") {
                purchaseDetail = PurchaseDetail(
                    trackingId: "def",
                    numberOfItems: 2)

                presentAlert = true
            }
            Button("Purchase 3") {
                purchaseDetail = PurchaseDetail(
                    trackingId: "ghi",
                    numberOfItems: 3)

                presentAlert = true
            }
            Spacer()
        }
        .padding()
        .alert("Thank You",
               isPresented: $presentAlert,
               actions: {
            Button("OK", action: {})
        }, message: {
            if let detail = purchaseDetail { // 1
                Text("Tracking ID: \(detail.trackingId)")
            }
        })
    }
}
1 The only difference is we have to unwrap optional data by ourselves.
So, there are two differences I see so far.
- You need to unwrap the data yourself.
- Alert with data will appear only if both
isPresentedistrueanddatais non-nil.
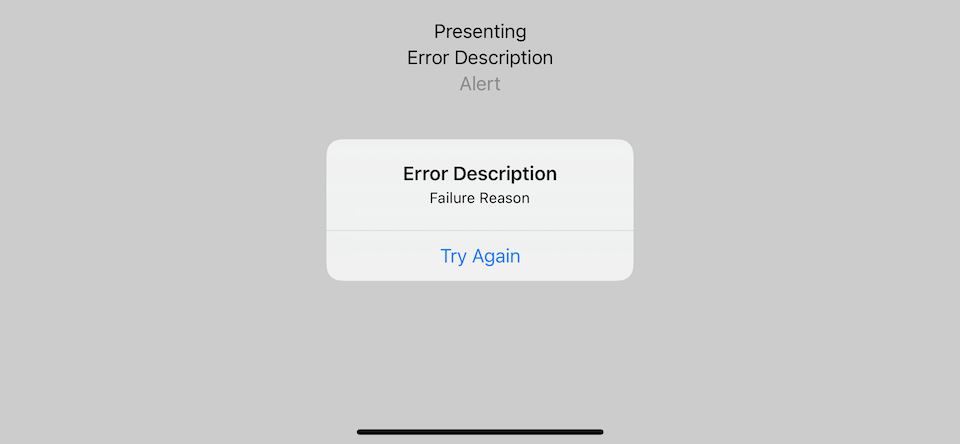
Alert with error
Presenting an alert with an error is similar to presenting alert with data. The two differences are as follow:
- Instead of passing an arbitrary data object, we pass
LocalizedErrorto anerrorparameter. - We can't explicitly define an alert title. The title of the alert is inferred from the error’s
errorDescription.
Present an alert with error also got the same behavior as present an alert with data. For the alert to appear, both isPresented must be true, and error must not be nil. But again, the statement isn't true (either the documentation or implementation is wrong).
Here is an example where we use ErrorInfo to populate the alert content. Most of the code should be familiar to you. The only difference is we don't need to specify the alert's title.
struct ErrorInfo: LocalizedError {
    var errorDescription: String?
    var failureReason: String?
    var recoverySuggestion: String?
    var helpAnchor: String?
}

struct ContentView3: View {
    @State private var presentAlert = false
    @State private var error: ErrorInfo?

    var body: some View {
        VStack {
            Text(presentAlert ? "Presenting": "Dismissed")
            Text(error?.errorDescription ?? "nil")
            Button("Alert") {
                error = ErrorInfo(
                    errorDescription: "Error Description",
                    failureReason: "Failure Reason",
                    recoverySuggestion: "Try Again",
                    helpAnchor: "Help Anchor"
                )
                presentAlert = true
            }
            Spacer()
        }
        .padding()
        .alert(
            isPresented: $presentAlert,
            error: error, // 1
            actions: { error in // 2
                if let suggestion = error.recoverySuggestion {
                    Button(suggestion, action: {
                        // Recover from an error
                    })
                }
            }, message: { error in // 3
            if let failureReason = error.failureReason {
                Text(failureReason)
            } else {
                Text("Something went wrong")
            }
        })
    }
}
1 We pass error instead of data.
2, 3 An error pass in as a closure parameter.
Notice that the errorDescription use as an alert' title.
You can easily support sarunw.com by checking out this sponsor.
Screenshot Studio: Create App Store screenshots in seconds not minutes.
Conclusion
As you can see, presenting an alert in iOS 15 is more unified than the one in prior iOS versions. We control the presenting/dismissal with only isPresented with an option to pass data/error to populate our alert content.
The way we craft our alert content is also simpler. We don't need a dedicated Alert representation. Everything is streamlined into method parameters and view builder.
I can't say this is better approach than the first version. I like that it solves a multiple alerts problem and how we can build action with a view builder, but there is something that I don't like, such as we don't have a proper way to set a dynamic title (and the option is even more limited for alert with error). There are also some rough edges and inconsistencies between documentation and the actual result, which I already submit feedbacks.
Read more article about SwiftUI, Alert, or see all available topic
Enjoy the read?
If you enjoy this article, you can subscribe to the weekly newsletter.
Every Friday, you'll get a quick recap of all articles and tips posted on this site. No strings attached. Unsubscribe anytime.
Feel free to follow me on Twitter and ask your questions related to this post. Thanks for reading and see you next time.
If you enjoy my writing, please check out my Patreon https://www.patreon.com/sarunw and become my supporter. Sharing the article is also greatly appreciated.
Become a patron Buy me a coffee Tweet ShareWhat does the ?? operator mean in Swift
?? is an operator that has one specific use case. Let's find out what it is.
Should every if statement has an else clause
Every switch statement has a default case. Every do-catch statement has a catch clause. Should every if statement has an else clause?