Searchable modifier in SwiftUI: A UISearchController and UISearchBar equivalent
Table of Contents
List view is a good way to present data to users. The list may contain a few data at the very beginning, but it just a matter of time before the number of data grows out of hand, and that when you users will ask for a search function.
With the coming of iOS 15 and SwiftUI 3, we don't have to hack around to add search functions anymore. Finally, we have a UISearchController and UISearchBar equivalent in SwiftUI. We get it in the form of a new modifier, .searchable.
searchable
Searchable is a modifier that marks the modified view as searchable. A view that supports the search function uses this to configures the display of a search field. Right now, the only view that responds to this modifier is NavigationView. Let's see how to use this new modifier.
You can easily support sarunw.com by checking out this sponsor.
AI Grammar: Correct grammar, spell check, check punctuation, and parphrase.
Placement
When you put .searchable to a navigation view or its children, the navigation view will show the search field where it sees fit according to the platform, and the view searchable is modified. The position you place the searchable affects where the navigation view will show the search field.
Just add a searchable modifier, and you will get all the search UI to work with.
struct ContentView: View {
@State private var queryString = ""
var body: some View {
NavigationView {
VStack {
Text(queryString)
}
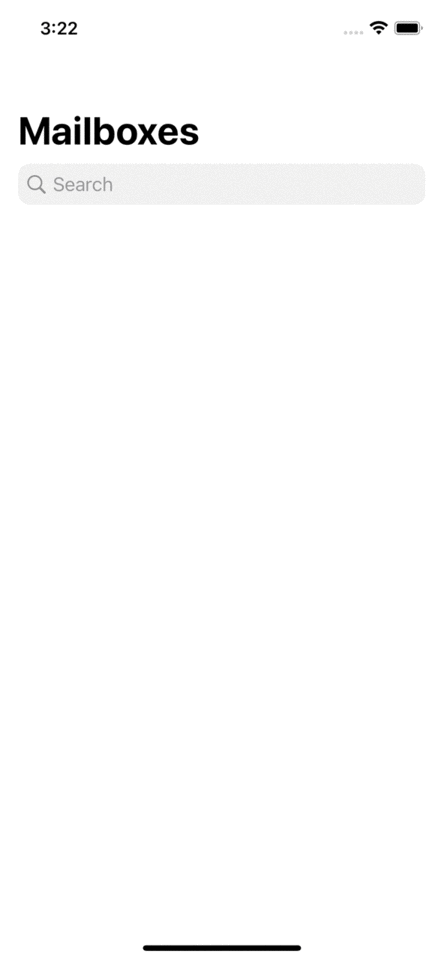
.navigationTitle("Mailboxes")
}
.searchable(text: $queryString) // 1
}
}<1> Add a searchable modifier with a string binding to the search query.

With this simple change, you get all the UI necessary to implement the search function.
Default
Placing searchable directly on NavigationView means you rely on SwiftUI to put the search field in a sensible place.
Single or Double column navigation view
The search field is placed on the first column for a single or double column navigation view.
struct ContentView: View {
    @State private var queryString = ""

    var body: some View {
        NavigationView {
            PrimaryView()
                .navigationTitle("Primary")
            DetailView()
                .navigationTitle("Detail")
        }
        .searchable(text: $queryString)
    }
}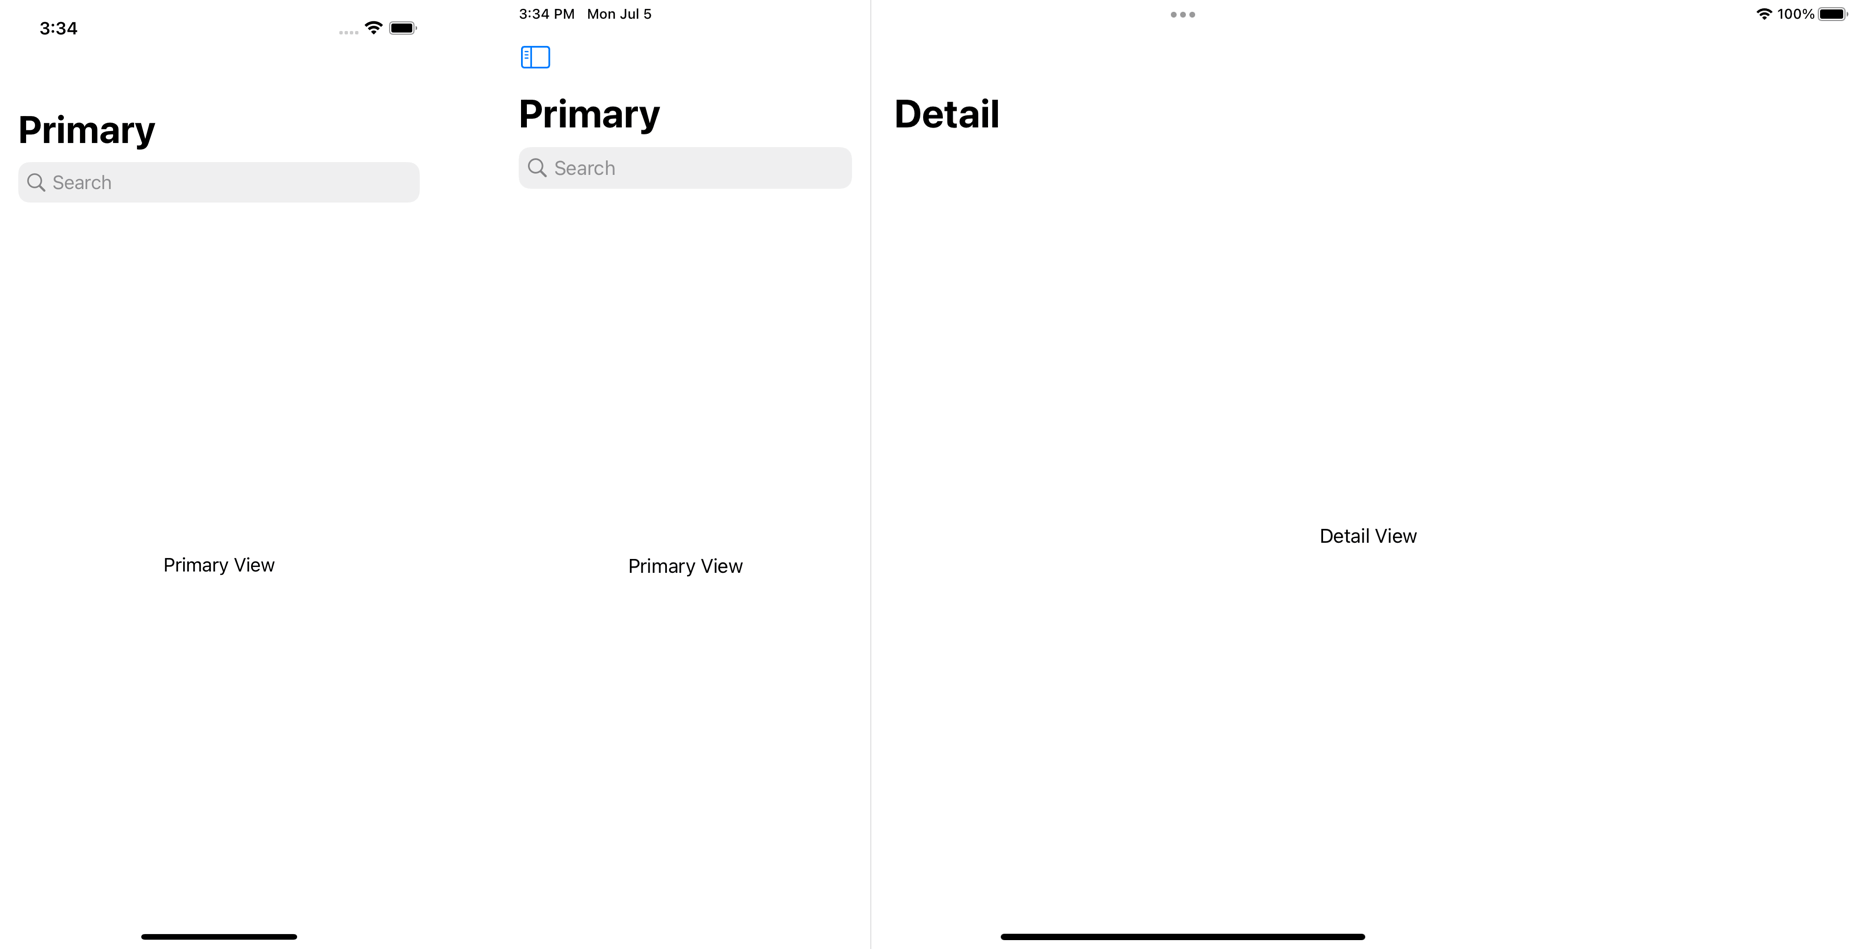
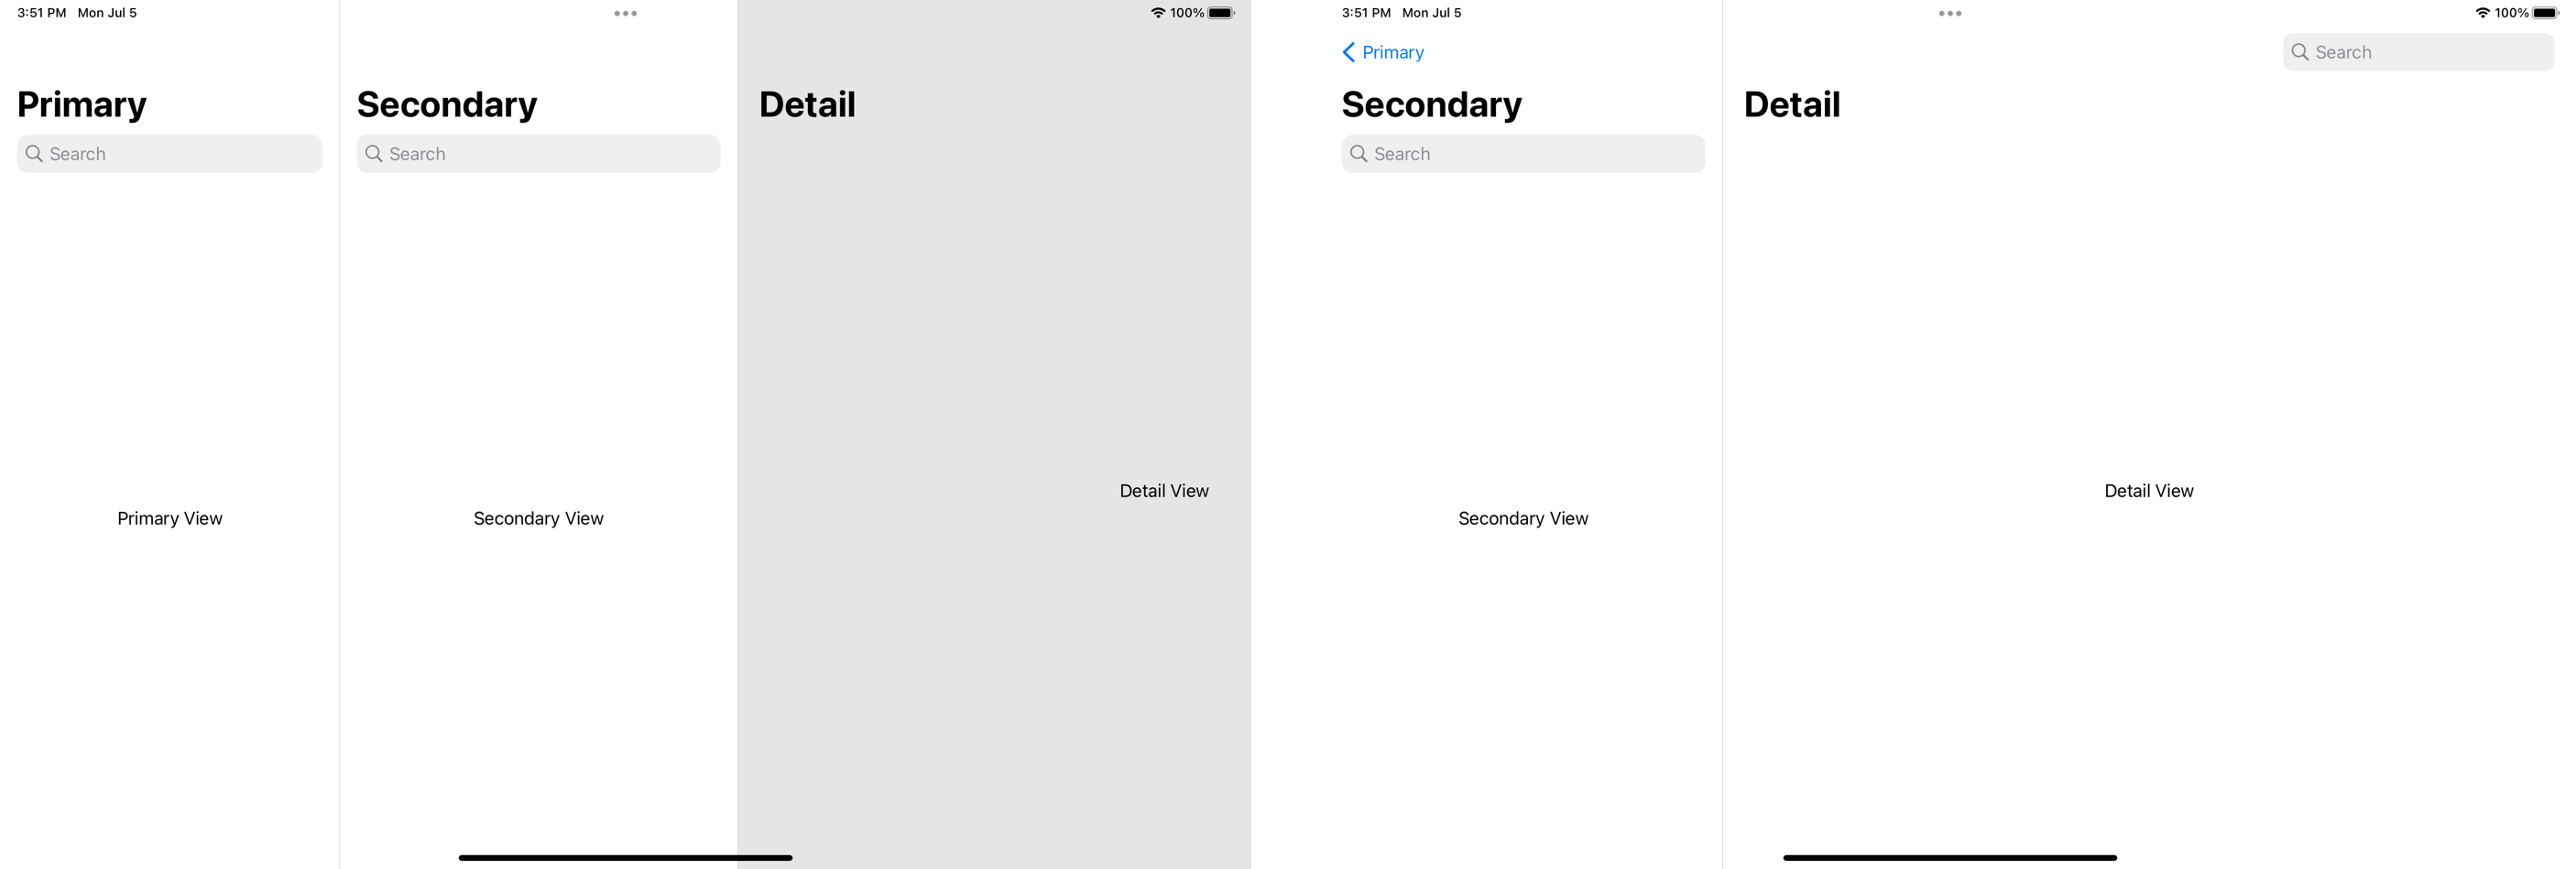
Triple-column navigation view
For a triple-column navigation view, the search field is placed on the second column.
struct ContentView: View {
    @State private var queryString = ""

    var body: some View {
        NavigationView {
            PrimaryView()
                .navigationTitle("Primary")
            SecondaryView()
                .navigationTitle("Secondary")
            DetailView()
                .navigationTitle("Detail")
        }
        .searchable(text: $queryString)
    }
}
On macOS, the search field is placed in the trailing-most position of the toolbar.
Explicit
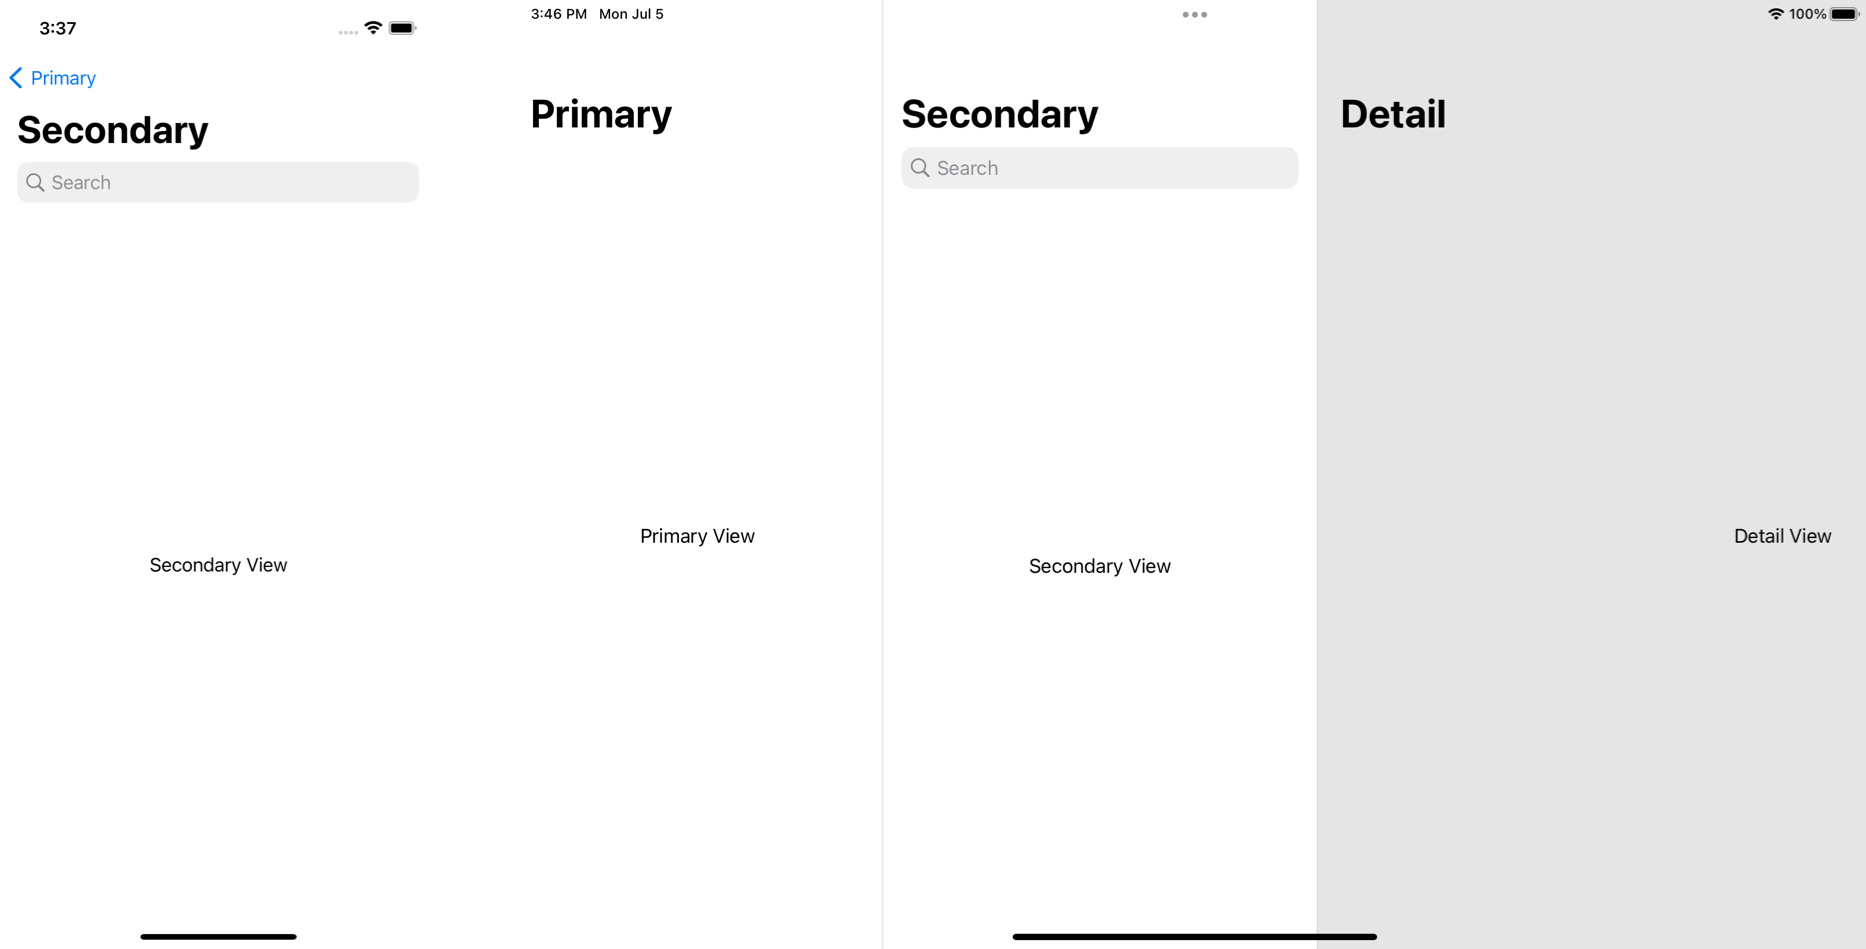
On iOS, iPadOS, or watchOS, you can be more explicit about where you want to place the search field by put .searchable on a specific column in a navigation view.
Here are examples of putting searchable modifiers on the first, second, and third columns.
struct ContentView: View {
    @State private var queryString = ""

    var body: some View {
        NavigationView {
            PrimaryView()
                .navigationTitle("Primary")
                .searchable(text: $queryString)
            SecondaryView()
                .navigationTitle("Secondary")
            DetailView()
                .navigationTitle("Detail")
        }
    }
}

struct ContentView: View {
    @State private var queryString = ""

    var body: some View {
        NavigationView {
            PrimaryView()
                .navigationTitle("Primary")
            SecondaryView()
                .navigationTitle("Secondary")
                .searchable(text: $queryString)
            DetailView()
                .navigationTitle("Detail")
        }
    }
}

struct ContentView: View {
    @State private var queryString = ""

    var body: some View {
        NavigationView {
            PrimaryView()
                .navigationTitle("Primary")
            SecondaryView()
                .navigationTitle("Secondary")
            DetailView()
                .navigationTitle("Detail")
                .searchable(text: $queryString)
        }
    }
}
Placing .searchable on each column result in the search field display on that column.
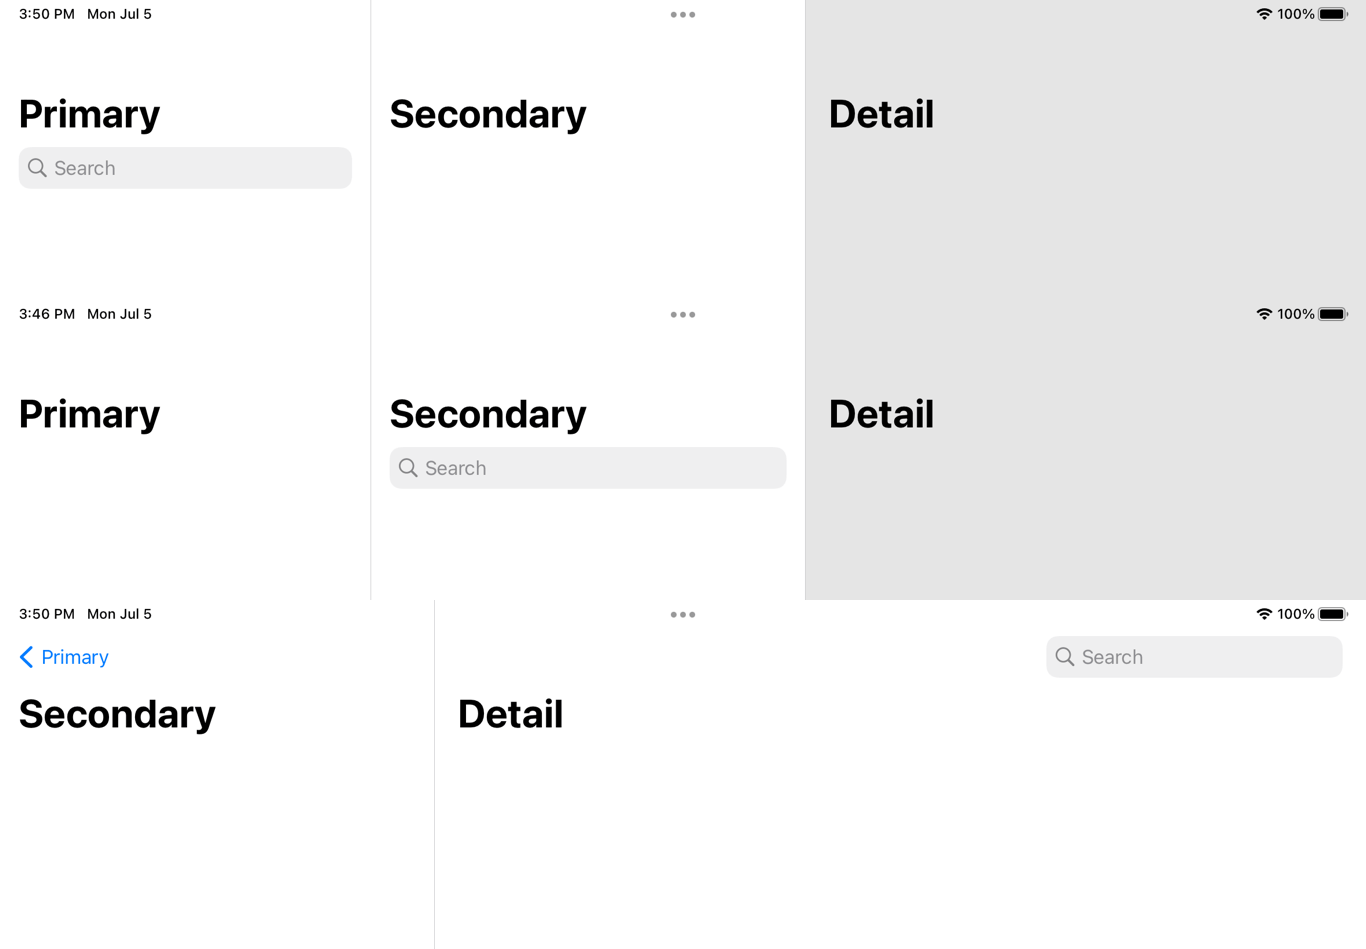
Multiple placment
Nothing stops you from putting .searchable in every column. NavigationView also supports multiple search fields.
In this example, we put searchable modifiers on each column.
struct ContentView: View {
    @State private var queryString = ""

    var body: some View {
        NavigationView {
            PrimaryView()
                .navigationTitle("Primary")
                .searchable(text: $queryString)
            SecondaryView()
                .navigationTitle("Secondary")
                .searchable(text: $queryString)
            DetailView()
                .navigationTitle("Detail")
                .searchable(text: $queryString)
        }
    }
}
Preferred placement
searchable initializer accepts placement as one of its parameters. You have four options to choose from, automatic, navigationBarDrawer, sidebar, and toolbar. Note that this parameter lets you specify preferred placement. Depending on the containing view hierarchy and platform, the requested placement may not be able to fulfill.
struct ContentView: View {
    @State private var queryString = ""

    var body: some View {
        NavigationView {
            PrimaryView()
                .navigationTitle("Primary")
            SecondaryView()
                .navigationTitle("Secondary")
            DetailView()
                .navigationTitle("Detail")
                .searchable(text: $queryString, placement: .navigationBarDrawer)
        }
    }
}
Specify the preferred placement of .navigationBarDrawer to the third column to make it show below the title instead of the default trailing position.

Search
Now that we know how to show the search field on the position you want, let's see how we can do the actual search.
Searchable modifiers display a search field with control and animation associated with a binding search string. You are the one who responsible for giving the search result.
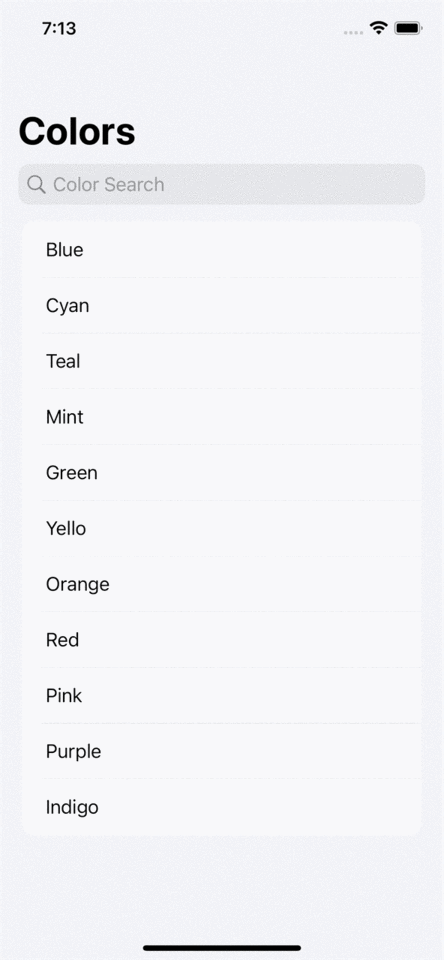
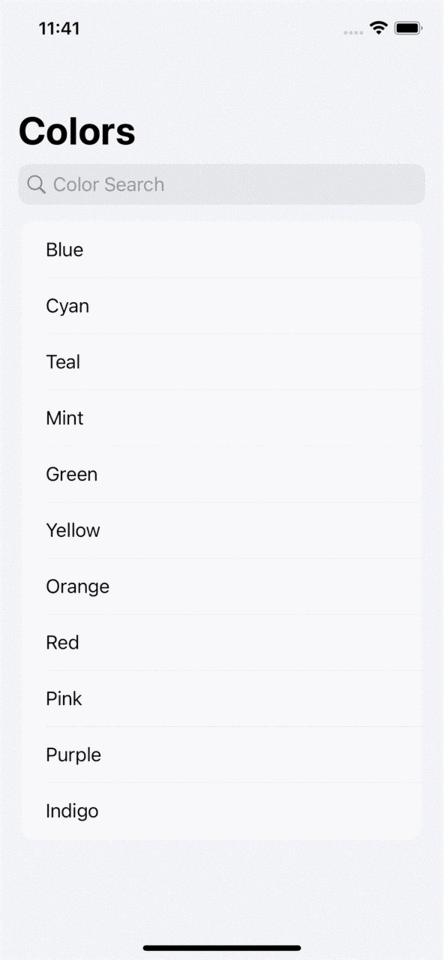
Here is an example of an app showing a list of colors where user can search for specific color.
struct ContentView: View {
    let colors = ["Blue", "Cyan", "Teal", "Mint", "Green", "Yellow", "Orange", "Red", "Pink", "Purple", "Indigo"]

    var filteredColors: [String] { // 1
        if queryString.isEmpty {
            return colors
        } else {
            return colors.filter { $0.localizedCaseInsensitiveContains(queryString) }
        }
    }

    @State private var queryString = ""

    var body: some View {
        NavigationView {
            List(filteredColors, id: \.self) { color in // 2
                Text(color)
            }
            .navigationTitle("Colors")
        }
        .searchable(text: $queryString, prompt: "Color Search")
    }
}
<1> We use queryString to filter our colors data.
<2> filteredColors are use to populate the list view.
The implementation detail is straightforward. We use a search string that binds to .searchable to filter our data and use that to present in the view.
With a few lines of code, we got a working search function.
Suggestions
Searchable also has an option for you to present search suggestions. suggestions parameter accepts a view builder that produces content that populates a list of suggestions.
You can use it like this.
struct ContentView: View {
    let colors = ["Blue", "Cyan", "Teal", "Mint", "Green", "Yellow", "Orange", "Red", "Pink", "Purple", "Indigo"]

    @Environment(\.dismissSearch) var dismissSearch

    var filteredColors: [String] {
        if queryString.isEmpty {
            return colors
        } else {
            return colors.filter { $0.localizedCaseInsensitiveContains(queryString) }
        }
    }

    @State private var queryString = ""

    var body: some View {
        NavigationView {
            List(filteredColors, id: \.self) { color in
                Text(color)
            }
            .navigationTitle("Colors")

        }
        .searchable(text: $queryString,
          prompt: "Color Search",
          suggestions: { //1
      Text("Red").searchCompletion("red") // 2
      Text("Blue").searchCompletion("blue")
    })
    }
}
<1> Provide a view builder block as the suggestions argument.
<2> Notice the new searchCompletion modifier. We will discuss this in the next section.
Tap on the search field, and you will see the suggestions provided.
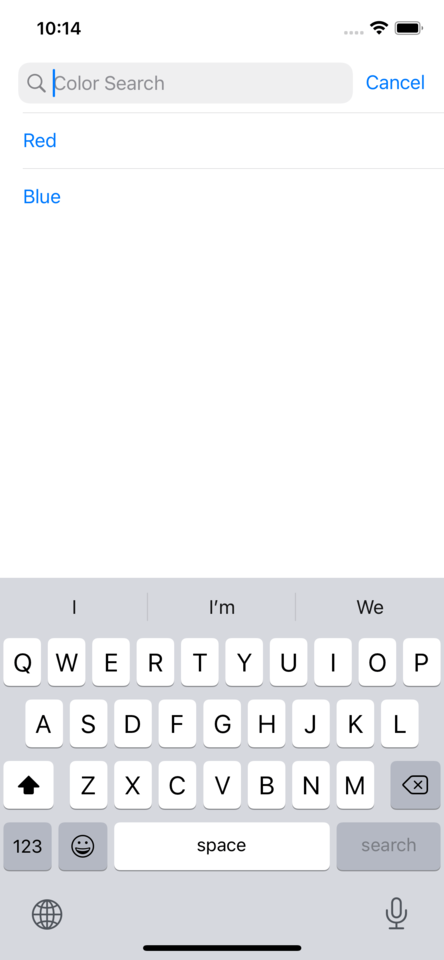
There are behaviors that not very obvious and might confuse you if you don't know. Here are the behaviors I think you should know to use suggestions.
searchCompletion
Suggested content can be anything. It can be an interactive view, e.g., buttons or non-interactive view, .e.g., text.
In this example, we use a button which once tap set a query string to pink.
.searchable(text: $queryString, prompt: "Color Search", suggestions: {
Button("Pink") {
queryString = "pink"
}
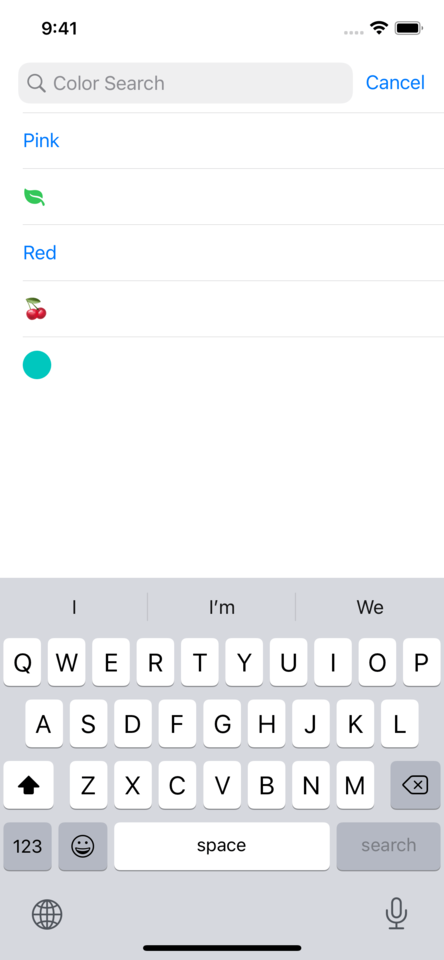
})It can be a non-interactive view like text and image. Since there is no action, you need a way to associate strings to the suggestion views to provide a suggestion string to the search field. We can do that with the .searchCompletion modifier. Add .searchCompletion will make non-interactive view interactable. Once you tap a view with .searchCompletion, the provided string will replace the text being currently edited.
.searchable(text: $queryString, prompt: "Color Search", suggestions: {
    Image(systemName: "leaf.fill")
        .symbolRenderingMode(.multicolor)
        .searchCompletion("green") // 1
    Text("Red").searchCompletion("red")
    Text("🍒").searchCompletion("pink")
    Circle()
        .fill(Color.mint)
        .frame(width: 25, height: 25)
        .searchCompletion("mint")
})
<1> We associated strings to the views provided to the suggestions view.
A mixed of suggestiong made of interactive and non-interactive views.
.searchable(text: $queryString, prompt: "Color Search", suggestions: {
    Button("Pink") {
        queryString = "pink"
    }
    Image(systemName: "leaf.fill")
        .symbolRenderingMode(.multicolor)
        .searchCompletion("green")
    Text("Red").searchCompletion("red")
    Text("🍒").searchCompletion("pink")
    Circle()
        .fill(Color.mint)
        .frame(width: 25, height: 25)
        .searchCompletion("mint")
})
Here is the result you will get with the above suggestions.
Another hidden behavior of .searchCompletion is if binding text (queryString in this case) matched the provided string, that view would remove from the suggestion list.
In the following example, we tap a leaf image which makes search completion string, green, replace queryString. Since search string and search completion are the same, our leaf image will remove from the suggestions.
Search completion that matched search string will be removed from the suggested list.

Dynamic Content
Just like a list view, you can populate suggestion content with ForEach.
.searchable(text: $queryString, prompt: "Color Search", suggestions: {
    ForEach(colors , id: \.self) { suggestion in
        Text(suggestion)
            .searchCompletion(suggestion)
    }
})
Suggestion Presentation
The suggestions will display when two conditions are met.
- Search field is in focus.
- Suggestions return non-empty contents.
Number two is what I want you to focus on. As long as suggestions return non-empty contents, suggestions will always show. Select any suggestion won't dismiss the suggestions view.
In this example, we create suggestions content with static content. Select one of suggestions won't dismiss the view.
.searchable(text: $queryString, prompt: "Color Search", suggestions: {
    Button("Pink") {
        queryString = "pink"
    }
    Image(systemName: "leaf.fill")
        .symbolRenderingMode(.multicolor)
        .searchCompletion("green")
    Text("Red").searchCompletion("red")
    Text("🍒").searchCompletion("pink")
    Circle()
        .fill(Color.mint)
        .frame(width: 25, height: 25)
        .searchCompletion("mint")
})
For static content like this, if you want to get rid of the suggestions view, you need some boolean variables to control it.
Here is an example where we only show suggestions only if a query string is empty.
.searchable(text: $queryString, prompt: "Color Search", suggestions: {
      if (queryString.isEmpty) {
        Button("Pink") {
          queryString = "pink"
        }
        Image(systemName: "leaf.fill")
          .symbolRenderingMode(.multicolor)
          .searchCompletion("green")
        Text("Red").searchCompletion("red")
        Text("🍒").searchCompletion("pink")
        Circle()
          .fill(Color.mint)
          .frame(width: 25, height: 25)
          .searchCompletion("mint")
      }
    })
The same rules apply to dynamic content. We need to add a condition to make the view builder return empty content to hide the suggestions view.
In the following example, we use the same logic that we use in the Search section.
- At the beginning, no suggestions will show since no string in
colorsis an empty string. - Once we start typing, colors that contain query strings will show up.
- When we tap on any suggestion,
queryStringwill be set, and suggestions content will be empty, resulting in suggestions automatically dismiss.
.searchable(text: $queryString, prompt: "Color Search", suggestions: {
    ForEach(colors.filter { $0.localizedCaseInsensitiveContains(queryString) } , id: \.self) { suggestion in
        Text(suggestion)
            .searchCompletion(suggestion)
    }
})
Suggestion Dismissal
There are three ways to dismiss a suggestion view.
As mentioned earlier, search suggestions will dismiss when no content in the suggestion block.
Tap the cancel button, which will also clear the search field.
Tap the return key, which will dismiss the suggestions will while preserving the current search string.
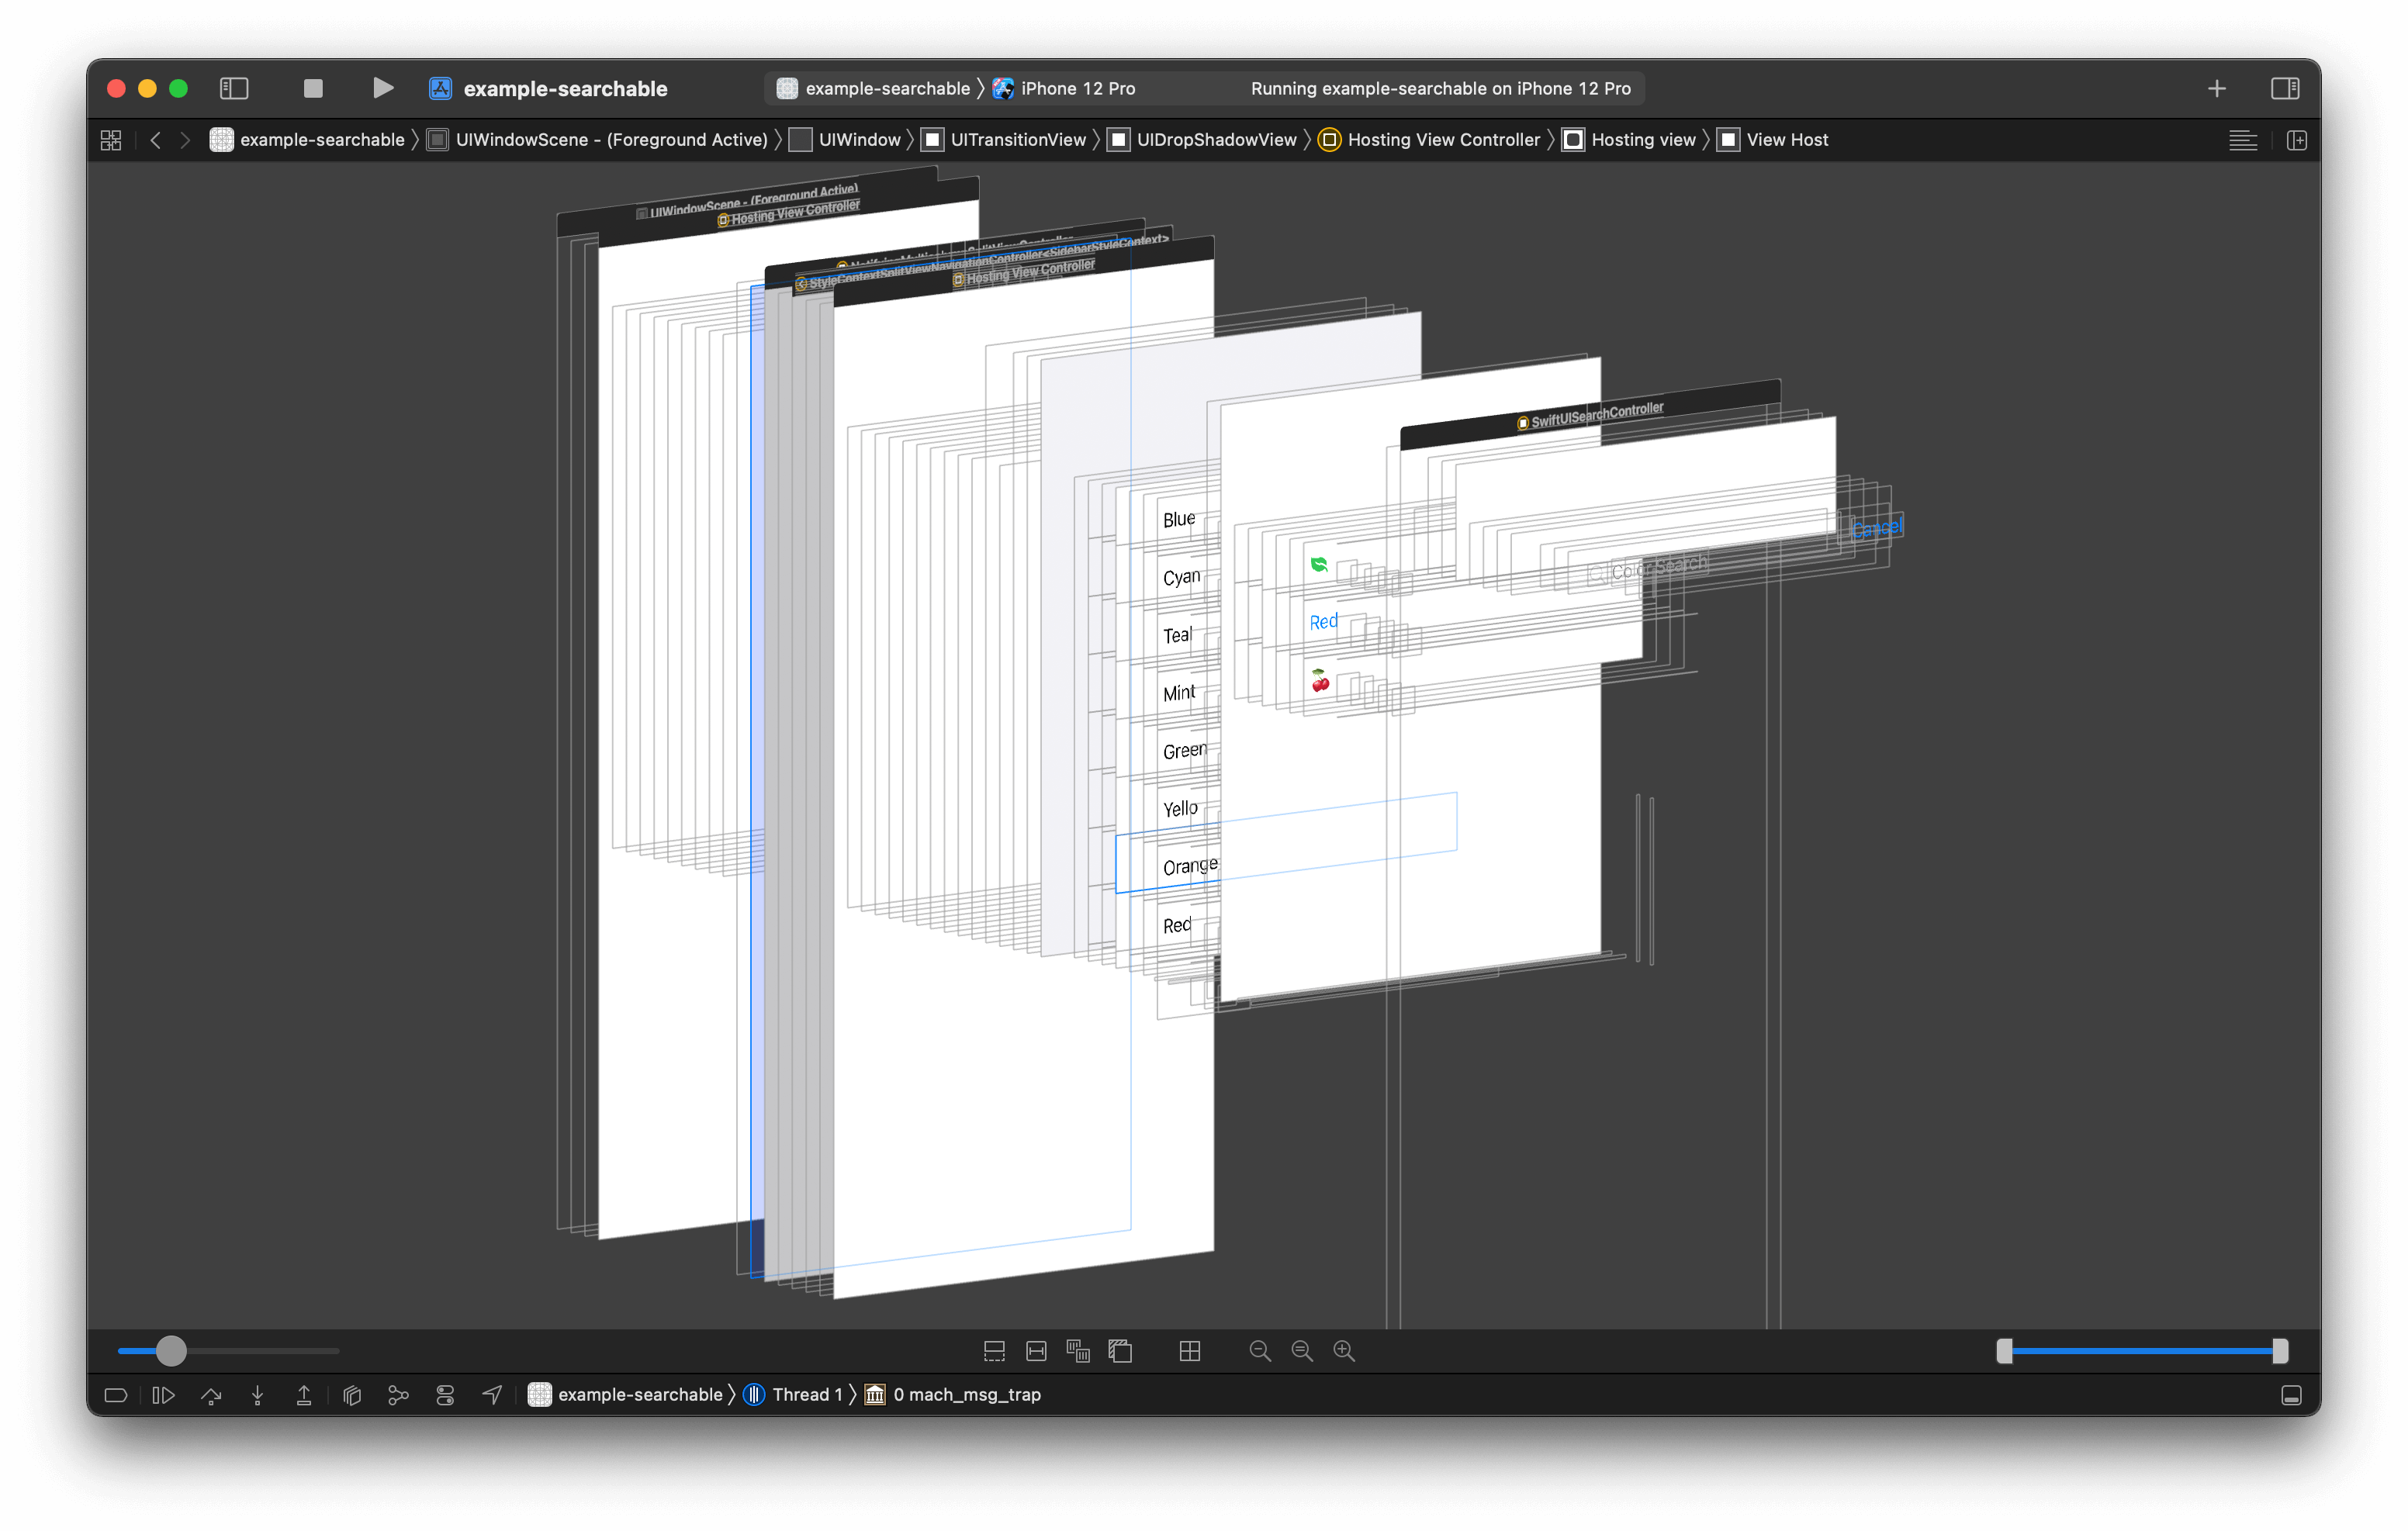
Search suggestion will show as an overlay over your view.
You don't need to know this, but search suggestions will overlay your main view.
Here is a "Debug View Hierarchy" of suggestions view.
Observe and Control
You can have a fully functional search using just a searchable modifier, but SwiftUI provides two more ways to observe and control the lifetime of a search field in case you want more control and customization.
onSubmit
You can associate an action with being invoked upon submission of the current search query by using an onSubmit(of:_:) modifier in conjunction with a searchable modifier.
func onSubmit(of triggers: SubmitTriggers = .text, _ action: @escaping (() -> Void)) -> some ViewAdd .onSubmit with the .search trigger to perform action when submit search query.
var body: some View {
    NavigationView {
        List(filteredColors, id: \.self) { color in
            Text(color)
        }
        .navigationTitle("Colors")
    }
    .searchable(text: $queryString, prompt: "Color Search", suggestions: {
        ForEach(colors.filter { $0.localizedCaseInsensitiveContains(queryString) } , id: \.self) { suggestion in
            Text(suggestion)
                .searchCompletion(suggestion)
        }
    })
    .onSubmit(of: .search) { // 1
        print("submit")
    }
}
<1> Add .onSubmit with the .search trigger.
.onSubmit will trigger when a search query is submitted, which can happen in many ways.
- User tap on search suggestion.
- User tap on the return key on the software keyboard.
- User tap on the return key on the hardware keyboard.
This might be the place where you submit a search query to your backend in a real-world application if you don't want to search every time the query string change.
Environment
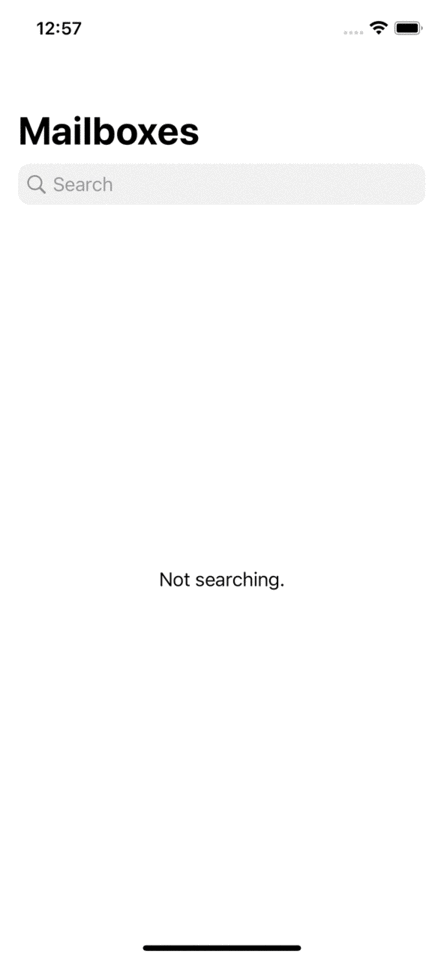
We have two environment values coming with .searchable, isSearching, and dismissSearch.
isSearching
isSearching is a boolean value showing whether the user is currently interacting with a search field.
struct ContentView: View {
    @State private var queryString = ""

    var body: some View {
        NavigationView {
            SearchContent(queryString: queryString) // 1
                .navigationTitle("Mailboxes")
        }
        .searchable(text: $queryString)
    }
}

struct SearchContent: View {
    var queryString: String
    @Environment(\.isSearching) var isSearching // 2

    var body: some View {
        VStack {
            Text(queryString)
            Text(isSearching ? "Searching!": "Not searching.")
        }
    }
}
<1> Set SearchContent as a main content.
<2> Read isSearching and use to determine content of a text view in the body.
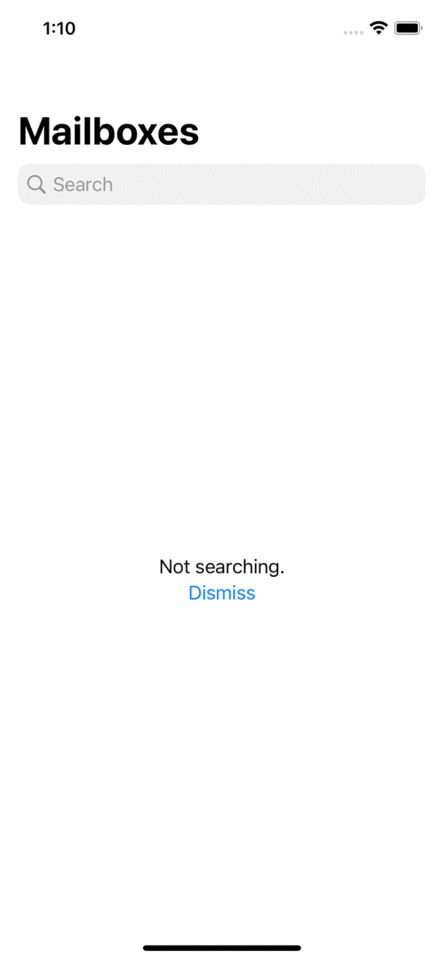
dismissSearch
dismissSearch dismisses a search interaction when called. You can use this to dismiss search UI programmatically.
Call this function will cause the following:
isSearchingto becomefalse.- Any search text to be cleared.
- The search field to lose focus.
struct ContentView: View {
    @State private var queryString = ""

    var body: some View {
        NavigationView {
            SearchContent(queryString: queryString)
                .navigationTitle("Mailboxes")
        }
        .searchable(text: $queryString)
    }
}

struct SearchContent: View {
    var queryString: String
    @Environment(\.isSearching) var isSearching
    @Environment(\.dismissSearch) var dismissSearch // 1

    var body: some View {
        VStack {
            Text(queryString)
            Text(isSearching ? "Searching!": "Not searching.")
            Button("Dismiss") {
                dismissSearch() // 2
            }
        }
    }
}
<1> We declare dismissSearch inside a child view, the same way we did with isSearching.
<2> We call dismissSearch() whenever we want to dismiss.
You can easily support sarunw.com by checking out this sponsor.
AI Grammar: Correct grammar, spell check, check punctuation, and parphrase.
Conclusion
The searchable modifier is very powerful. You can add search functionality to your app with a few lines of code. The searchable interface is simple but hides some complexity and undocumented behavior that we discover and learn in this article. After reading this article, I hope it would be clear enough for you to add a search function to your app.
Read more article about SwiftUI, searchable, or see all available topic
Enjoy the read?
If you enjoy this article, you can subscribe to the weekly newsletter.
Every Friday, you'll get a quick recap of all articles and tips posted on this site. No strings attached. Unsubscribe anytime.
Feel free to follow me on Twitter and ask your questions related to this post. Thanks for reading and see you next time.
If you enjoy my writing, please check out my Patreon https://www.patreon.com/sarunw and become my supporter. Sharing the article is also greatly appreciated.
Become a patron Buy me a coffee Tweet ShareHow to manually add existing certificates to the Fastlane match
Learn how to import .cer and p12 to Fastlane match without nuke or creating a new one.
Flutter: How much time do you save, and at what cost
The idea that you can use one codebase for multiple platforms and cut development time by half is tempting, but what do you trade for this time saved?