Sign in with Apple Tutorial, Part 1: Apps
Table of Contents
Part 1 in a series Sign in with Apple. In the first part, we will focus on the app part. What we need to do to add Sign in with Apple option in our app.
- Sign in with Apple, Part 1: Apps
- Sign in with Apple, Part 2: Private Email Relay Service
- Sign in with Apple, Part 3: Backend – Token verification
- Sign in with Apple, Part 4: Web and Other Platforms
Apple reveals Sign in with Apple[1], a privacy and security focus login service, to the world at WWDC 2019. Apple told us it is mandatory for all apps using other third-party login services, but not much detail back then.
On September 12, 2019, they published a public announcement about guidelines for Sign in with Apple[2]. Here are the highlights.
New apps submitted to the App Store must follow these guidelines. Existing apps and app updates must follow them by April 2020.
If you are reading this and not yet releasing your app, you might need to consider the following guideline.
4.8 Sign in with Apple
Apps that exclusively use a third-party or social login service (such as Facebook Login, Google Sign-In, Sign in with Twitter, Sign In with LinkedIn, Login with Amazon, or WeChat Login) to set up or authenticate the user’s primary account with the app must also offer Sign in with Apple as an equivalent option. A user’s primary account is the account they establish with your app for the purposes of identifying themselves, signing in, and accessing your features and associated services.Sign in with Apple is not required if:
- Your app exclusively uses your company’s own account setup and sign-in systems.
- Your app is an education, enterprise, or business app that requires the user to sign in with an existing education or enterprise account.
- Your app uses a government or industry-backed citizen identification system or electronic ID to authenticate users.
- Your app is a client for a specific third-party service and users are required to sign in to their mail, social media, or other third-party account directly to access their content.
In the end, no matter new or old, you might end up having this Sign in with Apple in your app, so let's get used to it.
Why Sign in with Apple?
Sign in with Apple is the Apple way for users to set up an account and start using your apps and websites. They promise fast, secure, and privacy-friendly experiences. Let's see if they can live up to their promise.
You can easily support sarunw.com by checking out this sponsor.

AI Grammar: Correct grammar, spell check, check punctuation, and parphrase.
Capability
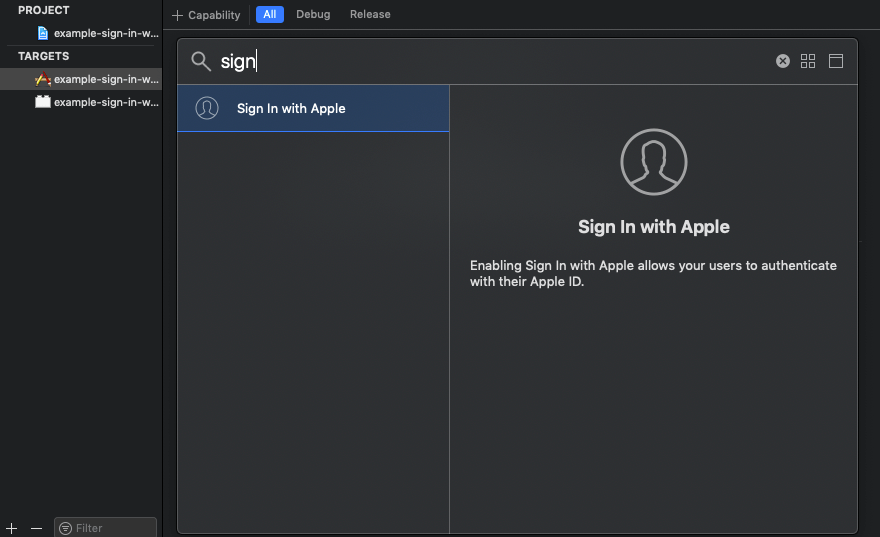
The first thing you need to do is add the new capability, Sign in with Apple. To do that click your app target > Signing & Capabilities tab > Click + Capability > Double click on "Sign in with Apple".
The button
Apple is very serious about their branding. They provide a dedicate class for their button, ASAuthorizationAppleIDButton[3]. To create a button, you just initialize and use it like a normal UIButton, nothing fancy here.
let button = ASAuthorizationAppleIDButton()
button.center = view.center
view.addSubview(button)
Button Size and Position
You can't manually adjust the font size of Sign in with Apple button. You can just change the frame of the button, and the font size will adapt accordingly.
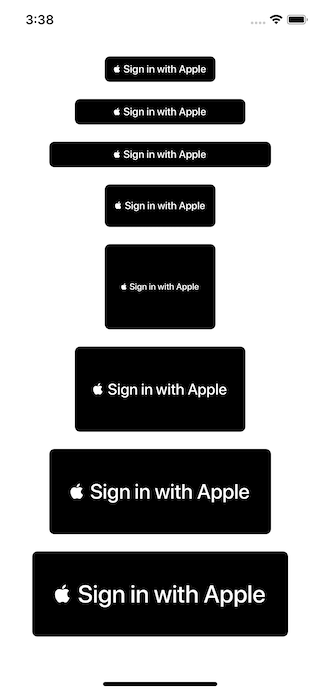
You might expect the font size getting bigger as frame expands, but as you can see, there is some weird behavior when size is 130x100 (the square one in the center) where the size is bigger, but font getting smaller.
So, my suggestion would be, start the design with Sign in with Apple button (so you know the font size) and then layout the rest of your alternative Sign in buttons.
Button Light and Dark
Sign in button isn't adapt to light and dark mode change by default. You have to handle this by yourself.
override func traitCollectionDidChange(_ previousTraitCollection: UITraitCollection?) {
    super.traitCollectionDidChange(previousTraitCollection)

    let hasUserInterfaceStyleChanged = traitCollection.hasDifferentColorAppearance(comparedTo: previousTraitCollection)

    if hasUserInterfaceStyleChanged {
        setupProviderLoginView()
    }
}

func setupProviderLoginView() {
    // Remove the old button from container
    switch traitCollection.userInterfaceStyle {
    case .dark:
        authorizationButton = ASAuthorizationAppleIDButton(type: .default, style: .white)
    default:
        authorizationButton = ASAuthorizationAppleIDButton(type: .default, style: .black)
    }
    // Replace it with a new one we just created
    ...
}
There is also .whiteOutline style, you can consult Apple Human Interface Guidelines on when to use it.
Corner radius
The last thing you can modify with the button is a corner radius. You can adjust to match the appearance of other buttons in your app.
button.cornerRadius = 0
After we have the button in place, if you run the app and try to tap the button, nothing will happen. That's because ASAuthorizationAppleIDButton is just a button, a simple view with no logic; you have to add target-action yourself like a normal button.
Action
You add an action like usual.
authorizationButton.addTarget(self, action: #selector(handleAuthorizationAppleIDButtonPress), for: .touchUpInside)Apple does all the hard work and packs everything in ASAuthorizationController, which will handle all the UI and presentation logic. The only thing we need to do in action is specify information you need via ASAuthorizationAppleIDRequest, which you can create from ASAuthorizationAppleIDProvider and put it as a parameter to ASAuthorizationController.
In the following example, we requested both email and fullName.
@objc
func handleAuthorizationAppleIDButtonPress() {
    let appleIDProvider = ASAuthorizationAppleIDProvider()
    let request = appleIDProvider.createRequest()
    request.requestedScopes = [.fullName, .email]

    let authorizationController = ASAuthorizationController(authorizationRequests: [request])
    authorizationController.delegate = self
    authorizationController.presentationContextProvider = self
    authorizationController.performRequests()
}
presentationContextProvider (ASAuthorizationControllerPresentationContextProviding) ask for one thing, a window to present sign in dialog.
// MARK: - ASAuthorizationControllerPresentationContextProviding
func presentationAnchor(for controller: ASAuthorizationController) -> ASPresentationAnchor {
    return self.view.window!
}
delegate (ASAuthorizationControllerDelegate) has two methods that will call when sign-in is a success and fail.
// MARK: - ASAuthorizationControllerDelegate
func authorizationController(controller: ASAuthorizationController, didCompleteWithAuthorization authorization: ASAuthorization) {
    if let appleIDCredential = authorization.credential as? ASAuthorizationAppleIDCredential {
        guard let appleIDToken = appleIDCredential.identityToken else {
            print("Unable to fetch identity token")
            return
        }

        guard let idTokenString = String(data: appleIDToken, encoding: .utf8) else {
            print("Unable to serialize token string from data: \(appleIDToken.debugDescription)")
            return
        }

        let userIdentifier = appleIDCredential.user
        let fullName = appleIDCredential.fullName
        let email = appleIDCredential.email
        ...
    }
}

func authorizationController(controller: ASAuthorizationController, didCompleteWithError error: Error) {
    // Handle error.
    guard let error = error as? ASAuthorizationError else {
        return
    }

    switch error.code {
    case .canceled:
        print("Canceled")
    case .unknown:
        print("Unknown")
    case .invalidResponse:
        print("Invalid Respone")
    case .notHandled:
        print("Not handled")
    case .failed:
        print("Failed")
    @unknown default:
        print("Default")
    }
}
This is about everything you need to do to integrate Sign in with Apple in your app. You can tap the sign-in button now and see it in action.
The sign-in flow is quite simple; let's have a quick look at what can happen when you tap the button.
No Apple ID
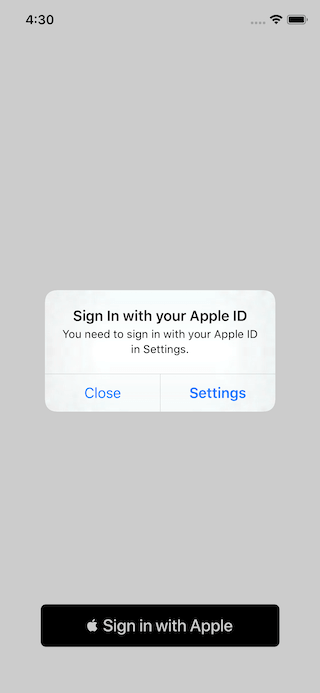
If the device has no Apple ID authorizationController(controller: ASAuthorizationController, didCompleteWithError error: Error) will be called with a ASAuthorizationErrorUnknown.
You don't have to do anything about this. System alert will show guiding users to sign in.
First time
If users already signed in, for the first time, they will see Data and privacy information screen.
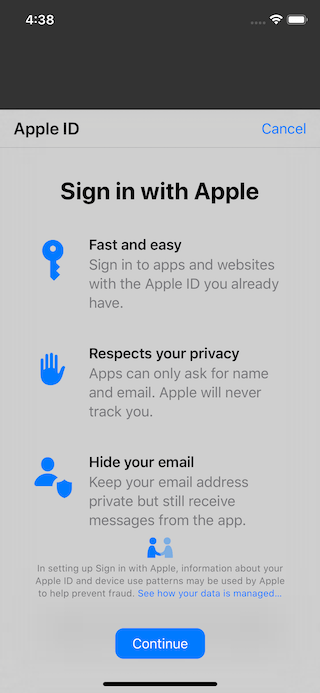
You would get ASAuthorizationErrorCanceled if they cancel, tap Continue would bring them to sign in screen.
Grant
In sign-in screen, users will be presented with a form, prefilled with full name and email that registered with Apple account.
It can be email, full name, or both based on your requested scopes at the very beginning.
let appleIDProvider = ASAuthorizationAppleIDProvider()
let request = appleIDProvider.createRequest()
request.requestedScopes = [.fullName, .email]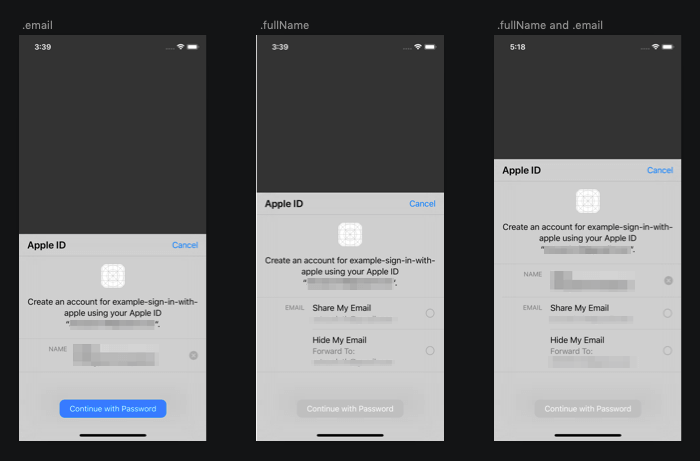
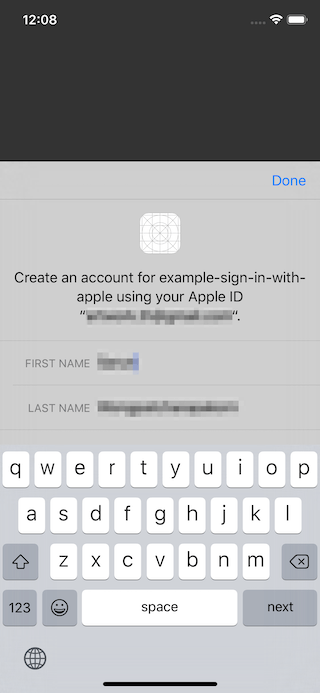
Users have options to edit both name and email.
Users can edit their name by tapping on them.
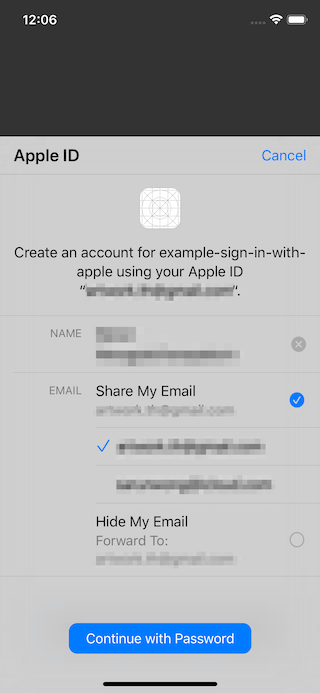
For email, they can choose to use any email associated with their Apple account (if they got more than one).
They can choose to hide their email by selecting "Hide my email" option, which will create an anonymous email address for users (a random string with @privaterelay.appleid.com).
Private relay email addresses have the following characteristics:
- They end in @privaterelay.appleid.com.
- They route emails to one of the Apple ID’s verified email addresses.
- They’re the same for a user across all apps written by a single development team, and different for the same user across apps written by different development teams.
- They’re active whether or not the user is signed into a device, and whether or not your app is installed on the device. You may send and receive email to the private email address at any time.
After the user has shared a private relay email address with your app, they can find, view, and manage it in their account settings at Settings > Apple ID > Password & Security > Apple ID Logins/App Using Your Apple ID > Your app name. They can see their assigned anonymous email there.
You can also manage this on website by visit your Apple ID > click Manage Apps & websites using Apple ID under Security section > Your app name.
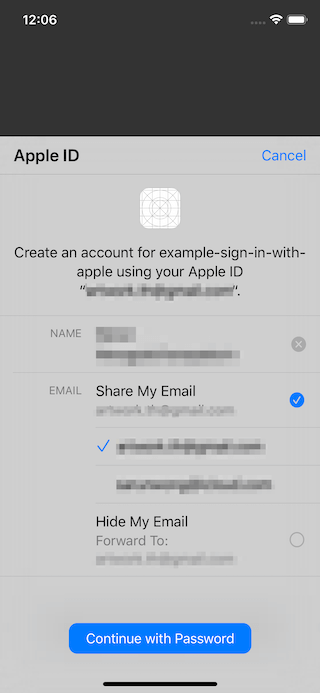
After they choose their preference and continue, there are no extra steps.
Done
Once signed in complete, you will get notified via authorizationController(controller: ASAuthorizationController, didCompleteWithAuthorization authorization: ASAuthorization) delegate where you can get user information from authorization: ASAuthorization object.
You can retrieve fullName, email, user, and identityToken from the object.
func authorizationController(controller: ASAuthorizationController, didCompleteWithAuthorization authorization: ASAuthorization) {
    if let appleIDCredential = authorization.credential as? ASAuthorizationAppleIDCredential {
        guard let appleIDToken = appleIDCredential.identityToken else {
            print("Unable to fetch identity token")
            return
        }

        guard let idTokenString = String(data: appleIDToken, encoding: .utf8) else {
            print("Unable to serialize token string from data: \(appleIDToken.debugDescription)")
            return
        }


        let userIdentifier = appleIDCredential.user
        let fullName = appleIDCredential.fullName
        let email = appleIDCredential.email

        print(idTokenString)
        print(userIdentifier)
        print(fullName)
        print(email)
    }
}
Pitfall
In the simulator, you can test Sign in with Apple many times as you want, and you would get everything (fullName, email, user, and identityToken) return in authorizationController(controller: ASAuthorizationController, didCompleteWithAuthorization authorization: ASAuthorization), but when you test on real device, this won't be the case.
If you test this on a device, once you grant the permission (on any devices or simulator with the same Apple ID), the subsequence sign in would prompt the user with this dialog instead.
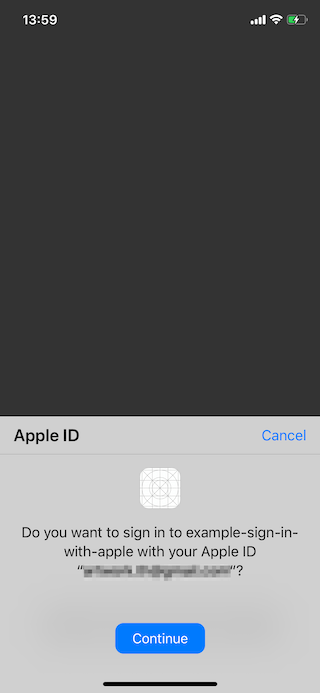
Tap Continue would result in a call on success delegate method, BUT full name and email won't be returned in ASAuthorization.
You can only retrieve the full name and email for the first time. If these are the required information for your registration process, make sure you save it before begin your registration process and remove it once your registration is confirmed.
This behavior is confirmed from Apple staff here https://forums.developer.apple.com/thread/121496#379297
This behaves correctly, user info is only sent in the ASAuthorizationAppleIDCredential upon initial user sign up. Subsequent logins to your app using Sign In with Apple with the same account do not share any user info and will only return a user identifier in the ASAuthorizationAppleIDCredential. It is recommened that you securely cache the initial ASAuthorizationAppleIDCredential containing the user info until you can validate that an account has succesfully been created on your server.
– Patrick
So, the code in authorizationController(controller: ASAuthorizationController, didCompleteWithAuthorization authorization: ASAuthorization) should be something like this:
func authorizationController(controller: ASAuthorizationController, didCompleteWithAuthorization authorization: ASAuthorization) {
    if let appleIDCredential = authorization.credential as? ASAuthorizationAppleIDCredential {
        guard let appleIDToken = appleIDCredential.identityToken else {
            print("Unable to fetch identity token")
            return
        }

        guard let idTokenString = String(data: appleIDToken, encoding: .utf8) else {
            print("Unable to serialize token string from data: \(appleIDToken.debugDescription)")
            return
        }


        let userIdentifier = appleIDCredential.user
        let fullName = appleIDCredential.fullName
        let email = appleIDCredential.email

        // Save a full name and email since you can't retrieve it later, e.g., save it in the key chain
        // Create an account in your system.
        // On success, remove the key
        // On fail, recover full name and email from the keychain and retry registration
    }
}
Testing
If you want to test sign in like the first time (and receive full name and email), you can do that by removing the permission in Settings > Apple ID > Password & Security > Apple ID Logins/App Using Your Apple ID > Your app name > Stop using Apple ID
You can also manage this on website by visit your Apple ID > click Manage Apps & websites using Apple ID under Security section > Your app name > Stop using Apple ID
This might be the only solution we can give to users if something went wrong.
Conclusion
I think the sign-in experience from Apple is very pleasant. Apple tries to ask as few data as possible and provide a built-in way to hide sensitive information like email. This is rarely seen in other sign-in services where they try to get as much data as they can. They delivered what they promised if you ask me.
These are everything you need to do for the client-side, but this is just one part of the whole sign-in process.
Right now, If you try sending an email to an anonymous email that you got from Apple (the one you received when you choose "Hide my email" option), it won't reach your primary email yet. We need a few steps to whitelist domains and emails that can communicate with our users. We will try to tackle this in part two of the series.
You can subscribe to my newsletter or follow me on Twitter if you don't want to miss the second part.
You can easily support sarunw.com by checking out this sponsor.

AI Grammar: Correct grammar, spell check, check punctuation, and parphrase.
Related Resources
- Sign in with Apple, Part 2: Private Email Relay Service
- Sign in with Apple, Part 3: Backend – Token verification
- Sign in with Apple, Part 4: Web and Other Platforms
- App Store review guideline - 4.8 Sign in with Apple
- Usage Guidelines for Websites and Other Platforms
- Human Interface Guideline - Sign in with Apple
- Communicating Using the Private Email Relay Service
- Sign in with Apple REST API
New Guidelines for Sign in with Apple. https://developer.apple.com/news/?id=09122019b ↩︎
A control you add to your interface that enables users to initiate the Sign In with Apple flow. https://developer.apple.com/documentation/authenticationservices/asauthorizationappleidbutton ↩︎
Read more article about Swift, Sign in with Apple, or see all available topic
Enjoy the read?
If you enjoy this article, you can subscribe to the weekly newsletter.
Every Friday, you'll get a quick recap of all articles and tips posted on this site. No strings attached. Unsubscribe anytime.
Feel free to follow me on Twitter and ask your questions related to this post. Thanks for reading and see you next time.
If you enjoy my writing, please check out my Patreon https://www.patreon.com/sarunw and become my supporter. Sharing the article is also greatly appreciated.
Become a patron Buy me a coffee Tweet ShareManually symbolicate crash reports
A guide to decode a gibberish crash report to a human readable format.