Sign in with Apple Tutorial, Part 2: Private Email Relay Service
Table of Contents
The second part in a series Sign in with Apple. In this part, we will talk about the anonymous email address. How to make it work and its limitation.
- Sign in with Apple, Part 1: Apps
- Sign in with Apple, Part 2: Private Email Relay Service
- Sign in with Apple, Part 3: Backend – Token verification
- Sign in with Apple, Part 4: Web and Other Platforms
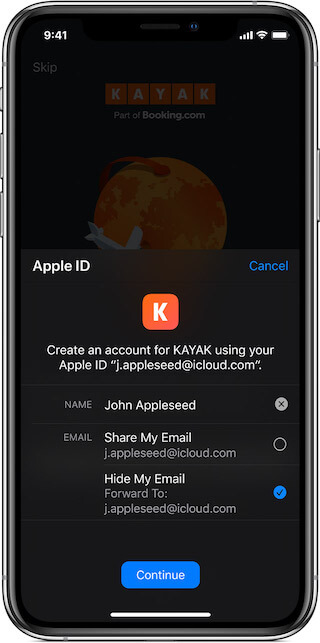
When you request email information from users, Sign in with Apple present them with two options:
- Share My Email; this will share user's personal email address. This is like other sign-in services out there.
- Hide My Email; this will create a unique, random address for users. This is an option we will focus on today.
Hide My Email
Private relay email addresses have the following characteristics:
- This address is unique to you and the developer and follows this format:
<unique-alphanumeric-string>@privaterelay.appleid.com. - Any messages sent to this address by the app or website developer are automatically forwarded to your personal email address by our private email relay service.
- They’re the same for a user across all apps written by a single development team, and different for the same user across apps written by different development teams.
- They’re active whether or not the user is signed into a device, and whether or not your app is installed on the device. You may send and receive email to the private email address at any time.
- You can read and respond directly to these emails and still keep your personal address private.
The following is a random email address given:
dpdcnf87nu@privaterelay.appleid.comIf you are testing on Xcode, you can print this information out in success delegate.
func authorizationController(controller: ASAuthorizationController, didCompleteWithAuthorization authorization: ASAuthorization) {
if let appleIDCredential = authorization.credential as? ASAuthorizationAppleIDCredential {
guard let appleIDToken = appleIDCredential.identityToken else {
print("Unable to fetch identity token")
return
}
guard let idTokenString = String(data: appleIDToken, encoding: .utf8) else {
print("Unable to serialize token string from data: \(appleIDToken.debugDescription)")
return
}
let userIdentifier = appleIDCredential.user
let fullName = appleIDCredential.fullName
let email = appleIDCredential.email
print(email)
}
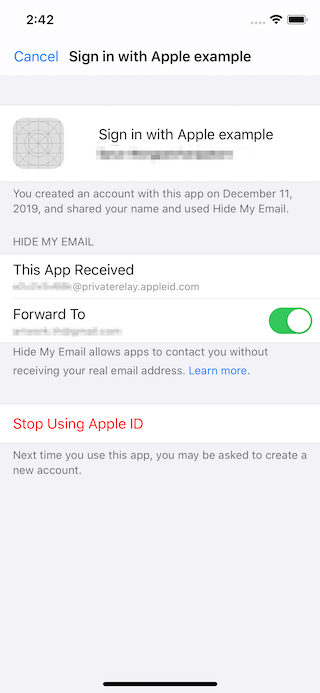
}If you test on a real device, you can view it in Settings > Apple ID > Password & Security > Apple ID Logins/App Using Your Apple ID > Your app name (Under HIDE MY EMAIL section).
You can easily support sarunw.com by checking out this sponsor.
Offline Transcription: Fast, privacy-focus way to transcribe audio, video, and podcast files. No data leaves your Mac.
Do users need to know about this email?
It seems hard to retrieve this email, but that shouldn't be a problem. This email should act as a read-only for users. We use this email to send the necessary information to users, such as verification links and news.
Can users use this email elsewhere?
No, only the whitelist email domain can send and receive email from this anonymous email. You can try sending email to anonymous email, and nothing will reach your Apple ID's verified email addresses.
Register Your Email Domain
Since the anonymous email can't send or receive any email except the one that registered with Apple, this is the first thing you need to do.
To send emails to users with private email addresses, you must register your outbound email[1] domains. All registered domains must create Sender Policy Framework (SPF)[2] DNS TXT records in order to transit Apple's private mail relay. These mechanisms ensure that only you can communicate with your users through this channel, and they prevent spam from getting through.
You might never hear of these terms and jargon, but the process is easier than you think. Let's begin.
Register Domains with Apple
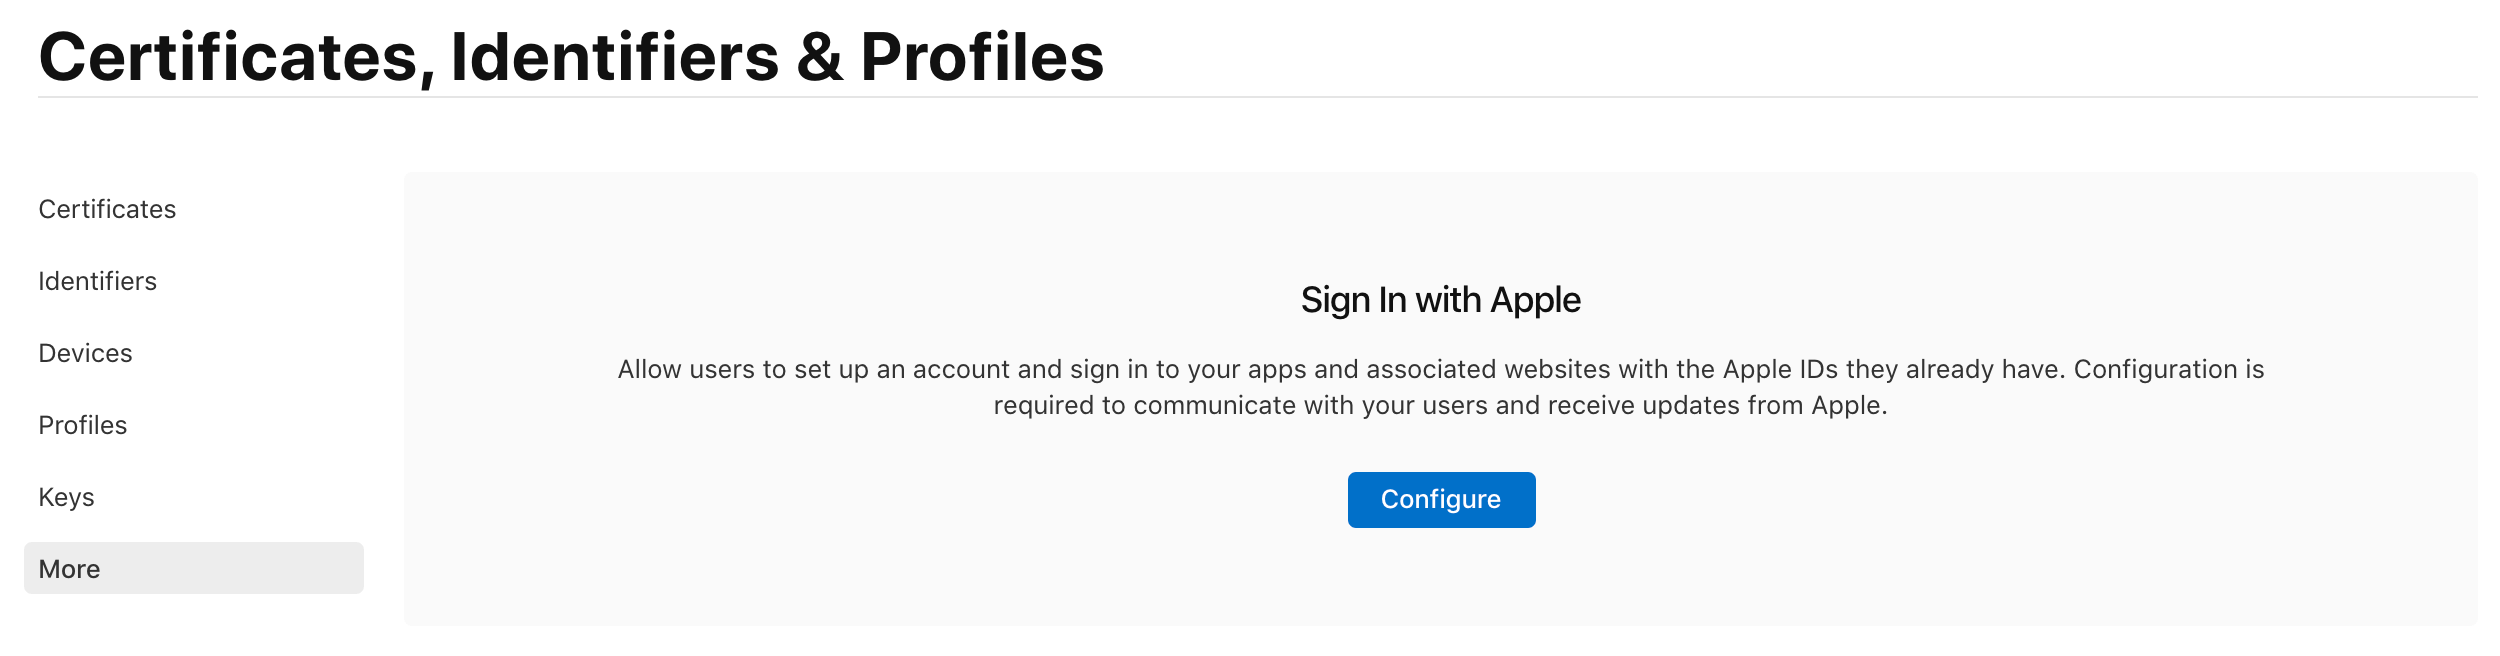
- In Certificates, Identifiers & Profiles, select More from the sidebar, and click Configure Sign in with Apple.
- In the "Domains and Associated Email Addresses" section, enter your domain name, and click Register.
- Once registered, click Download, place the downloaded file (
apple-developer-domain-association.txt) in the specified location (https://example.com/.well-known/apple-developer-domain-association.txt), then click Verify.

- A green checkmark will appear when the domain has passed verification and is registered to your account.

All email addresses associated with your registered domains will be able to send and receive messages to and from customers using Apple’s private email relay service.
If you don't want that, you can also add individual email addresses one by one.
Register Communication Emails
-
In Certificates, Identifiers & Profiles, select More from the sidebar, and click Configure Sign in with Apple.
-
In "Individual Email Addresses" section, enter the email address you will use to contact your customers and click Register. Registration will fail if the domain does not publish an SPF DNS TXT record.
-
A green checkmark will appear when the email domain has passed validation and is registered to your account.

Send and Receive Emails
That's all you need to do to send and receive emails with a private email. Let's try it out.
After you register your outbound email domains, you can send emails to users through the private email relay service.
I try sending an email from hello@sarunw.com to xxx@privaterelay.appleid.com that I got when signed in, and the message reached my primary email.
Sender email is not what you might expect
If you look at the sender, it won't be hello@sarunw.com, it will be hello_at_sarunw_com_<something>@privaterelay.appleid.com. This weird email address made a reply possible. Without this, your users will expose their original email when they reply to the message.
The relay server transforms the outbound email address, so it's readable to the user. For example, sales@xyz.com may become sales_at_xyz_com_<something>@privaterelay.appleid.com. Replies from the user are still routed back through the service to preserve the user's privacy.
If a user chooses to stop receiving email from your app, the relay server rejects all future emails sent to that address. Because the address is the same for all apps written by a development team, disabling the relay service will inform the user of all the other apps that will be affected.
Conclusion
Email is the simplest way to communicate with users. This private email feature makes sure it is only used for that purpose. Apple does a lot of hard lifting for us here. This is the feature that I hope other providers would steal.
In the next article, we will talk about the last piece of Sing in with Apple, the server.
You can easily support sarunw.com by checking out this sponsor.
Offline Transcription: Fast, privacy-focus way to transcribe audio, video, and podcast files. No data leaves your Mac.
Related Resources
- Sign in with Apple, Part 1: Apps
- Sign in with Apple, Part 3: Backend – Token verification
- Sign in with Apple, Part 4: Web and Other Platforms
- Hide My Email for Sign in with Apple
- Configure Private Email Relay Service
- Sign in with Apple
- Communicating Using the Private Email Relay Service
Outbound email is an email sent by you(developers). ↩︎
Spammers might send emails that appear to come from your domain. This is called spoofing. You can add a Sender Policy Framework (SPF) record to your domain host to help your recipients know where emails from your domain should be coming from and that they aren't spoofed. https://support.google.com/a/answer/33786?hl=en, https://en.wikipedia.org/wiki/Sender_Policy_Framework ↩︎
Read more article about Swift, Sign in with Apple, or see all available topic
Enjoy the read?
If you enjoy this article, you can subscribe to the weekly newsletter.
Every Friday, you'll get a quick recap of all articles and tips posted on this site. No strings attached. Unsubscribe anytime.
Feel free to follow me on Twitter and ask your questions related to this post. Thanks for reading and see you next time.
If you enjoy my writing, please check out my Patreon https://www.patreon.com/sarunw and become my supporter. Sharing the article is also greatly appreciated.
Become a patron Buy me a coffee Tweet Share