Sign in with Apple Tutorial, Part 4: Web and Other Platforms
Table of Contents
The fourth part of a series Sign in with Apple (And maybe the last part). This part is less related to us, iOS developer, let's explore it to see what we might need to do to support this on web and other platforms.
- Sign in with Apple, Part 1: Apps
- Sign in with Apple, Part 2: Private Email Relay Service
- Sign in with Apple, Part 3: Backend – Token verification
- Sign in with Apple, Part 4: Web and Other Platforms
Behind the scene
As I remembered, Apple didn't mention OAuth or OpenID Connect in their WWDC session or documentation. Luckily Apple didn't introduce their own wheel but adopt the existing open standards OAuth 2.0 and OpenID Connect (Hybrid Flow). They use the same terminology and API calls. If you're familiar with these technologies, Sign in with Apple shouldn't be a problem for you. If you aren't familiar with OAuth and OpenID Connect, don't worry. I will guide you through all of the flow and dance needed.
Let's begin from the frontend, the button.
You can easily support sarunw.com by checking out this sponsor.
AI Grammar: Correct grammar, spell check, check punctuation, and parphrase.
Configuring Your Webpage for Sign In with Apple
Ensure your webpage is ready to authorize users through Sign In with Apple.
Embed Sign In with Apple JS in Your Webpage
Use the script tag and link to Apple’s hosted version of the Sign In with Apple JS framework:
<script type="text/javascript" src="https://appleid.cdn-apple.com/appleauth/static/jsapi/appleid/1/en_US/appleid.auth.js"></script><html>
<head>
<meta name="appleid-signin-client-id" content="[CLIENT_ID]">
<meta name="appleid-signin-scope" content="[SCOPES]">
<meta name="appleid-signin-redirect-uri" content="[REDIRECT_URI]">
<meta name="appleid-signin-state" content="[STATE]">
</head>
<body>
<div id="appleid-signin" class="signin-button" data-color="black" data-border="true" data-type="sign in"></div>
<script type="text/javascript" src="https://appleid.cdn-apple.com/appleauth/static/jsapi/appleid/1/en_US/appleid.auth.js"></script>
</body>
</html>You can also configure the authorization object using the JavaScript APIs and display a Sign In with Apple button, as in the following example:
<html>
    <head>
    </head>
    <body>
        <script type="text/javascript" src="https://appleid.cdn-apple.com/appleauth/static/jsapi/appleid/1/en_US/appleid.auth.js"></script>
        <div id="appleid-signin" data-color="black" data-border="true" data-type="sign in"></div>
        <script type="text/javascript">
            AppleID.auth.init({
                clientId : '[CLIENT_ID]',
                scope : '[SCOPES]',
                redirectURI: '[REDIRECT_URI]',
                state : '[STATE]'
            });
        </script>
    </body>
</html>
Your page would look something like this:

At this moment, there is a bug in the script. You can monkey patch it with some CSS trick, here is mine:
.signin-button > div > div > svg {
  height: 50px;
  width: 100%;
}
Now we have a proper sign-in button.

If you click on the button right now, you will get an invalid client error, which is not a surprise since our value in meta tag still be placeholder value.

To make this work, we need to provide four values. I will show you how to get those values (client id, scopes, redirect URL, and state).
Parameters
Client ID & Redirect URL
First, you need to have a client id to represent your application. Apple called this Services ID in the Apple developer portal.
- Go to Identifiers menu in Certificates, Identifiers & Profiles
- Choose Services IDs

- Define the name of the app that the user will see during the login flow, as well as define the identifier, which becomes the OAuth
client_id. - Check the Sign In with Apple checkbox.
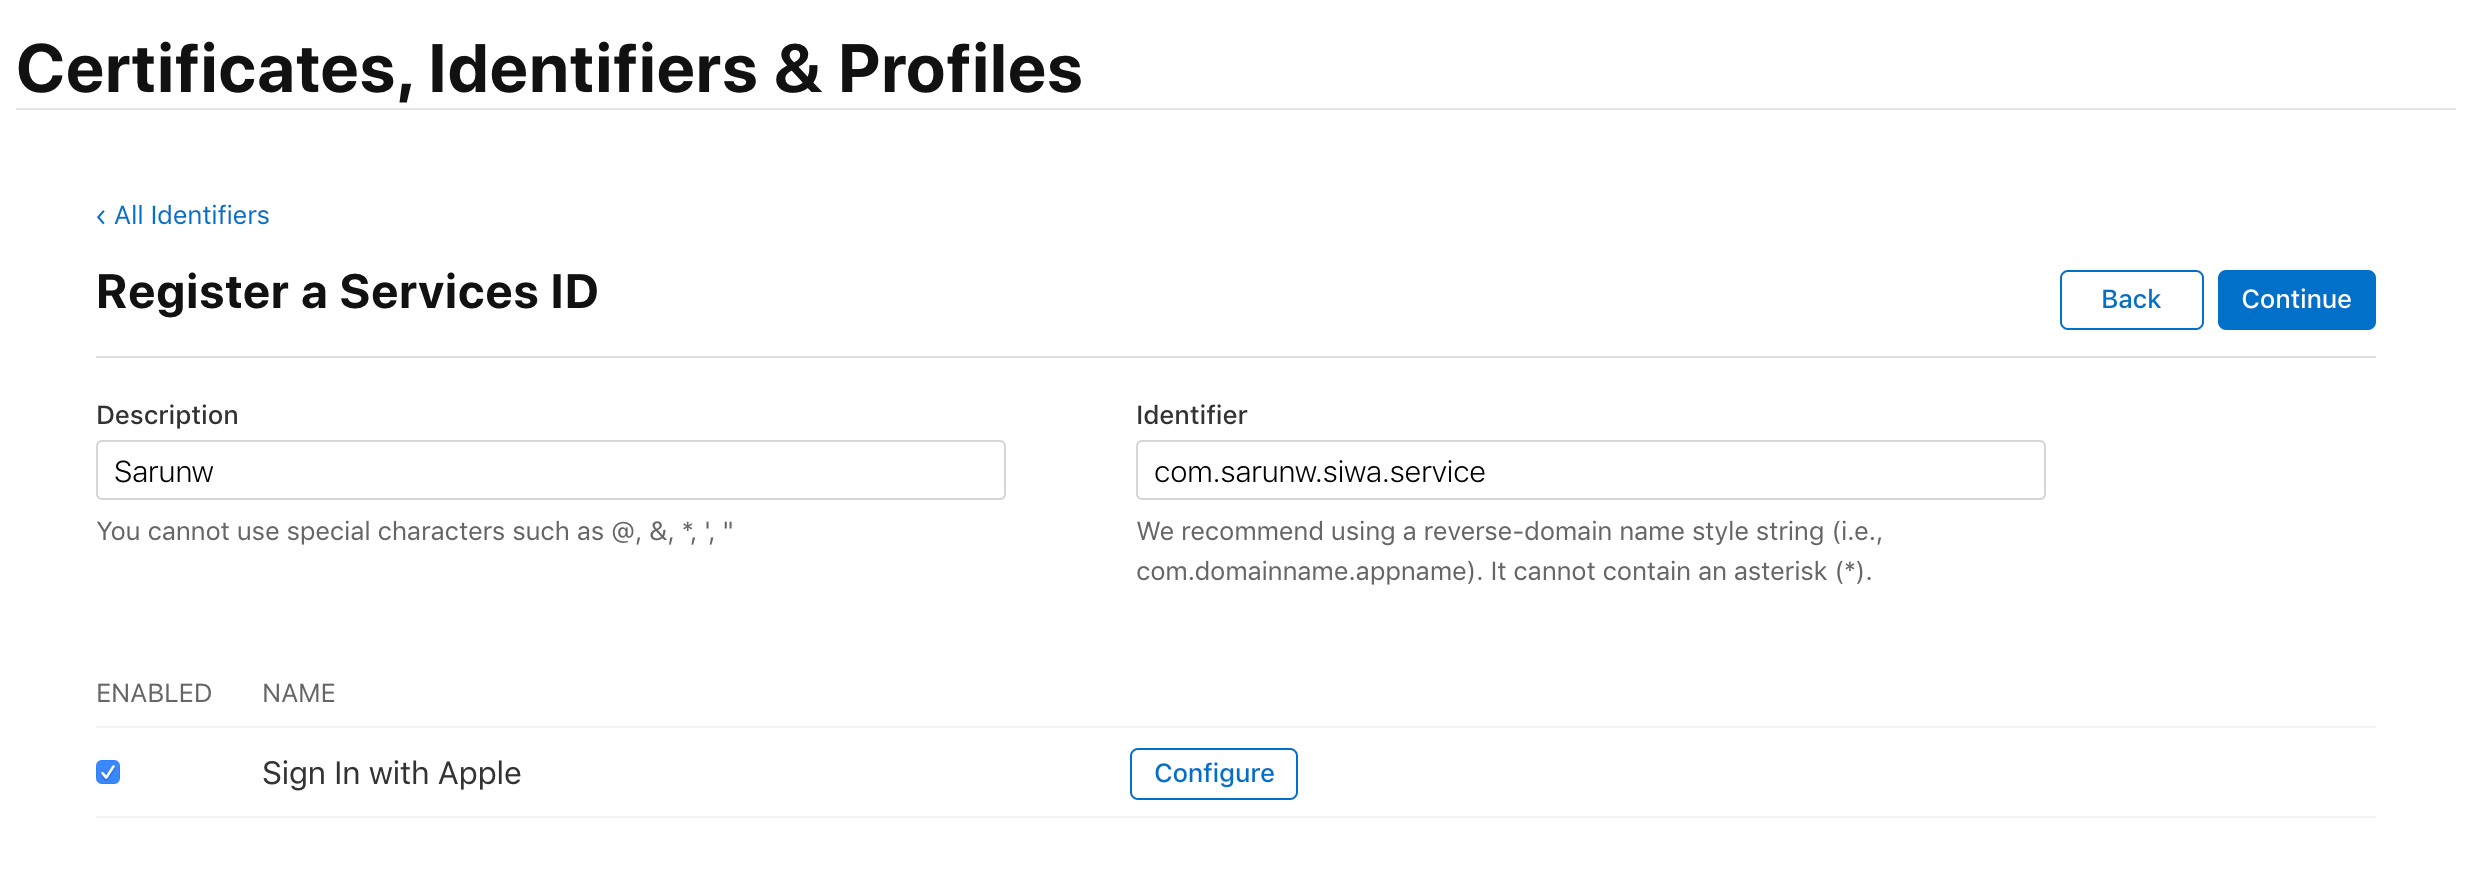
- Click the Configure button next to Sign in with Apple. This is where you define the domain your app is running and redirect URLs for OAuth flow.
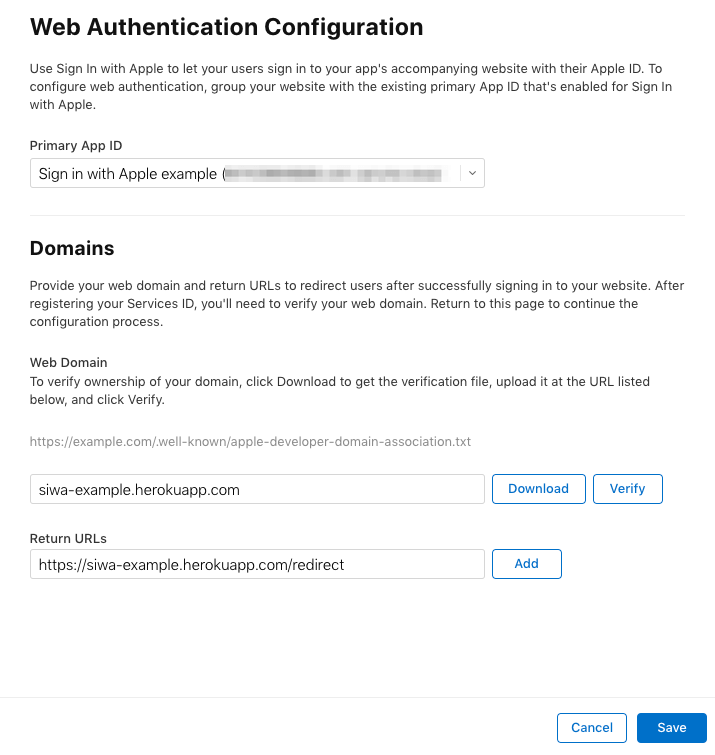
We just created a Services ID (client_id) and a redirect URL that are required to initiate Sign in with Apple (Authentication Request[1] step in OpenID Connect flow).
Scope
The scope is the amount of user information requested from Apple[2]. Right now, there are only two options name and email. You can request the user’s name or email. You can also choose to request both or neither.
State
State is a parameter defined in OAuth protocol[3] used to mitigate CSRF attacks[4]. It can be any string; just make sure it is unique and non-guessable value.
After you know how to get and generate those parameters, replace all the placeholders, and try signing in again. This time everything would work as it should be. You will be redirected to Apple.com and prompt with Sign in form.

Configuring Sign In with Apple Buttons
Use CSS styles and data attributes to display and configure Sign In with Apple buttons in browsers.
Size
Control the size of the button by adding a class that contains the desired CSS width and height styles.
.signin-button {
  width: 210px;
  height: 40px;
}
The above example is coming from the Apple documentation, but it does not work as expected at the moment. I hack around with the following instead.[5]
.signin-button > div > div > svg {
  height: 50px;
  width: 100%;
}
Text
You can change the text in the button by setting the data-type property to one of the following values:
sign in. (Default) For the Sign In with Apple button.continue. For the Continue with Apple button.
Background Color
Specify the background color of the Sign In with Apple button by setting the data-color property to one of the following values:
black. (Default) Sets the background of the button to black.white. Sets the background of the button to white.
Border
Specify the border for the Sign In with Apple button by setting the data-border property to one of the following values:
false. (Default) The button doesn’t have a border.true. Draws a border around the button.
Corner Radius
Use CSS to control the corner radius like you normally do.
.signin-button {
  border-radius: 10px;
}
Demo
We are not finished yet, but let see how far we can go with the information we have now.
- Click Sign in with Apple button now direct you to Apple.com and prompt users to sign in.
If this is your first time, you might see two-factor authentication dialog.

- After pass two-factor authentication, you will see a prompt confirming that you want to sign in to this application using your Apple ID along with information that will be shared with the app.
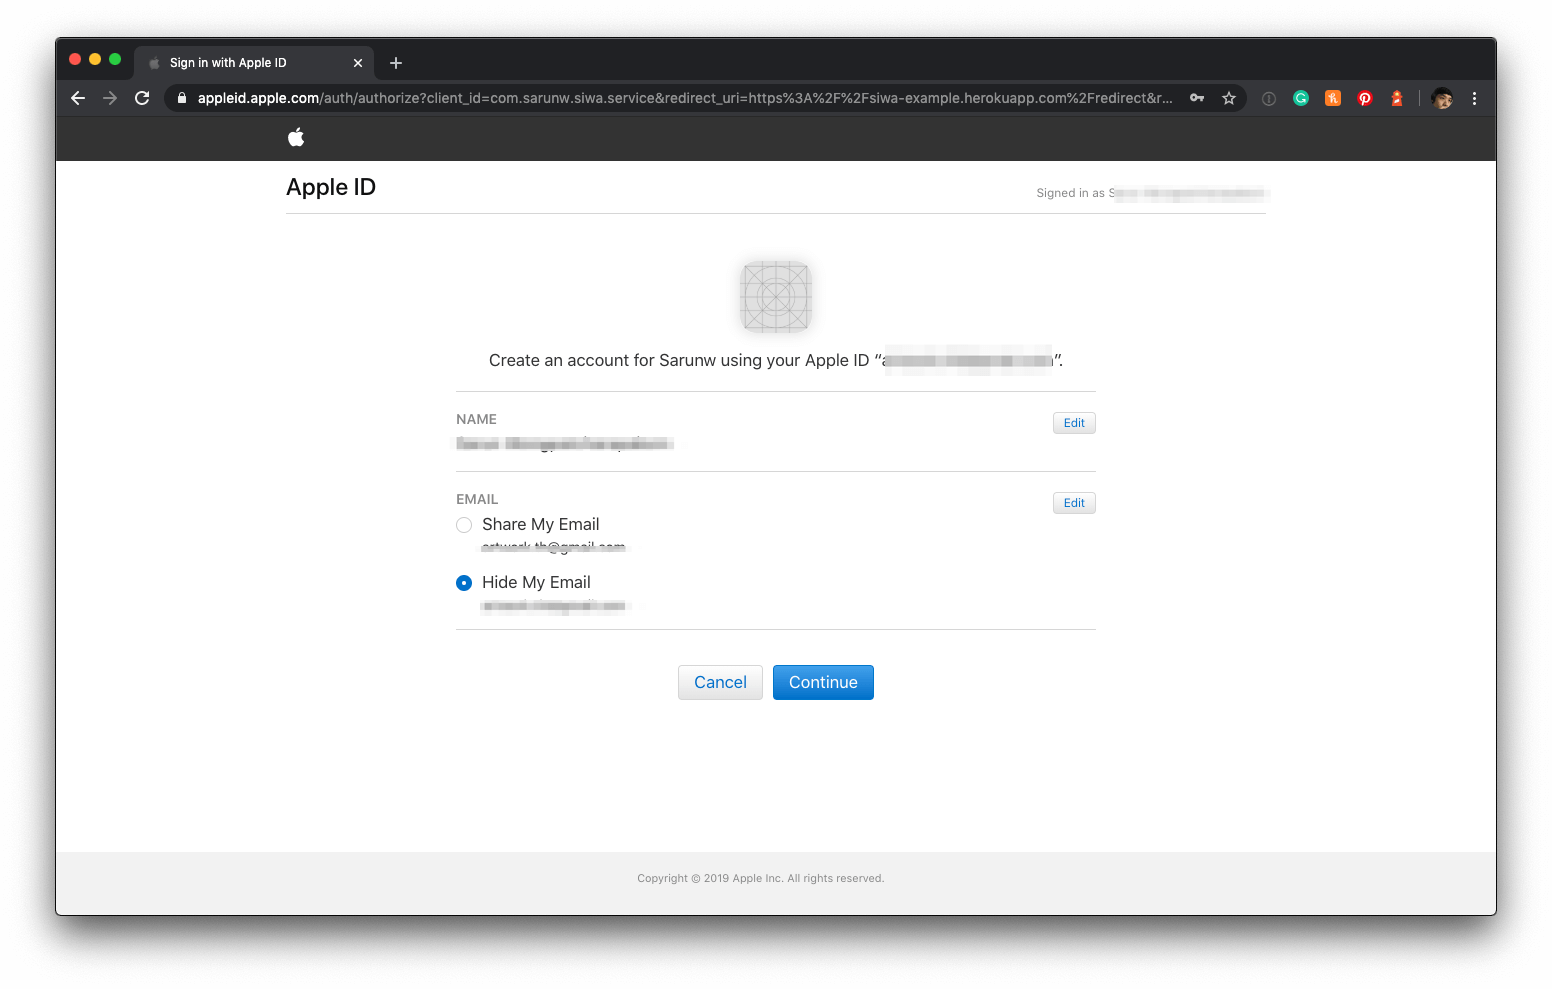
- You can edit that information by click on Edit buttons

- Click Continue and you will be redirected back to your app, which will be failed since we didn't implement any logic to handle the redirect.

As you can see, we can go a bit far with the information we got. We redirected back to what we put in <meta name="appleid-signin-redirect-uri" content="[REDIRECT_URI]"> (https://siwa-example.herokuapp.com/redirect).
Handle the Redirect
This is where we handle Authentication Response[6]. The default response_type for Authentication Request generated from Apple JS is code id_token, so we would get state, id_token, and code along with user in the response.
The Apple default button is making a request with response_mode equal to form_post[8] (which is required if you requested any scopes) which will make an HTTP POST to the client with Authorization Response parameters.
Here is a very simple Rails application to handle the POST response.
Payload:
{
   "state": "xxx",
   "code": "yyy",
   "id_token": "zzz",
   "user": {
        "name": {
            "firstName":"John",
            "lastName":"Doe"
        },
        "email":"example@privaterelay.appleid.com"
    }
}
Application code:
# home_controller.rb
class HomeController < ApplicationController
  skip_before_action :verify_authenticity_token, only: :redirect

  def index
    state = Digest::SHA1.hexdigest(SecureRandom.random_bytes(1024))
    session[:state] = state
  end

  def redirect
    @state = params[:state]
    @code = params[:code]
    @id_token = params[:id_token]
    @user = parmas[:user]

    # TODO: Validation

    render 'redirect'
  end
end

# redirect.html.erb
Redirect Completed

<h1>Code</h1>
<p><%= @code %></p>

<h1>State(<%= session[:state] %>)</h1>
<p><%= @state %></p>

<h1>ID TOKEN</h1>
<p><%= @id_token %></p>

<h1>User</h1>
<p><%= @user %></p>
Sign in again, but this time the redirect will be successful with four values code, state, user, and id_token.

Response Validation
At this point, we got everything we need to create an account. You can get sub (Apple user's unique ID) and user information in user, but don't just blindly trust everything from a network. You need to validate these information before use[9].
State Validation
We use state to mitigate Cross-Site Request Forgery[4:1]. We verify the state parameter by matches the one we sent at the beginning with the one we get back from the response.
def redirect
  @code = params[:code]

  if @code.present? && session[:state] == @state
    session.delete(:state)
    ...
  end
  ...
end
Full detail spec can be found here
ID Token (id_token) Validation
ID Token[7:1] is a JSON Web Token (JWT) contain a set of user attributes, which are called claims.
Apple id_token contains following information:
// Header
{
  "kid": "AIDOPK1",
  "alg": "RS256"
}
// Payload
{
  "iss": "https://appleid.apple.com",
  "aud": [Services ID that we registered at the beginning],
  "exp": 1579073561,
  "iat": 1579072961,
  "sub": [Apple User Identifier],
  "c_hash": "Q4ZkNP4SB2f-m9vtLfO0UA",
  "email": [EMAIL],
  "email_verified": "true",
  "is_private_email": "true",
  "auth_time": 1579072961
}
I already show you how to validate JWT in my previous article, Sign in with Apple, Part 3: Backend – Token verification. Following are the fields you should validate:
| Key | Description | Note |
|---|---|---|
| iss (issuer) | The issuer registered claim key. | Should come from Apple (https://appleid.apple.com in this case) |
| aud (audience) | The audience registered claim key. | Must matched a Services ID (client_id) that you created in Client ID & Redirect URL` |
| exp (expiration) | The expiration time registered claim key. | The current time MUST be before the time represented by the exp Claim |
| iat (issued at) | The issued at registered claim key, the value of which indicates the time at which the token was generated. | You can check elapsed time since this issued time if you need custom expiration duration. |
You must also validate the signature of the ID Token with Apple's public key. I already wrote a rough how-to in my previous post How to verify the token. You can check it out there.
Full detail spec can be found here
Authorization Code (code) Validation
Token Request flow exchange Authorization Code (code) with access_token and id_token. As we always do, we need to validate the Authorization code before doing the exchange.
To do that, we need to compare the code we get with c_hash (Code Hash) value in the id_token. You can't just compare it, as a name imply Code Hash is a hash value of code. To compare it, you need to know what Code Hash represented.
c_hashCode hash value. Its value is the base64url encoding of the left-most half of the hash of the octets of the ASCII representation of the code value, where the hash algorithm used is the hash algorithm used in the alg Header Parameter of the ID Token's JOSE Header. For instance, if the alg is HS512, hash the code value with SHA-512, then take the left-most 256 bits and base64url encode them. The c_hash value is a case sensitive string.
If the ID Token is issued from the Authorization Endpoint with a code, which is the case for the response_type values code id_token and code id_token token, this is REQUIRED; otherwise, its inclusion is OPTIONAL.
– https://openid.net/specs/openid-connect-core-1_0.html#HybridIDToken
To sum it up, these are steps you need to do:
- Hash the octets of the ASCII representation of the code with the SHA-256 algorithm.
- Take the left-most half of the hash and base64url encode it.
- Compare
c_hashwith the one you got in step 2.
Full detail spec can be found here
Here is an example in Ruby:
c_hash = "xxx"
code = "yyy"
hash_code = Digest::SHA256.digest code
base64url_encode = Base64.urlsafe_encode64(hash_code[0, hash_code.size/2.to_i], padding: false)

if base64url_encode == c_hash
  # Valid
end
Exchange authorization code with an access token
The final part of the flow is to exchange authorization code for an access token. The endpoint and parameters are documents in Apple Documentation
Endpoint:
POST https://appleid.apple.com/auth/tokenParameters:
| Key | Description | Note |
|---|---|---|
| client_id | The application identifier for your | com.sarunw.siwa.client in my case. |
| client_secret | A secret generated as a JSON Web Token that uses the secret key generated by the WWDR portal. | I will tell you how to get it in the next section |
| code | The authorization code received from your application’s user agent. The code is single use only and valid for five minutes. | The one that we got from Authorization Response |
| grant_type | The grant type that determines how the client interacts with the server. For authorization code validation, use authorization_code. For refresh token validation requests, use refresh_token. |
Use authorization_code |
| redirect_uri | The destination URI the code was originally sent to. |
At this point, we can fill in every parameter but one, client_secret. Let's see how to get that.
Create a Sign in with Apple private key
To get a client_secret, we need to create an Apple private key for Sign in with Apple service first.
-
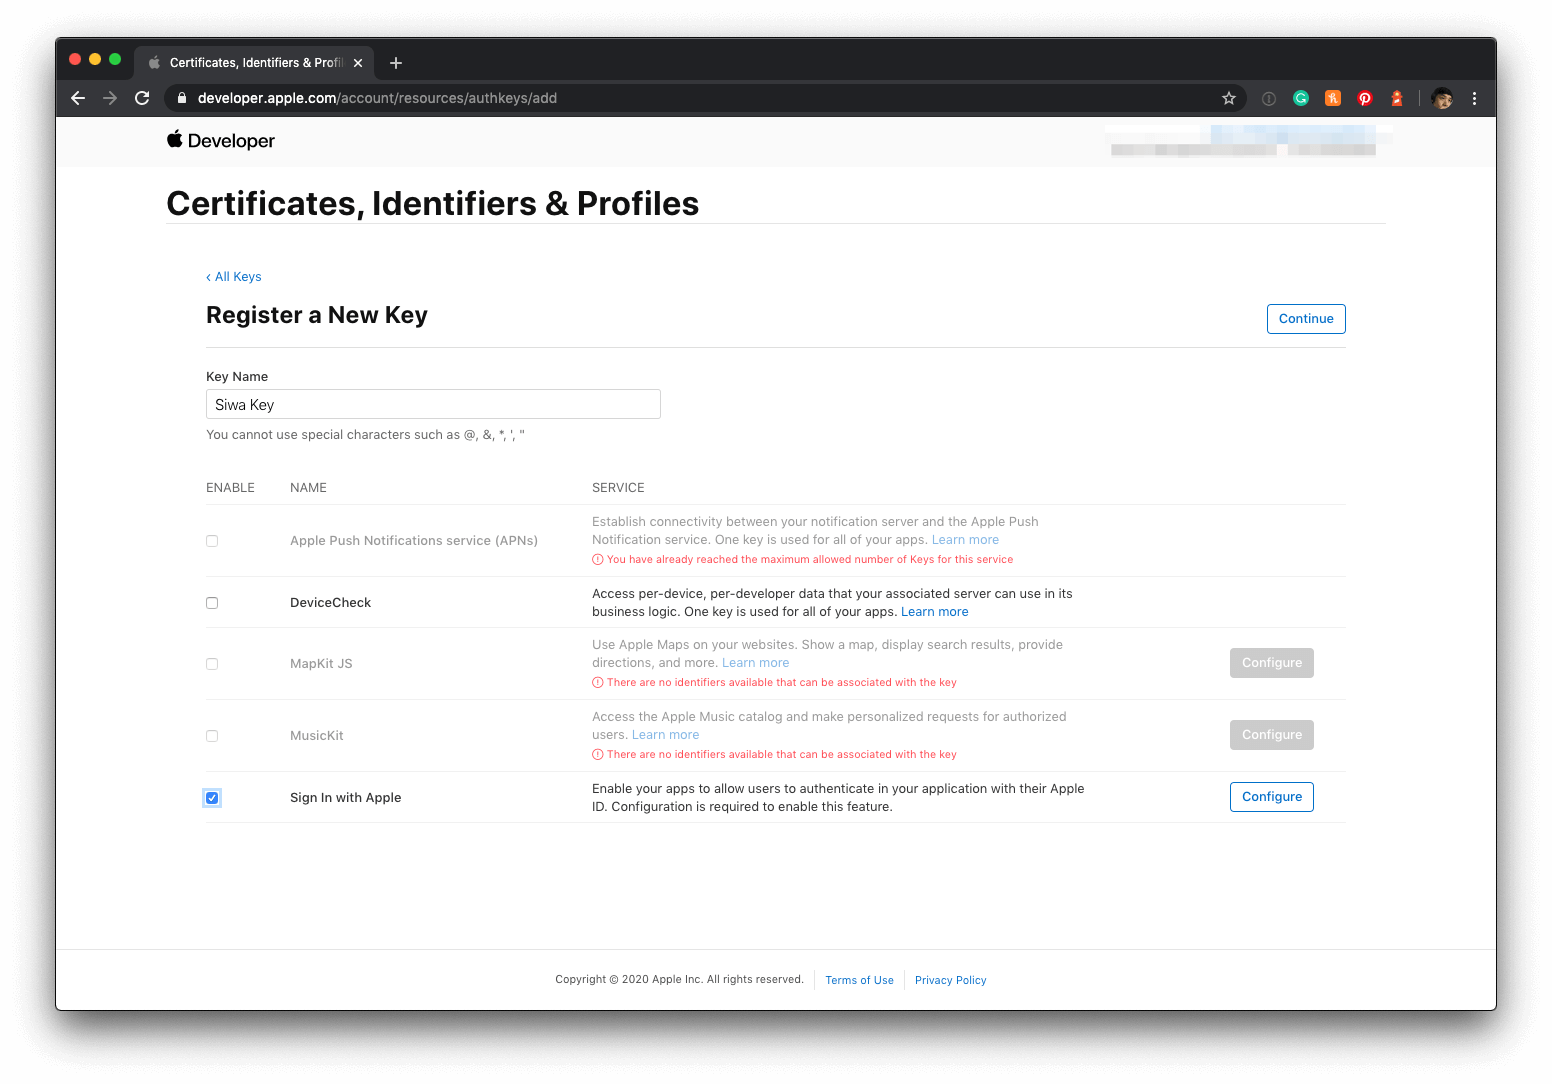
Go to Identifiers menu in Certificates, Identifiers & Profiles
-
Choose Key
-
Click the blue plus icon to register a new key. Give your key a name, and check the Sign In with Apple checkbox.
![]()
-
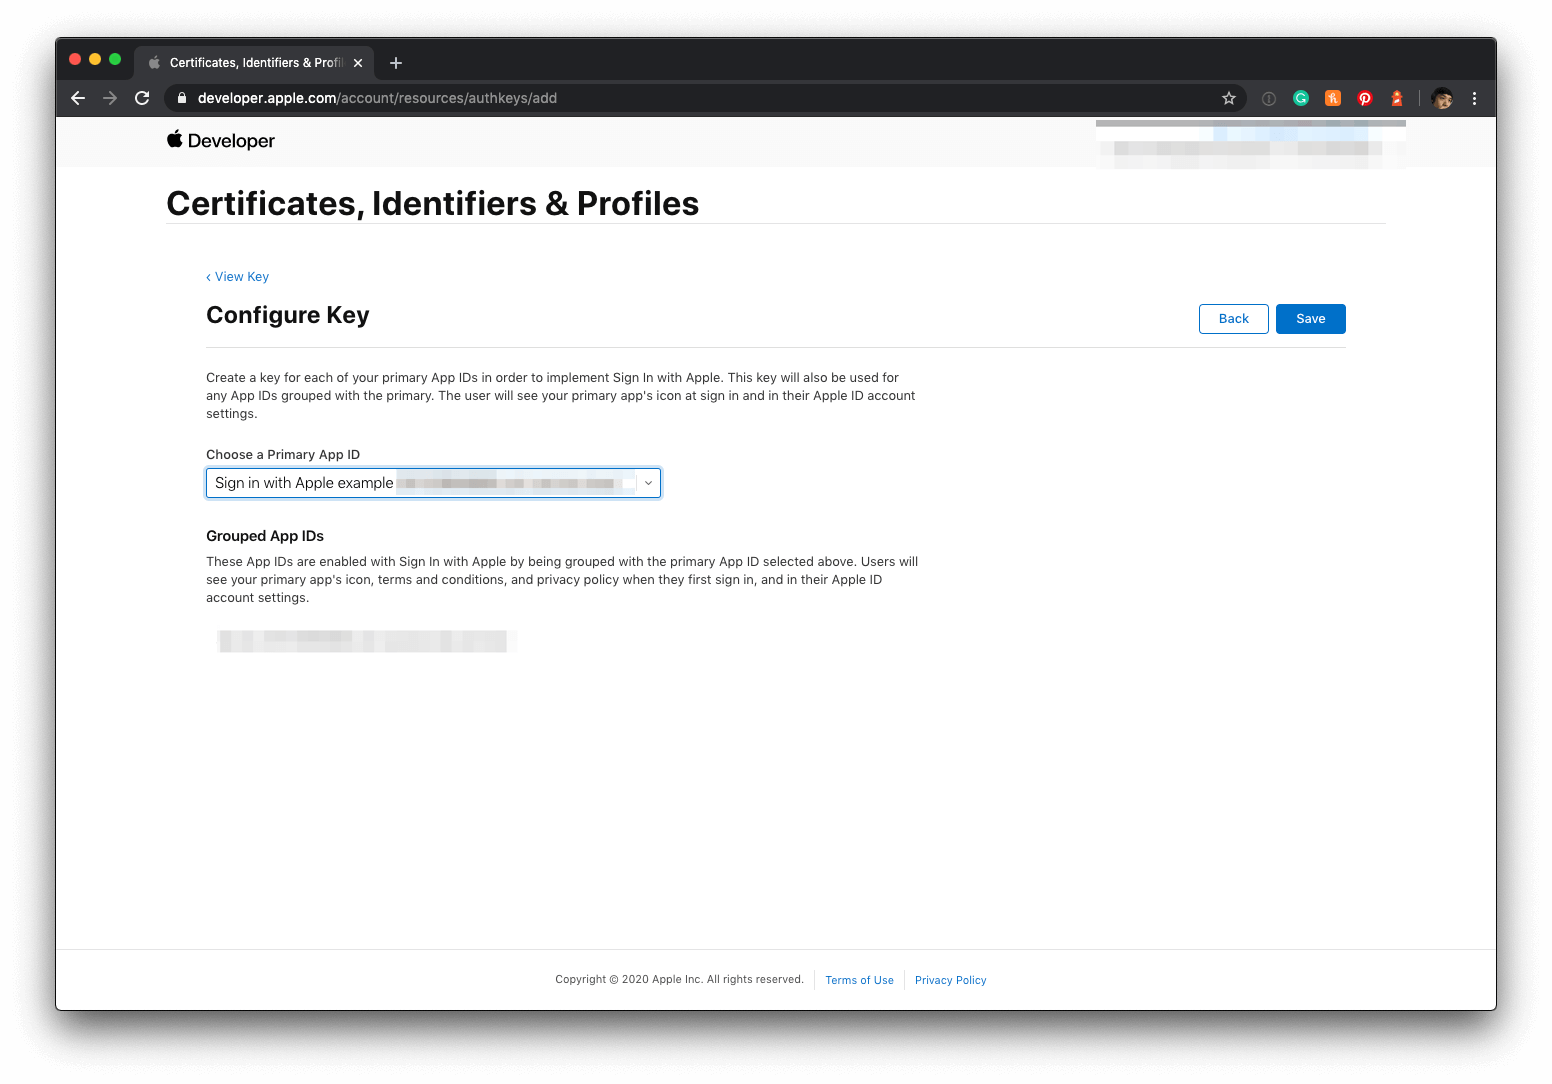
Click the Configure button and select the primary App ID you created earlier.
![]()
-
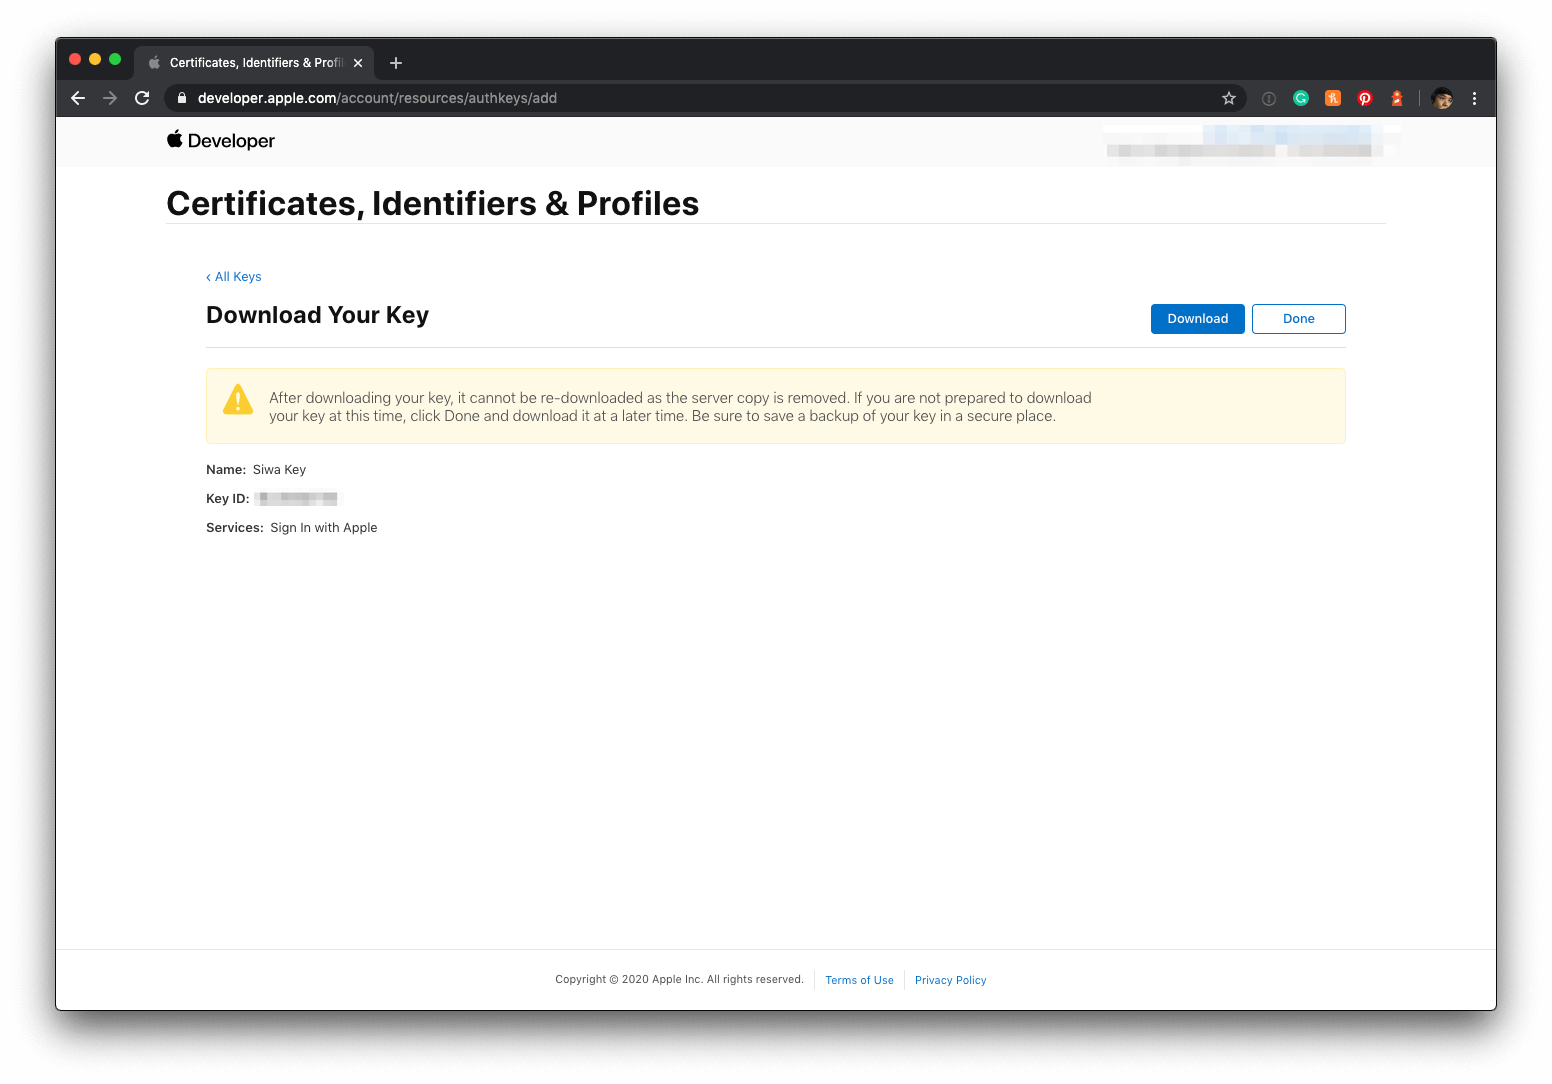
Apple will generate a new private key for you and let you download it only once. Make sure you save this file because you won’t be able to get it back again later! The file you download will end in .p8. You also get key identifier (
kid) (The key identifier appears below the key name.)[12]
![]()
Creating the Client Secret
Client secret is in JWT format with following header and payload:
// Header
{
  "kid": "[KEY_ID]",
  "alg": "ES256"
}
// Payload
{
  "iss": "[TEAM_ID]",
  "iat": 1579087819,
  "exp": 1594639819,
  "aud": "https://appleid.apple.com",
  "sub": "[CLIENT_ID]"
}
Header
| Key | Description | Note |
|---|---|---|
| alg | The algorithm used to sign the token. | ES256 in this case. |
| kid | A 10-character key identifier obtained from your developer account. | We already got this Step 5. in the previous steps. |
Payload
| Key | Description | Note |
|---|---|---|
| iss | The issuer registered claim key, which has the value of your 10-character Team ID, obtained from your developer account. | Log in to your Apple Developer Account and click on Membership section on the left panel, you will see your Team ID there. |
| iat | The issued at registered claim key, the value of which indicates the time at which the token was generated, in terms of the number of seconds since Epoch, in UTC. | |
| exp | The expiration time registered claim key, the value of which must not be greater than 15777000 (6 months in seconds) from the Current Unix Time on the server. | |
| aud | The audience registered claim key, the value of which identifies the recipient the JWT is intended for. Since this token is meant for Apple, use https://appleid.apple.com. |
Use https://appleid.apple.com |
| sub | The subject registered claim key, the value of which identifies the principal that is the subject of the JWT. Use the same value as client_id as this token is meant for your application | Use a Services ID that we created in Client ID & Redirect URL |
Here comes another tricky part. After you have everything in place, you need to sign it with the private key generated from Create a Sign in with Apple private key.
From Apple Documentation
After creating the token, sign it using the Elliptic Curve Digital Signature Algorithm (ECDSA) with the P-256 curve and the SHA-256 hash algorithm. Specify the value ES256 in the algorithm header key. Specify the key identifier in the kid attribute.
In my case, I use ruby-jwt
pem_content = <<~EOF
-----BEGIN PRIVATE KEY-----
xxxxx......
-----END PRIVATE KEY-----
EOF

ecdsa_key = OpenSSL::PKey::EC.new pem_content

headers = {
    'kid' => 'key_id'
}

claims = {
    'iss' => 'team_id',
    'iat' => Time.now.to_i,
    'exp' => Time.now.to_i + 86400*180,
    'aud' => 'https://appleid.apple.com',
    'sub' => 'client_id',
}

token = JWT.encode claims, ecdsa_key, 'ES256', headers
This is the JWT client secret.
token = JWT.encode claims, ecdsa_key, 'ES256', headersConclusion
This article should give you enough information for you to implement Sign in with Apple yourself (if you are a solo developer) or if you have a backed team, you should be able to find every value your colleagues would ask for.
I can't cover all the detail here (I provided a lot of references in Related Resources section and footnote for further reading), but I think I cover all the basics you should know to implement Sign in with Apple in your application.
If you have any feedback, comment, or any mistakes on this series, you can contact me via email or Twitter; I would love to hear from you.
You can easily support sarunw.com by checking out this sponsor.
AI Grammar: Correct grammar, spell check, check punctuation, and parphrase.
Related Resources
- Sign in with Apple, Part 1: Apps
- Sign in with Apple, Part 2: Private Email Relay Service
- Sign in with Apple, Part 3: Backend – Token verification
- Sign in with Apple – Get started
- Sign in with Apple JS
- Sign in with Apple REST API
- Generate and validate tokens
- Configuring Your Webpage for Sign In with Apple
- Incorporating Sign in with Apple into Other Platforms
- Displaying and Configuring Sign In with Apple Buttons
- Human Interface Guidelines – Sign in with Apple
- What the Heck is Sign In with Apple?
- Open ID Connect
- Open ID Specification
- OpenID Connect explained
- OpenID Connect explained in plain English
- Hybrid Flow
- ID Token Validation
- Authorization Code Validation
Authentication request for Hybrid flow https://openid.net/specs/openid-connect-core-1_0.html#HybridAuthRequest ↩︎
https://developer.apple.com/documentation/signinwithapplejs/clientconfigi/3230955-scope, https://developer.apple.com/documentation/signinwithapplejs/configuring_your_webpage_for_sign_in_with_apple ↩︎
State Parameter https://auth0.com/docs/protocols/oauth2/oauth-state, Authorization Request spec https://tools.ietf.org/html/rfc6749#section-4.1.1 ↩︎
Cross-site request forgery https://en.wikipedia.org/wiki/Cross-site_request_forgery, The OAuth 2.0 Authorization Framework - 10.12. Cross-Site Request Forgery https://tools.ietf.org/html/rfc6749#section-10.12 ↩︎ ↩︎
Successful Authentication Response https://openid.net/specs/openid-connect-core-1_0.html#HybridAuthResponse ↩︎
ID Token https://openid.net/specs/openid-connect-core-1_0.html#IDToken, Standard Claims https://openid.net/specs/openid-connect-core-1_0.html#StandardClaims ↩︎ ↩︎
OAuth 2.0 Form Post Response Mode
Abstract https://openid.net/specs/oauth-v2-form-post-response-mode-1_0.html ↩︎Full spec of Authentication Response Validation can be found here https://openid.net/specs/openid-connect-core-1_0.html#HybridAuthResponseValidation ↩︎
There is also a Token Request flow https://openid.net/specs/openid-connect-core-1_0.html#HybridTokenRequest, https://openid.net/specs/openid-connect-core-1_0.html#TokenRequest ↩︎ ↩︎ ↩︎
Authentication using the Authorization Code Flow https://openid.net/specs/openid-connect-core-1_0.html#CodeFlowAuth ↩︎
https://help.apple.com/developer-account/#/dev77c875b7e, https://help.apple.com/developer-account/#/devcdfbb56a3, https://help.apple.com/developer-account/#/dev646934554 ↩︎
Read more article about Swift, Sign in with Apple, or see all available topic
Enjoy the read?
If you enjoy this article, you can subscribe to the weekly newsletter.
Every Friday, you'll get a quick recap of all articles and tips posted on this site. No strings attached. Unsubscribe anytime.
Feel free to follow me on Twitter and ask your questions related to this post. Thanks for reading and see you next time.
If you enjoy my writing, please check out my Patreon https://www.patreon.com/sarunw and become my supporter. Sharing the article is also greatly appreciated.
Become a patron Buy me a coffee Tweet SharePrint unescaped string output in Swift
How to print object (po) in a debugger (lldb) without escape special characters.