How to create custom operators and do operators overloading in Swift
Table of Contents
What is the operator
An operator is a special symbol that you use with one or more values to produce a specific result. For example, the addition operator (+) adds two numbers and resulting in the sum between those two, as in let i = 1 + 2.
You can think of it as a function with a unique name that can call in unusual places such as front, between, and after the value. You will see in the later section how creating a custom operator is similar to creating a function.
Before we begin to override or create a custom operator, let's learn how many types of operators we have in Swift. Which one that we can override and some limitation when we want to create a custom one.
You can easily support sarunw.com by checking out this sponsor.
Offline Transcription: Fast, privacy-focus way to transcribe audio, video, and podcast files. No data leaves your Mac.
Types of operators
We can categorize operators into three groups.
Unary operators
Binary operators
Ternary operators
Unary operators
Unary operators operate on a single target such as -1, !booleanValue. Unary can appear in two places.
- Unary prefix operators which appear immediately before their targets such as negative value (
-2) and logical not operator (!booleanValue). - Unary postfix operators which appear immediately after their target such as force unwrapping (
optionalValue!).
We can overload and create a custom prefix and postfix operator.
Binary operators
Binary operators operate on two targets (such as 2 + 3). It can only appear in between their two targets, infix operator.
We can overload and create a custom infix operator.
Ternary operators
Ternary operators operate on three targets, such as the ternary conditional operator (a ? b : c).
We can't overload or create this kind of operator.
Limitation
Not every type of operator can be overload. There are four restrictions that I know of:
- You can't overload and create a custom ternary operator.
- You can't overload the default assignment operator (
=). You can overload other binary operators, including compound assignment operators such as a += 2. - Only a subset of the ASCII characters are supported. You can check the full list here.
- Some characters and combinations are reserved for some operators. You can check the full list here.
Since we can't overload or create ternary operators, that left us with three kinds of operators to play with:
Prefix
Postfix
Infix
Now that we know its limitation, let's try overloading existing operators, then defining your own.
Overloading the existing operators
Operator overloading lets us declare multiple operators of the same name with different implementations, in this case, different operands[1] and return type.
Infix
Let's start with overloading infix operators.
Overload new operator on strings
Swift supports the four standard arithmetic operators for all number types:
- Addition (+)
- Subtraction (-)
- Multiplication (*)
- Division (/)
Swift string doesn't support the * operator, but we will overload the * operator to work on it. We will overload the * operator to take string and integer as arguments and produce a new string representing the given string repeated the specified number of times. The result will look like this:
let str = "Ho! "
str * 3 // "Ho! Ho! Ho! "
As I mentioned before, you can think of operators as a function with a special name. To declare overloading operators, we would do just that.
Declare as a global function
You can declare it as a global function like this.
func * (left: String, right: Int) -> String { // <1>
    return String(repeating: left, count: right) // <2>
}
Declare as static function of a class or struct
You can declare it as a static function under a class or struct. I prefer this form since it shows that the operator is a part of string capability (This is also how Swift declare the + operator on the string)
extension String {
    static func * (left: String, right: Int) -> String { // <1>
        return String(repeating: left, count: right) // <2>
    }
}
<1> We declare an infix operator that works on two operands, string, and integer, and returns a new string.
<2> We create a new string representing the given string repeated the specified number of times.
Again, here is the result:
let str = "Ho! "
str * 3 // "Ho! Ho! Ho! "
Overload existing operators with different arguments.
Swift string already overloading + operators, which concatenated two strings together.
public static func + (lhs: String, rhs: String) -> StringResult:
"Hello, " + "Swift!"
// "Hello, Swift!"
We will overload the + operator with a different argument. Our new overloading operates on string and integer and produces a string with the last character repeated equals to the second operands.
extension String {
    static func + (left: String, right: Int) -> String {
        guard let lastCharacter = left.last else { // <1>
            return left
        }
        return left + String(lastCharacter) * right // <2>
    }
}
<1> Try to get the last character.
<2> Concatenate the string with the repeated last character.
Result:
"Hello" + 5
// Helloooooo
Prefix
To overloading a prefix operator, we need to add a prefix keyword before a func.
In the following example, I overload the - unary operator for a string, which will reverse the characters in a given string.
static prefix func -(str: String) -> String { // <1>
    return String(str.reversed())
}
<1> We add the prefix keyword to tell the compiler that this is intended to use as a prefix operator.
And here is the result:
-"Hello"
// olleH
Postfix
To overloading a postfix operator, we need to add a postfix keyword before a func.
In the following example, I overload ... unary operator for string which will append "..." string at the end of the given string.
static postfix func ...(str: String) -> String { // <1>
    return str + "..."
}
<1> We add the postfix keyword to tell the compiler that this is intended to use as a postfix operator.
And here is the result:
"Hello"...
// Hello...
Adding a custom operator
If the existing operators are not enough for you, Swift allows you to define a new operator. We will create a new operator called 🦄 Unicorn operator (.^.). Then we will make this operator operate on a string.
The unicorn operator will insert a rainbow emoji 🏳️🌈 according to the operation position (prefix, postfix, infix).
Infix
The first thing we need to do is telling Swift about our new operator. We will start with the infix version of our Unicorn operator.
This is a syntax to declare a new infix operator.
infix operator .^.That's all we need to do. Now Swift knows about our new operator. We can use it the same way as we did with operator overloading.
extension String {
static func .^. (left: String, right: String) -> String { // <1>
return String("\(left)🏳️🌈\(right)") // <2>
}
}<1> We overload our new operator with string operands.
<2> Our Unicorn operator will insert a rainbow flag between two operands.
Results:
"Hello".^."Swift"
// Hello🏳️🌈SwiftPostfix
It is not much different on how to declare an infix operator. The only difference we need to make is changing the keyword from infix to postfix.
This is a syntax to declare a new postfix operator.
postfix operator .^.Then we use it just like before.
extension String {
static postfix func .^. (str: String) -> String {
return String("\(str)🏳️🌈") // <1>
}
}<1> We append a rainbow flag at the end of the string.
Results:
"Hello, Swift".^.
// Hello, Swift🏳️🌈Prefix
You might be able to guess. Here is how we declare a new prefix operator.
prefix operator .^.And here is how we implement it.
extension String {
static prefix func .^. (str: String) -> String {
return String("🏳️🌈\(str)") // <1>
}
}<1> We prepend a rainbow flag at the beginning of the string.
Results:
.^."Hello, Swift"
// 🏳️🌈Hello, SwiftThe difference between overload existing operator and a custom one
As you can see, the only difference between an overload existing operator and a custom one is declaring a new operator. If you are failing to do so, the compiler will give you this error.
Operator implementation without matching operator declaration.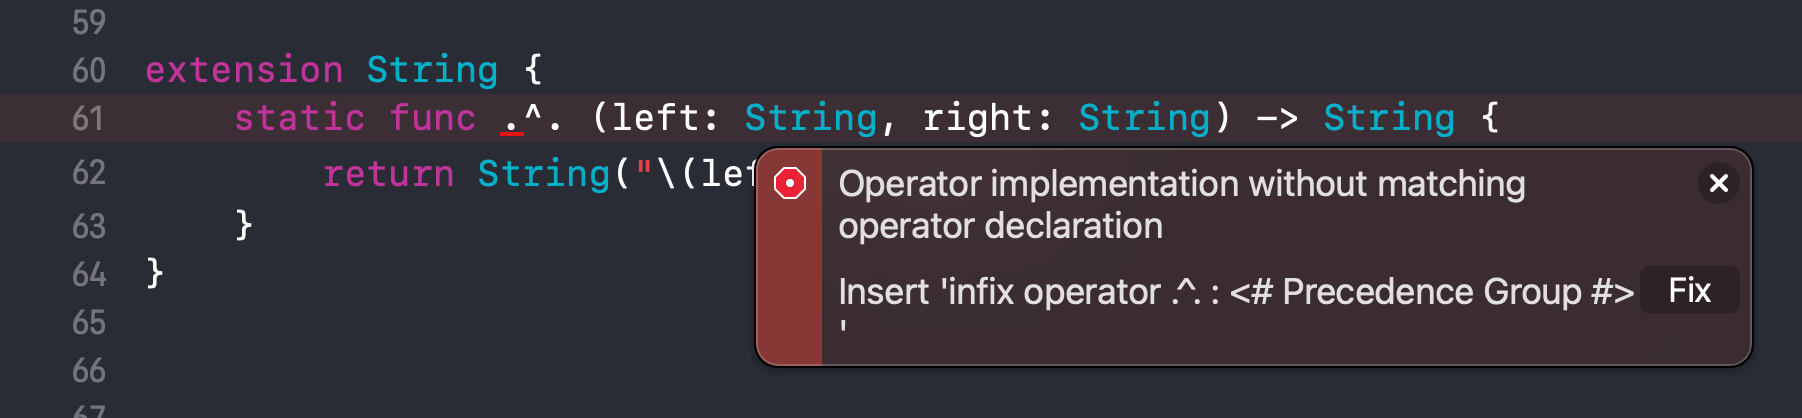
Conclusion
It might be debatable about this Swift feature whether you should use it or not. In the end, it all about trades off. Using this feature would save you from some boilerplate code but might cause poor code readability since you introduce a new syntax and implementation to the existing operators. I think you would find a fair use case out of it when the time comes.
I also leave out some implementation detail of declaring a new operator, Operator Precedence and Associativity. I think it deserves its own article and I might write about it in the future. If you don't want to miss it, Subscribe or Follow me on Twitter and get notified.
You can easily support sarunw.com by checking out this sponsor.
Offline Transcription: Fast, privacy-focus way to transcribe audio, video, and podcast files. No data leaves your Mac.
Related Resourcess
- The swift programming language
- Advanced Operators
- Lexical Structure - Operators, List of characters that can be used to define custom operators.
- Apple Documentation
The values that operators affect are operands. In the expression 1 + 2, the + symbol is a binary operator, and its two operands are the values 1 and 2. ↩︎
Read more article about Swift, Operator, or see all available topic
Enjoy the read?
If you enjoy this article, you can subscribe to the weekly newsletter.
Every Friday, you'll get a quick recap of all articles and tips posted on this site. No strings attached. Unsubscribe anytime.
Feel free to follow me on Twitter and ask your questions related to this post. Thanks for reading and see you next time.
If you enjoy my writing, please check out my Patreon https://www.patreon.com/sarunw and become my supporter. Sharing the article is also greatly appreciated.
Become a patron Buy me a coffee Tweet ShareHow to use ScrollView in SwiftUI
Part 2 in the series "Building Lists and Navigation in SwiftUI". We will explore a ScrollView, UIScrollView equivalent in SwiftUI.
List view, a UITableView equivalent in SwiftUI
Part 3 in the series "Building Lists and Navigation in SwiftUI". We will explore a List, UITableView equivalent in SwiftUI.