How to define custom Environment Values in SwiftUI
Table of Contents
One of a mechanism that SwiftUI use to pass data from one view to another is via @Environment. We learn how SwiftUI use the environment to pass value such as locale and calendar through a view hierarchy in What is @Environment in SwiftUI. In that article, I only mentioned how to read an environment value from the system predefined EnvironmentValues, but it is possible to define your own custom keys/values and that is what we are going to learn in this article.
To define Environment values you need two things.
Meet isSensitive
As a demonstration, we will create a new value called isSensitive. This value indicates whether the view is considered sensitive. We will use this to make sure we hide sensitive information within a view.
You can easily support sarunw.com by checking out this sponsor.
AI Paraphrase:Are you tired of staring at your screen, struggling to rephrase sentences, or trying to find the perfect words for your text?
Create an environment key
First, you need to define a new key for your new value. You do that by creating a type that conforms to the EnvironmentKey protocol. The only requirement for this protocol is you define a default value for the key.
private struct SensitiveKey: EnvironmentKey {
    // 1
    static let defaultValue: Bool = false
}
1 Declare a new key with a default value of false.
Even it has a word key in the name (EnvironmentKey), this is where you declare your data type. In this case, we declare boolean environment data, which you can access it using the SensitiveKey key.
Introduce new value to EnvironmentValues
Once we declare a data type and a key to access it, we introduce this newly create key/value to EnvironmentValues using an extension. We use the key defined in the last section to get and set the value.
extension EnvironmentValues {
    var isSensitive: Bool {
        get { self[SensitiveKey.self] }
        set { self[SensitiveKey.self] = newValue }
    }
}
This is a boilerplate code for adding a new value to EnvironmentValues. Just create a new variable environment value and use the key you created to access the value in getter and setter.
Add a dedicated modifier (Optional)
After creating a new key and introduce it to environmental values, we have a working environment value that you can set and access like the system-defined one.
struct ContentView: View {
    @Environment(\.isSensitive) var isSensitive

    var body: some View {
        Text("Hello")
            .environment(\.isSensitive, true)
    }
}
You can add a dedicated modifier to make it easier for users to set the new value. To do that we create a new view modifier and wrap .environment(\.isSensitive) inside.
extension View {
    func isSensitive(_ value: Bool) -> some View {
        environment(\.isSensitive, value)
    }
}
This gives a more concise syntax to override the environment value, just like some system-defined ones such as .font and .colorScheme.
Text("Hello")
    .isSensitive(true)
Demo
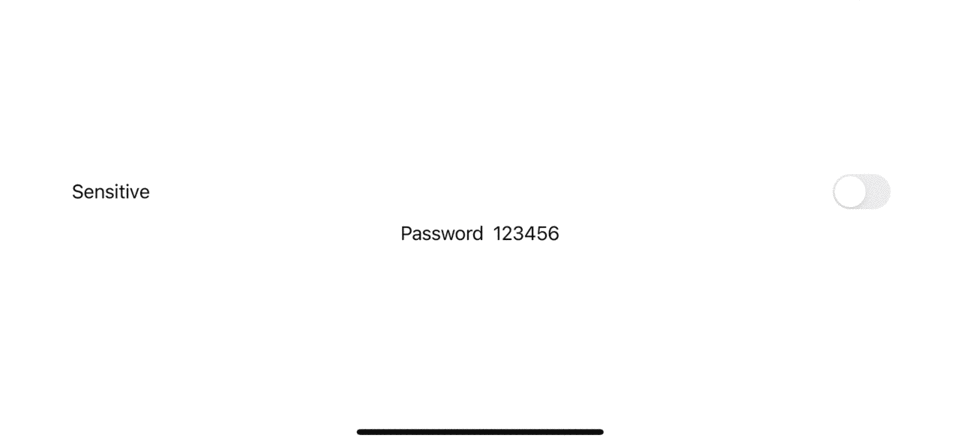
Before wrapping up, let's put this new value into use. We create a PasswordField that can react to the change of the isSensitive value.
struct PasswordField: View {
    let password: String

    // 1
    @Environment(\.isSensitive) private var isSensitive

    var body: some View {
        HStack {
            Text("Password")
            Text(password)
                .redacted(reason: isSensitive ? .placeholder: []) // 2
        }
    }
}
1 We read environment value with @Environment.
2 View then react to isSensitive value by redact the password if isSensitive is true.
Then we put this into use.
struct ContentView: View {
    // 1
    @State private var isSensitive = false

    var body: some View {
        VStack {
            // 2
            Toggle("Sensitive", isOn: $isSensitive)
            // 3
            PasswordField(password: "123456")
                .isSensitive(isSensitive)
        }.padding()
    }
}
1 We create a @State variable to control isSensitive environment value.
2 Bind the state variable to a toggle, so we can control the value.
3 Use the state variable to override isSensitive environment value of PasswordField.
Here is the result.
You can easily support sarunw.com by checking out this sponsor.
AI Paraphrase:Are you tired of staring at your screen, struggling to rephrase sentences, or trying to find the perfect words for your text?
Conclusion
It might not be obvious that we can create a custom environment value, but we can do that. The steps to create one are not as straightforward as we usually do, but it isn't hard if you know how to do it.
Here is a summary of how to create a new environment value.
// Create an environment key
private struct NewKey: EnvironmentKey {
    static let defaultValue: DataTypeForNewValue = defaultValue
}

// ## Introduce new value to EnvironmentValues
extension EnvironmentValues {
    var newEnvironmentName: DataTypeForNewValue {
        get { self[NewKey.self] }
        set { self[NewKey.self] = newValue }
    }
}

// Add a dedicated modifier (Optional)
extension View {
    func newModifier(_ value: DataTypeForNewValue) -> some View {
        environment(\.newEnvironmentName, value)
    }
}
Read more article about SwiftUI or see all available topic
Enjoy the read?
If you enjoy this article, you can subscribe to the weekly newsletter.
Every Friday, you'll get a quick recap of all articles and tips posted on this site. No strings attached. Unsubscribe anytime.
Feel free to follow me on Twitter and ask your questions related to this post. Thanks for reading and see you next time.
If you enjoy my writing, please check out my Patreon https://www.patreon.com/sarunw and become my supporter. Sharing the article is also greatly appreciated.
Become a patron Buy me a coffee Tweet ShareHow to reference a method with the same name and parameters but a different return type in Swift
Trying to reference two methods with the same name and parameters will cause an ambiguous compile error. Learn how to resolve it.
How to set custom CodingKey for the convertFromSnakeCase decoding strategy
The thing you should know before using the convertFromSnakeCase decoding strategy.