SwiftUI's ViewModifier
Table of Contents
View modifier is a very important concept of SwiftUI. If you have a chance to play around with SwiftUI you might have seen one already - e.g. .background, .padding, etc.
SwiftUI already provided plenty of modifiers, but you can also create a custom one with a simple protocol, ViewModifier.
What is ViewModifier?
As you might be able to imply from the name.
ViewModifier is a modifier that you apply to a view or another view modifier, producing a different version of the original value.
It is a simple protocol with required only one method.
func body(content: Self.Content) -> Self.BodyYou get parameter as a body content of a caller view and you can return a modified version of that view.
You can easily support sarunw.com by checking out this sponsor.

AI Grammar: Correct grammar, spell check, check punctuation, and parphrase.
Basic example, Bigger modifier
Let's start with a simple one, let say you want to have custom modifier where scale-up any view 2x.
struct BiggerModifier: ViewModifier {
	func body(content: Content) -> some View {
		return content.scaleEffect(2)
	}
}
We have 2 ways to use this new shiny modifier.
.modifier function
Text("Giant").modifier(BiggerModifier())ModifiedContent
ModifiedContent(content: Text("Giant"), modifier: BiggerModifier())Make it more beautiful
The system provided modifiers e.g. .foregroundColor, .font are less verbose and easy to use, we can do that too with the help of an old friend, extension.
extension View {
	func bigger() -> some View {
		self.modifier(BiggerModifier())
	}
}
We add a new function to View here, making it easier to call our ViewModifier. We can call it like this.
Text("Giant").bigger()Advance example, NSFW modifier
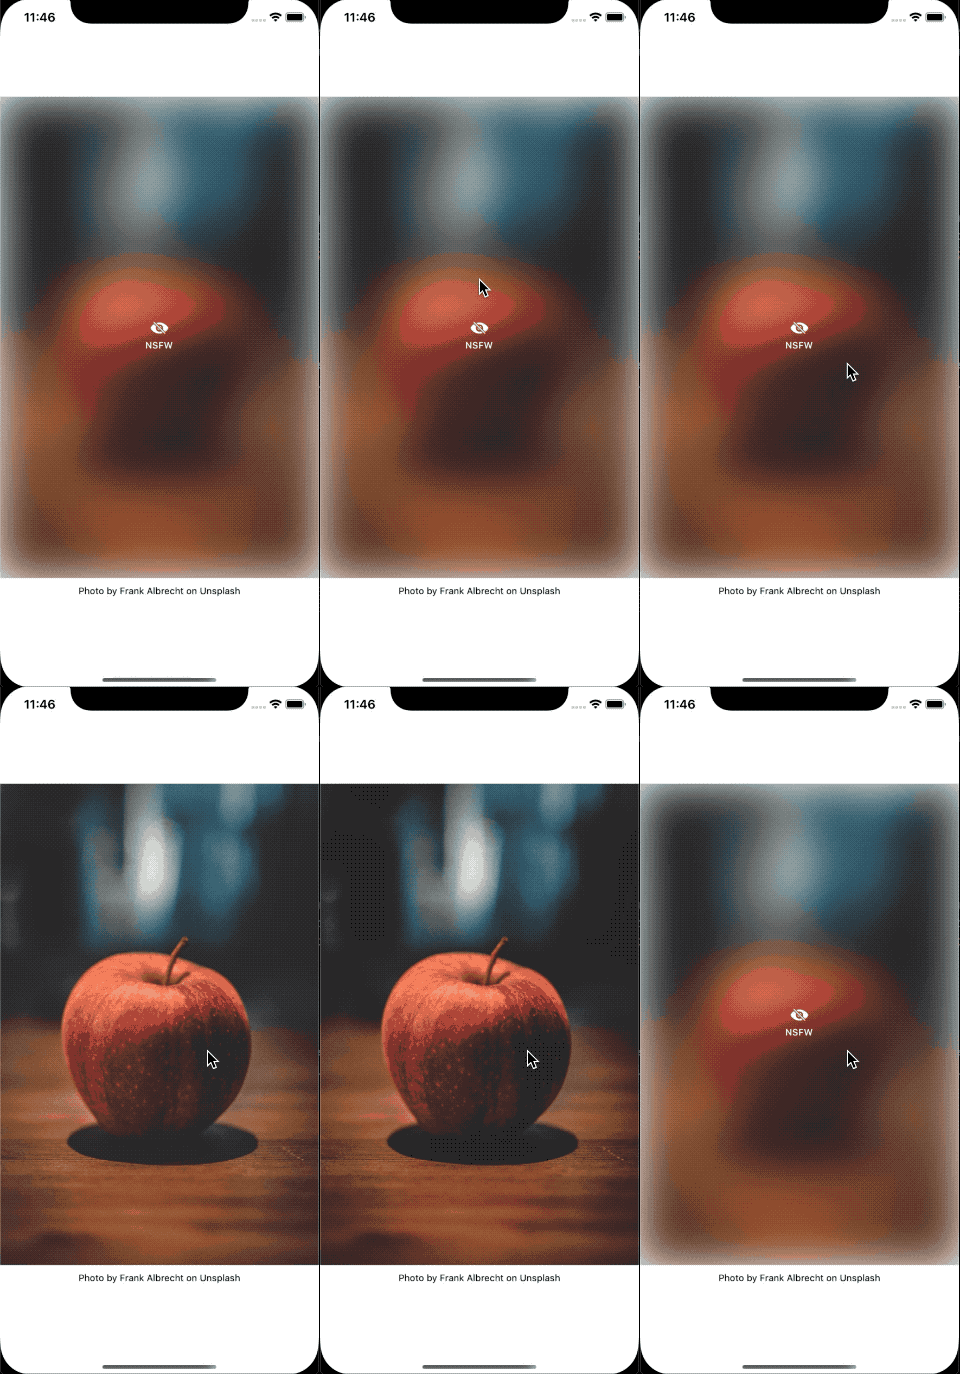
For more advanced example, we will create a modifier for censor NSFW (not safe for work) content by add blur effect on them. This is what we gonna do.

struct NSFW: ViewModifier {
  func body(content: Content) -> some View {
    ZStack(alignment: .center, content: {
        content.layoutPriority(1)
            .blur(radius: 30).clipped()
        VStack {
            Image(systemName: "eye.slash.fill").foregroundColor(.white)
            Text("NSFW").font(.caption).bold().foregroundColor(.white)
        }
    })
  }
}

extension Image {
    func nsfw() -> some View {
        self.modifier(NSFW())
    }
}
Even I titled it advanced, but you can see nothing fancy here we just layout system image and text labeled NSFW over blurry content.
Add @State and Animation
To make it more advance let make it that users can tap on NSFW view to show its content. We can have @State and animation within ViewModifier, there is no limitation here.
struct NSFW: ViewModifier {
    @State var isHide: Bool = true

    func body(content: Content) -> some View {
        ZStack(alignment: .center, content: {
            if isHide {
                content.layoutPriority(1)
                    .blur(radius: 30).clipped()
                VStack {
                    Image(systemName: "eye.slash.fill").foregroundColor(.white)
                    Text("NSFW").font(.caption).bold().foregroundColor(.white)
                }
            } else {
                content
            }
        }).onTapGesture {
            withAnimation {
                self.isHide = !self.isHide
            }
        }
    }
}
This is final result.

Conclusion
I think view modifier is a very strong concept of SwiftUI. It allows us to define our view and behavior in a descriptive manner by grouping up reusable view and logic into one function. I can see myself using this a lot in my code.
Feel free to follow me on Twitter and ask your questions related to this post or share your implementation for view modifier. Thanks for reading and see you next time.
You can easily support sarunw.com by checking out this sponsor.

AI Grammar: Correct grammar, spell check, check punctuation, and parphrase.
References
Read more article about Swift, iOS, SwiftUI, ViewModifier, or see all available topic
Enjoy the read?
If you enjoy this article, you can subscribe to the weekly newsletter.
Every Friday, you'll get a quick recap of all articles and tips posted on this site. No strings attached. Unsubscribe anytime.
Feel free to follow me on Twitter and ask your questions related to this post. Thanks for reading and see you next time.
If you enjoy my writing, please check out my Patreon https://www.patreon.com/sarunw and become my supporter. Sharing the article is also greatly appreciated.
Become a patron Buy me a coffee Tweet ShareCustom UIHostingController
Learn how to create a custom subclass of UIHostingController and its benefit.