Responsive layout in SwiftUI with ViewThatFit
Table of Contents
Making SwiftUI views responsive usually involves a lot of GeometryReaders and if-else.
In iOS 16, SwiftUI got a new view that makes it easier to create a responsive layout, ViewThatFits.
What is ViewThatFits
ViewThatFits is a container view that lets you
- Define a list of child views that suit different sizes.
- Then, based on the available space, it will provide the first child view that fits.
ViewThatFits {
    Text("Very Very long text")
    Text("Medium text")
    Text("Short")
}
You can easily support sarunw.com by checking out this sponsor.
AI Grammar: Correct grammar, spell check, check punctuation, and parphrase.
How does ViewThatFits work
The way that ViewThatFits choose which child view to show are as follows:
ViewThatFitsevaluates its child views in the order you provide them to the initializer (From top to bottom).- It selects the first child whose ideal size on the constrained axes fits within the proposed size.
To put this in simpler words.
ViewThatFitsapplyfixedSize()on each child view, starting from the top.- If the child view ideal size is larger than the parent's proposed size,
ViewThatFitsevaluate the next child. - Then it returns the first child that fits within the proposed size.
How to use ViewThatFits
Making a responsive view using ViewThatFits is simple.
- You put the view that required the largest space first in the initializer list.
- Then you put the next largest view.
- You repeat this for all of your supported view layouts.
- Then, you put a view that required the least space at the end of the list. This will be a default view when no other view fits the available space.
It is easier to understand this with an example.
In this example, I create a TextThatFits that use ViewThatFits to display a different length of text view based on available space.
struct TextThatFits: View {
var body: some View {
ViewThatFits {
Text("Very Very long text")
Text("Medium text")
Text("Short")
}
}
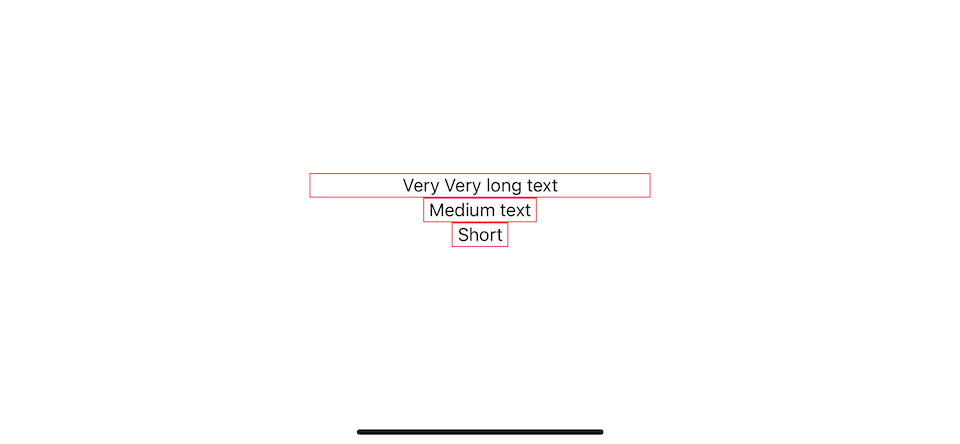
}To test the TextThatFits view out, we use it on different available spaces.
var body: some View {
    VStack {
        // 1
        TextThatFits()
            .frame(maxWidth: 300)
            .border(.pink)
        // 2
        TextThatFits()
            .frame(maxWidth: 100)
            .border(.pink)
        // 3
        TextThatFits()
            .frame(maxWidth: 50)
            .border(.pink)
    }
}
1 We set max width to 300 points on the first view. This is large enough for "Very Very long text" text, as seen from the pink border, so the first child from ViewThatFits is used.
2 100 points are too small for "Very Very long text", but enough for "Medium text".
3 The last child, Text("Short"), will be selected as a last resort.
You can easily support sarunw.com by checking out this sponsor.
AI Grammar: Correct grammar, spell check, check punctuation, and parphrase.
Conclusion
ViewThatFits is a welcoming change. It provides an easy interface for implementing a responsive layout.
In this article, I only show a basic example for you to understand the concept, but the possibility is limitless here.
For example, you can have buttons that show in HStack and then turn into VStack when space is limited.
The best part is that the interface is too easy to the point that you can translate what I just described into the code. And it is very easy to understand.
ViewThatFits {
    HStack {
        Button("Sign In") {}
        Button("Sign Up") {}
    }
    VStack {
        Button("Sign In") {}
        Button("Sign Up") {}
    }
}Read more article about SwiftUI, iOS 16, WWDC22, or see all available topic
Enjoy the read?
If you enjoy this article, you can subscribe to the weekly newsletter.
Every Friday, you'll get a quick recap of all articles and tips posted on this site. No strings attached. Unsubscribe anytime.
Feel free to follow me on Twitter and ask your questions related to this post. Thanks for reading and see you next time.
If you enjoy my writing, please check out my Patreon https://www.patreon.com/sarunw and become my supporter. Sharing the article is also greatly appreciated.
Become a patron Buy me a coffee Tweet ShareWhat is the fixedSize modifier in SwiftUI
When you read SwiftUI tutorials, you might stumble on the fixedSize() modifier. Let's see what it is and why we need it.
How to save enum in UserDefaults using Swift
Enumeration is a type that I think is perfect for representing options for users, but we can't save it directly to UserDefaults. Let's learn how to read/write enum to UserDefaults.