Adopting iOS Dark Mode
Table of Contents
A Dark mode is always a thing in the developer world, people craving for everything dark, dark theme, black Macbook, space gray, midnight (green), etc. Apple first introduced dark mode in macOS Mojave, I love it and use it ever since. Now its time for iOS to enjoy the same experience.
In iOS 13, it finally supports dark mode.
Should I adopt it?
Yes, one thing that I hate about dark mode on Mojave is all the apps that don't support dark mode. If your app is the only app that doesn't support dark mode, it will look alienate from the system.
You can easily support sarunw.com by checking out this sponsor.

AI Grammar: Correct grammar, spell check, check punctuation, and parphrase.
How can I adopt it?
You might already do if you build your app against new Xcode 11. Without you knowing, your app might look like this on iOS13.

Before iOS13

After building against Xcode 11 and run in dark mode on iOS13
I'm not ready for this, how can I opt-out
If you have no time and resource to go over all of your design you can opt-out of this in 2 ways.
Info.plist
You can add a key UIUserInterfaceStyle or User Interface Style and set it to Light and your app will be always bright and shine through the darkness.
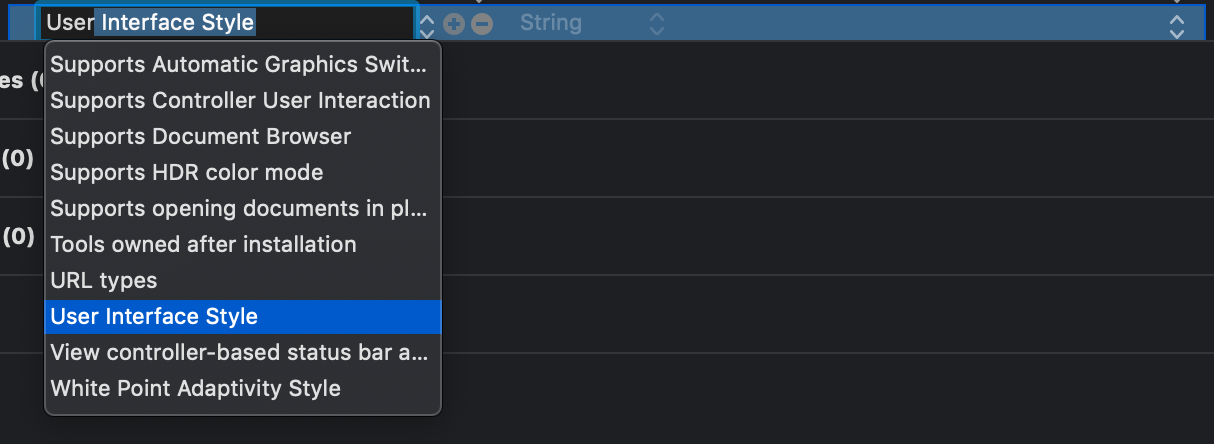
Programmatically
Set overrideUserInterfaceStyle flag to .light where you see fit. You can set it on UIView
Use this property to force the view to always adopt a light or dark interface style. The default value of this property is UIUserInterfaceStyle.unspecified, which causes the view to inherit the interface style from a parent view or view controller. If you assign a different value, the new style applies to the view and all of the subviews owned by the same view controller. (If the view hierarchy contains the root view of an embedded child view controller, the child view controller and its views do not inherit the interface style.) If the view is a UIWindow object, the new style applies to everything in the window, including the root view controller and all presented content.
Use this property to force the view controller to always adopt a light or dark interface style. The default value of this property is UIUserInterfaceStyle.unspecified, which causes the view controller to inherit the interface style from the system or a parent view controller. If you assign a different value, the new style applies to the view controller, its entire view hierarchy, and any embedded child view controllers.
In short, if you want to force light interface on your whole app the easiest way is to set it on UIWindow.
if #available(iOS 13.0, *) {
  window?.overrideUserInterfaceStyle = .light
}
You can leave now (and come back later) if you don't want to apply dark mode right now, that's all you need to do to disable it. Your app will be the only light in the darkness (Not in a good way) once iOS13 released.
I'm ready how can I adopt it?
To adopt dark mode there are few things you need to know.
Dark mode is one of UITraitCollection
UITraitCollection is the iOS interface environment for your app, defined by traits such as horizontal and vertical size class, display scale, and user interface idiom. Dark and light mode is just another trait.
Adaptive colors
Instead of using fixed color, Apple introduced a concept of adaptive colors where the color object returns different color values for different interface styles.
Adaptive Images
Images also get new appearance options just like size class options they got many years ago.
These 3 make the magic happened. The system provided a dark trait based on the user's preference and adaptive colors/images pick that up and present color/image based on that trait.
Let's go through each of these changes one by one.
UITraitCollection
Dark and light are a trait under UITraitCollection you can find this information in userInterfaceStyle. Nothing new here if you have ever played with this trait collection before.
When the user changes the system appearance, the system automatically asks each window and view to redraw itself. During this process, the system calls several well-known methods for both macOS and iOS, listed in the following table, to update your content. The system updates the trait environment before calling these methods, so if you make all of your appearance-sensitive changes in them, your app updates itself correctly.
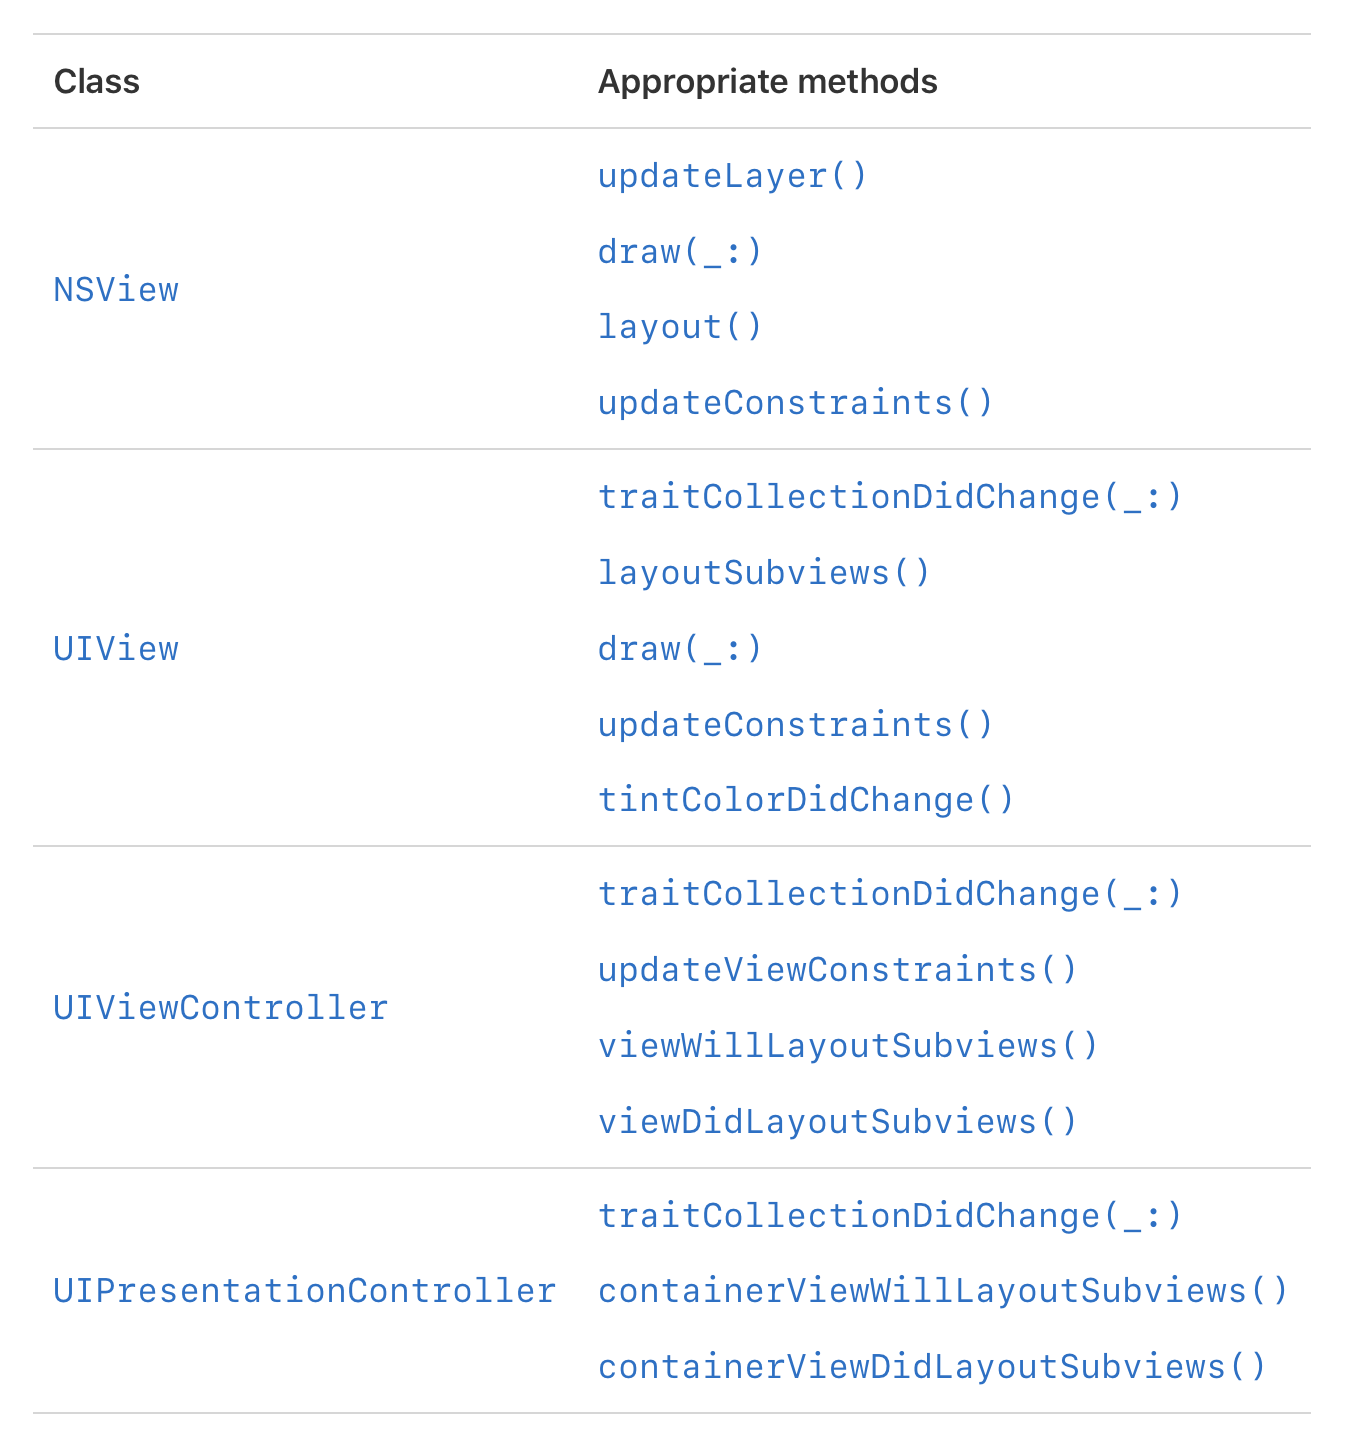
If you have special treatment for your custom view those methods are where you should put your logic into.
Adaptive colors
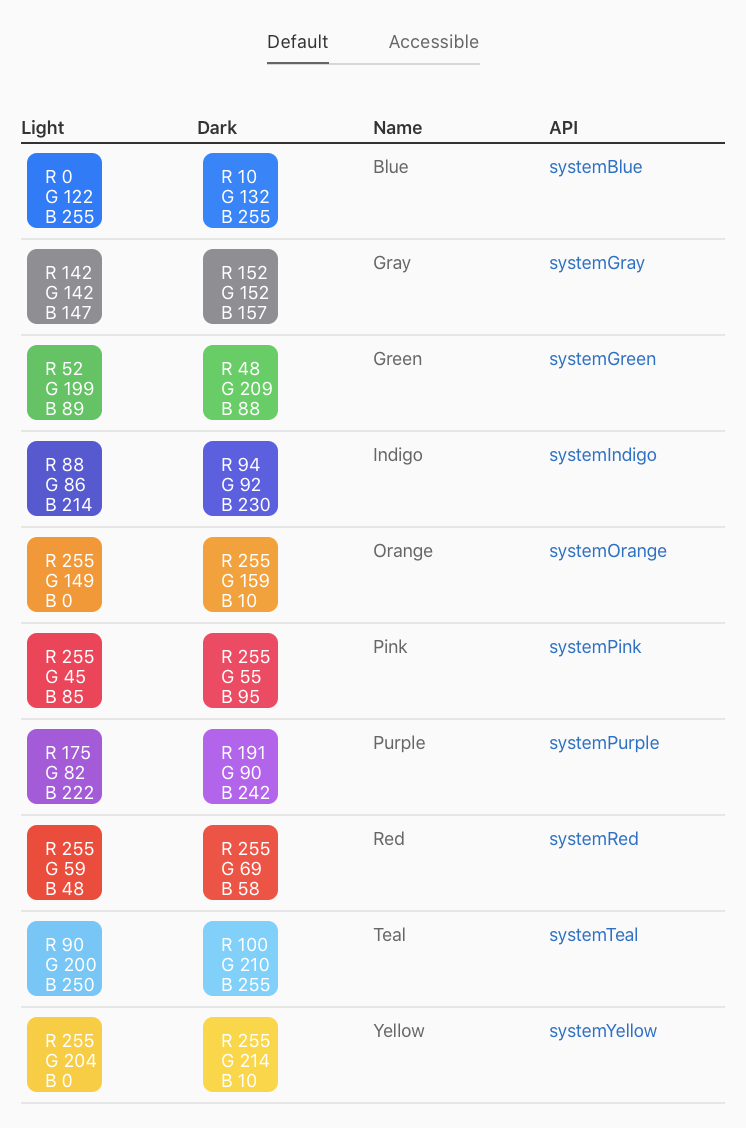
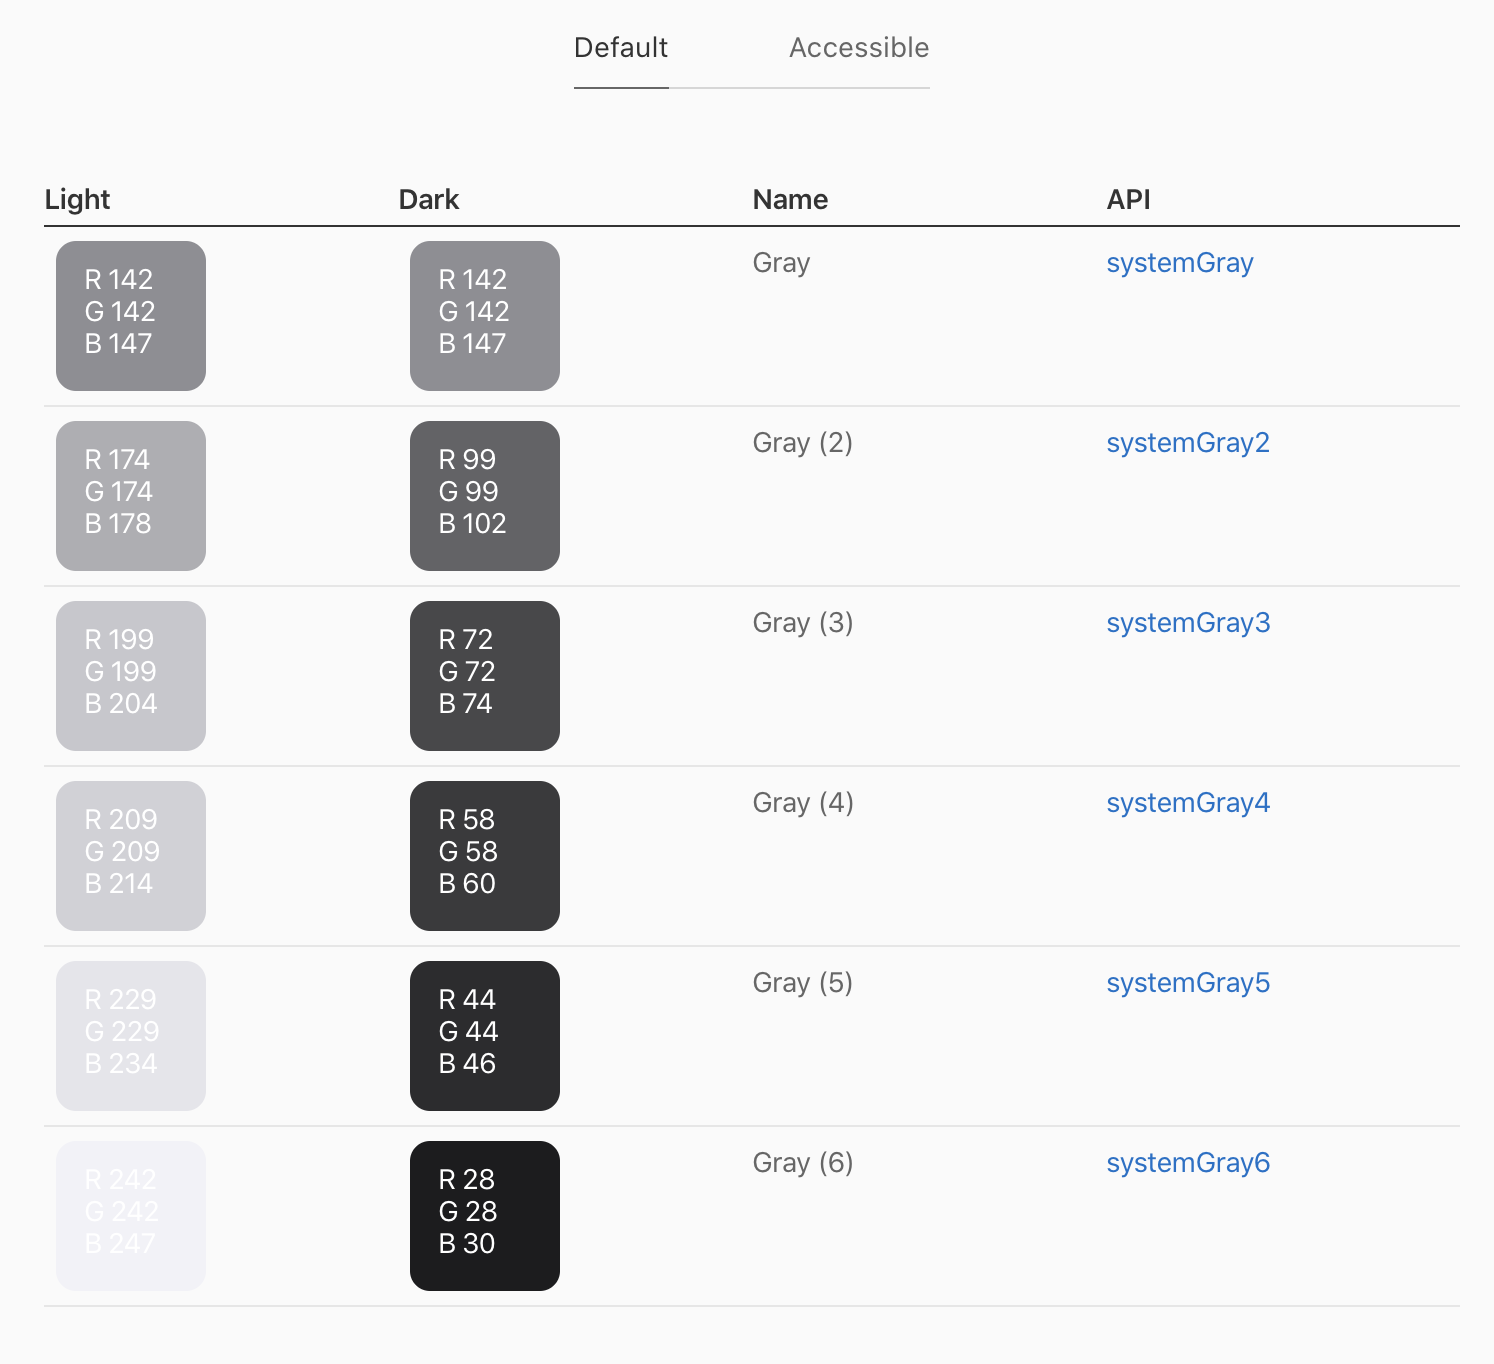
Apple provided built-in dynamic colors called System Colors, a set of colors that automatically adapt to light and dark modes.
This system colors can be categorized into 2 groups tint colors and semantic colors.
System Colors
Tint colors are quite straight forward like systemBlue and systemRed. You use it when you need that color and Apple will make sure it returns appropriate shade of red/blue that works well with light/dark mode.
Semantic System Colors
Semantic colors are design based on their intended usage i.e. label, separator, systemBackground. You don't have to know its real raw value of these color just make sure you use it based on their intention.
You can find all of them here UI Element colors
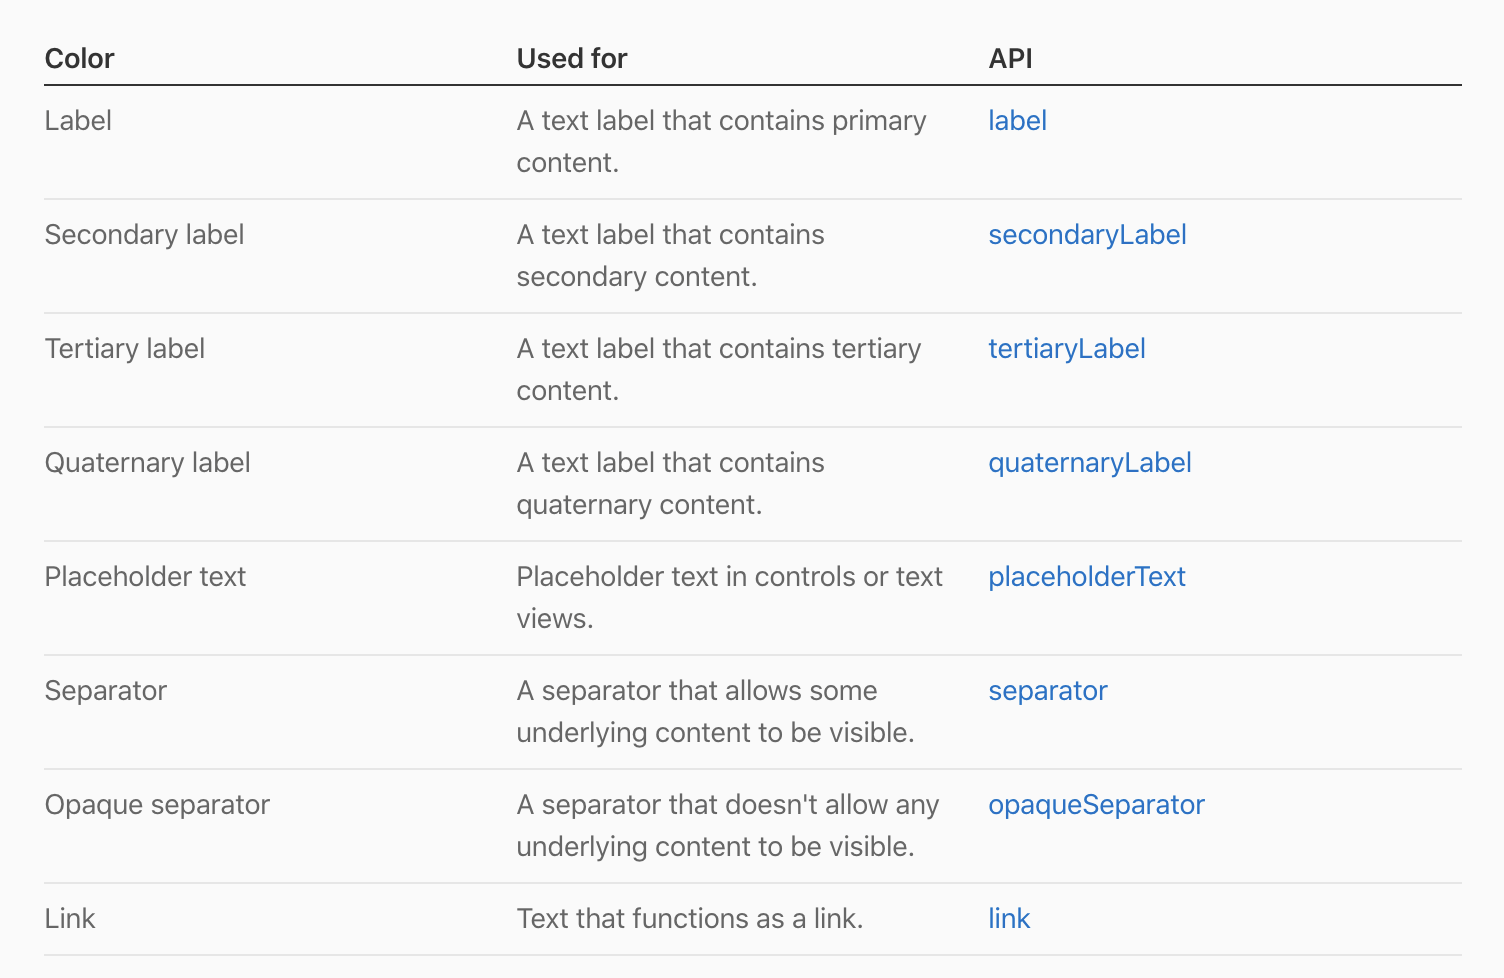
You can pick these up in Interface builder
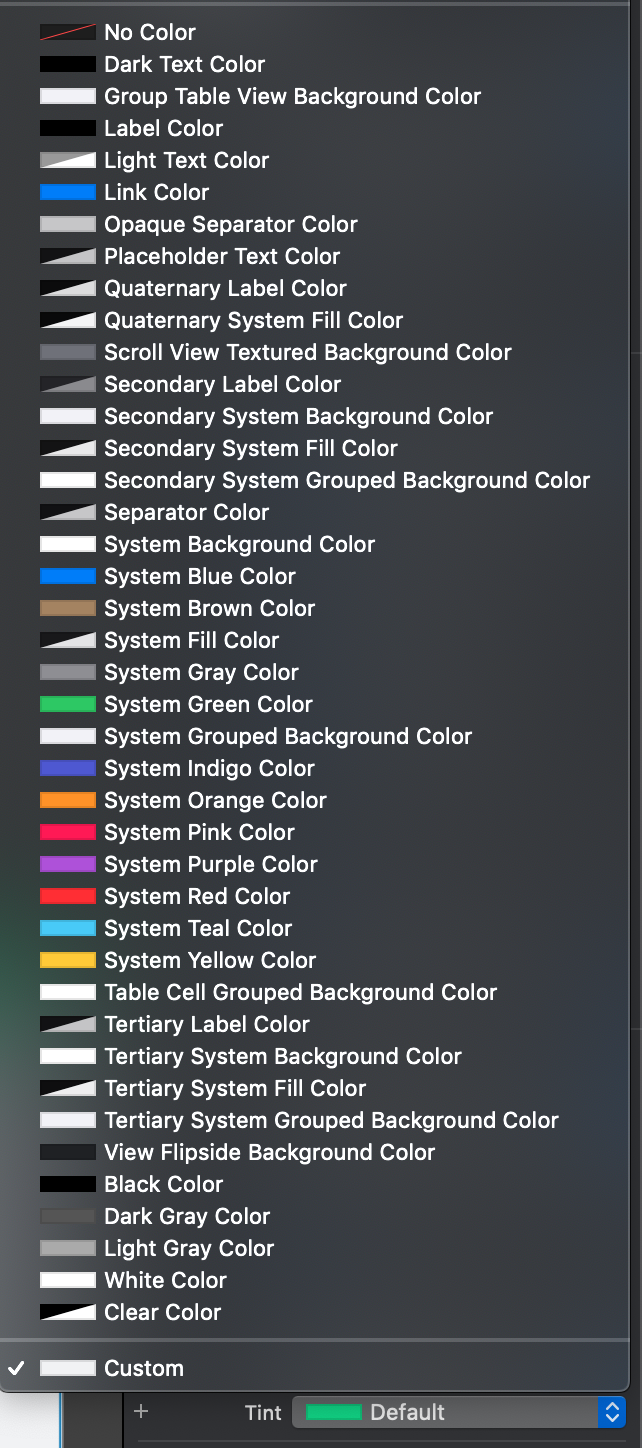
or you can use it in code.
view.backgroundColor = .systemBackground
label.color = .label
button.tintColor = .systemBlue
This semantic thing also covers vibrancy and blur effect, so you can have something like.
let blur = UIBlurEffect(style: .systemThinMaterial)
let vibrancy = UIVibrancyEffect(blurEffect: blur, style: .label)
Check out all available value here UIBlurEffect.Style, UIVibrancyEffectStyle
Semantic color is the reason that makes some of your ui elements support dark mode once you build your old app against new SDK. Because of Xcode 11 translate default color from old elements like UILabel and UITableViewCell to this new semantic system.

As you can see from my previous example app, some elements are already supported dark mode without any changes.

Custom Colors
System colors should be enough for most cases and Apple encourages us to use it for consistency, but if you have a custom design that system colors can't serve you, you can create your adaptive colors.
You can do this in the asset catalog. In Attributes inspector under a new Appearances section, you can add variations for an image. The simplest one would be Any, Dark where you provided another image for dark appearance.
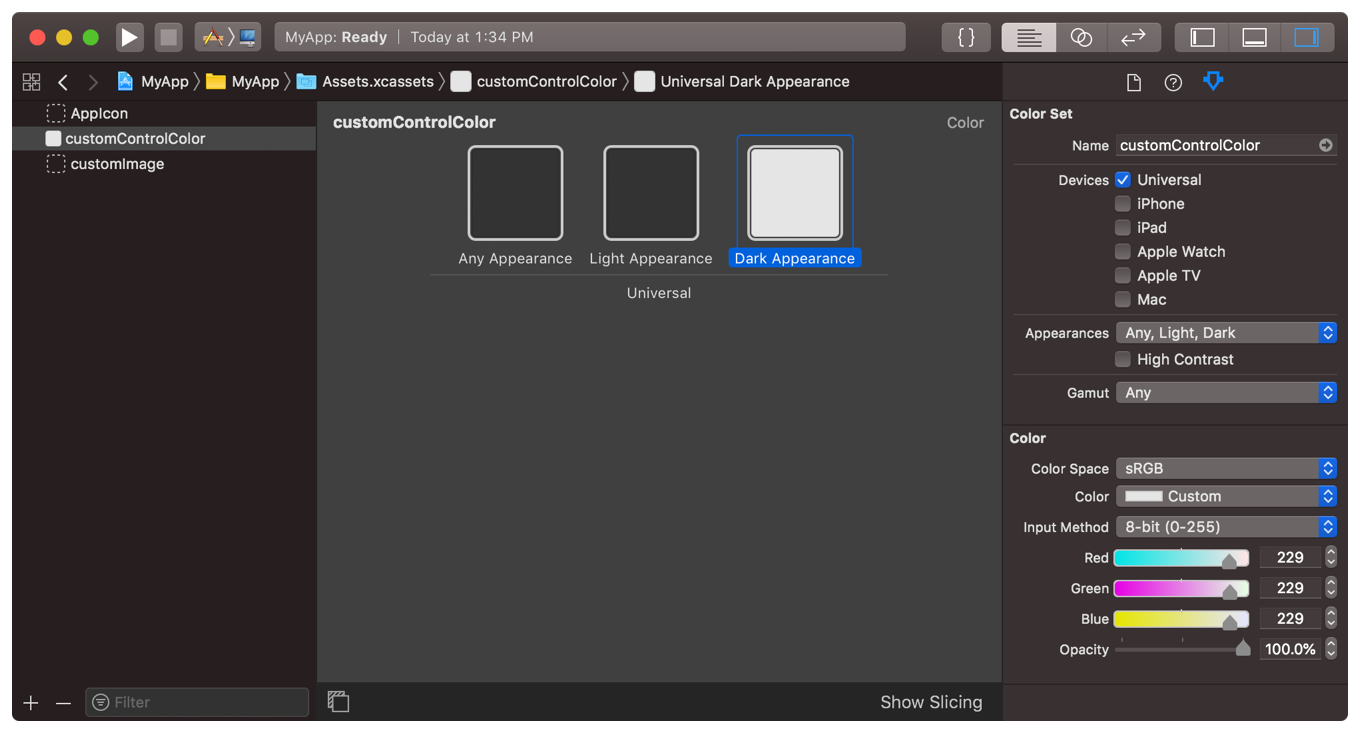
Define color in asset catalog like this is backward compatibility, the color you provided in the
AnyAppearance slots will be used for older versions of macOS or iOS.
Important Note
Right now (September 12, 2019) there is a bug in UIColor, be careful and test it out before submitting to the App Store.
Named colors in the asset catalog are not found at runtime when running on iOS 11, likely causing the app to crash or behave incorrectly. (54325712)
From Submit Your Apps to the App Store
Please note that apps built with Xcode 11 using named colors may experience lookup failures (with no value returned) when the app runs on iOS 11 or earlier. This will be fixed in a future Xcode update. To avoid this issue, raise the minimum deployment target to iOS 12 or later to submit to the App Store now, or rebuild with the next Xcode GM candidate seed when it’s available.
If you are still supporting iOS 10 I got bad news for you, Asset catalog doesn't work prior to iOS 11.0. Luckily you can create custom color programmatically with new UIColor's initializer, init(dynamicProvider:)
let customColor = UIColor { (trait) -> UIColor in
  switch trait.userInterfaceStyle {
  case .dark:
    return .red
  default:
    return .blue
  }
}

// Custom color that support high contrast
let customColor2 = UIColor { (trait) -> UIColor in
  switch (trait.userInterfaceStyle, trait.accessibilityContrast) {
  case (.dark, .high):
    return .red
  case (.dark, _):
    return .red
  case (_, .high):
    return .blue
  case (_, _):
    return .blue
  }
}
Adaptive Images
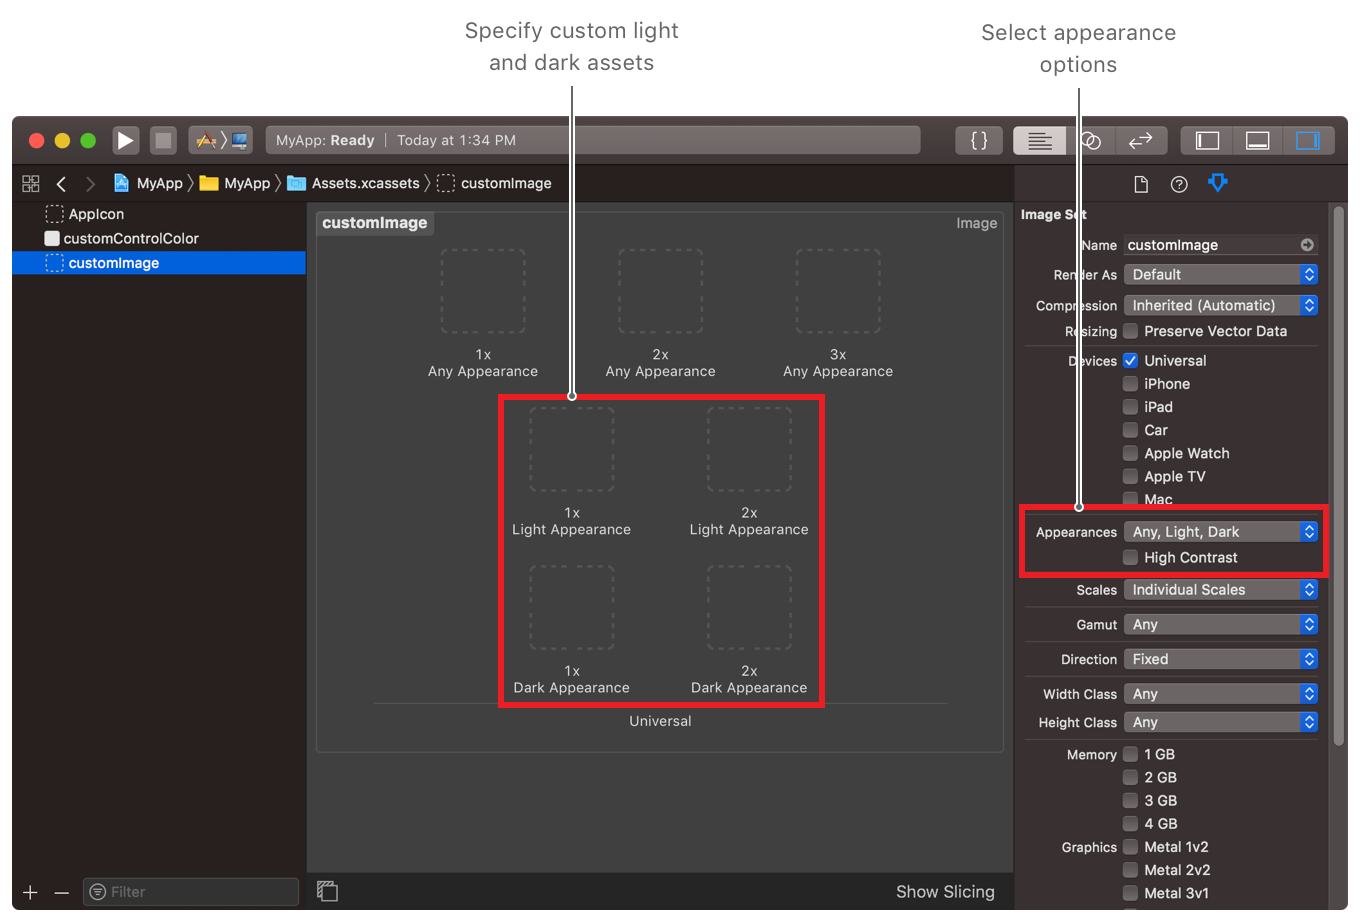
Most images should work fine on both dark and light mode, but if you have special treatment for them you can do this in asset catalog (I can't find a way to do this in code). In Attributes inspector under a new Appearances section, you can add variations for an image. The simplest one would be Any, Dark where you provided another image for dark appearance.
This new adaptive images is backward compatibility, the image you provided in the
AnyAppearance slots will be used for older versions of macOS or iOS.
Test it out
After finish changing all of your assets its time to test it out.
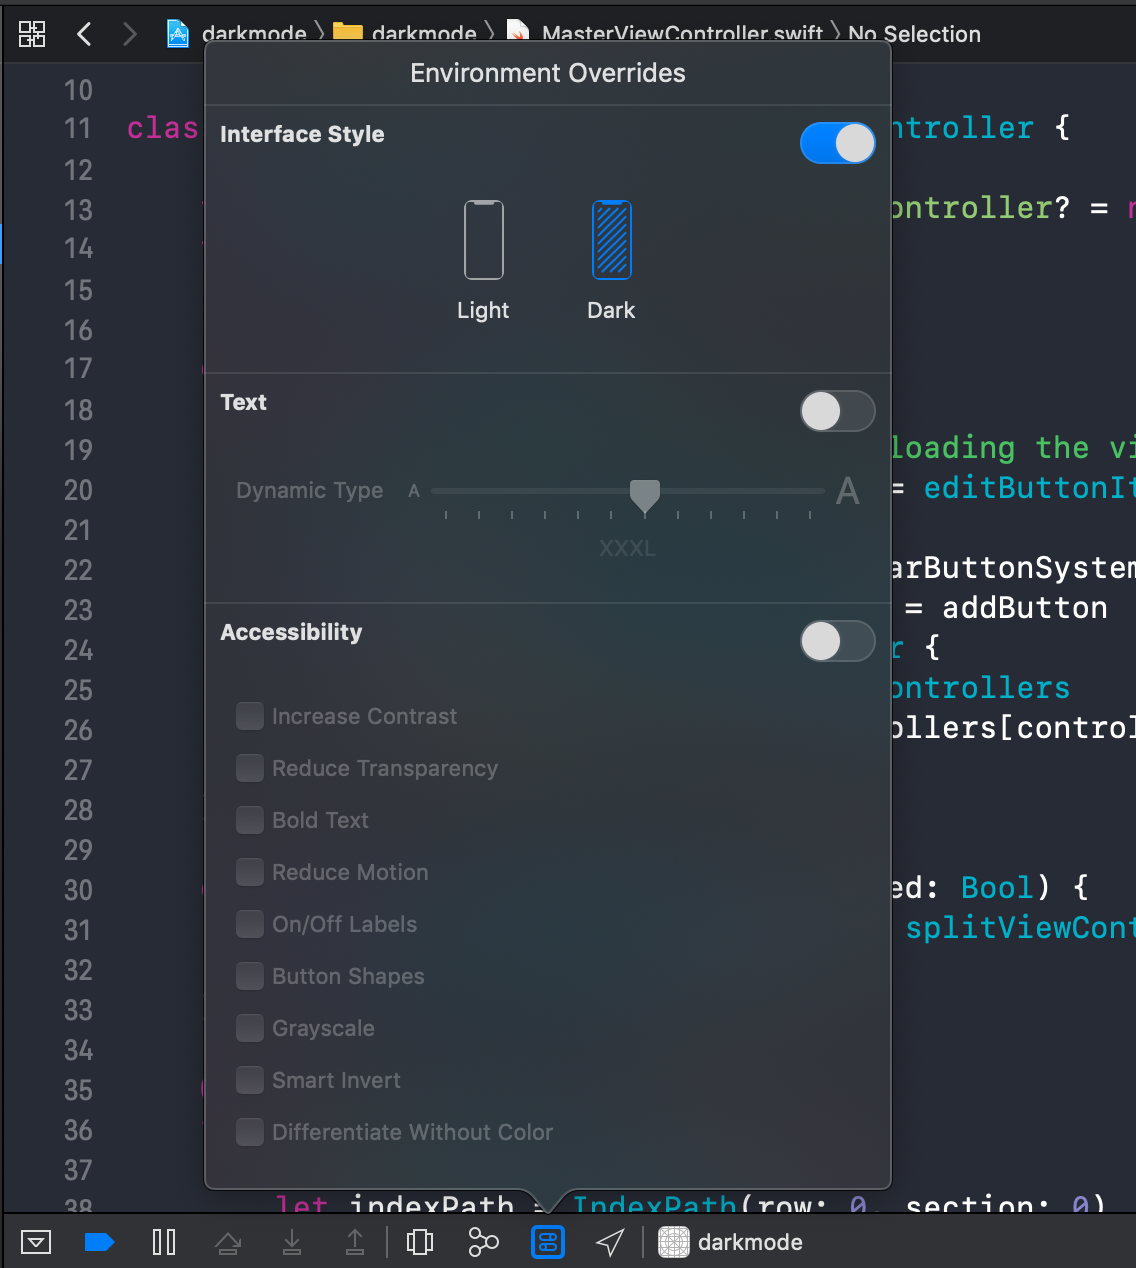
Run your app in the simulator, under the debug bar you would see a new Environment Overrides where you can override interface style along with others.
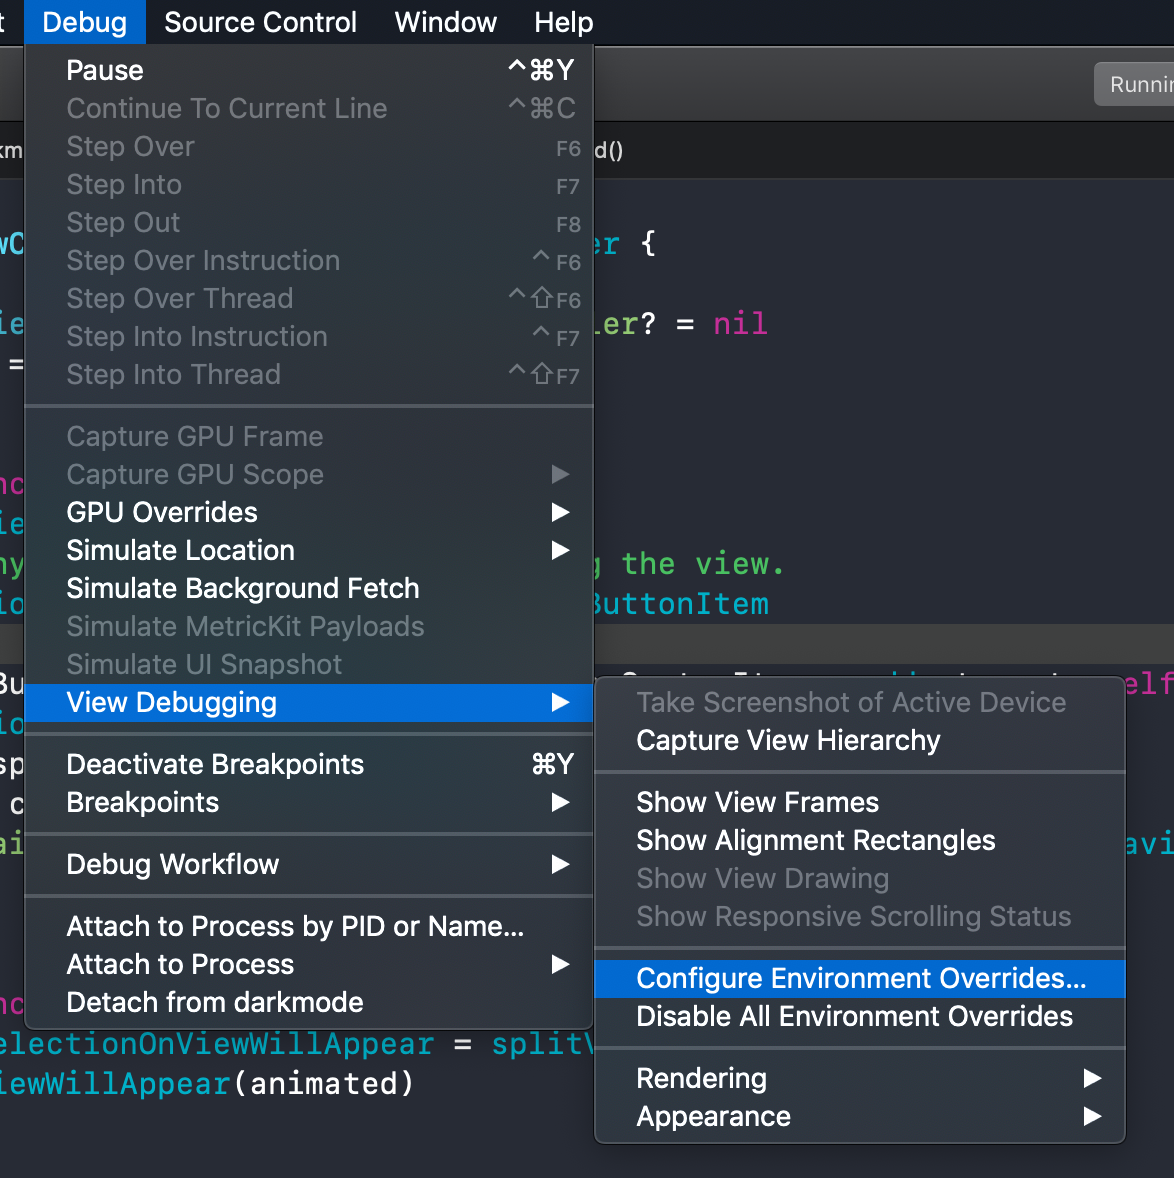
You can also find it in Debug > View Debugging > Configure Environment Overrides
You can also test it in storyboard and xib file, click "View as: ...." button at the bottom to toggle device and orientation adjustment, you will find a new interface style there.

Conclusion
A dark mode might look like just a color change, but I think many users looking forward to it. I think adopting this is an easy task, but a time consuming one. Apple doesn't enforce this in any way right now, they just encourage people to do so in their document and guideline.
I would try to adopt this as soon as I can since I love it and waiting for this feature for a very long time. Feel free to follow me on Twitter and ask your questions related to this post. Thanks for reading and see you next time.
You can easily support sarunw.com by checking out this sponsor.

AI Grammar: Correct grammar, spell check, check punctuation, and parphrase.
References
Read more article about Xcode, iOS, Dark Mode, or see all available topic
Enjoy the read?
If you enjoy this article, you can subscribe to the weekly newsletter.
Every Friday, you'll get a quick recap of all articles and tips posted on this site. No strings attached. Unsubscribe anytime.
Feel free to follow me on Twitter and ask your questions related to this post. Thanks for reading and see you next time.
If you enjoy my writing, please check out my Patreon https://www.patreon.com/sarunw and become my supporter. Sharing the article is also greatly appreciated.
Become a patron Buy me a coffee Tweet ShareModality changes in iOS13
In iOS13, the modal presentation gets a new look and dismissal gesture. This article will talk about what you can do with these new welcoming changes.
UINavigationBar changes in iOS13
Apple brings a lot of appearance changes in iOS13, and the navigation bar is one of them. Cover everything you should know once you build your app against iOS13 (Xcode11).