How to create Activity Ring in SwiftUI
Table of Contents
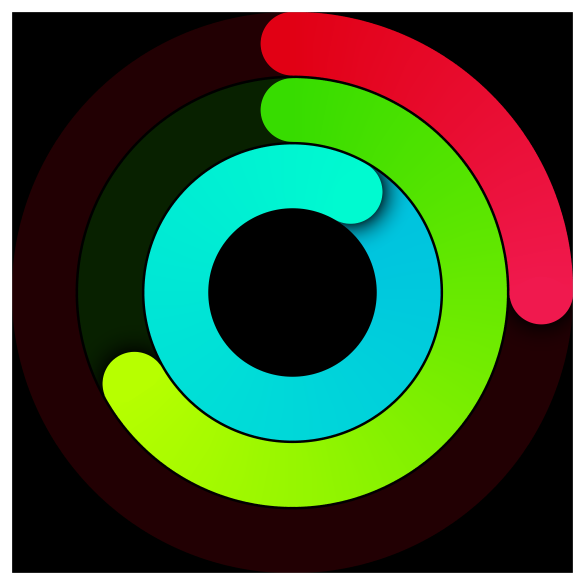
In this article, I'm going to guide you through my thinking process of how to replicate the Activity Ring (The one you see in Apple Watch) in SwiftUI.
I encourage you to think along and use this article as the answer key. To be able to create this activity ring, I have written articles of basic SwiftUI components that you should know here:
Decomposition
The first thing you need to do before creating a custom view is to figure out how your custom views are composed of. Try to break down a complex view into smaller and simpler views. If you can do this, you are half-way done.
Three to one
For me, this view composes of three identical rings. The only differences are their size and colors, so I will focus on replicate one ring and make sure I have an option to set its colors and size.
Choose your stack
The ring composes of two identical circular views. One is sitting on top of another. The bottom and the subtle one use when there is no progress and the vibrant one to fill the progress. These are enough for me to get the first version.
Here are my initial components:
Circleview with solid colorCircleview with a gradient colorZStackto present the secondCircleview on top of the firstCircleview
You can easily support sarunw.com by checking out this sponsor.
Screenshot Studio: Create App Store screenshots in seconds not minutes.
Ring up the curtain (1st iteration)
After you got all the components, let's put it back together. The following is my first draft.
Color extension to use in this article.
extension Color {
    public static var outlineRed: Color {
        return Color(decimalRed: 34, green: 0, blue: 3)
    }

    public static var darkRed: Color {
        return Color(decimalRed: 221, green: 31, blue: 59)
    }

    public static var lightRed: Color {
        return Color(decimalRed: 239, green: 54, blue: 128)
    }

    public init(decimalRed red: Double, green: Double, blue: Double) {
        self.init(red: red / 255, green: green / 255, blue: blue / 255)
    }
}
Our custom view.
struct ActivityRingView: View {
    var colors: [Color] = [Color.darkRed, Color.lightRed]

    var body: some View {
        ZStack {
            Circle()
                .stroke(Color.outlineRed, lineWidth: 20)
            Circle()
                .stroke(
                    AngularGradient(
                        gradient: Gradient(colors: colors),
                        center: .center,
                        startAngle: .degrees(0),
                        endAngle: .degrees(360)
                    ),
                    style: StrokeStyle(lineWidth: 20, lineCap: .round)
            )
        }.frame(idealWidth: 300, idealHeight: 300, alignment: .center)
    }
}
Put it in use.
struct ContentView: View {
    var body: some View {
        ZStack {
            Color.black
                .edgesIgnoringSafeArea(.all)
            ActivityRingView()
                .fixedSize()
        }
    }
}
Here is our result.
Debugging Tip
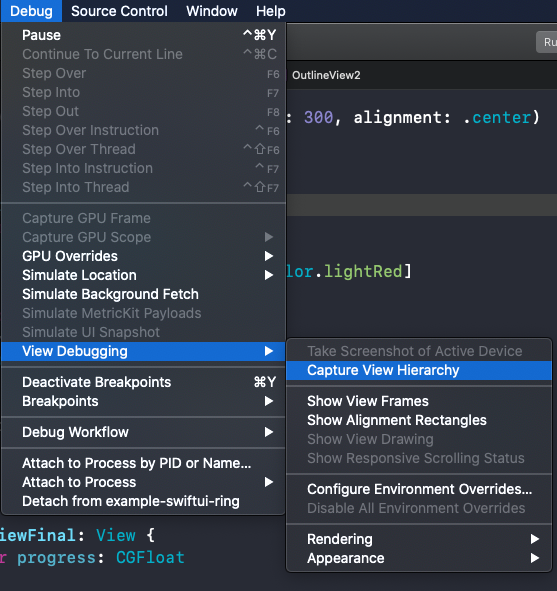
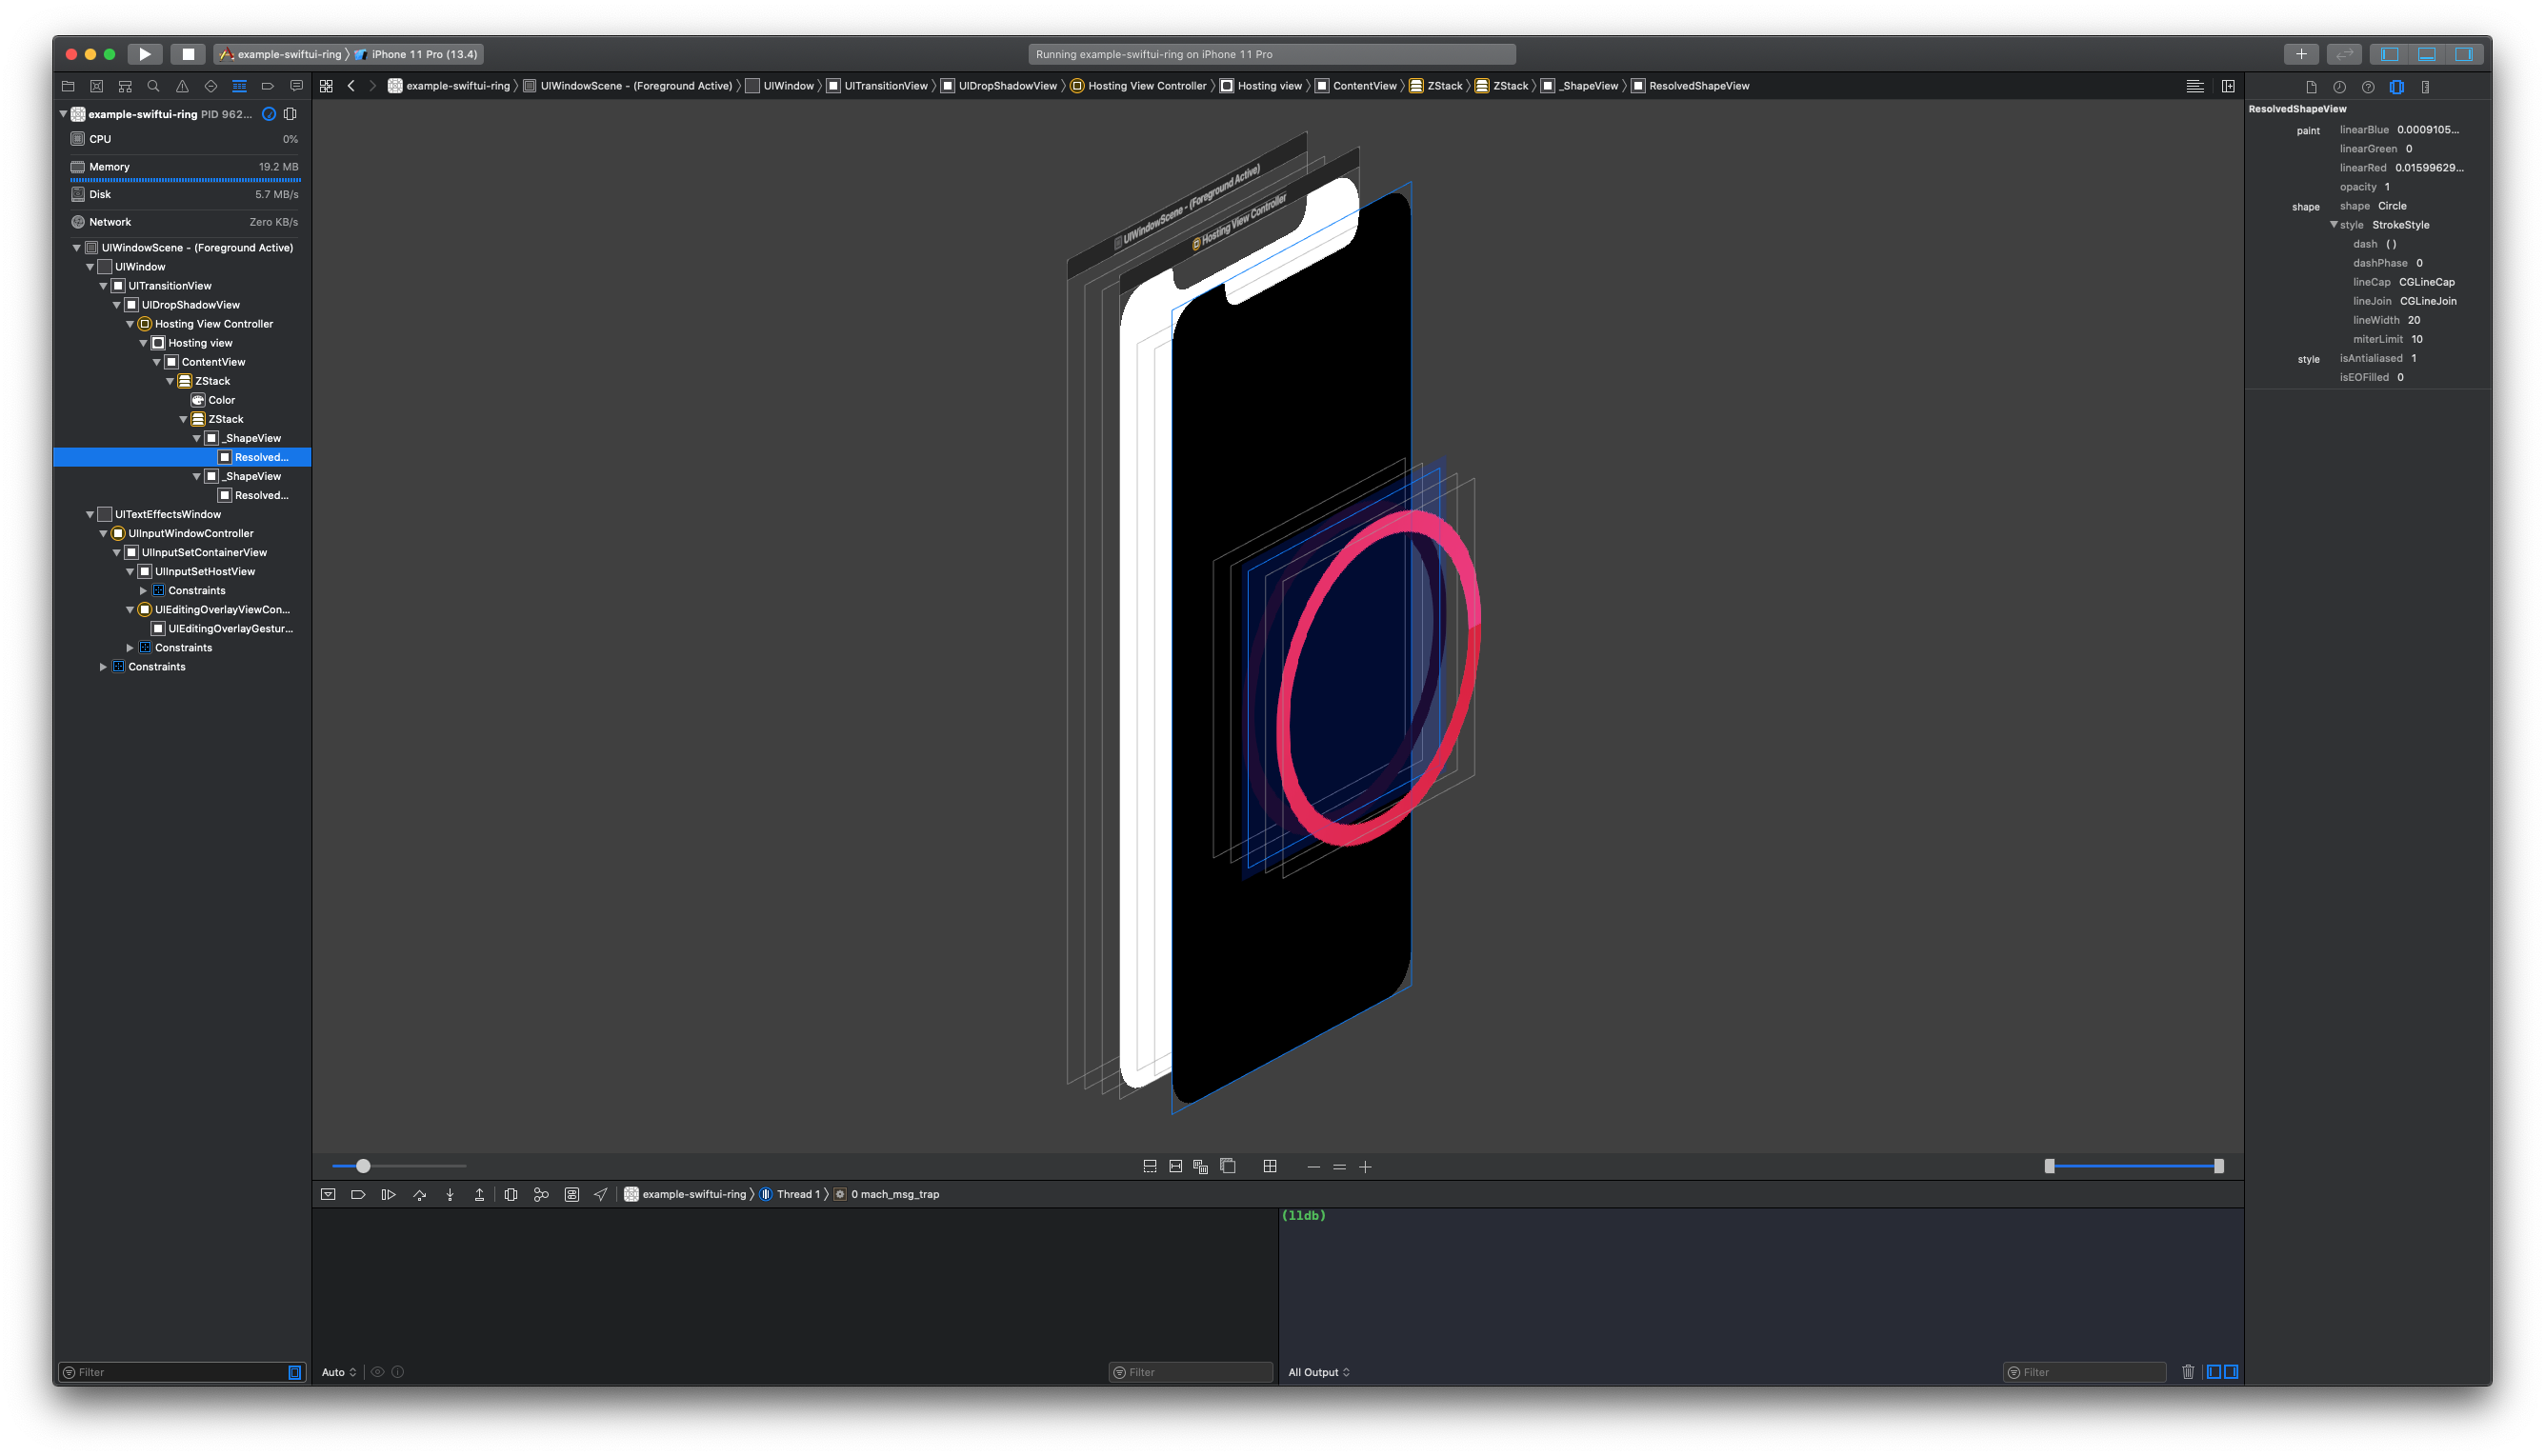
As you can see, the top Circle is cover the entire bottom Circle, which is hard to see whether everything works as expected or not. Luckily, Xcode has the capability to debug view hierarchy.
Just go to the menu Debug > View Debugging > Capture View Hierarchy to enter view hierarchy debugging.
Another way is to click the Debug view hierarchy button in the debug area.

Both methods will bring you to view hierarchy debugging.
That's good enough on our first try, next steps we would make progress adjust based on progress parameter.
Make progress
Adding progress is an easy task if you know a little bit of SwiftUI data. If you didn't, you could read my three-part articles about it.
- Data in SwiftUI, Part 1: Data
- Data in SwiftUI, Part 2: Views as a function of data
- Data in SwiftUI, Part 3: Tools
struct ActivityRingView: View {
    @Binding var progress: CGFloat

    var colors: [Color] = [Color.darkRed, Color.lightRed]

    var body: some View {
        ZStack {
            Circle()
                .stroke(Color.outlineRed, lineWidth: 20)
            Circle()
                .trim(from: 0, to: progress)
                .stroke(
                    AngularGradient(
                        gradient: Gradient(colors: colors),
                        center: .center,
                        startAngle: .degrees(0),
                        endAngle: .degrees(360)
                    ),
                    style: StrokeStyle(lineWidth: 20, lineCap: .round)
            )
        }.frame(idealWidth: 300, idealHeight: 300, alignment: .center)
    }
}
With two lines of code @Binding and .trim, our view is now progressible.
To use this, the caller needs to provide bindable CGFloat.
struct ContentView: View {
    @State private var progress: CGFloat = 0.3

    var body: some View {
        ZStack {
            Color.black
                .edgesIgnoringSafeArea(.all)
            ActivityRingView2(progress: $progress)
                .fixedSize()
        }
    }
}
Run the above example and get the following result.
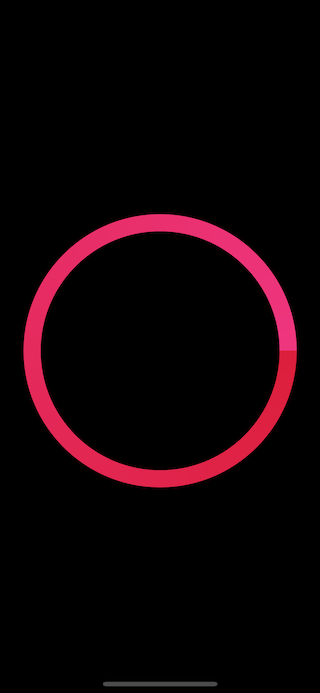
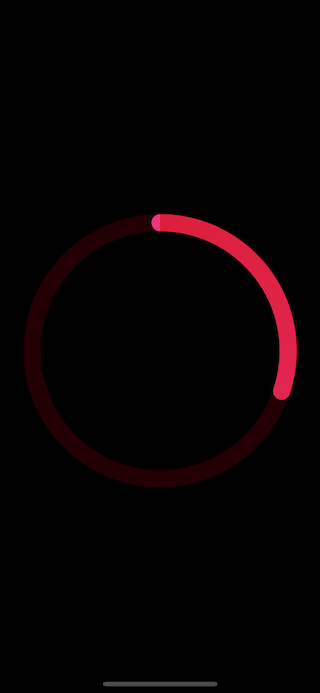
Run rings around (2nd iteration)
Our activity ring is now supporting setting progress, but there are a few things we need to fix.
The problems are:
- Progress start from the rightmost
- The rounding cap at starting position show end color (
.lightRed)
Rotation
The first problem is quite easy to solve with .rotationEffect. Apply -90 degree to the view.
struct ActivityRingView: View {
    @Binding var progress: CGFloat

    var colors: [Color] = [Color.darkRed, Color.lightRed]

    var body: some View {
        ZStack {
            Circle()
                .stroke(Color.outlineRed, lineWidth: 20)
            Circle()
                .trim(from: 0, to: progress)
                .stroke(
                    AngularGradient(
                        gradient: Gradient(colors: colors),
                        center: .center,
                        startAngle: .degrees(0),
                        endAngle: .degrees(360)
                    ),
                    style: StrokeStyle(lineWidth: 20, lineCap: .round)
                ).rotationEffect(.degrees(-90))
        }.frame(idealWidth: 300, idealHeight: 300, alignment: .center)
    }
}
Fixing the color
AngularGradient applies the color as the angle changes; you define the start and end angle which gradient will be applied to. This makes you see the starting and ending colors at the very top, which is the starting and ending point where both colors meet.
I overcome this by place another Circle view at the starting position.
To fix this, I create another Circle view with the same size as lineWidth (20), the same color as the starting point (.darkRed), and positioned at the starting point (-150 which is the distance of the circle radius).
Circle()
    .frame(width: 20, height: 20)
    .foregroundColor(Color.darkRed)
    .offset(y: -150)
struct ActivityRingView: View {
@Binding var progress: CGFloat
var colors: [Color] = [Color.darkRed, Color.lightRed]
var body: some View {
ZStack {
Circle()
.stroke(Color.outlineRed, lineWidth: 20)
Circle()
.trim(from: 0, to: progress)
.stroke(
AngularGradient(
gradient: Gradient(colors: colors),
center: .center,
startAngle: .degrees(0),
endAngle: .degrees(360)
),
style: StrokeStyle(lineWidth: 20, lineCap: .round)
).rotationEffect(.degrees(-90))
Circle()
.frame(width: 20, height: 20)
.foregroundColor(Color.darkRed)
.offset(y: -150)
}.frame(idealWidth: 300, idealHeight: 300, alignment: .center)
}
}Run it to see the result.
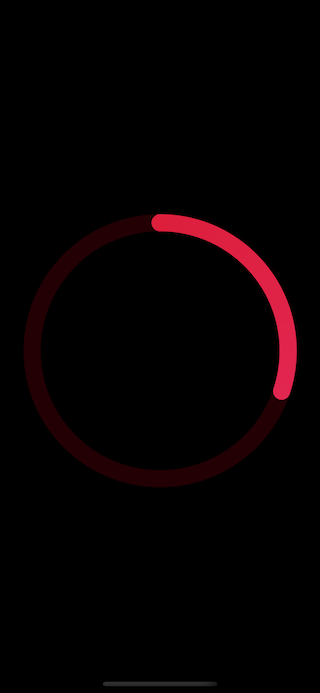
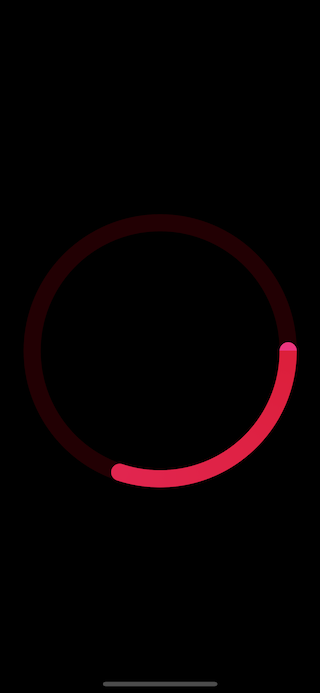
It looks great, but if you set progress to 1, you would see another problem popping up.

Let's revisit the final design that we want. The ending part will be over the starting part with a shadow (the inner ring).
The last iteration
To fix the last problem, I use the same similar technique that I had used in the previous problem. I create another Circle on the topmost, which move along with the current progress.
I create another Circle view with the same size as lineWidth (20), the same color as ending point (.lightRed), and positioned at the starting point (-150 which is the distance of the circle radius). These steps are similar to our previous solution.
Then we add a .shadow and apply .rotationEffect based on progress, so it moves along with the current progress.
Circle()
.frame(width: 20, height: 20)
.offset(y: -150)
.foregroundColor(Color.lightRed)
.rotationEffect(Angle.degrees(360 * Double(progress)))
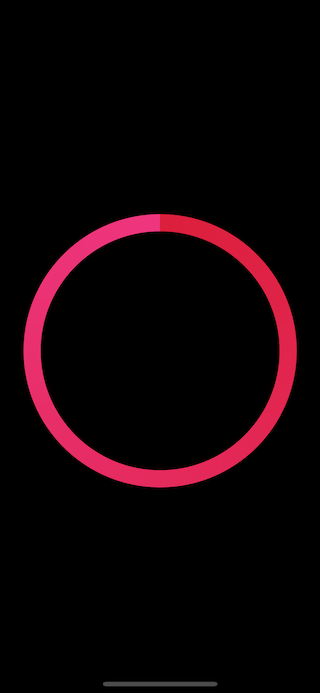
.shadow(Color.black.opacity(0.1))The result looks good.
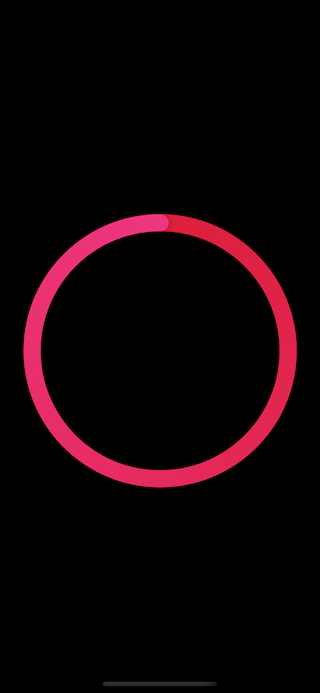
But if the progress less than 1, you will see the odd. The end color stands out when the progress is less than 1.

I fix this with some if condition. I apply shadow and show end color only when progress almost reaches 1.
Circle()
    .frame(width: 20, height: 20)
    .foregroundColor(progress > 0.95 ? Color.lightRed: Color.lightRed.opacity(0))
    .offset(y: -150)
    .rotationEffect(Angle.degrees(360 * Double(progress)))
    .shadow(color: progress > 0.95 ? Color.black.opacity(0.1): Color.clear, radius: 3, x: 4, y: 0)
The following is the final code and result.
struct ActivityRingView: View {
    @Binding var progress: CGFloat

    var colors: [Color] = [Color.darkRed, Color.lightRed]

    var body: some View {
        ZStack {
            Circle()
                .stroke(Color.outlineRed, lineWidth: 20)
            Circle()
                .trim(from: 0, to: progress)
                .stroke(
                    AngularGradient(
                        gradient: Gradient(colors: colors),
                        center: .center,
                        startAngle: .degrees(0),
                        endAngle: .degrees(360)
                    ),
                    style: StrokeStyle(lineWidth: 20, lineCap: .round)
            ).rotationEffect(.degrees(-90))
            Circle()
                .frame(width: 20, height: 20)
                .foregroundColor(Color.darkRed)
                .offset(y: -150)
            Circle()
                .frame(width: 20, height: 20)
                .foregroundColor(progress > 0.95 ? Color.lightRed: Color.lightRed.opacity(0))
                .offset(y: -150)
                .rotationEffect(Angle.degrees(360 * Double(progress)))
                .shadow(color: progress > 0.96 ? Color.black.opacity(0.1): Color.clear, radius: 3, x: 4, y: 0)
        }.frame(idealWidth: 300, idealHeight: 300, alignment: .center)
    }
}
Ring down the curtain
There are still improvements you can make upon this, e.g., make .offset dynamic with the frame (currently it hard code to 150), pack three rings to make an identical as Apple Activity ring, or make the ring supports progress more than 1.
I encourage you to implement those improvements yourself. I may write a follow-up of this article to cover those things.
If you love this article, Subscribe or Follow me on Twitter to get more posts like this. Sharing this with your friends is greatly appreciated.
You can easily support sarunw.com by checking out this sponsor.
Screenshot Studio: Create App Store screenshots in seconds not minutes.
Related Resources
Read more article about SwiftUI or see all available topic
Enjoy the read?
If you enjoy this article, you can subscribe to the weekly newsletter.
Every Friday, you'll get a quick recap of all articles and tips posted on this site. No strings attached. Unsubscribe anytime.
Feel free to follow me on Twitter and ask your questions related to this post. Thanks for reading and see you next time.
If you enjoy my writing, please check out my Patreon https://www.patreon.com/sarunw and become my supporter. Sharing the article is also greatly appreciated.
Become a patron Buy me a coffee Tweet ShareTesting Remote Push Notification in iOS simulator
A new and easier way to test Apple push notification on iOS simulator.
How to create a new Xcode project without Storyboard
Modify AppDelegate or SceneDelegate to support a non-storyboard approach.