What is SwiftUI Form
Table of Contents
What is SwiftUI Form
Form is one of a container view in SwiftUI that is designed for grouping controls used for modifying data entry.
One example that fits this use case is a settings view.
You can easily support sarunw.com by checking out this sponsor.
Offline Transcription: Fast, privacy-focus way to transcribe audio, video, and podcast files. No data leaves your Mac.
How to use SwiftUI Form
Form behaves similar to List view.
- It applies platform-appropriate style to views and controls that sit inside a form.
- You can group controls under
Section, just like a list view.
You can construct a form like you create a List view. The only difference is you use a Form instead of a List view.
I will show you how to create a form from basic views and controls.
Form with TextField
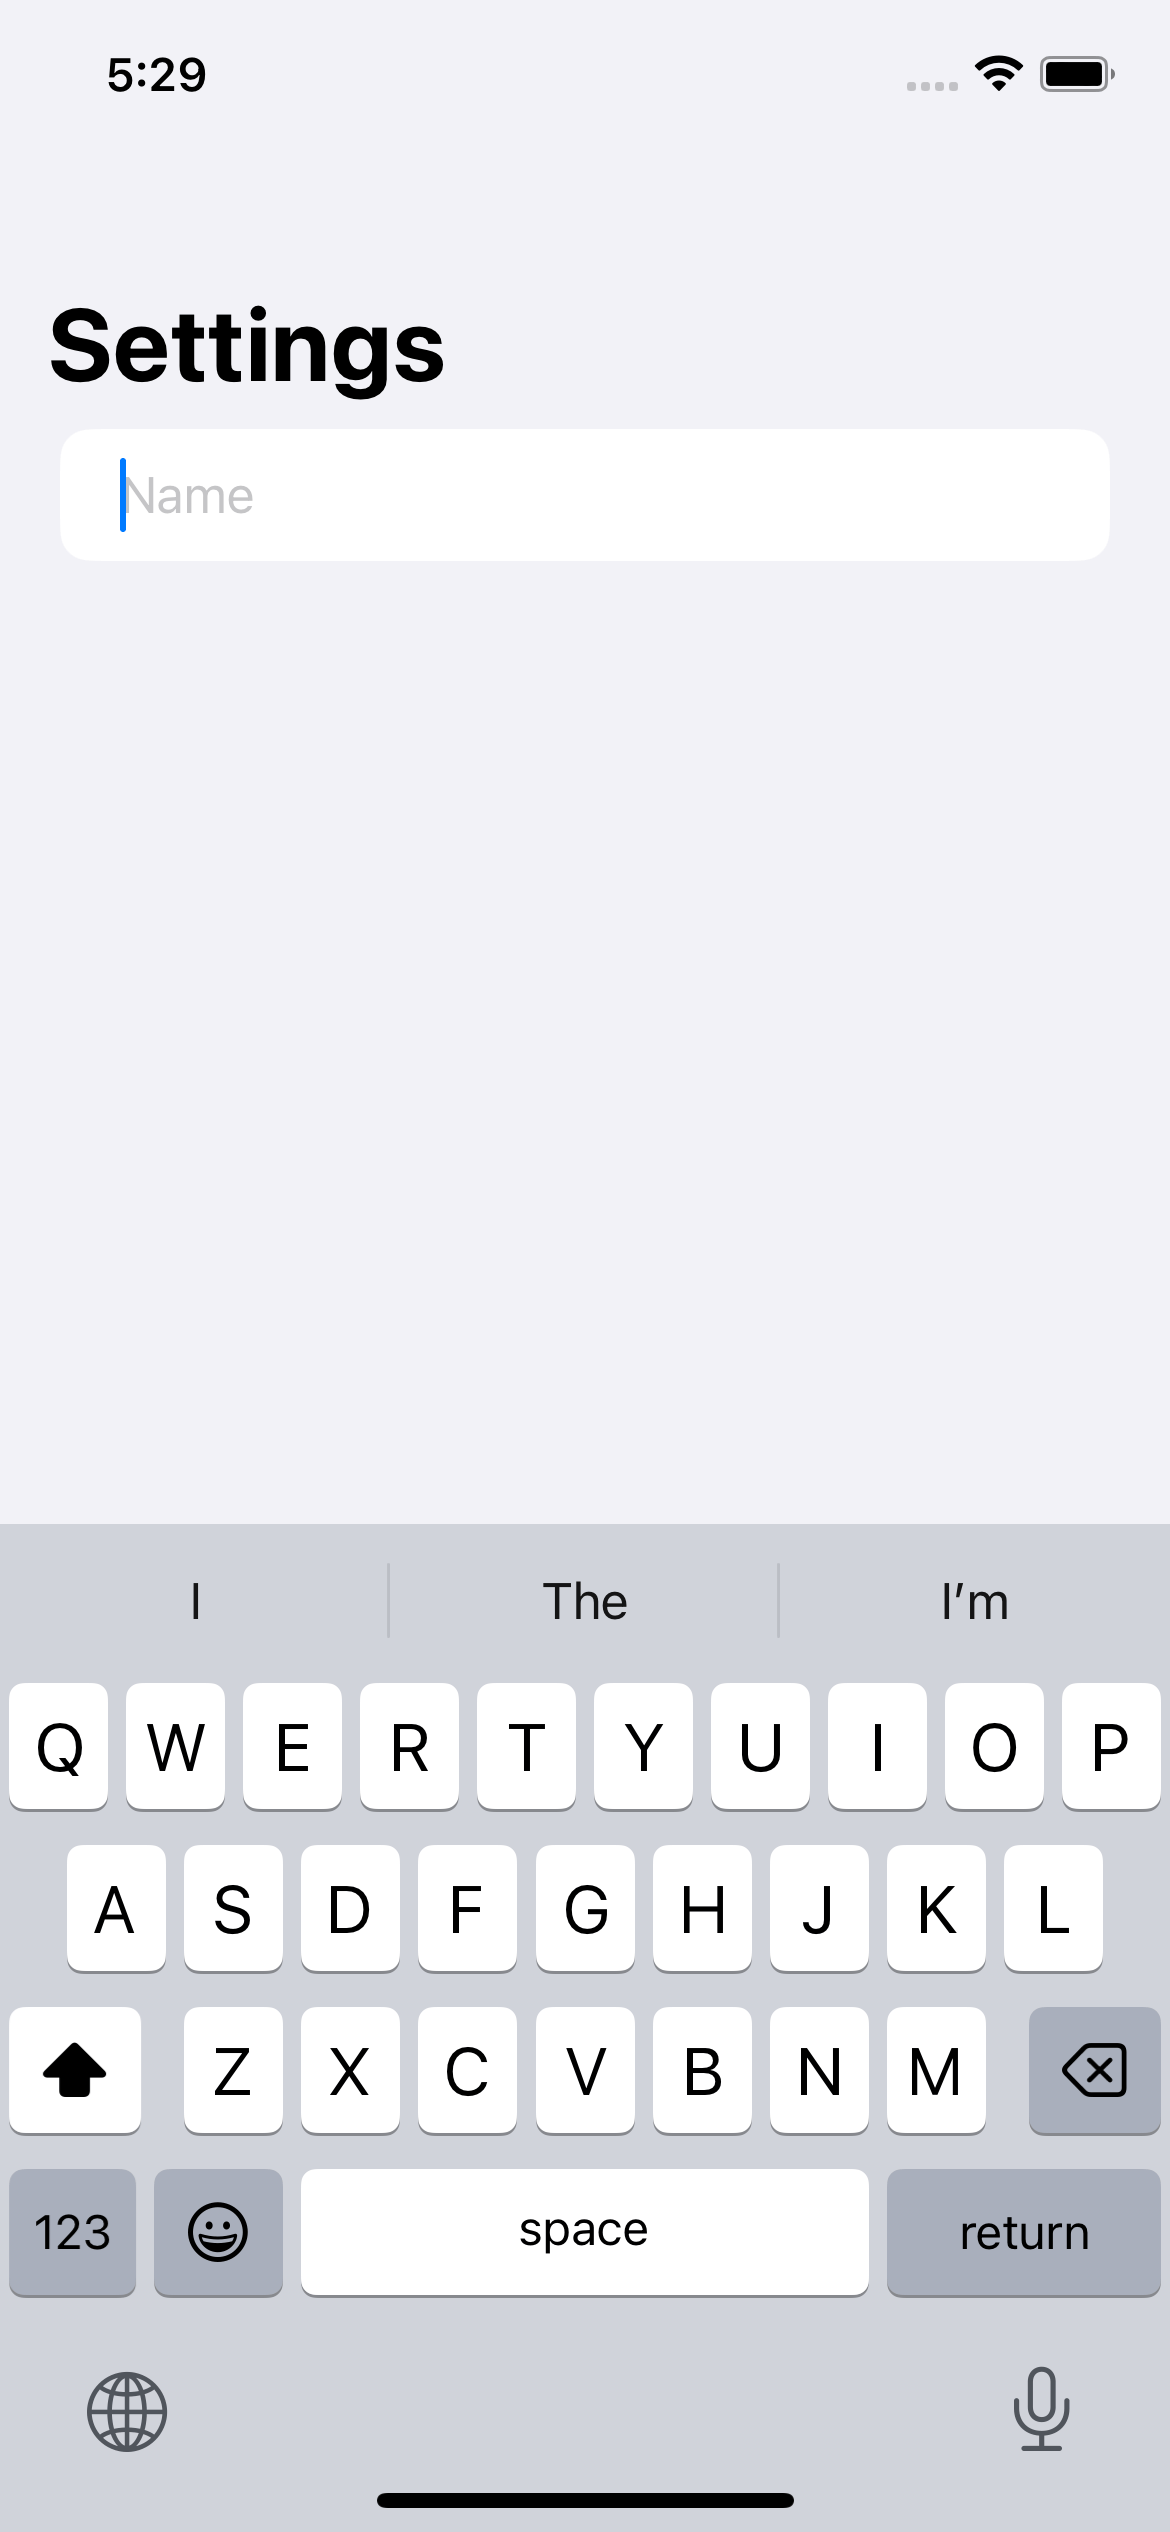
We start by creating a simple form with one text field.
struct ContentView: View {
    // 1
    @AppStorage("deviceName") private var deviceName: String = ""

    var body: some View {
        NavigationStack {
            // 2
            Form {
                // 3
                TextField("Name", text: $deviceName)
            }
            .navigationBarTitle("Settings")
        }
    }
}
1 Since Form is meant to manipulate a group of data entries. Most controls are probably backed by data. In this case, we use @AppStorage to make it persist across the app launch.
2 Form is a container view that wraps all of our controls.
3 We create a text field that binds to the deviceName variable.
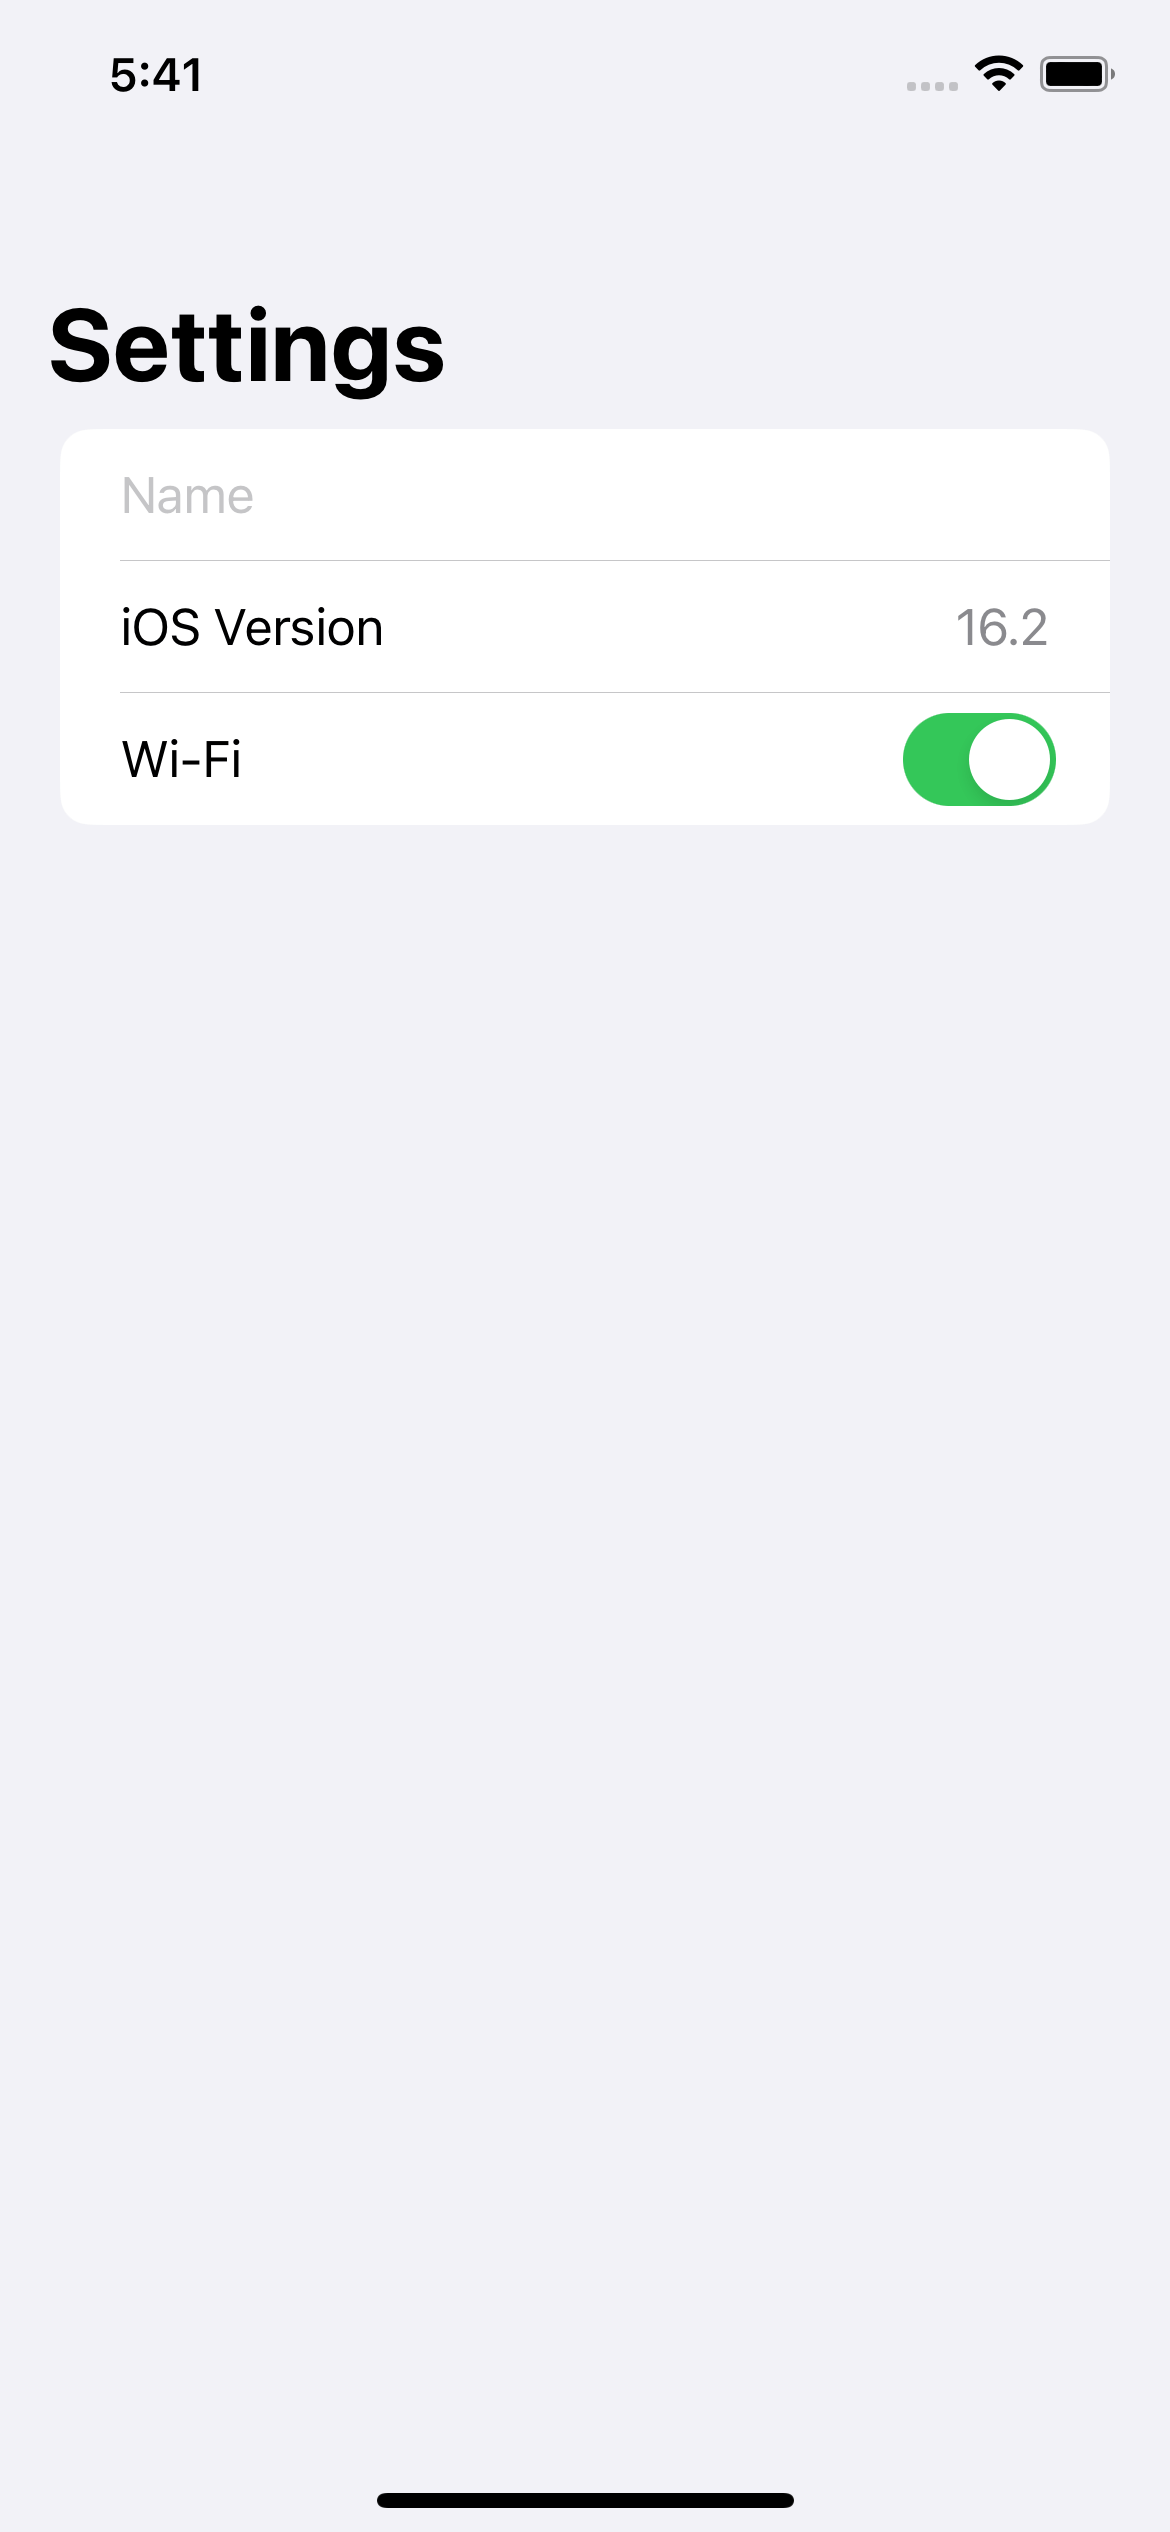
Form with LabeledContent
Form also supports static content. In this case, I use LabeledContent to show the current iOS version.
struct ContentView: View {
    @AppStorage("deviceName") private var deviceName: String = ""

    var body: some View {
        NavigationStack {
            Form {
                TextField("Name", text: $deviceName)
                LabeledContent("iOS Version", value: "16.2")
            }
            .navigationBarTitle("Settings")
        }
    }
}
Form with Toggle
You can keep adding controls to a form. I add a new Toggle that controls Wi-Fi here.
struct ContentView: View {
    @AppStorage("deviceName") private var deviceName: String = ""
    @AppStorage("wifi") private var isWifiEnabled: Bool = false

    var body: some View {
        NavigationStack {
            Form {
                TextField("Name", text: $deviceName)
                LabeledContent("iOS Version", value: "16.2")
                Toggle("Wi-Fi", isOn: $isWifiEnabled)
            }
            .navigationBarTitle("Settings")
        }
    }
}
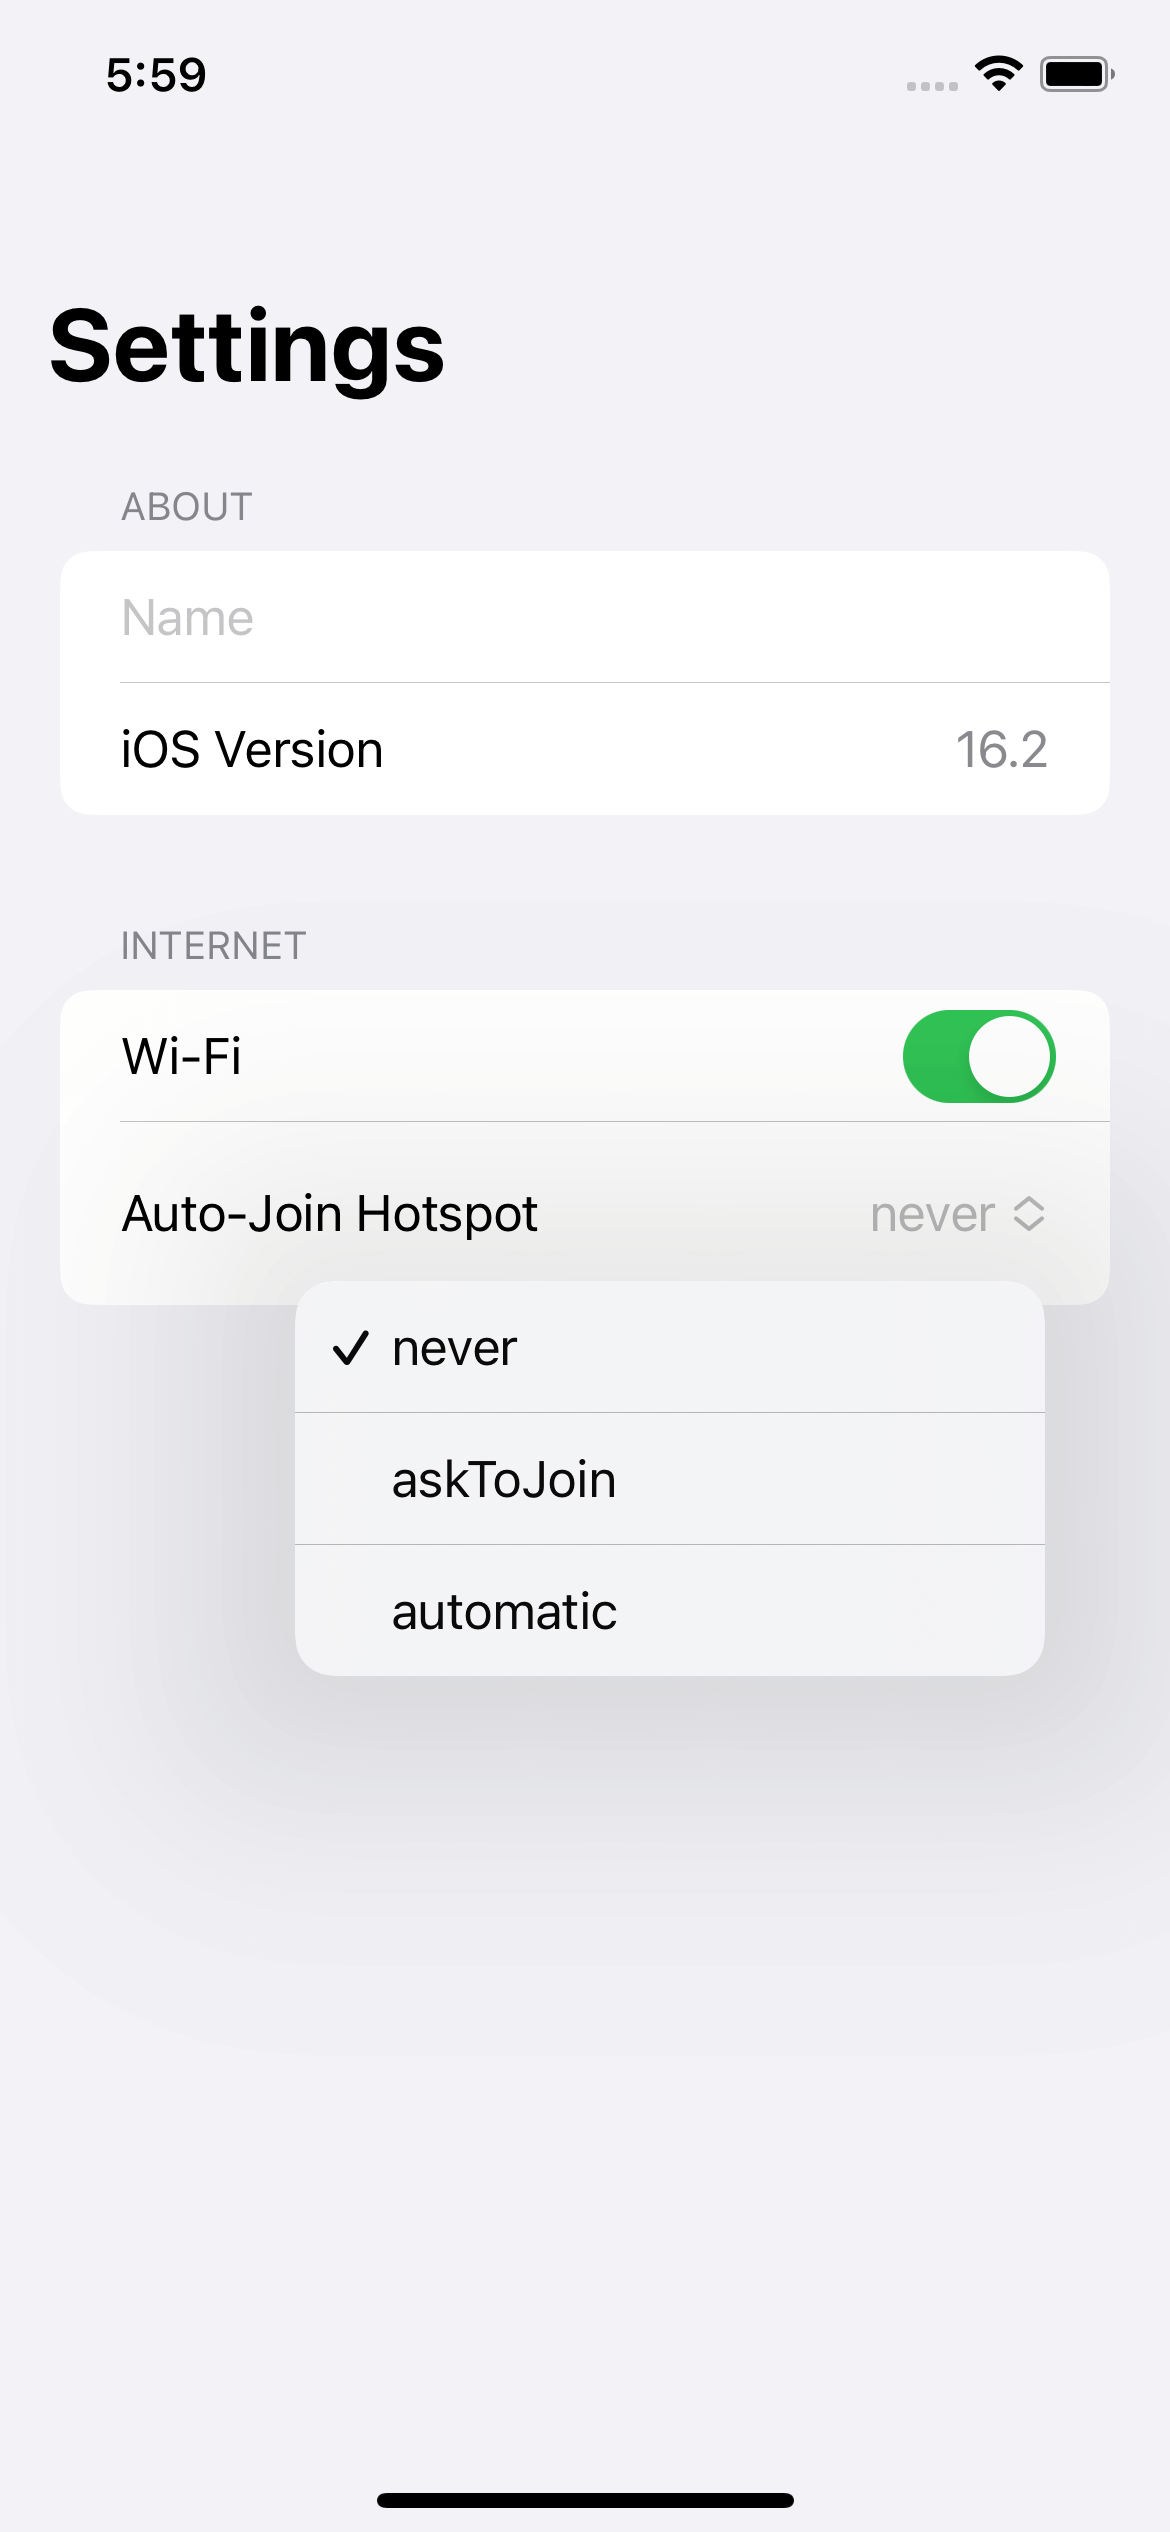
Add Section to a Form
If you have a lot of controls, you can use Section to group related items together.
In the following example, we create two groups.
- About
- Internet
struct ContentView: View {
    @AppStorage("deviceName") private var deviceName: String = ""
    @AppStorage("wifi") private var isWifiEnabled: Bool = false

    var body: some View {
        NavigationStack {
            Form {
                Section {
                    TextField("Name", text: $deviceName)
                    LabeledContent("iOS Version", value: "16.2")
                } header: {
                    Text("About")
                }

                Section {
                    Toggle("Wi-Fi", isOn: $isWifiEnabled)
                } header: {
                    Text("Internet")
                }
            }
            .navigationBarTitle("Settings")
        }
    }
}
Add Picker to a Form
Settings usually include an option for users to choose from.
So, enum and Picker are common choices. Form also supports a picker view.
I create a new enum for an option, AutoJoinHotspotOption.
enum AutoJoinHotspotOption: String, CaseIterable, Identifiable {
    var id: Self {
        return self
    }

    case never
    case askToJoin
    case automatic
}
Then, I present these options with a Picker view.
struct ContentView: View {
    @AppStorage("deviceName") private var deviceName: String = ""
    @AppStorage("wifi") private var isWifiEnabled: Bool = false
    @AppStorage("autoJoin") private var autoJoinOption: AutoJoinHotspotOption = .never

    var body: some View {
        NavigationStack {
            Form {
                Section {
                    TextField("Name", text: $deviceName)
                    LabeledContent("iOS Version", value: "16.2")
                } header: {
                    Text("About")
                }

                Section {
                    Toggle("Wi-Fi", isOn: $isWifiEnabled)
                    Picker("Auto-Join Hotspot", selection: $autoJoinOption) {
                        ForEach(AutoJoinHotspotOption.allCases) { option in
                            Text(option.rawValue)
                        }
                    }

                } header: {
                    Text("Internet")
                }
            }
            .navigationBarTitle("Settings")
        }
    }
}
A picker renders with a menu style in iOS 16.
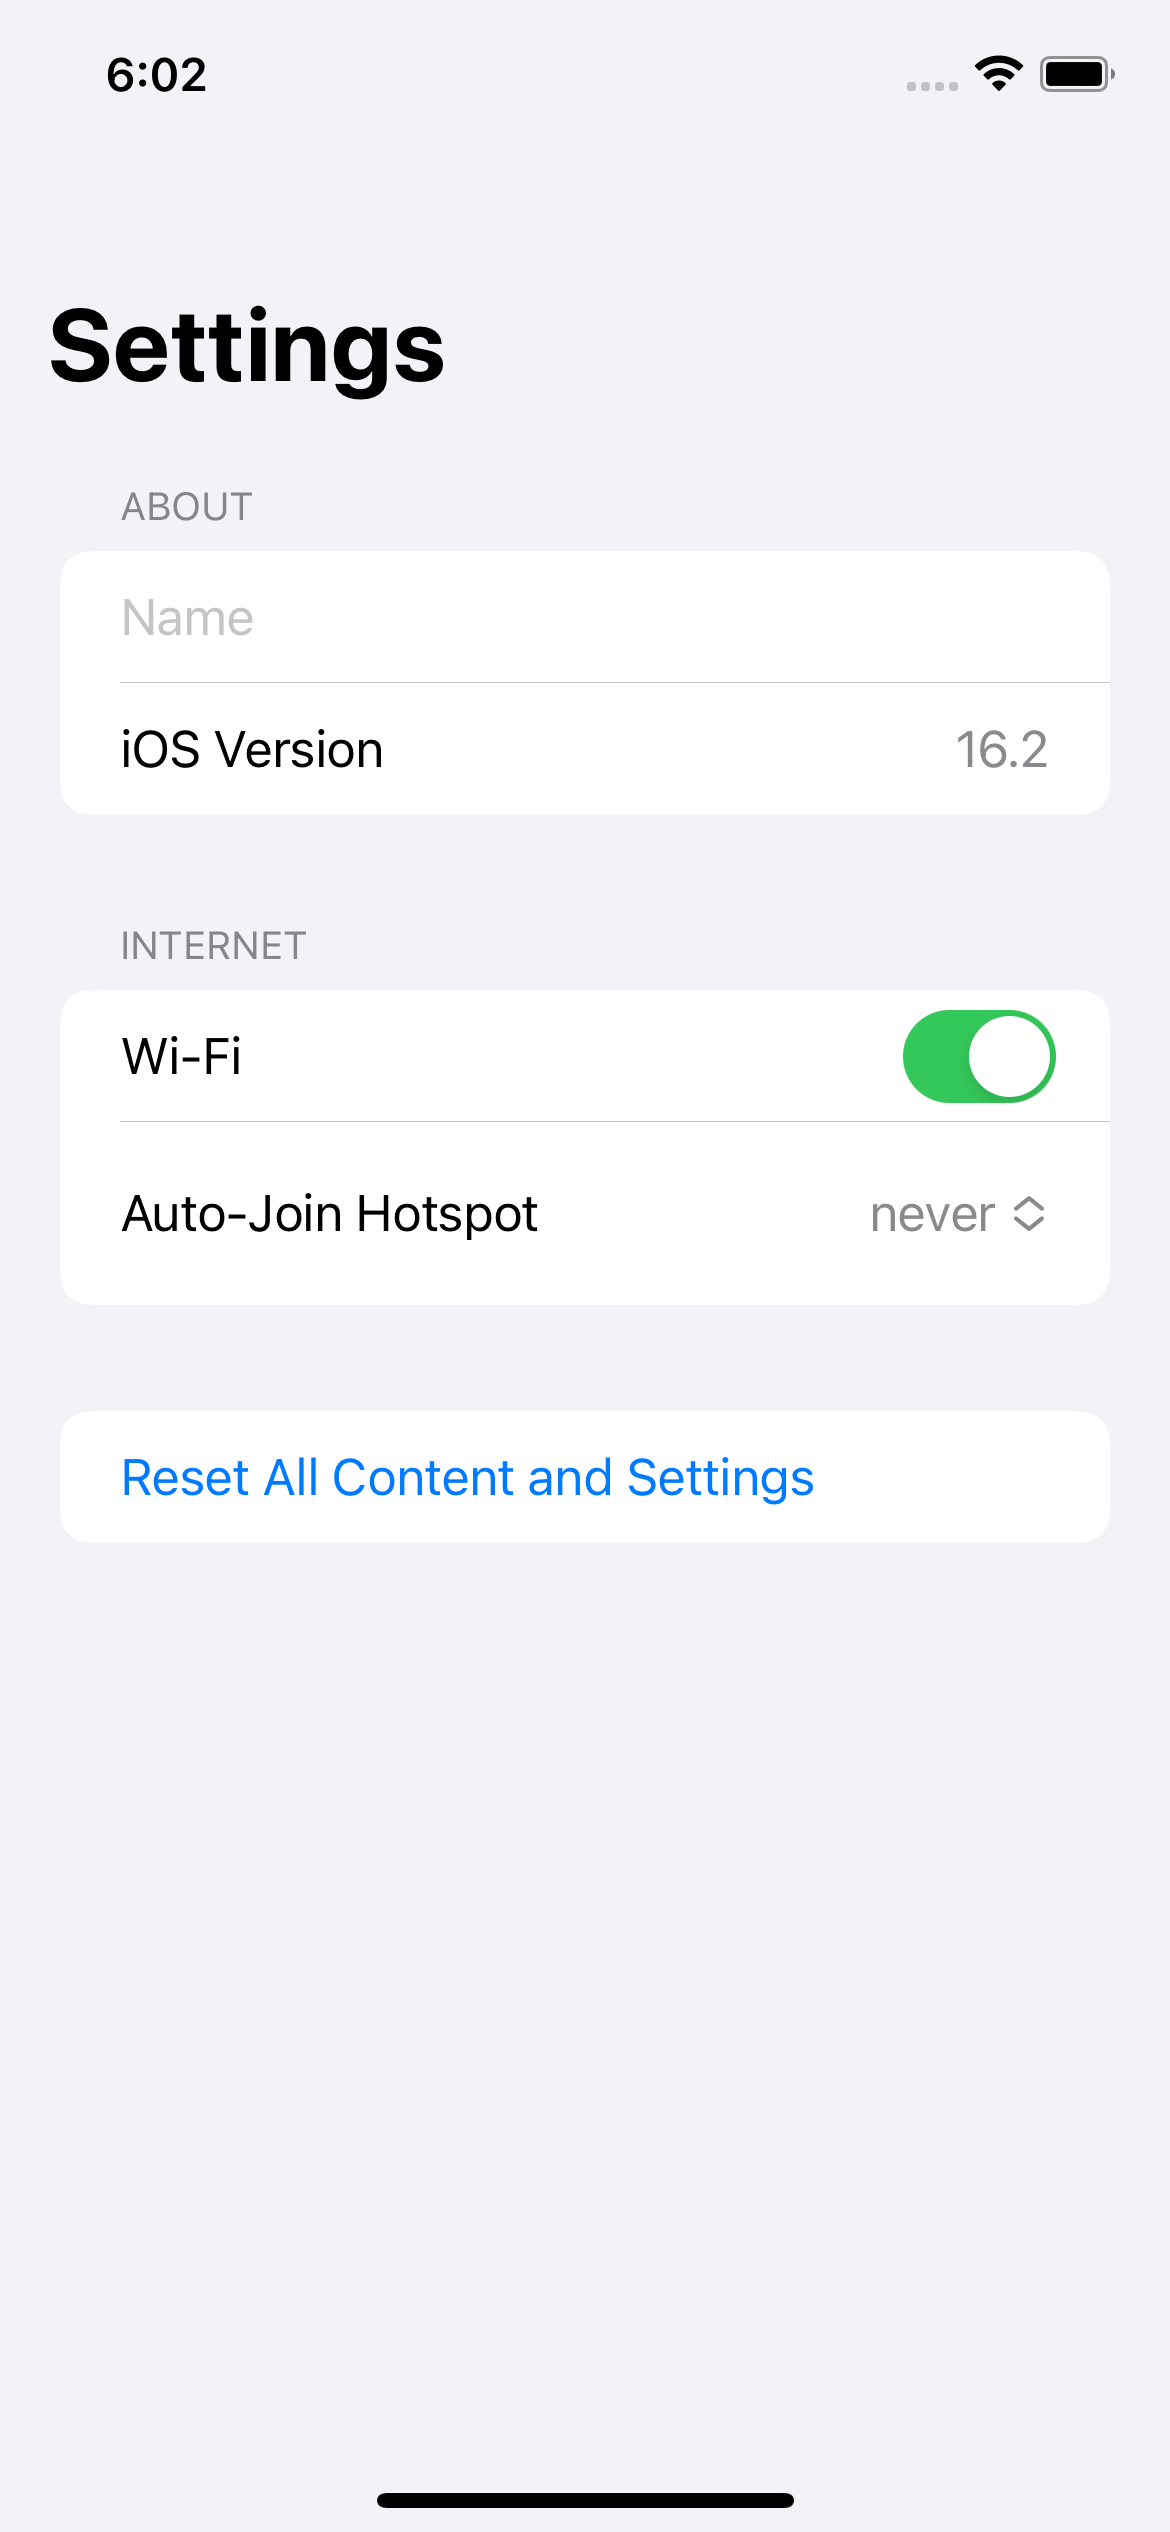
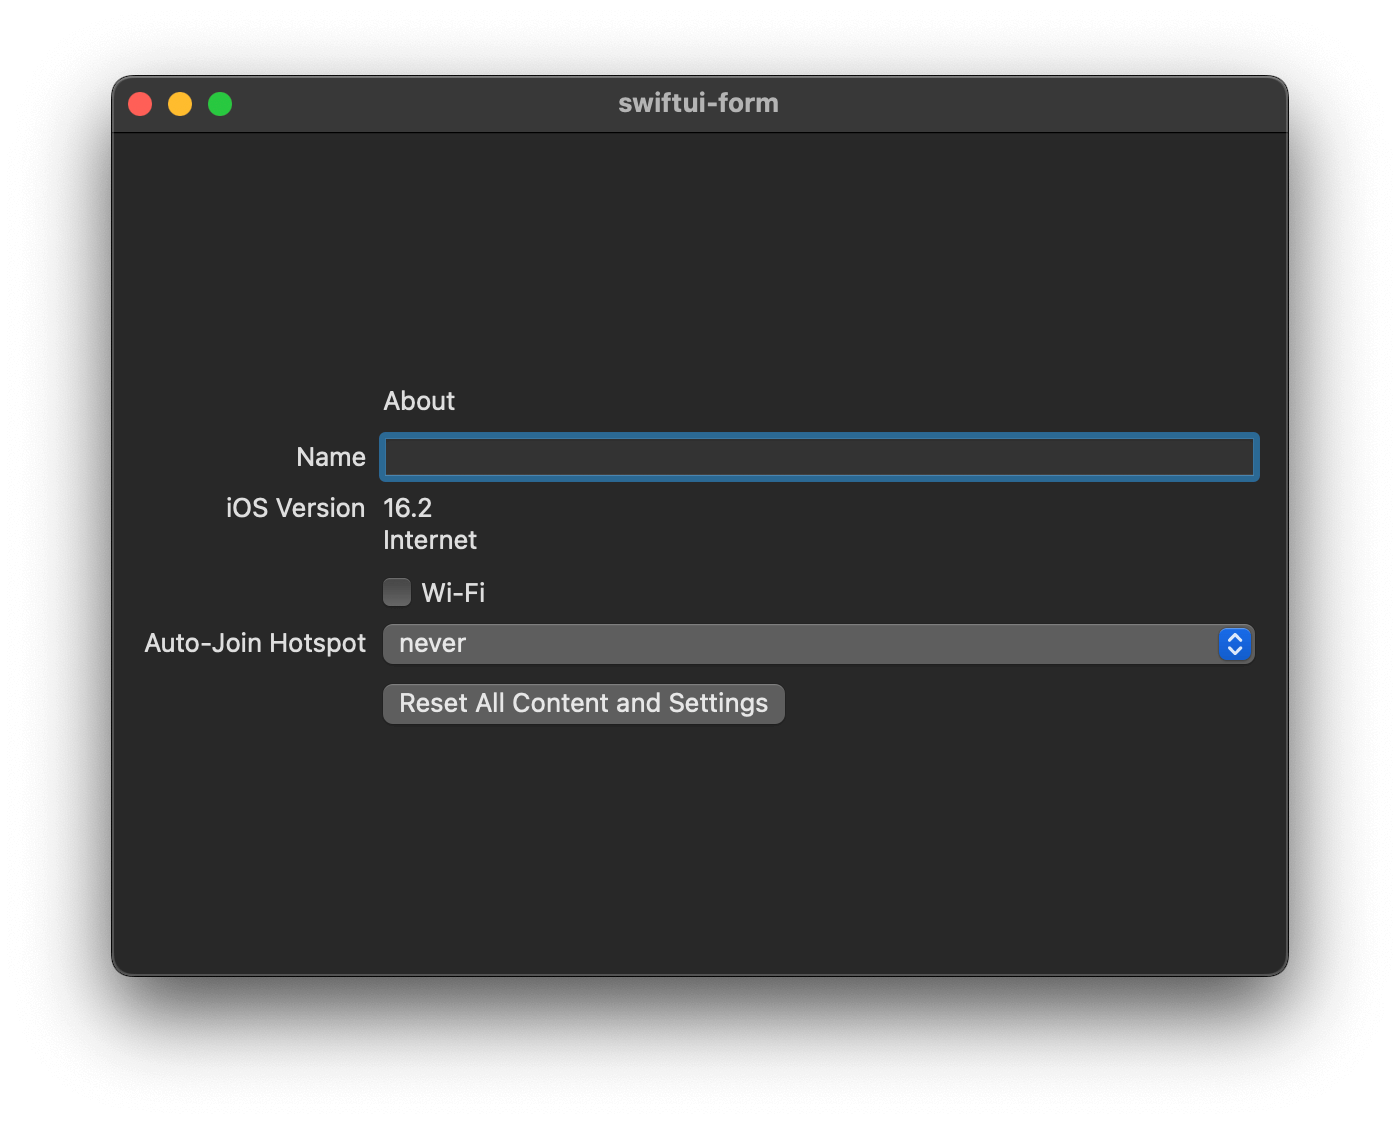
Add Button to a Form
The last control that I will add to the form is a button.
We add a button to reset all content and settings and put it in the new section at the bottom of the form.
struct ContentView: View {
    @AppStorage("deviceName") private var deviceName: String = ""
    @AppStorage("wifi") private var isWifiEnabled: Bool = false
    @AppStorage("autoJoin") private var autoJoinOption: AutoJoinHotspotOption = .never

    var body: some View {
        NavigationStack {
            Form {
                Section {
                    TextField("Name", text: $deviceName)
                    LabeledContent("iOS Version", value: "16.2")
                } header: {
                    Text("About")
                }

                Section {
                    Toggle("Wi-Fi", isOn: $isWifiEnabled)
                    Picker("Auto-Join Hotspot", selection: $autoJoinOption) {
                        ForEach(AutoJoinHotspotOption.allCases) { option in
                            Text(option.rawValue)
                        }
                    }

                } header: {
                    Text("Internet")
                }

                Section {
                    Button("Reset All Content and Settings") {
                        // Reset logic
                    }
                }
            }
            .navigationBarTitle("Settings")
        }
    }
}
You can easily support sarunw.com by checking out this sponsor.
Offline Transcription: Fast, privacy-focus way to transcribe audio, video, and podcast files. No data leaves your Mac.
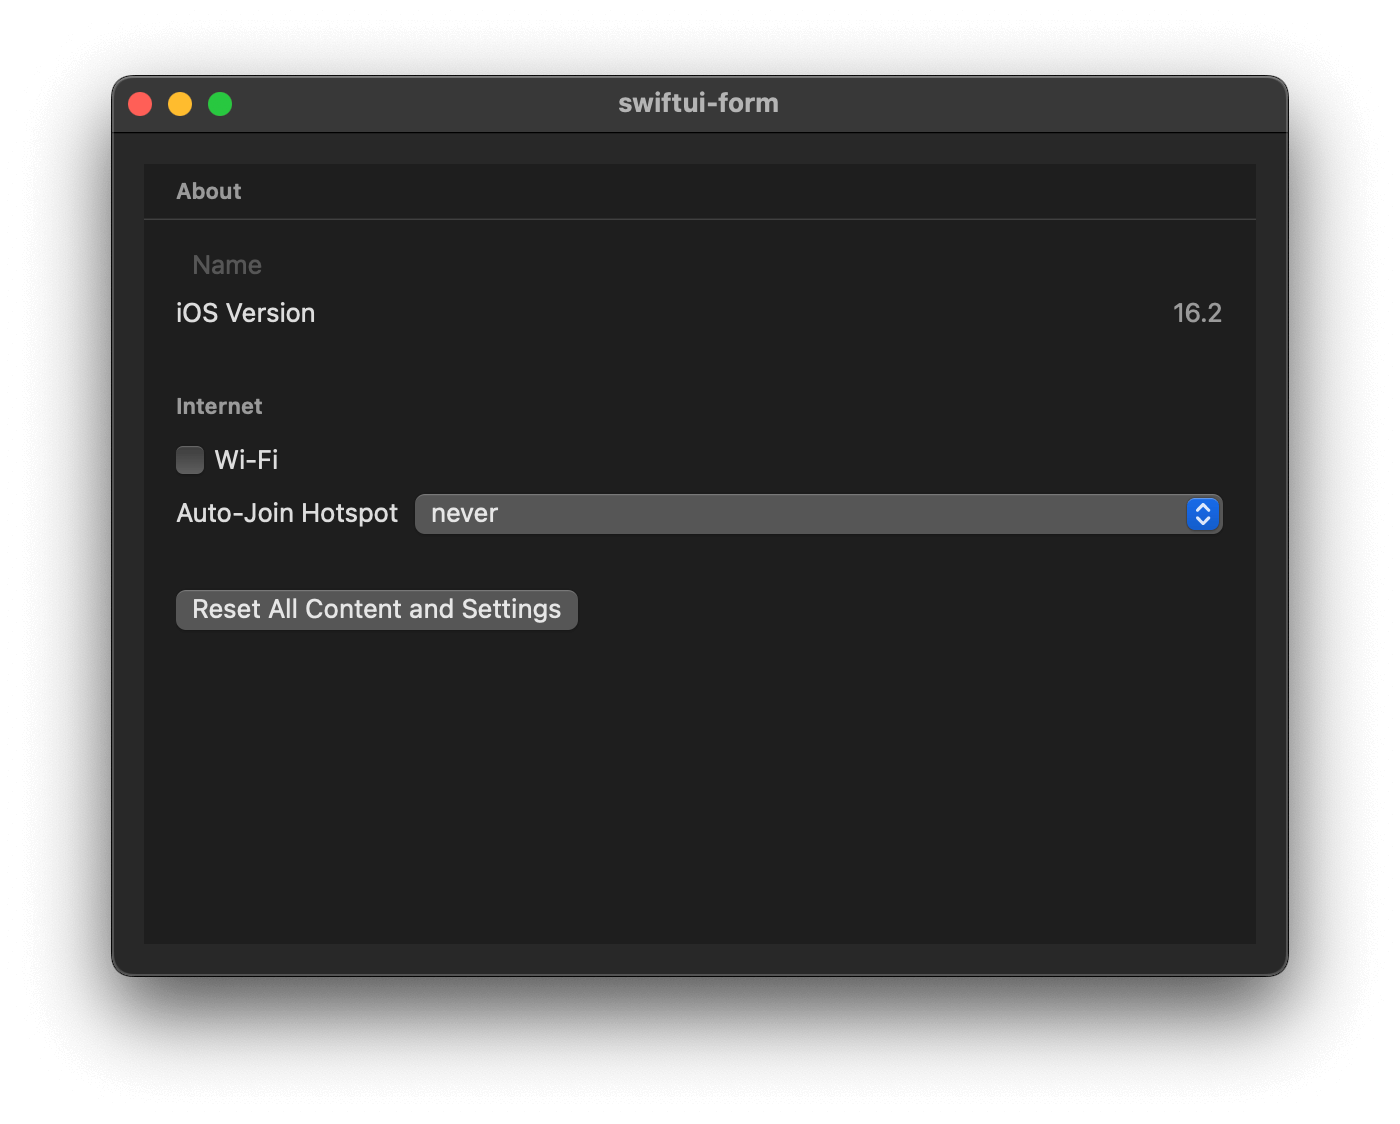
What is the difference between Form and List
With the example you see so far, you might wonder what the difference is between List and Form.
It is a reasonable question since Form in iOS uses the same appearance and style as an inset grouped list. So, there is no difference there.
But as mentioned earlier, Form applies a platform-appropriate style to its child views. So, the similarity between Form and List isn't guaranteed.
You will see a difference when you use Form on a platform where settings use a different design language from a List.
Here is an example of Form in macOS.
Compare it to List here.
Read more article about SwiftUI, Form, or see all available topic
Enjoy the read?
If you enjoy this article, you can subscribe to the weekly newsletter.
Every Friday, you'll get a quick recap of all articles and tips posted on this site. No strings attached. Unsubscribe anytime.
Feel free to follow me on Twitter and ask your questions related to this post. Thanks for reading and see you next time.
If you enjoy my writing, please check out my Patreon https://www.patreon.com/sarunw and become my supporter. Sharing the article is also greatly appreciated.
Become a patron Buy me a coffee Tweet ShareSwift private access level change in Swift 4
In Swift 4, there is a change in the private access level that means to end the use of fileprivate. Let's learn what it is all about.
Swift Ternary operator (?:)
The Ternary operator is quite similar to if-else statements, but it isn't the same. Let's learn what it is and how to use it.