Easy way to Format Date in SwiftUI Text
Table of Contents
Since iOS 14, SwiftUI Text has many initializers dedicated to presenting dates.
In this article, we will explore all of them.
- Text of Range between two dates
- Text of time interval
- Text of Date and Time
- Count down / up Timer
- Offset
- Relative Time
Text of Range between two dates
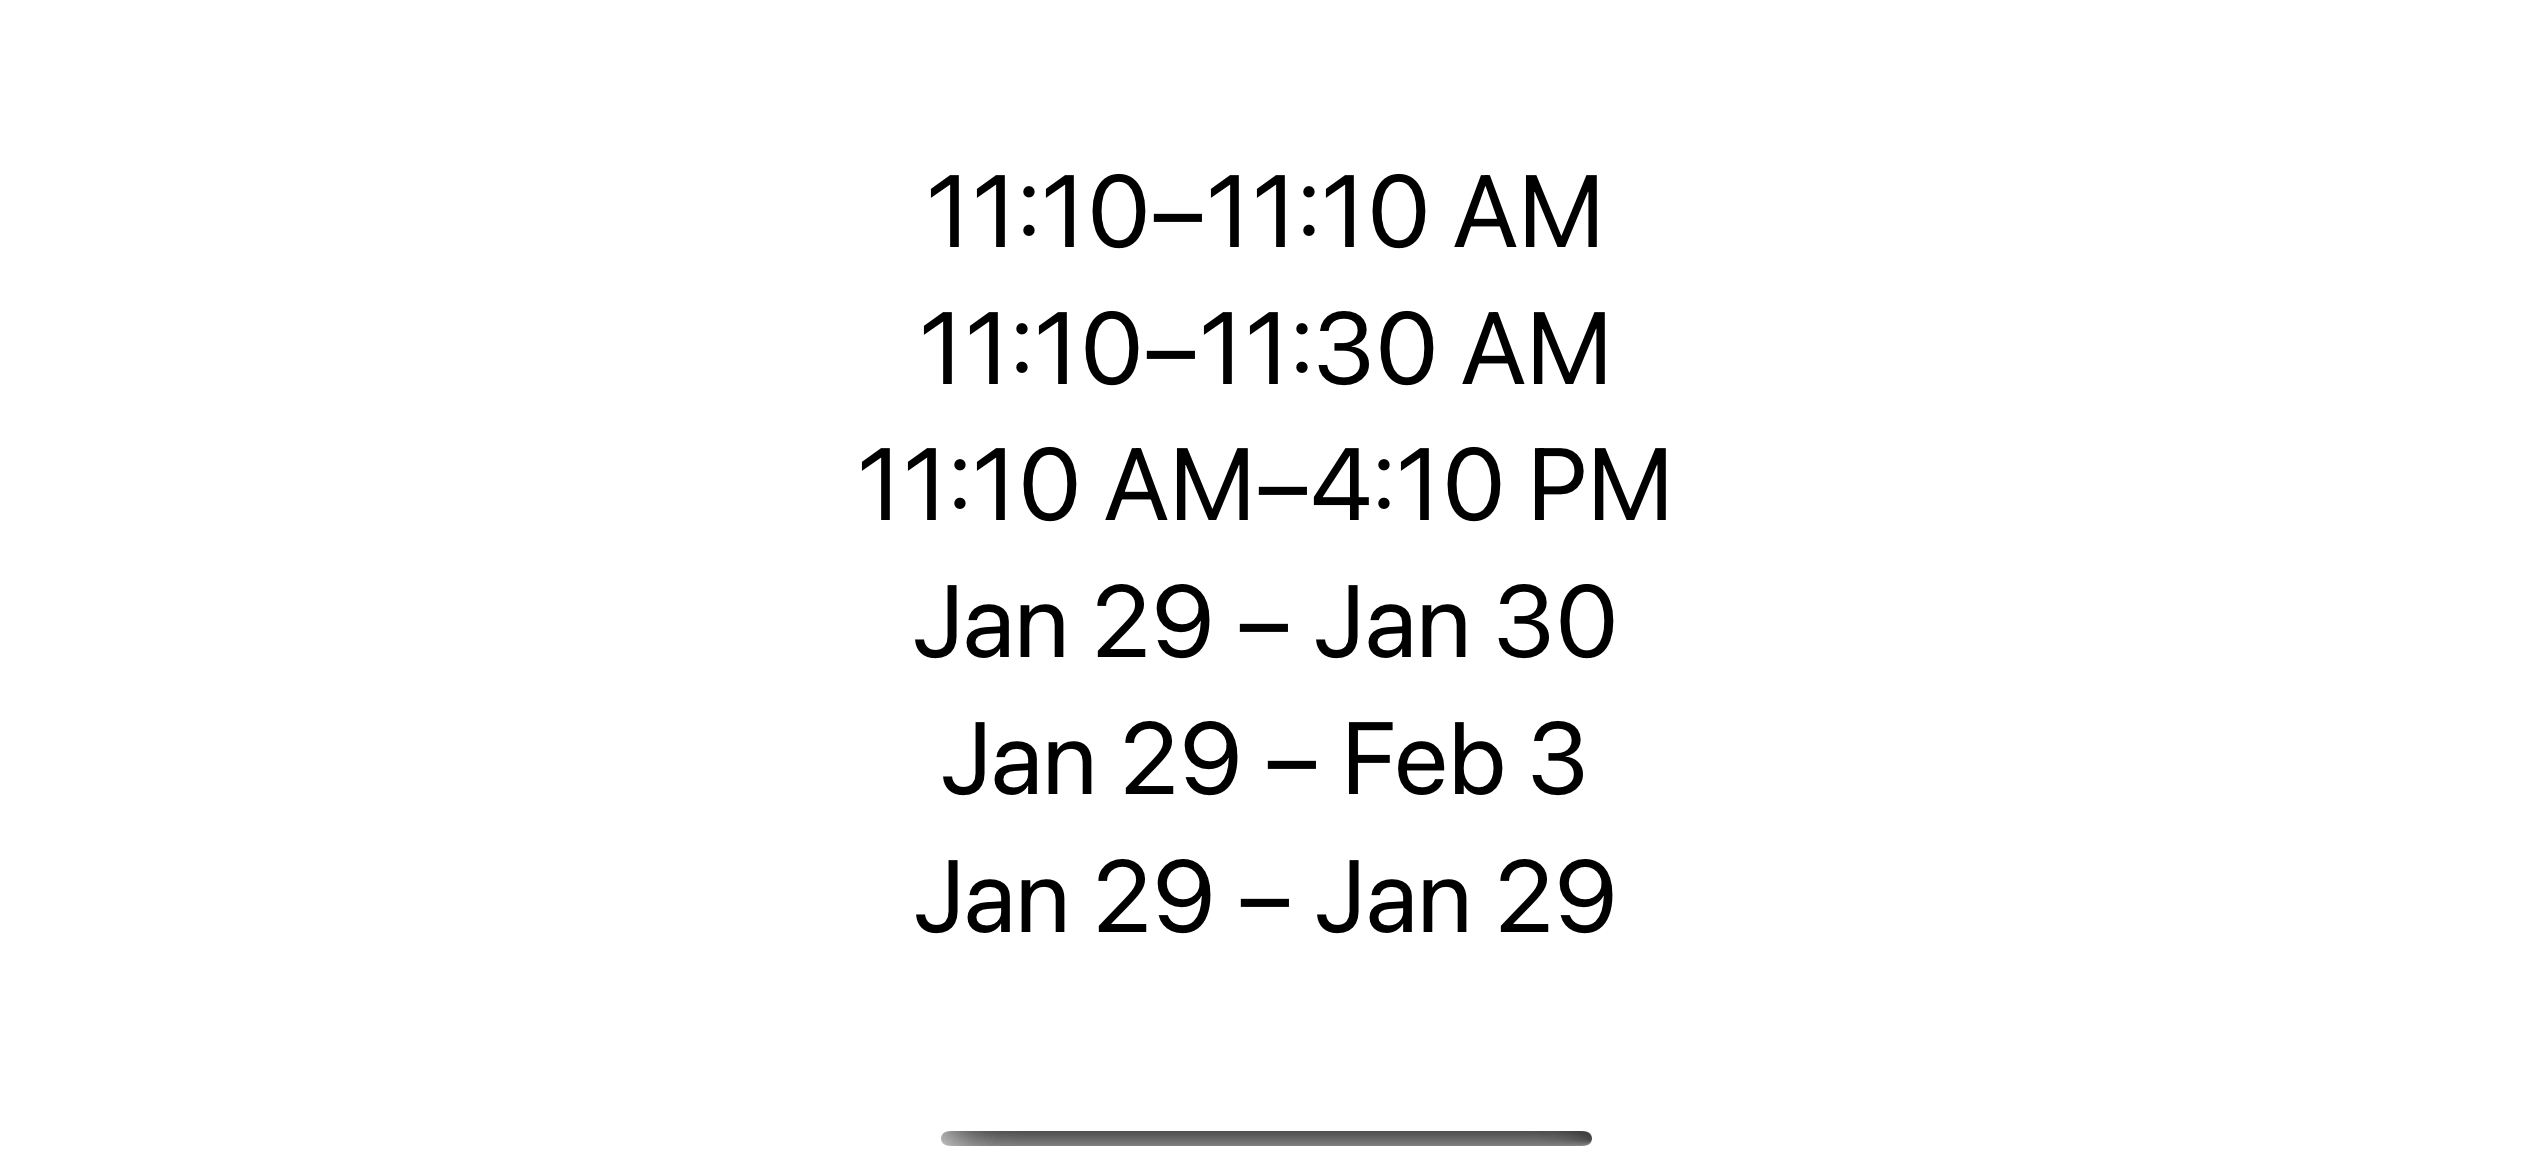
To present a range between two dates, we initialize a Text view with ClosedRange of two Date, e.g., startDate...endDate.
In the following example, I use dates with different time intervals to show you all the possible formats.
struct ContentView: View {
    let startDate = Date.now
    let secondsFromStart = Date.now.addingTimeInterval(20)
    let minutesFromStart = Date.now.addingTimeInterval(20 * 60)
    let hoursFromStart = Date.now.addingTimeInterval(5 * 60 * 60)
    let daysFromStart = Date.now.addingTimeInterval(24 * 60 * 60)
    let monthsFromStart = Date.now.addingTimeInterval(5 * 24 * 60 * 60)
    let yearsFromStart = Date.now.addingTimeInterval(365 * 24 * 60 * 60)

    var body: some View {
        VStack {
            Text(startDate...secondsFromStart)
            Text(startDate...minutesFromStart)
            Text(startDate...hoursFromStart)
            Text(startDate...daysFromStart)
            Text(startDate...monthsFromStart)
            Text(startDate...yearsFromStart)
        }
        .font(.largeTitle)
    }
}
Here is the result.
Caveat
There are two scenarios I want to highlight here.
- The date range from this method will not show the number of seconds.
- It neither show the number of years.
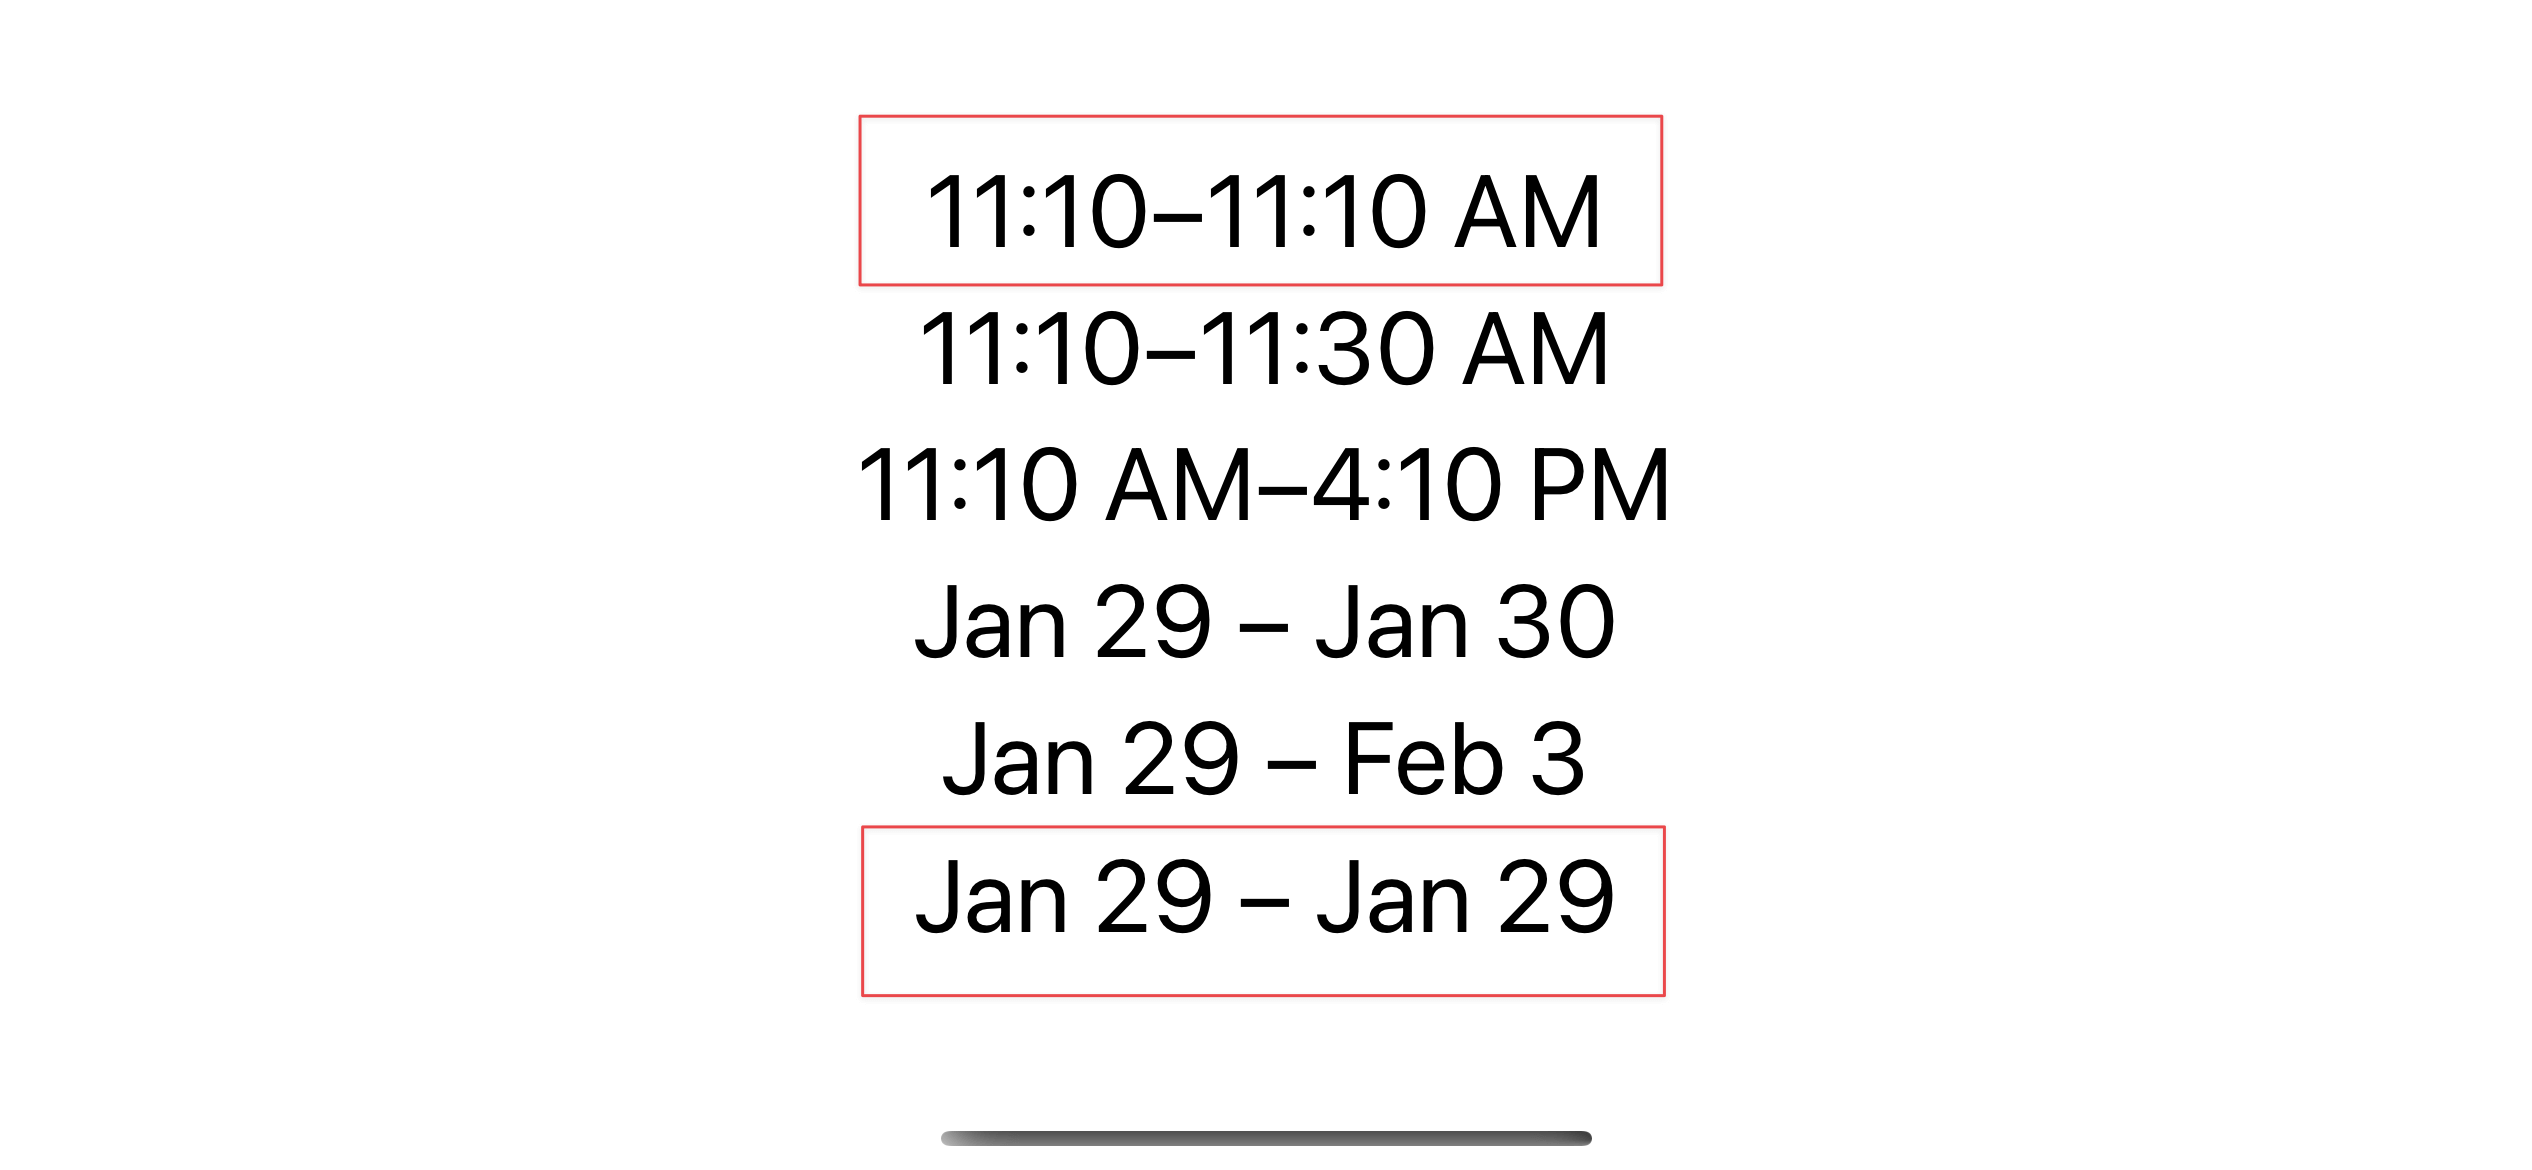
Based on these facts, I think we should not use this to show the range between two distance dates.
I think it best represents the date range between two dates within the same day.
You can easily support sarunw.com by checking out this sponsor.

AI Paraphrase:Are you tired of staring at your screen, struggling to rephrase sentences, or trying to find the perfect words for your text?
Text of time interval
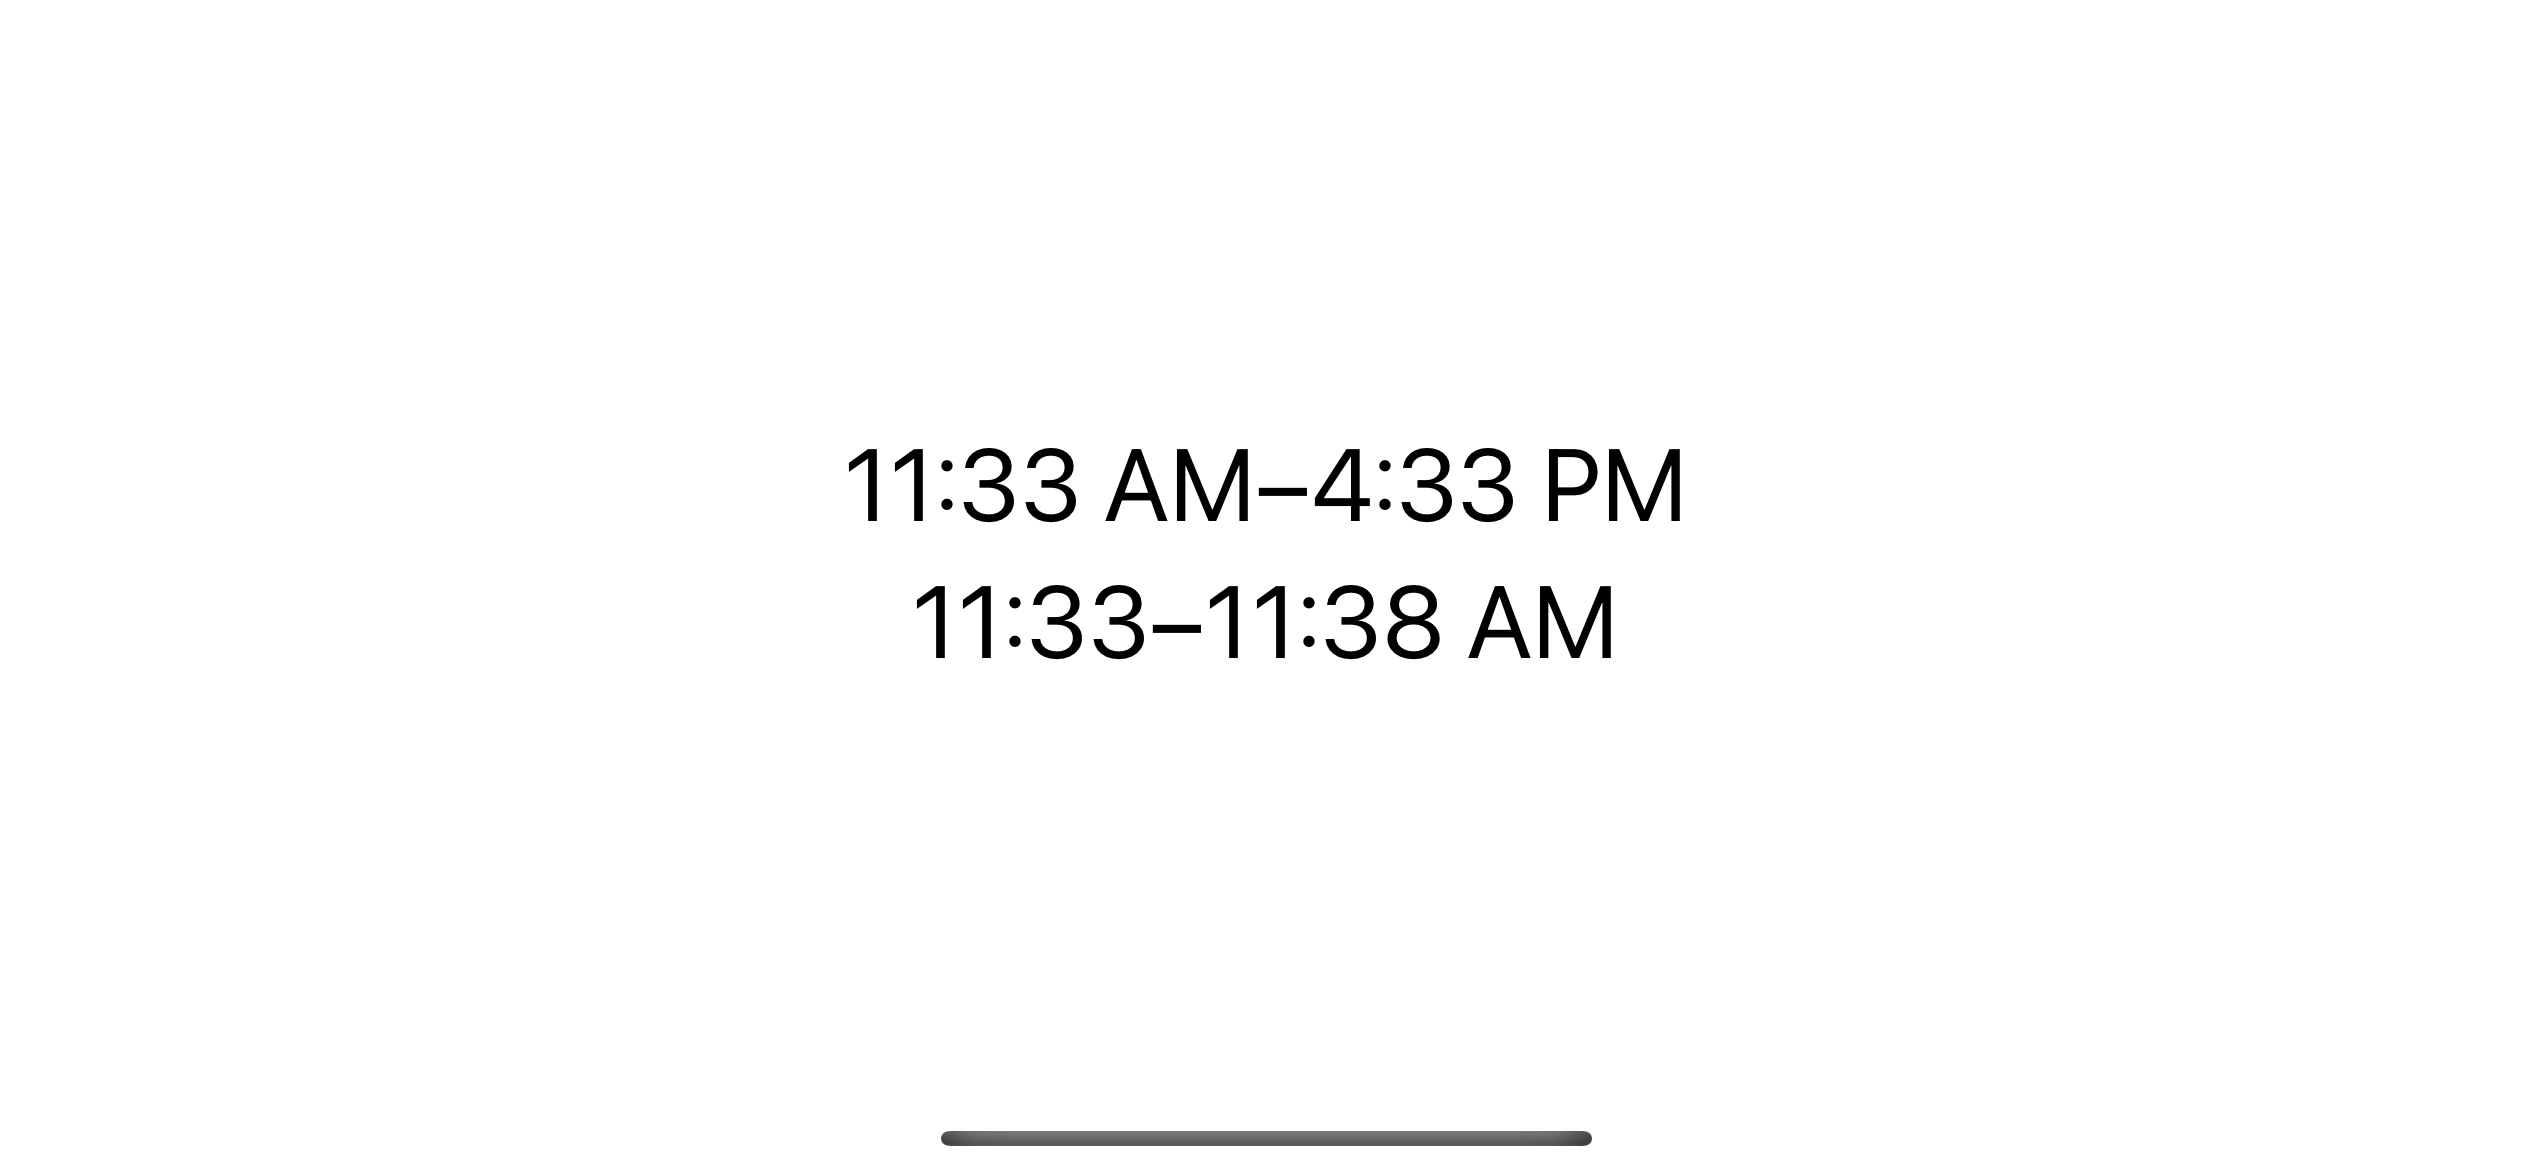
Text view also accepts DateInterval, which is also a struct that represents a closed range of dates.
It also yields the same result as using ClosedRange.
struct ContentView: View {
    let startDate = Date.now
    let hoursFromStart = Date.now.addingTimeInterval(5 * 60 * 60)

    var body: some View {
        VStack {
            Text(DateInterval(start: startDate, end: hoursFromStart))
            Text(DateInterval(start: startDate, duration: 5 * 60))
        }
        .font(.largeTitle)
    }
}
Text of Date and Time
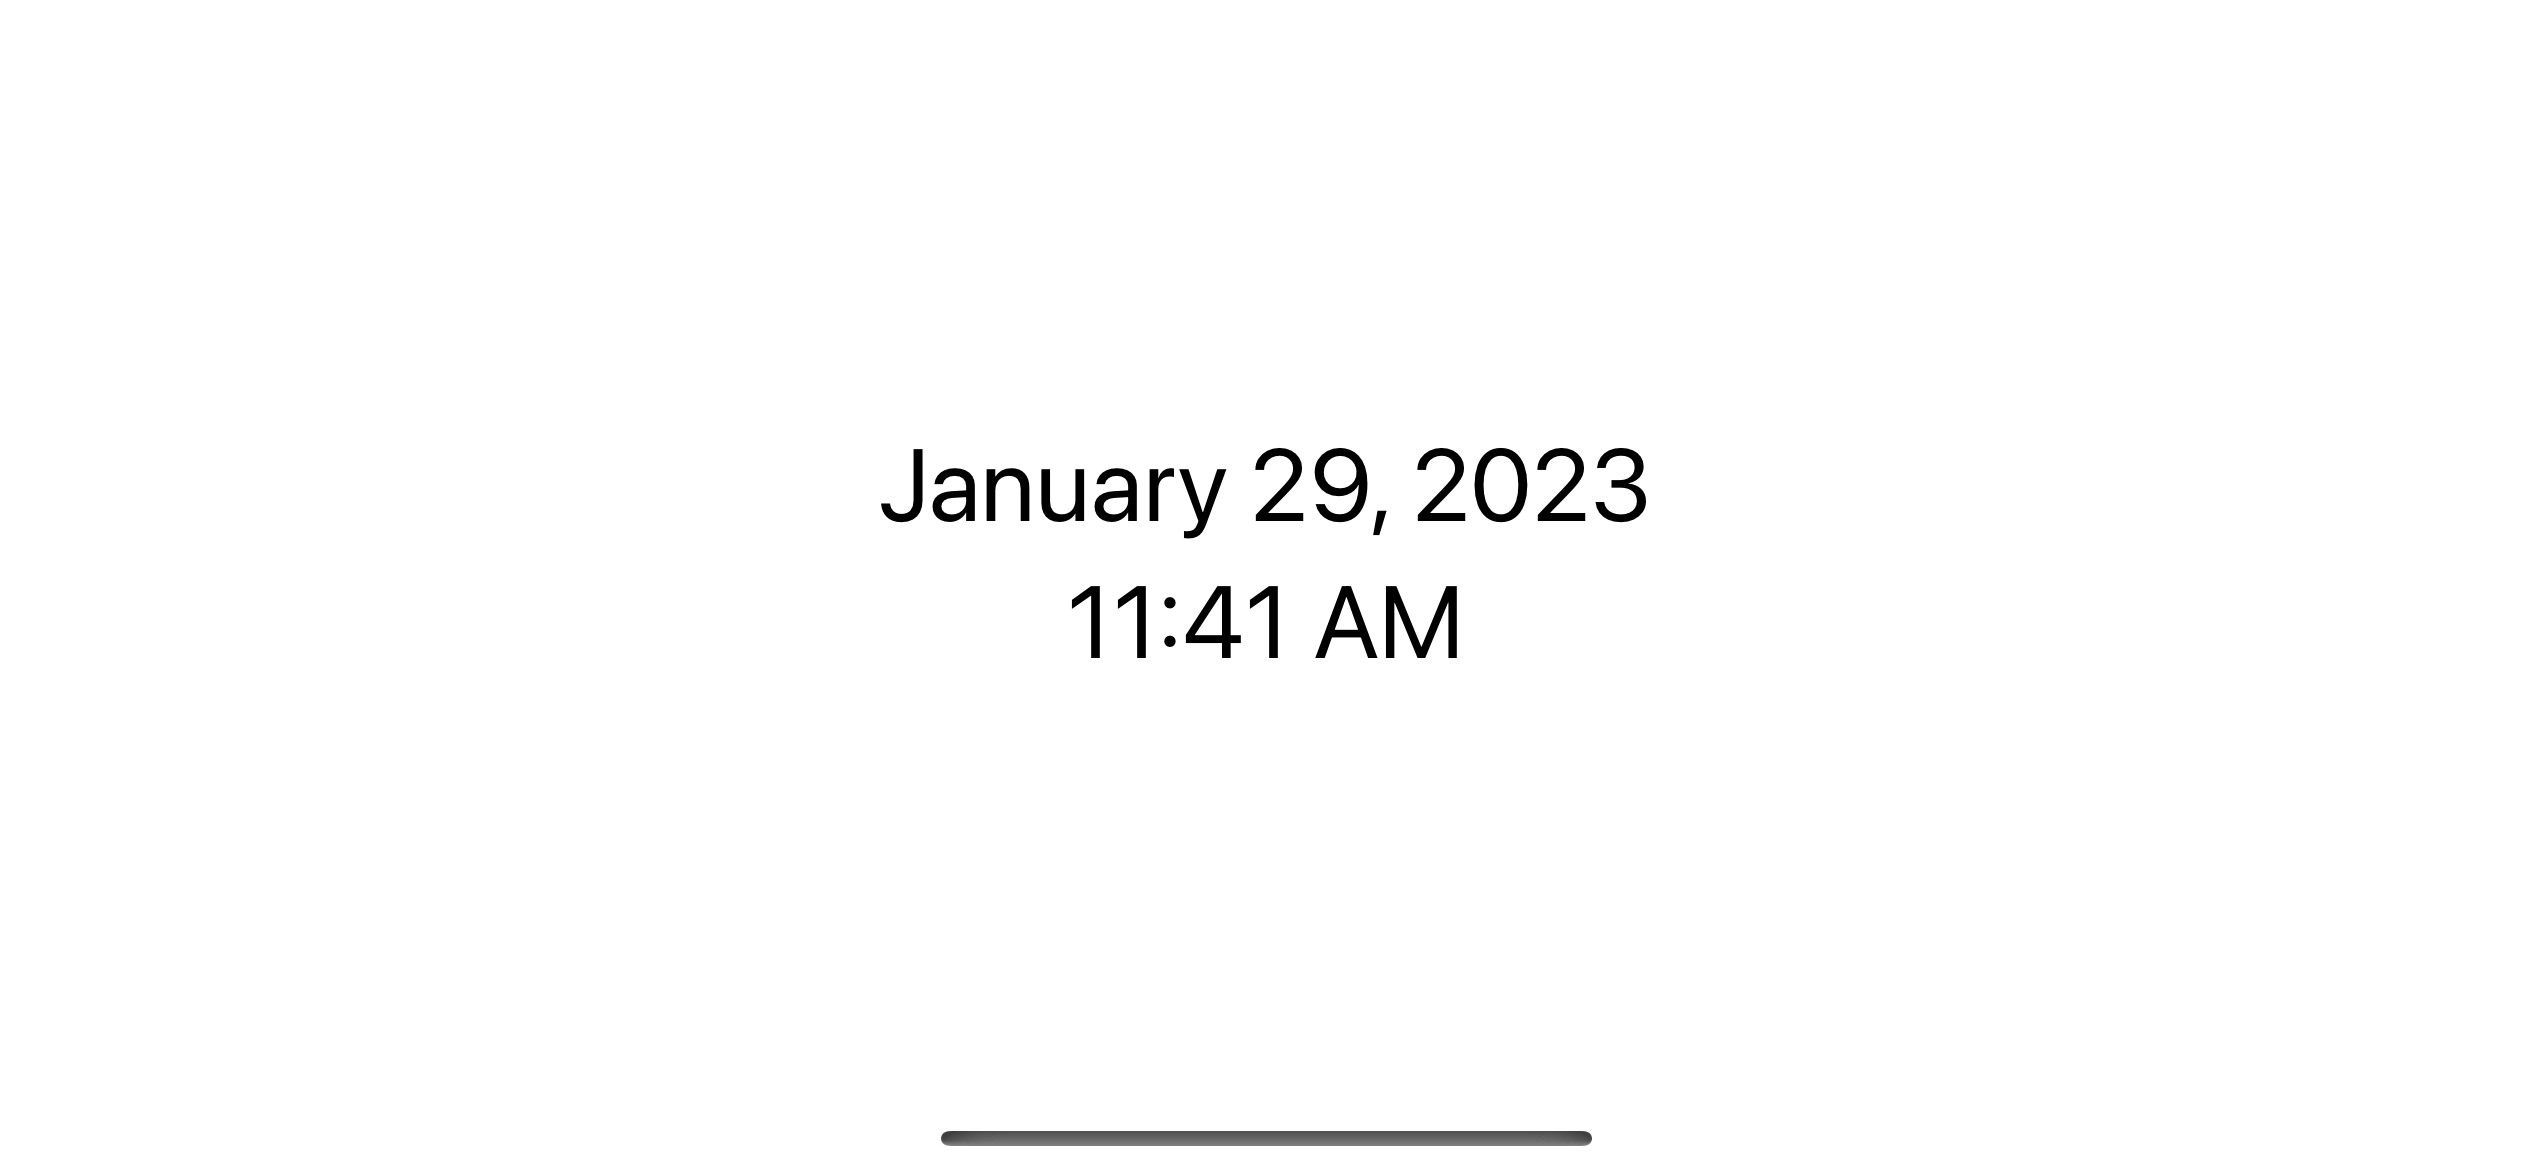
To present date or time is easy, Text has an initializer that accepts Date and Text.DateStyle, init(_ date: Date, style: Text.DateStyle).
- To turn a date into localized date string, we specify
.datestyle. - To turn a date into localized time string, we specify
.timestyle.
struct ContentView: View {
    let startDate = Date.now

    var body: some View {
        VStack {
            Text(startDate, style: .date)
            Text(startDate, style: .time)
        }
        .font(.largeTitle)
    }
}- Text(startDate, style: .date) will show the date components of
startDate. - Text(startDate, style: .time) will show the time components of
startDate.
Timer
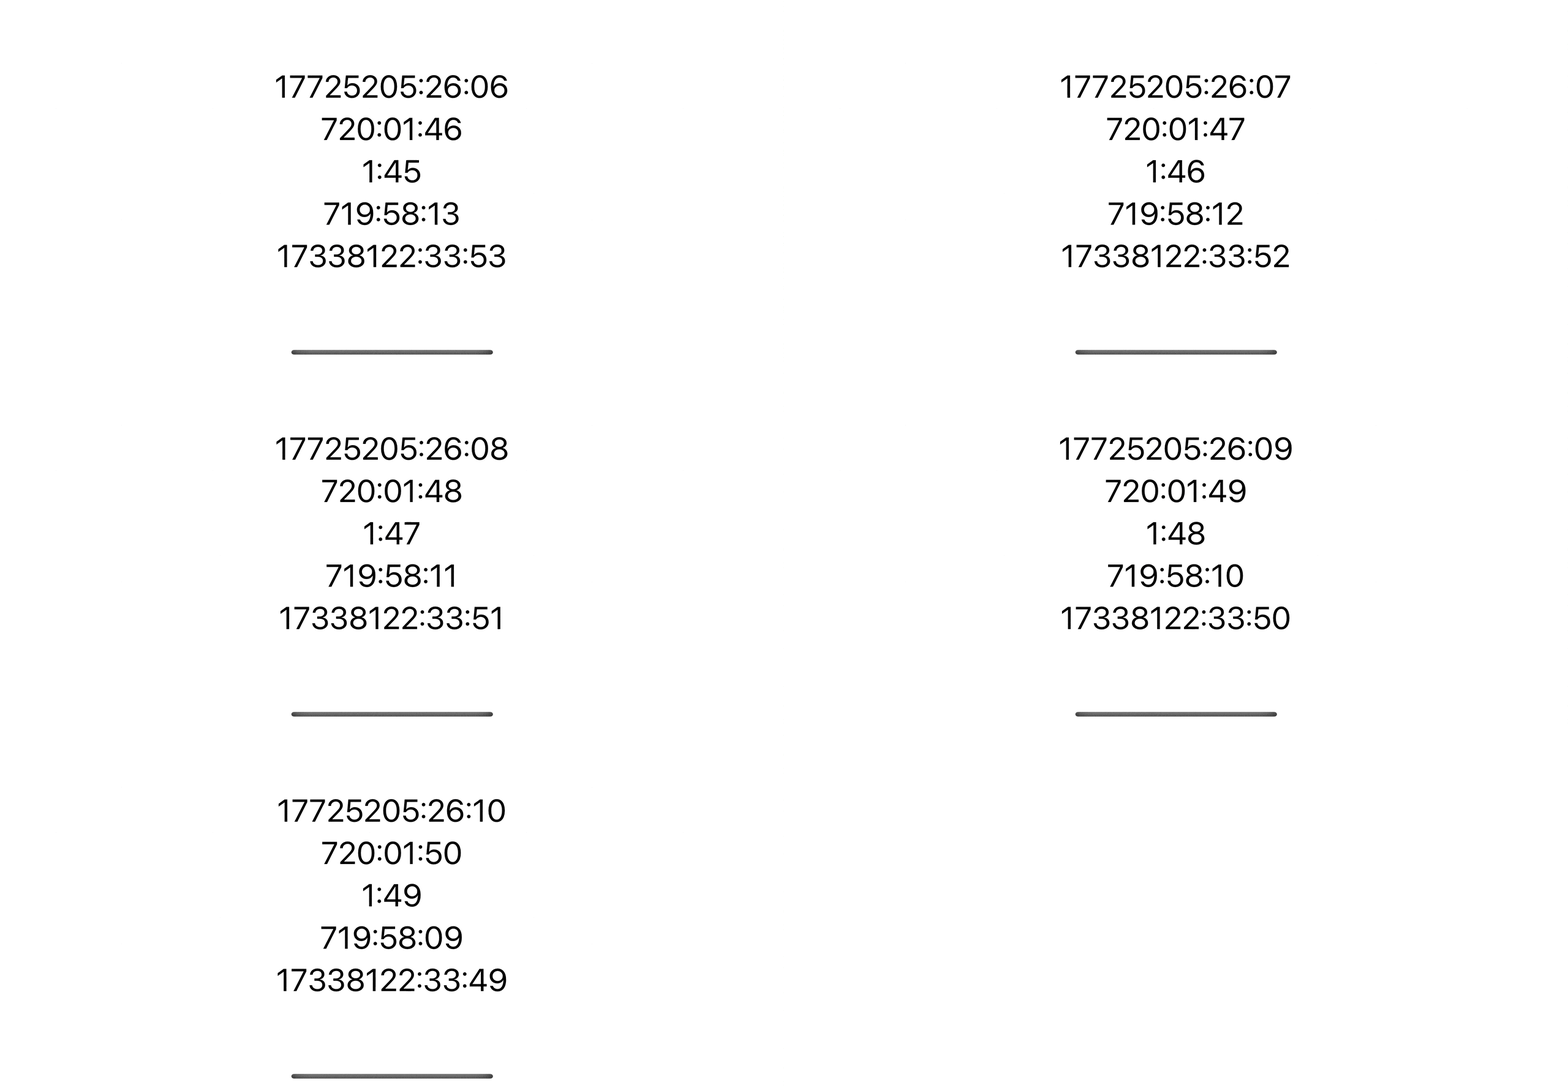
By using the .timer date style, you can have a count-down or count-up timer.
Text view will show a timer counting relative to the current date (now).
- If the specified date is in the past, it will count up from that date.
- If the speicfied date is in the future, it will count down to that date.
struct ContentView: View {
    let pastMonth = Date.now.addingTimeInterval(-30 * 24 * 60 * 60)
    let futureMonth = Date.now.addingTimeInterval(30 * 24 * 60 * 60)

    var body: some View {
        VStack {
            // 1
            Text(.distantPast, style: .timer)
            Text(pastMonth, style: .timer)
            Text(.now, style: .timer)
            // 2
            Text(futureMonth, style: .timer)
            Text(.distantFuture, style: .timer)
        }
        .font(.largeTitle)
    }
}
1 The first three Text views use the dates in the past, so the timer will count up from that date.
2 The other two will count down to the specified future dates.
Offset
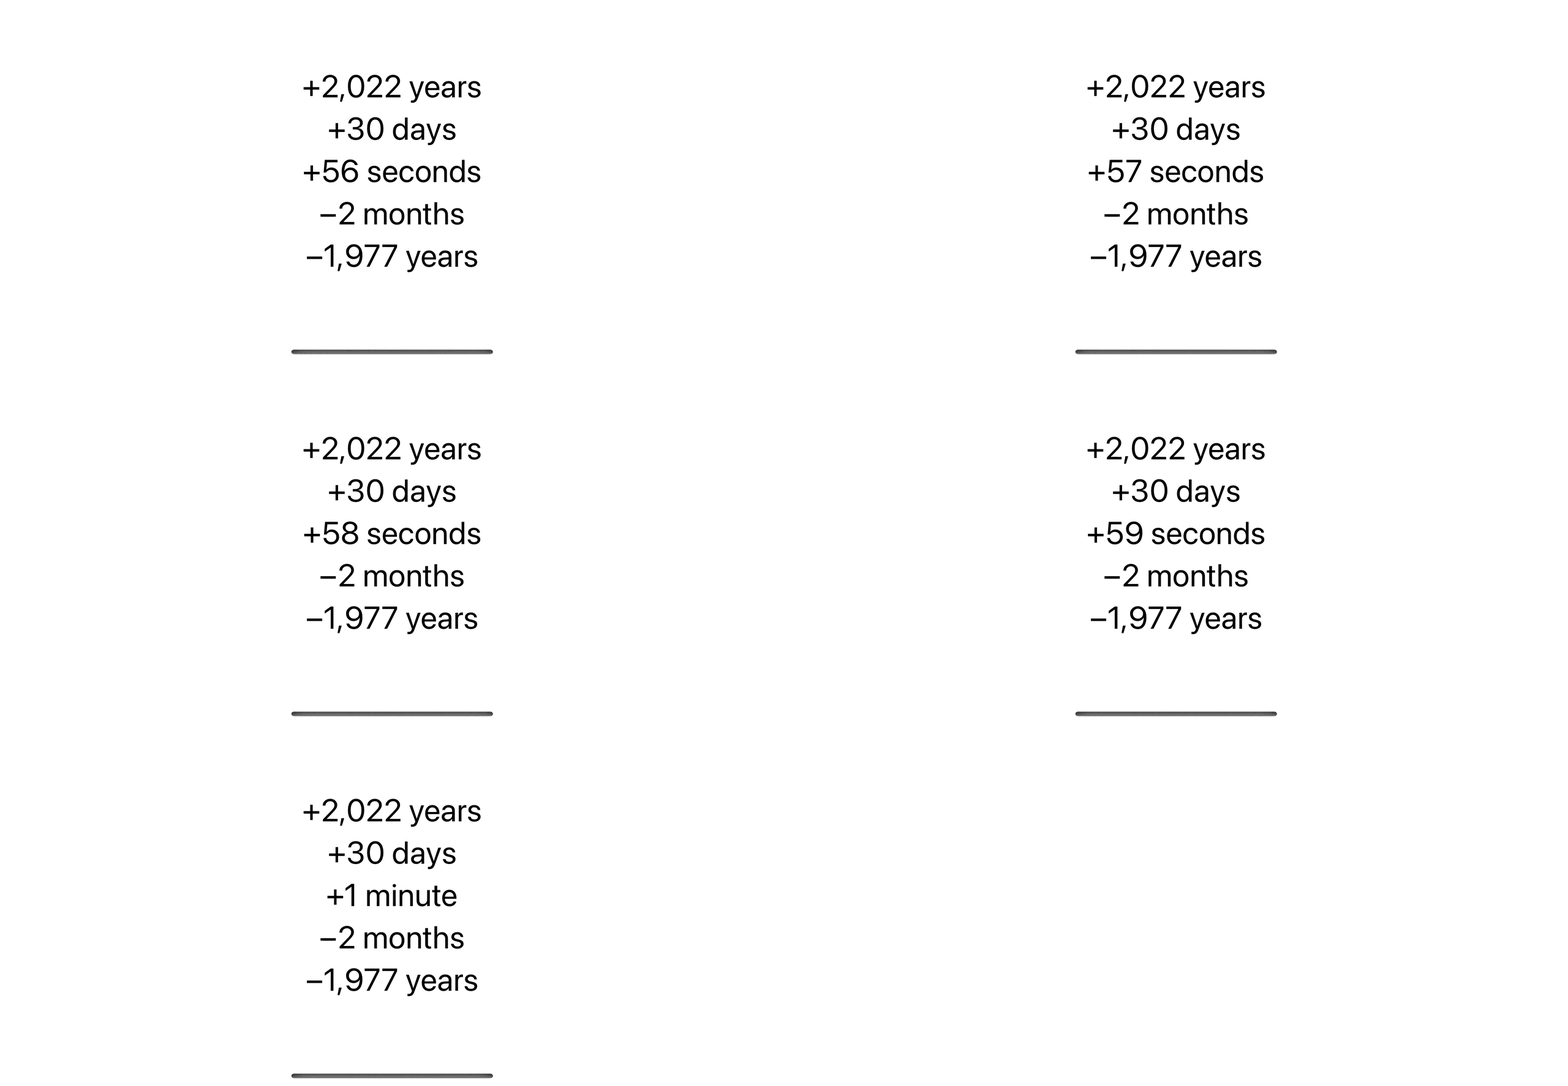
By using the .offset date style, you will get an offset between the specified date and now.
You will get a +, - sign and the difference between the specified date in the largest time unit.
Example output:
+2 hours
-3 months
struct ContentView: View {
    let pastMonth = Date.now.addingTimeInterval(-30 * 24 * 60 * 60)
    let futureMonth = Date.now.addingTimeInterval(60 * 24 * 60 * 60)

    var body: some View {
        VStack {
            Text(.distantPast, style: .offset)
            Text(pastMonth, style: .offset)
            Text(.now, style: .offset)
            Text(futureMonth, style: .offset)
            Text(.distantFuture, style: .offset)
        }
        .font(.largeTitle)
    }
}- The date in the past will prefix with the plus sign (+).
- The date in the future will prefix with the minus sign (-).
You can easily support sarunw.com by checking out this sponsor.

AI Paraphrase:Are you tired of staring at your screen, struggling to rephrase sentences, or trying to find the perfect words for your text?
Relative
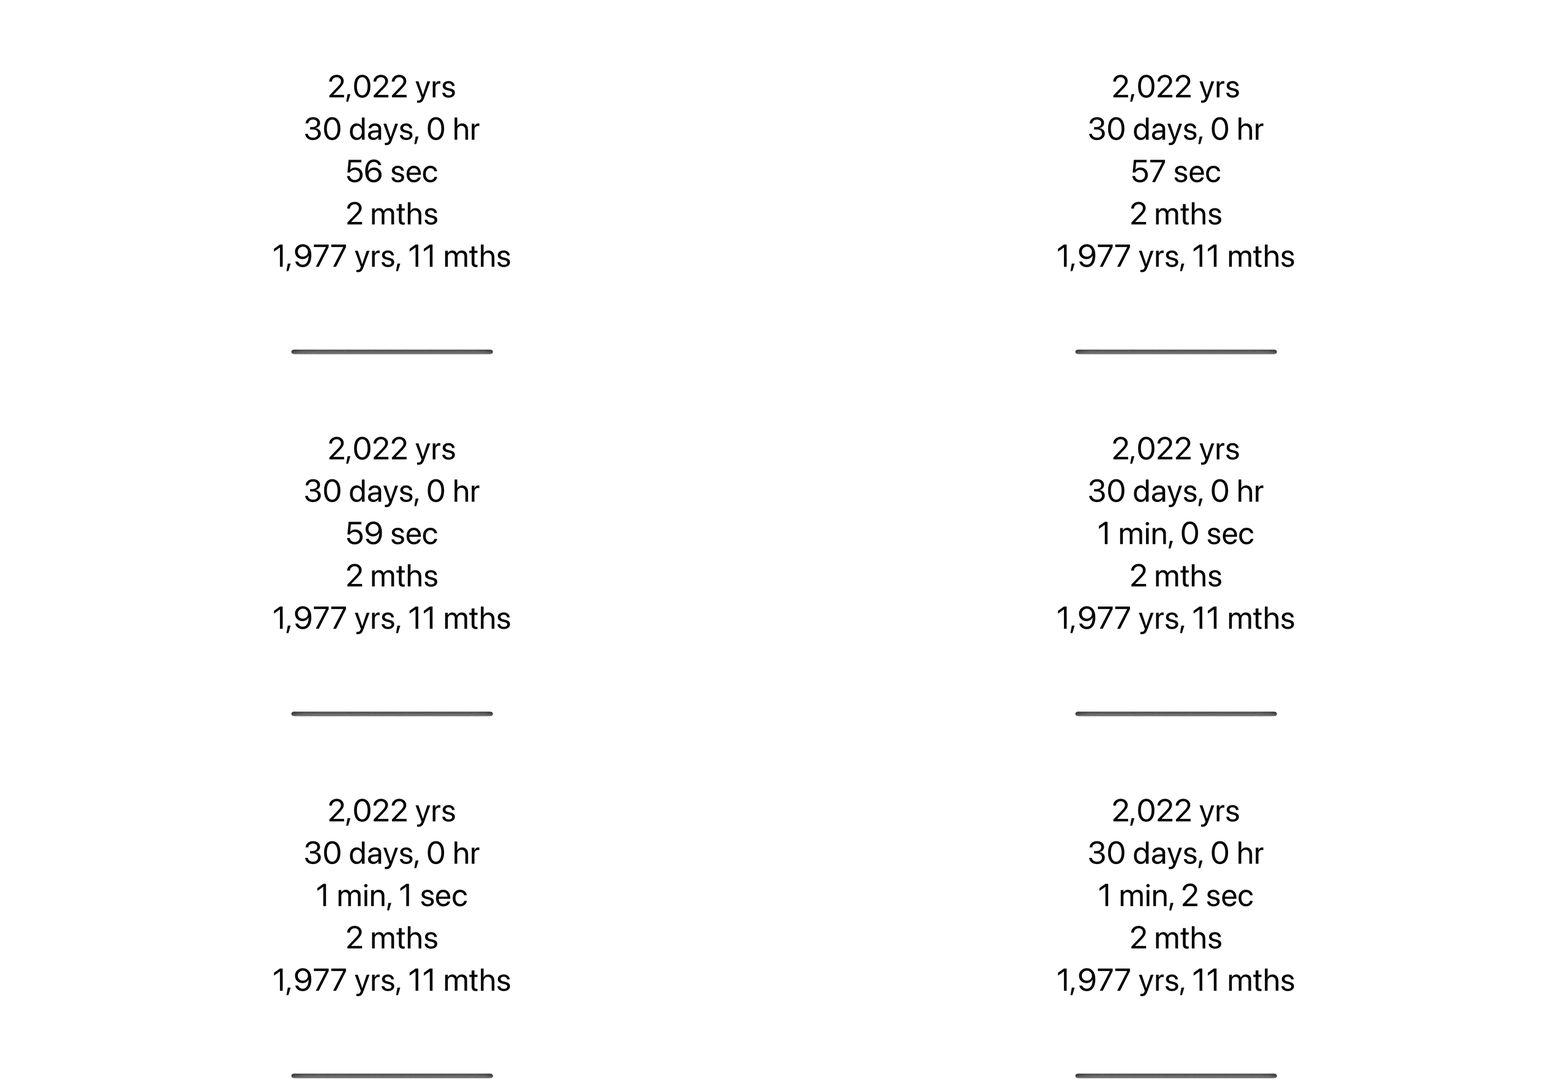
By using the .relative date style, you will get a string of relative time difference between the specified date and now.
The string return using .relative show only the difference between the two dates.
That means you have no way to differentiate between the past and the future.
Example output:
2 hours, 23 minutes
1 year, 1 month
struct ContentView: View {
    let pastMonth = Date.now.addingTimeInterval(-30 * 24 * 60 * 60)
    let futureMonth = Date.now.addingTimeInterval(60 * 24 * 60 * 60)

    var body: some View {
        VStack {
            Text(.distantPast, style: .relative)
            Text(pastMonth, style: .relative)
            Text(.now, style: .relative)
            Text(futureMonth, style: .relative)
            Text(.distantFuture, style: .relative)
        }
        .font(.largeTitle)
    }
}
As you can see, there is no indicator of whether the date is in the past or future.
Compare offset, relative, and timer
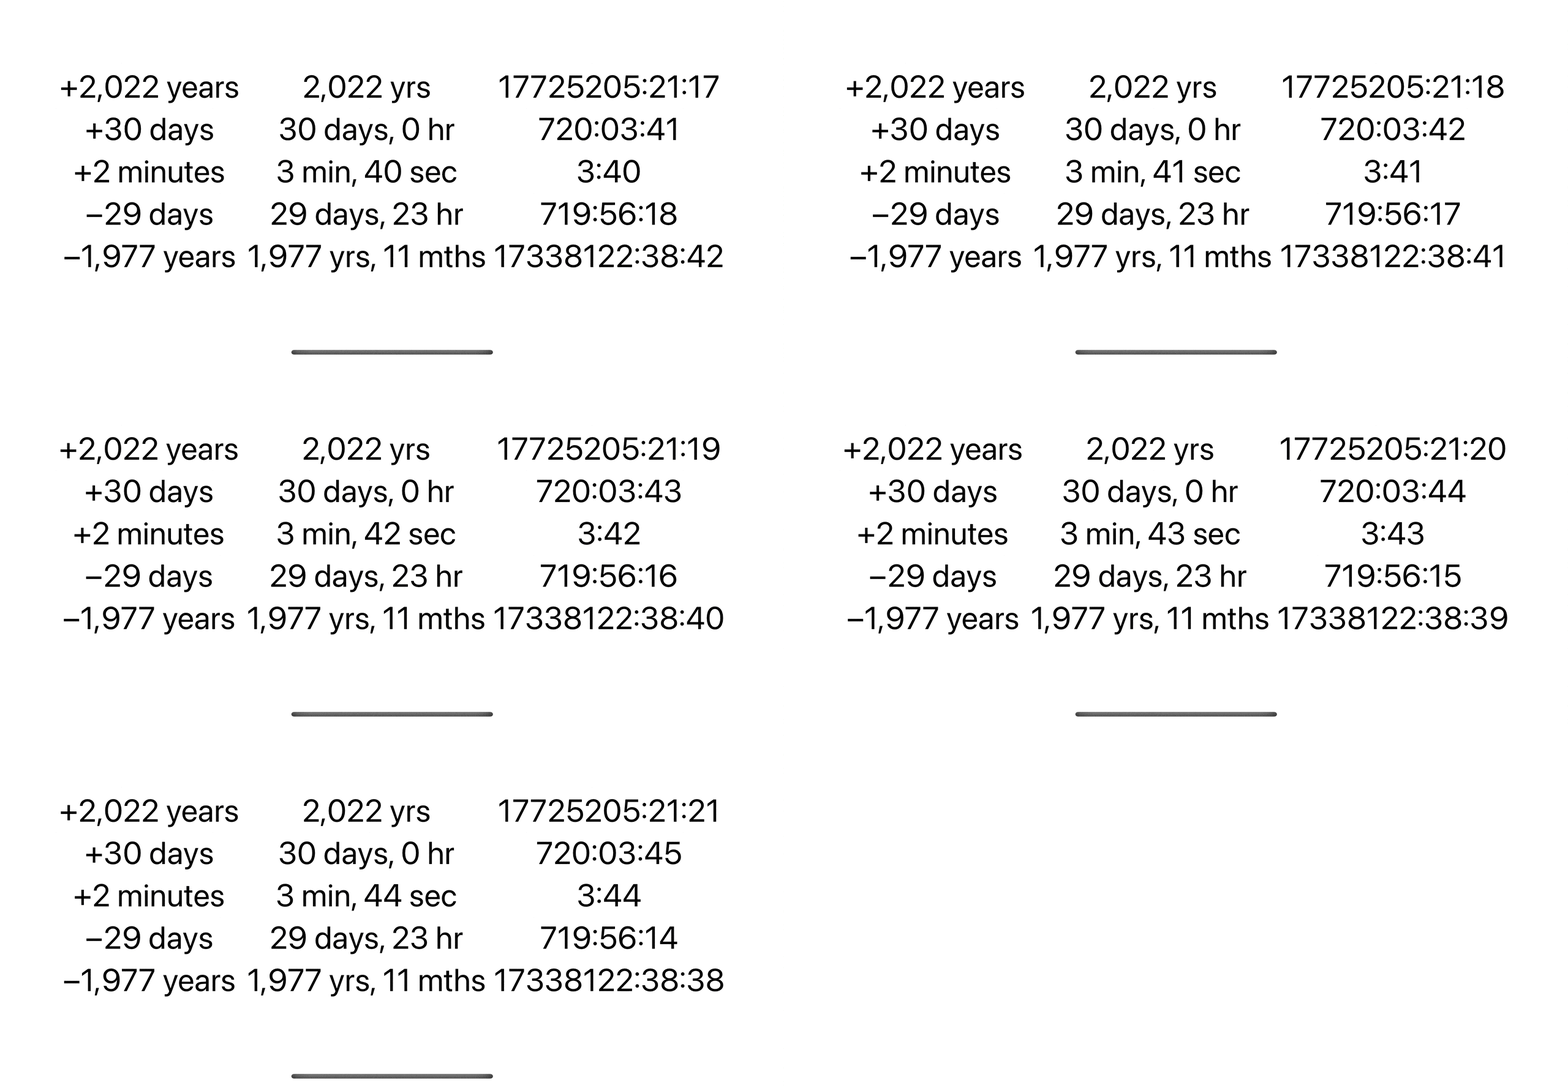
Here are .offset, .relative, and .timer running side-by-side.
Read more article about SwiftUI, Timer, Text, Date, or see all available topic
Enjoy the read?
If you enjoy this article, you can subscribe to the weekly newsletter.
Every Friday, you'll get a quick recap of all articles and tips posted on this site. No strings attached. Unsubscribe anytime.
Feel free to follow me on Twitter and ask your questions related to this post. Thanks for reading and see you next time.
If you enjoy my writing, please check out my Patreon https://www.patreon.com/sarunw and become my supporter. Sharing the article is also greatly appreciated.
Become a patron Buy me a coffee Tweet ShareAdding and Removing Swift Package dependencies in Xcode
Since Xcode 11, we can easily integrate Swift Package dependencies into our project. Let's learn how to do it.
Swift private access level change in Swift 4
In Swift 4, there is a change in the private access level that means to end the use of fileprivate. Let's learn what it is all about.