How to present a Bottom Sheet in iOS 15 with UISheetPresentationController
Table of Contents
A bottom sheet usually refers to a UI anchored to the bottom of the screen with content that usually supplements the screen's primary UI region. As screen size keeps increasing year over year, this UI component becomes more popular. Even Apple uses this UI in their app, such as Map, Find My, and Photos, but they don't provide any public API for us and keep this to themself for years. In iOS 15, we finally have a public API to present a bottom sheet.

Basic Usage
Apple treats a bottom sheet as another size of sheet presentation. Since it is a sheet presentation, you need two things to enjoy this new bottom sheet presentation.
- Set
modalPresentationStyleto sheet. We have two options,.formSheetand.pageSheet. - Set the size of the sheet.
.medium()is the size you want to present a bottom sheet style presentation.
You shouldn't need to do anything for step one since the default modal presentation style is .pageSheet. For step two, you can set it via the new property in a view controller, sheetPresentationController.
private func presentModal() {
    let detailViewController = DetailViewController()
    let nav = UINavigationController(rootViewController: detailViewController)
    // 1
    nav.modalPresentationStyle = .pageSheet

    // 2
    if let sheet = nav.sheetPresentationController {
        // 3
        sheet.detents = [.medium(), .large()]
    }
    // 4
    present(nav, animated: true, completion: nil)
}
1 You don't need this line, since the default value of modalPresentationStyle is .pageSheet. I want to make it explicit in our first encounter with this new style.
2 You get sheetPresentationController instance from the view controller that you about to present. In this case, it is navigation controller, not the root view controller (DetailViewController). sheetPresentationController will be nil if the modalPresentationStyle is not .formSheet or .pageSheet.
3 Set the supported size of a sheet. .medium() is the size you want to present a bottom sheet style presentation.
4 Present it as usual.
With a few lines of code and you get a bottom sheet functionality.
As you can see, all we need is to set supported sizes to a presented view controller and present it as usual.
You can easily support sarunw.com by checking out this sponsor.
AI Grammar: Correct grammar, spell check, check punctuation, and parphrase.
UISheetPresentationController
UISheetPresentationController exposes many properties that we can use to tweak behaviors and appearances of a bottom sheet. I will show you some of them.
Detent
We specified the size that we want our sheet to support in detents property.
For me, "detent" is a weird term to describe the size of a sheet, but after I know what it means, it kind of makes sense. "Detent" is a term used in the machinery world to describe a mechanism that temporarily keeps one part in a certain position and can be released by applying force to one of the parts.
The term aligns very well with the description of UISheetPresentationController.Detent. Apple describes it as an object that represents a height where a sheet naturally rests. You can change the resting position by applying force (drag gesture).
Here is a youtube video of a ball detent pin. This should give you an idea, what detent is all about.
Enough for machinery. Let's get back to the iOS world. We have only two types of detent at the moment (Too bad).
.large()..medium().
Default (Large)
The default value of the detents is .large(). It is the full height modal sheet that we always have.
sheet.detents = [.large()]Medium
By specifying a medium detent, the sheet shows up and rest at approximately half the screen's height.
sheet.detents = [.medium()]
Medium and Large
detents accepts an array of heights where a sheet can rest. If you specified both medium and large, you could drag the sheet to rest between these two positions.
sheet.detents = [.medium(), .large()]
The sheet shows up at the medium position, but you can change the starting position by setting selectedDetentIdentifier.
The following code will present sheet at large position.
sheet.detents = [.medium(), .large()]
sheet.selectedDetentIdentifier = .largeScrolling
For scrollable content, the default behavior is, scroll up will increases the detent instead of scrolling the sheet's content. So, you can't scroll your content in a medium height.
You can control this behavior with prefersScrollingExpandsWhenScrolledToEdge property, which is default to true.
To make the content scrollable in a medium detent, you have to set prefersScrollingExpandsWhenScrolledToEdge to false. But how can we change the detent height? To change the detent height in this setting, you have to drag on the navigation bar area.
sheet.detents = [.medium(), .large()]
sheet.prefersScrollingExpandsWhenScrolledToEdge = false
Interact with content underneath
When you use a bottom sheet, you might expect users to interact with content underneath, but that isn't a default behavior. By default, the system adds a noninteractive dimming view which dismisses the sheet once users tap it.

You can change this behavior with largestUndimmedDetentIdentifier. You specified the largest detent that you doesn’t want to put a dimming view underneath to largestUndimmedDetentIdentifier. Anything larger than that will has a dimming view. So, in the current state where we only have two detents, .medium might be the only option you use.
sheet.largestUndimmedDetentIdentifier = .mediumThis would make the dimming view go away for a medium detent, and you can interact with the view underneath.
Prevent dismissal
If you use a bottom sheet for a nonmodal experience (no dimming, medium detent), you might want to disable drag to dismiss to ensure the modal is always there at the bottom.
You simply set the isModalInPresentation flag to true on the presented view controller to prevent the drag gesture dismissal. In this case, a navigation controller.
nav.isModalInPresentation = true
if let sheet = nav.sheetPresentationController {
    sheet.detents = [.medium()]
    sheet.largestUndimmedDetentIdentifier = .medium
}
Programmatically changing the size
You have two ways to control the sheet position.
Switch between available detents
If you support multiple detents, you can programmatically switch between them by setting selectedDetentIdentifier.
let detailViewController = DetailViewController()
let nav = UINavigationController(rootViewController: detailViewController)

if let sheet = nav.sheetPresentationController {
    // 1
    sheet.detents = [.medium(), .large()]
}

let medium = UIBarButtonItem(title: "Medium", primaryAction: .init(handler: { _ in
    if let sheet = nav.sheetPresentationController {
        // 2
        sheet.animateChanges {
            // 3
            sheet.selectedDetentIdentifier = .medium
        }
    }
}))

let large = UIBarButtonItem(title: "Large", image: nil, primaryAction: .init(handler: { _ in
    if let sheet = nav.sheetPresentationController {
        sheet.animateChanges {
            sheet.selectedDetentIdentifier = .large
        }
    }
}))

detailViewController.navigationItem.leftBarButtonItem = medium
detailViewController.navigationItem.rightBarButtonItem = large

present(nav, animated: true, completion: nil)
1 We support two detents in this case.
3 Set selectedDetentIdentifier to detent you want to change to. 2 You need to wrap it in animateChanges to make the change animated.

Change available detent
If you want to support only one detent at a time and conditionally change that, you can do it by setting new detents.
let detailViewController = DetailViewController()

let nav = UINavigationController(rootViewController: detailViewController)

// 1
nav.isModalInPresentation = true

if let sheet = nav.sheetPresentationController {
    // 2
    sheet.detents = [.medium()]
}

let medium = UIBarButtonItem(title: "Medium", primaryAction: .init(handler: { _ in
    if let sheet = nav.sheetPresentationController {
        sheet.animateChanges {
            sheet.detents = [.medium()]
        }
    }
}))

let large = UIBarButtonItem(title: "Large", image: nil, primaryAction: .init(handler: { _ in
    if let sheet = nav.sheetPresentationController {
        sheet.animateChanges {
            // 3
            sheet.detents = [.large()]
        }
    }
}))

detailViewController.navigationItem.leftBarButtonItem = medium
detailViewController.navigationItem.rightBarButtonItem = large

present(nav, animated: true, completion: nil)
1 We set isModalInPresentation = true to prevent dismissal. I set this to true for demonstration purpose.
2 We start by support only medium detent.
3 Then, we programmatically change detents by setting a new one.
Unlike the previous method, change detents this way would prevent users from manually drag to adjust the size.

Appearance customization
Corner radius
You can control a corner radius of a sheet with preferredCornerRadius.
sheet.preferredCornerRadius = 50Grabber
You can choose to show a grabber at the top of the sheet. A grabber is a visual clue that a sheet is resizable. By setting prefersGrabberVisible to true, the grabber will show at the top of the sheet. The default value is false.
As you can see, we can modify detent behavior in many ways. It can be draggable/dismissable/static, so Apple is not opinionated about this and leaves the decision to us.
sheet.prefersGrabberVisible = true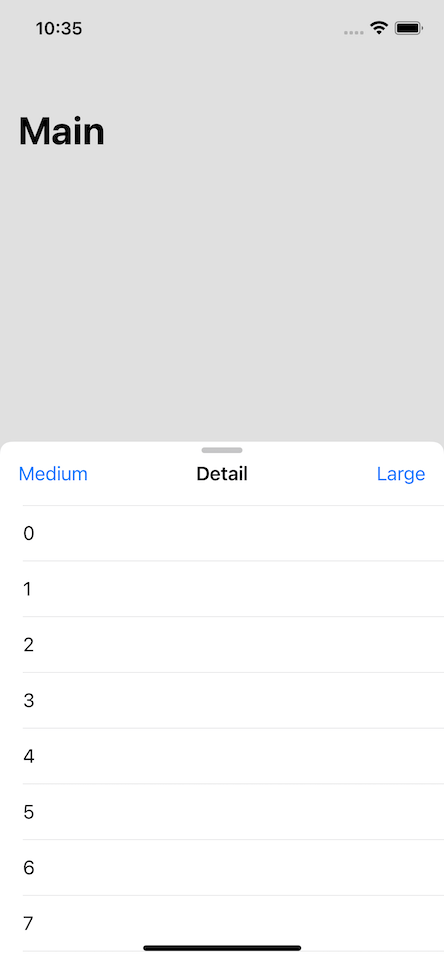
You can easily support sarunw.com by checking out this sponsor.
AI Grammar: Correct grammar, spell check, check punctuation, and parphrase.
Conclusion
This is a welcome change for UIKit. We finally have a built-in way to display a bottom sheet style presentation in just a few lines of code. The size is still limited, and I hope we have more options to customize the detent height in the future.
Read more article about UIKit, iOS 15, Sheet, or see all available topic
Enjoy the read?
If you enjoy this article, you can subscribe to the weekly newsletter.
Every Friday, you'll get a quick recap of all articles and tips posted on this site. No strings attached. Unsubscribe anytime.
Feel free to follow me on Twitter and ask your questions related to this post. Thanks for reading and see you next time.
If you enjoy my writing, please check out my Patreon https://www.patreon.com/sarunw and become my supporter. Sharing the article is also greatly appreciated.
Become a patron Buy me a coffee Tweet Share7 ways to pass a closure as an argument in Swift
There are many ways we can satisfy a closure argument. Some of them do not even look like closure. Let's learn all of them in this article.
What does the ?? operator mean in Swift
?? is an operator that has one specific use case. Let's find out what it is.