How to change SwiftUI font size
Table of Contents
How to change SwiftUI font size
There are two ways to set a font size for Text view in SwiftUI.
You can easily support sarunw.com by checking out this sponsor.
Offline Transcription: Fast, privacy-focus way to transcribe audio, video, and podcast files. No data leaves your Mac.
What is Fixed Size
Fixed font size stays the same regardless of user preference.
How to set a fixed font size
To set fixed font size, we specified the size we wanted at a time when we created a font. We can set this for both the system font and a custom font.
System Font
We create a system font with Font.system(size:weight:design:) method. This method lets us specify a fixed font size that we want.
Here is an example where we set the font for the second text to a fixed size of 36 points.
VStack {
    Text("Hello, world!")
    Text("Hello, world!")
        .font(.system(size: 36))
}
System font has many variations for us to choose from. As you might notice, there are weight and design parameters in the Font.system(size:weight:design:) method.
You can also set weight and design along with the font size.
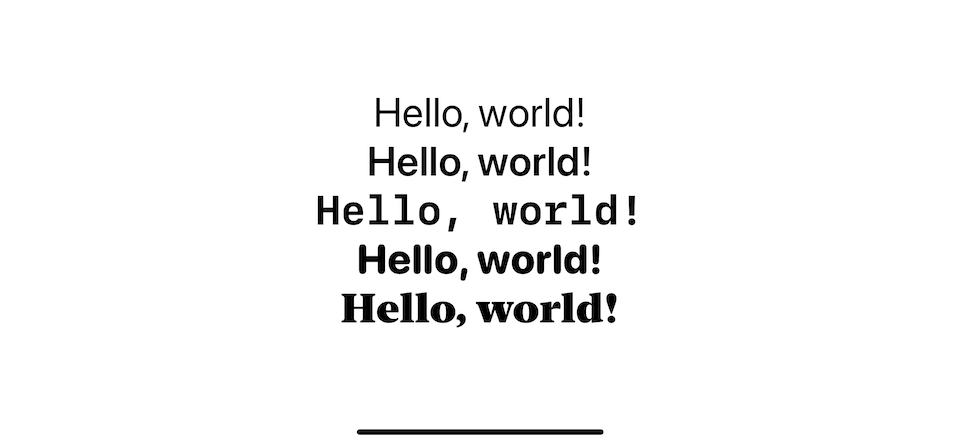
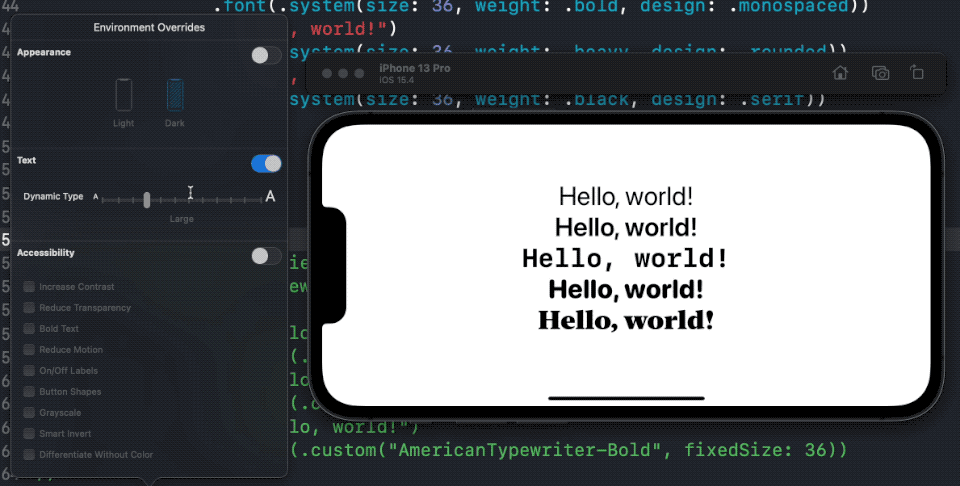
Here is an example of fixed system font for different weights and designs.
VStack {
    Text("Hello, world!")
        .font(.system(size: 36))
    Text("Hello, world!")
        .font(.system(size: 36, weight: .semibold))
    Text("Hello, world!")
        .font(.system(size: 36, weight: .bold, design: .monospaced))
    Text("Hello, world!")
        .font(.system(size: 36, weight: .heavy, design: .rounded))
    Text("Hello, world!")
        .font(.system(size: 36, weight: .black, design: .serif))
}
Custom Font
Setting a fixed font size for a custom font is no different than the system one. The only different is we use Font.custom(_:fixedSize:) method instead.
Here is an example where we use "American Typewriter" font with a fixed size of 36 points.
Text("Hello, world!")
    .font(.custom("AmericanTypewriter", fixedSize: 36))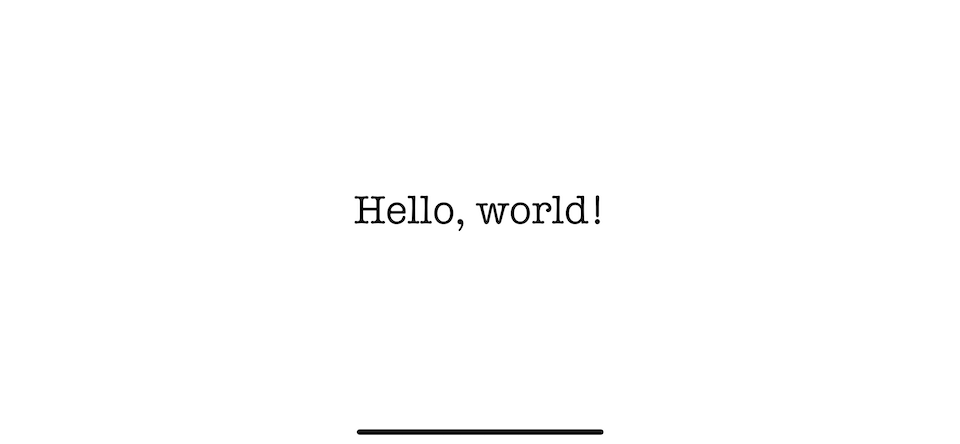
A custom font can have a different weight and design, so we can't specify that as a method argument like the system font. We have to specify the name for a custom variation manually.
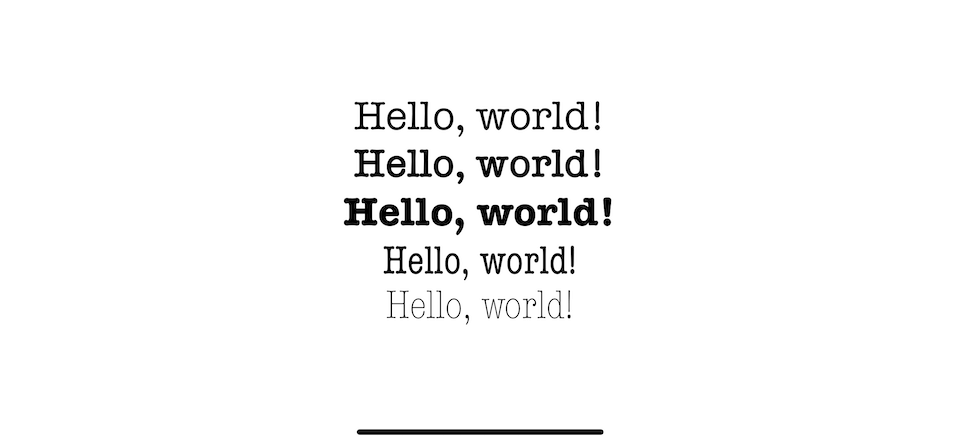
Here is an example of a different font style of American Typewriter.
VStack {
    Text("Hello, world!")
        .font(.custom("AmericanTypewriter", fixedSize: 36))
    Text("Hello, world!")
        .font(.custom("AmericanTypewriter-Semibold", fixedSize: 36))
    Text("Hello, world!")
        .font(.custom("AmericanTypewriter-Bold", fixedSize: 36))
    Text("Hello, world!")
        .font(.custom("AmericanTypewriter-Condensed", fixedSize: 36))
    Text("Hello, world!")
        .font(.custom("AmericanTypewriter-CondensedLight", fixedSize: 36))
}
What is Dynamic Size
Dynamic Type size is a way we describe text size from its usage (text style) instead of the exact point size.
Apple has 11 text styles at the moment.
- Large Title
- Title 1
- Title 2
- Title 3
- Headline
- Body
- Callout
- Subhead
- Footnote
- Caption 1
- Caption 2
The benefit of defining size like this is adaptivity and accessibility. Text size and weight will automatically react to accessibility features like bold text and larger type.
Here is an example of how each text style adapts to the dynamic type size.
Compare this to fixed font size, which always stays the same.
You can easily support sarunw.com by checking out this sponsor.
Offline Transcription: Fast, privacy-focus way to transcribe audio, video, and podcast files. No data leaves your Mac.
How to set dynamic font size
To set dynamic font size, we specify the text style or purpose to the system font.
System Font
To set a dynamic font size for a system font, we create it with Font.system(_:design:) method.
As you can see, size and weight parameters are gone since that would be dynamically adjusted based on user preference.
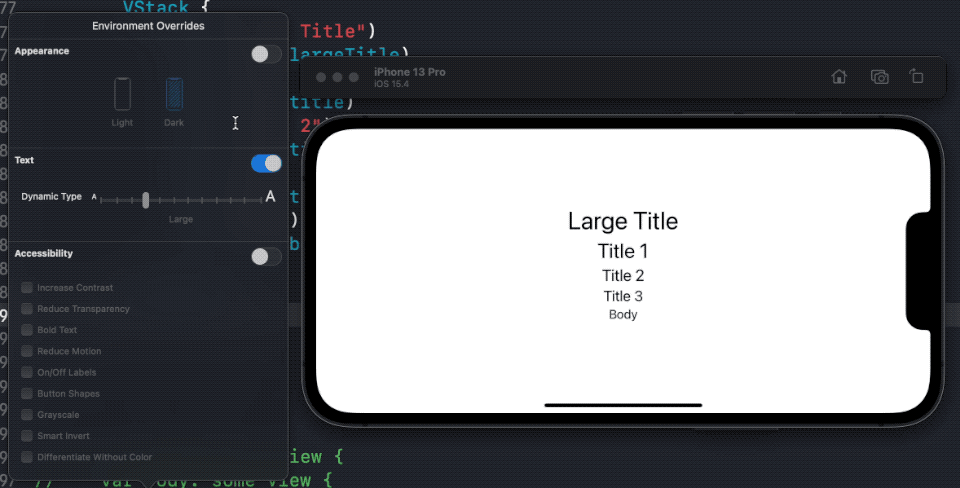
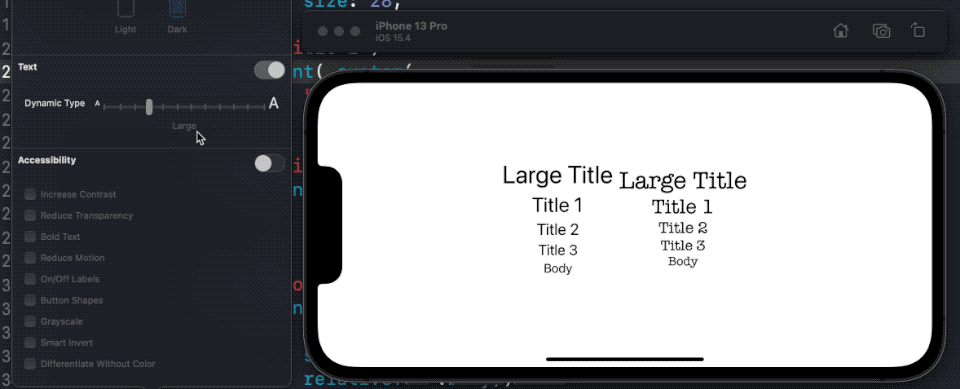
Here is an example of five text style on large Dynamic Type sizes (default size).
VStack {
    Text("Large Title")
        .font(.largeTitle)
    Text("Title 1")
        .font(.title)
    Text("Title 2")
        .font(.title2)
    Text("Title 3")
        .font(.title3)
    Text("Body")
        .font(.body)
}
Here is the same text style on xxxLarge Dynamic Type sizes.

Custom Font
Dynamically adjusting font appearance isn't an easy task. Apple does heavy lifting for us to define font size, weight, and leading for each text style of the system font to make sure it is readable based on user preference.
Luckily we can use some of this goodness (font scaling) on our custom font.
To make a custom font scale with the same scaling factor as Apple text style, we use Font.custom(_:size:relativeTo:) method.
Here is an example where I use custom font with the same size and use the same scale factor as Apple text style.
VStack {
    Text("Large Title")
        .font(.custom(
            "AmericanTypewriter",
            size: 34,
            relativeTo: .largeTitle))
    Text("Title 1")
        .font(.custom(
            "AmericanTypewriter",
            size: 28,
            relativeTo: .title))
    Text("Title 2")
        .font(.custom(
            "AmericanTypewriter",
            size: 22,
            relativeTo: .title2))
    Text("Title 3")
        .font(.custom(
            "AmericanTypewriter",
            size: 20,
            relativeTo: .title3))
    Text("Body")
        .font(.custom(
            "AmericanTypewriter",
            size: 17,
            relativeTo: .body))
}
As you can see, it scales at the same pace as the system text style.
Font.custom(:size:) vs Font.custom(:size:relativeTo:)
There is also another method for a custom font that you should be aware of, Font.custom(_:size:).
This method is equivalent to Font.custom(_:size:relativeTo:) with relativeTo parameter set to .body text style.
Here is an example using Font.custom(_:size:) along side with Font.custom(_:size:relativeTo:) and Font.custom(_:fixedSize:).
VStack {
    Text("Hello, world!")
        .font(.custom(
            "AmericanTypewriter",
            size: 17,
            relativeTo: .body))
    Text("Hello, world!")
        .font(.custom(
            "AmericanTypewriter",
            size: 17))
    Text("Hello, world!")
        .font(.custom(
            "AmericanTypewriter",
            fixedSize: 17))
}
It looks the same on the large dynamic type size.

But as we change the size to xxx large, Font.custom(_:fixedSize:) stays the same while the other two adapt with the same scale factor.

Read more article about SwiftUI, Font, Text, or see all available topic
Enjoy the read?
If you enjoy this article, you can subscribe to the weekly newsletter.
Every Friday, you'll get a quick recap of all articles and tips posted on this site. No strings attached. Unsubscribe anytime.
Feel free to follow me on Twitter and ask your questions related to this post. Thanks for reading and see you next time.
If you enjoy my writing, please check out my Patreon https://www.patreon.com/sarunw and become my supporter. Sharing the article is also greatly appreciated.
Become a patron Buy me a coffee Tweet ShareHow to prepare your iOS project to support modular architecture
At the beginning of a project, there are a lot of changes and uncertainty. You might want to start modularizing your code in the later phase, where the scope is clearer. Let's see how to prepare your single module project to support future modularizing.
How to create SwiftUI circular progress bar
In this tutorial, we will learn how to create a circular progress bar in SwiftUI using just three SwiftUI views.