How to disable a button in Flutter
Table of Contents
In iOS, we can easily control a button enabled/disabled state by setting an isEnabled property for UIKit and a disabled(_:) modifier for SwiftUI. In Flutter, you won't find such attributes.
// SwiftUI
Button("Click Me!", action: {})
    .disabled(true)

// UIKit
let button = UIButton(type: .system)
button.isEnabled = false
How to disable a button in Flutter
Flutter pushes declarative UI to its limit in this case. Enable and disable the state of a button resulting from the present of onPressed callback.
If the onPressed callback is null, Flutter treat the button as no action hence showing the button in a disabled state.
If the onPressed is there, Flutter shows the button in an enabled state.
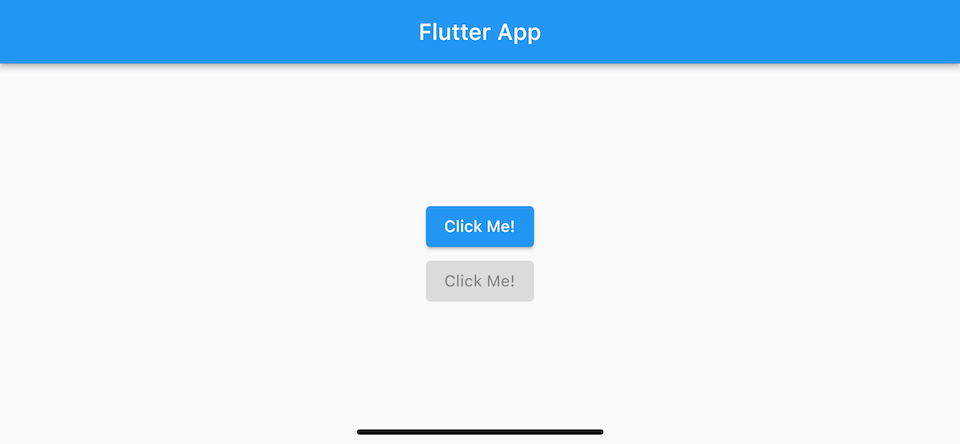
Here is an example of buttons in an enable and a disable state.
ElevatedButton(
  onPressed: () {},
  child: Text('Click Me!'),
),
ElevatedButton(
  onPressed: null,
  child: Text('Click Me!'),
),
The first button contains onPressed callback, so Flutter shows it in an enabled state. Flutter doesn't care about the activities within the callback. It only checks for its existence.
The second button has a null callback, showing as a disabled state.
You can easily support sarunw.com by checking out this sponsor.
Offline Transcription: Fast, privacy-focus way to transcribe audio, video, and podcast files. No data leaves your Mac.
How to conditionally change a button enable/disable state
Normally, we would want to enable and disable a button based on some condition. For example, I want a button to enable once a user accepts terms and conditions.
To do that, we need to do two things.
- Declare a
boolvariable or function that returns abool. This will use to control a button state. - Use that variable or function to set the
onPressedcallback conditionally.
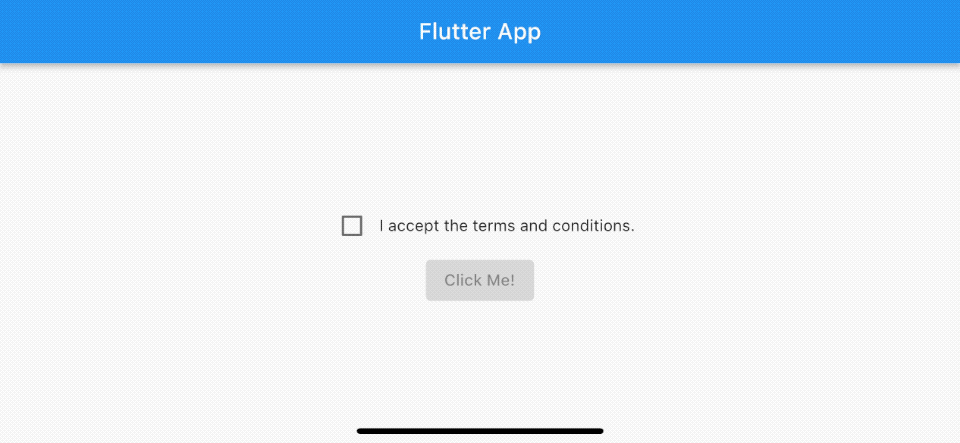
In the following example, we enable a button only when a user accepts the terms and conditions checkbox.
class HomePage extends StatefulWidget {
const HomePage({Key? key}) : super(key: key);
_HomePageState createState() => _HomePageState();
}
class _HomePageState extends State<HomePage> {
// 1
bool _isAcceptTermsAndConditions = false;
Widget build(BuildContext context) {
return Scaffold(
appBar: AppBar(
title: Text('Flutter App'),
),
body: Center(
child: Column(
mainAxisAlignment: MainAxisAlignment.center,
children: [
Row(
mainAxisAlignment: MainAxisAlignment.center,
children: [
Checkbox(
value: _isAcceptTermsAndConditions,
onChanged: (value) {
setState(() {
// 2
_isAcceptTermsAndConditions = value ?? false;
});
}),
Text('I accept the terms and conditions.'),
],
),
ElevatedButton(
// 3
onPressed: _isAcceptTermsAndConditions
? () {
print('Submit');
}
: null,
child: Text('Click Me!'),
),
],
),
),
);
}
}1 We declare a bool variable, _isAcceptTermsAndConditions, to keep user choice.
2 When checkbox value change, we change _isAcceptTermsAndConditions value.
3 We use _isAcceptTermsAndConditions value to conditional set onPressed callback.
You can easily support sarunw.com by checking out this sponsor.
Offline Transcription: Fast, privacy-focus way to transcribe audio, video, and podcast files. No data leaves your Mac.
Conclusion
A Flutter button enabled and disabled state is controlled by a present of the onPressed callback.
Disabled button
We set the onPressed callback to null to disable a button.
onPressed: nullEnabled button
We set the onPressed callback to a non-null function to enable a button.
onPressed: () { print('action') }Conditionally enable and disable a button
To control an enable and disable state dynamically, we use a ternary operation (?:) to set the onPressed callback.
var isEnabled = false

onPressed: isEnabled ? () {}: nullRead more article about Flutter or see all available topic
Enjoy the read?
If you enjoy this article, you can subscribe to the weekly newsletter.
Every Friday, you'll get a quick recap of all articles and tips posted on this site. No strings attached. Unsubscribe anytime.
Feel free to follow me on Twitter and ask your questions related to this post. Thanks for reading and see you next time.
If you enjoy my writing, please check out my Patreon https://www.patreon.com/sarunw and become my supporter. Sharing the article is also greatly appreciated.
Become a patron Buy me a coffee Tweet ShareWhat is the iOS version global market share
Find out where we can get information about the iOS version market share.
How to make a transparent navigation bar in iOS
A transparent navigation bar is quite popular among the design community. It is just a matter of time before you have to do it. We will explore different ways to do that in this article.