How to modularize existing iOS projects using Swift Package
Table of Contents
Modular programming is a software design technique that breaks your project into a smaller maintainable module which promotes separation of concern and reusability.
Today, I will show you how to modularize an iOS app using Swift Package. Modularizing your app may sound technical and complicated, but in reality, it is just as easy as grouping your files in a folder and you don't need to modularize everything at the very beginning. You can incrementally adopt this part by part at your own pace.
Overview
There are only five small steps we need to do to modularize an app.
- Create a new Swift Package within your project.
- Move files from the main project to the newly created Swift Package.
- Configure Swift Package supported platform.
- Add Swift Package to the main project.
- Change access levels of classes and methods, e.g.,
private,public.
You can easily support sarunw.com by checking out this sponsor.
AI Grammar: Correct grammar, spell check, check punctuation, and parphrase.
Create a new Swift Package
- Open your project and create a new Swift package by selecting File > New > Package....
- Named your new module. In this case, I named it "MyUI". Make sure you select your main project root folder as the destination and add the new package to the main project.
![]()
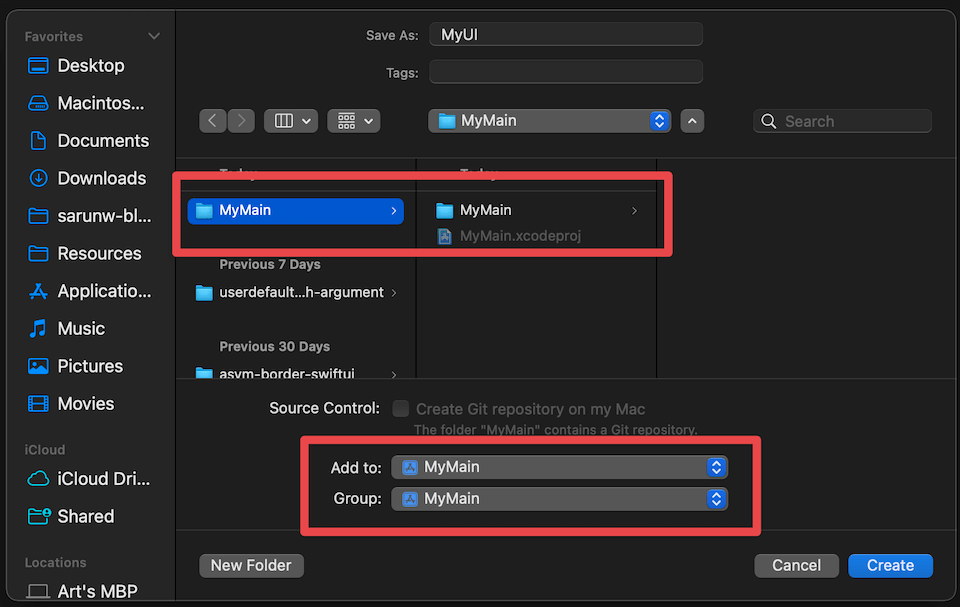
That's all you need to do to create a new local Swift Package for your module. Easy right?
Move files
After creating a new package, the next step is to move files over from the main project to the new package. But before we do that, let me introduce you to the sample project we will use throughout this article.
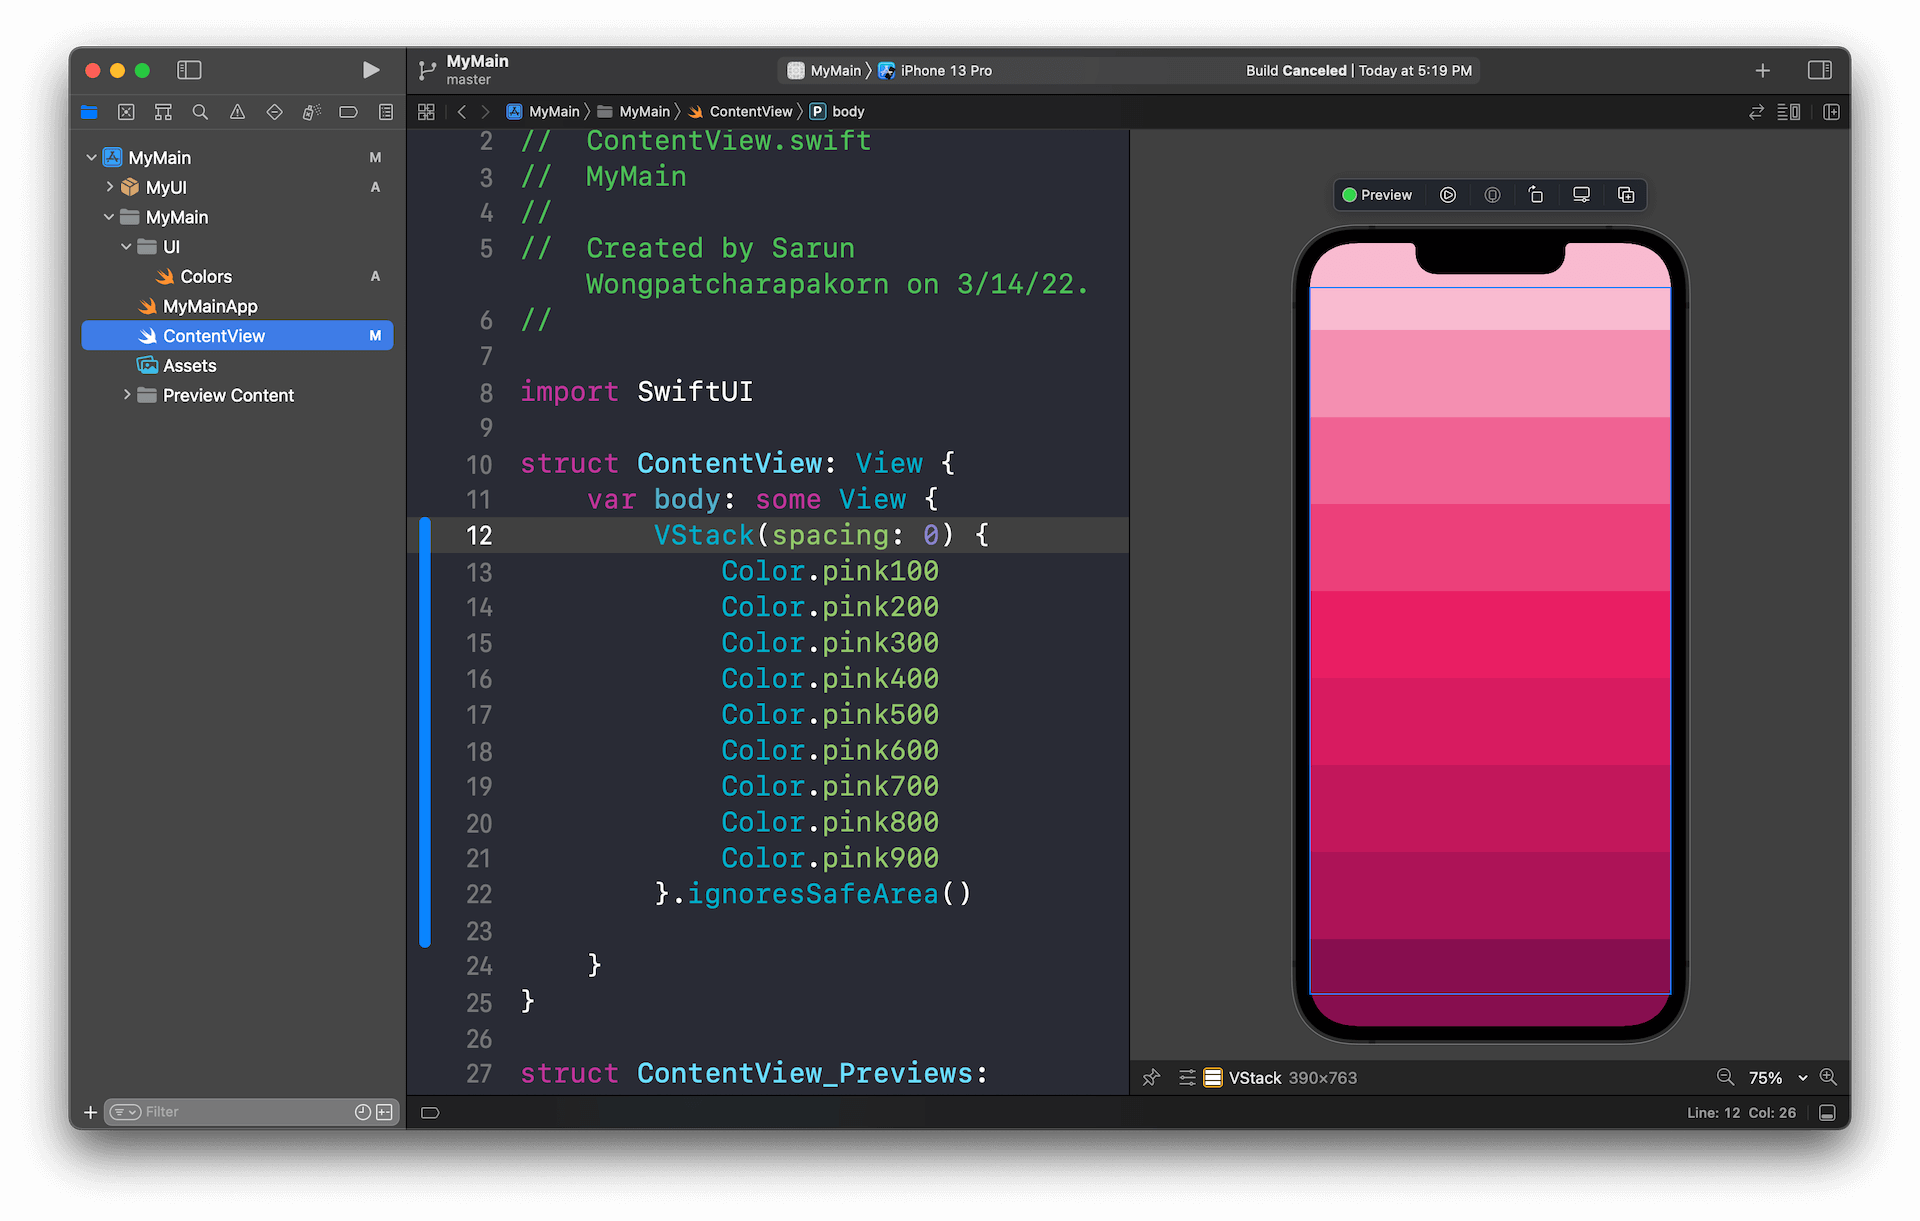
Here is our sample project. I have only Color extension in Colors.swift file. This is the file we want to extract into a separate module.
import SwiftUI

// MARK: - Color
extension Color {
    init(hex: UInt, alpha: Double = 1) {
        self.init(
            .sRGB,
            red: Double((hex >> 16) & 0xff) / 255,
            green: Double((hex >> 08) & 0xff) / 255,
            blue: Double((hex >> 00) & 0xff) / 255,
            opacity: alpha
        )
    }

    // MARK: - Pink
    static let pink100 = Color(hex: 0xf8bbd0)
    static let pink200 = Color(hex: 0xf48fb1)
    static let pink300 = Color(hex: 0xf06292)
    static let pink400 = Color(hex: 0xec407a)
    static let pink500 = Color(hex: 0xe91e63)
    static let pink600 = Color(hex: 0xd81b60)
    static let pink700 = Color(hex: 0xc2185b)
    static let pink800 = Color(hex: 0xad1457)
    static let pink900 = Color(hex: 0x880e4f)
}
And here is our content view, which shows all the colors we declared in the extension.
import SwiftUI

struct ContentView: View {
    var body: some View {
        VStack(spacing: 0) {
            Color.pink100
            Color.pink200
            Color.pink300
            Color.pink400
            Color.pink500
            Color.pink600
            Color.pink700
            Color.pink800
            Color.pink900
        }.ignoresSafeArea()

    }
}
The result is this beautiful pink rainbow.
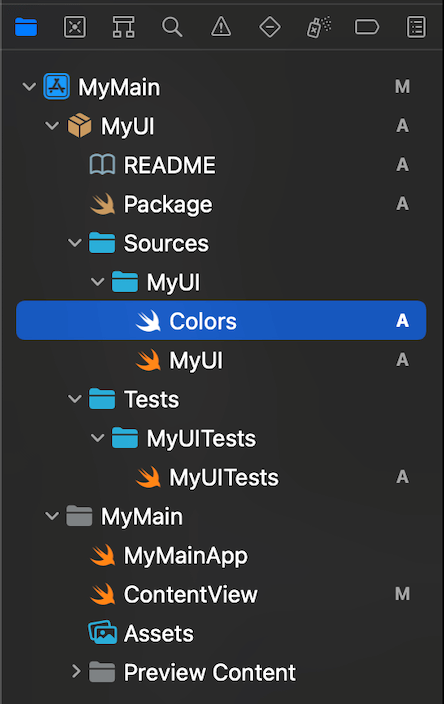
We move any class we want to extract into a module into a new package folder. In this case, we move Colors.swift from MyMain/UI/Colors.swift to MyUI/Sources/MyUI/Colors.swift.
Configure your Swift Package
If you change your Xcode scheme to the new package and build the project, you will get a lot of errors about Color availability.

By default, Swift packages are platform-independent. It means to be used by any platform you like, but we use Color, which is available only on some platforms (@available(iOS 13.0, macOS 10.15, tvOS 13.0, watchOS 6.0, *)), and that is the cause of the error.
We can fix this in two ways.
Use conditional compilation blocks to handle platform-specific code and achieve cross-platform compatibility.
Make Swift packages platform-specific.
Cross-Platform compatible
If you want your package to stay platform-independent, you must use conditional compilation blocks. In my case, I put @available(iOS 13.0, *) on my extension to make it available only for iOS 13 and forward.
This will fix the error we got earlier.
@available(iOS 13.0, *)
extension Color {

    init(hex: UInt, alpha: Double = 1) {
        self.init(
            .sRGB,
            red: Double((hex >> 16) & 0xff) / 255,
            green: Double((hex >> 08) & 0xff) / 255,
            blue: Double((hex >> 00) & 0xff) / 255,
            opacity: alpha
        )
    }

    // MARK: - Pink
    static let pink100 = Color(hex: 0xf8bbd0)
    static let pink200 = Color(hex: 0xf48fb1)
    static let pink300 = Color(hex: 0xf06292)
    static let pink400 = Color(hex: 0xec407a)
    static let pink500 = Color(hex: 0xe91e63)
    static let pink600 = Color(hex: 0xd81b60)
    static let pink700 = Color(hex: 0xc2185b)
    static let pink800 = Color(hex: 0xad1457)
    static let pink900 = Color(hex: 0x880e4f)
}
Platform-specific
If you only aim to support a subset of the platform and don't want to put conditional blocks everywhere, you can specify the supported platform in Package.swift file under the platforms key. This will make our Swift package become a platform-specific package.
I make the package only support iOS 13 and forward by specifying platforms: [.iOS(.v13)].
let package = Package(
    name: "MyUI",
    platforms: [.iOS(.v13)],
    products: [
        // Products define the executables and libraries a package produces, and make them visible to other packages.
        .library(
            name: "MyUI",
            targets: ["MyUI"]),
    ],
    dependencies: [
        // Dependencies declare other packages that this package depends on.
        // .package(url: /* package url */, from: "1.0.0"),
    ],
    targets: [
        // Targets are the basic building blocks of a package. A target can define a module or a test suite.
        // Targets can depend on other targets in this package, and on products in packages this package depends on.
        .target(
            name: "MyUI",
            dependencies: []),
        .testTarget(
            name: "MyUITests",
            dependencies: ["MyUI"]),
    ]
)
You can make your package either platform-independent or platform-specific. The choice is totally up to you.
Add Swift Package to the main project
After we make sure our package is built successfully, let's switch back to the main project and run our app. You will get a compile error saying "Type 'Color' has no member 'pink100-900'".
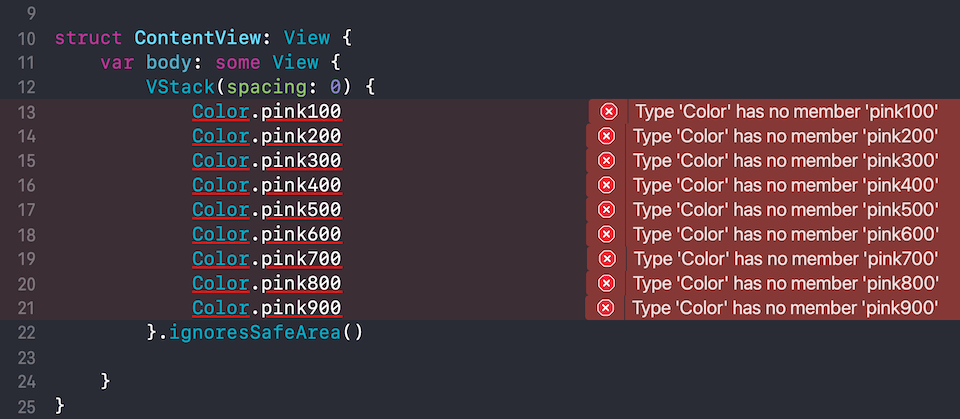
That's because the newly created Swift package didn't automatically add as our project dependency. You have to do it yourself.
Add dependency to the new Swift Package
To add a new Swift package dependency:
-
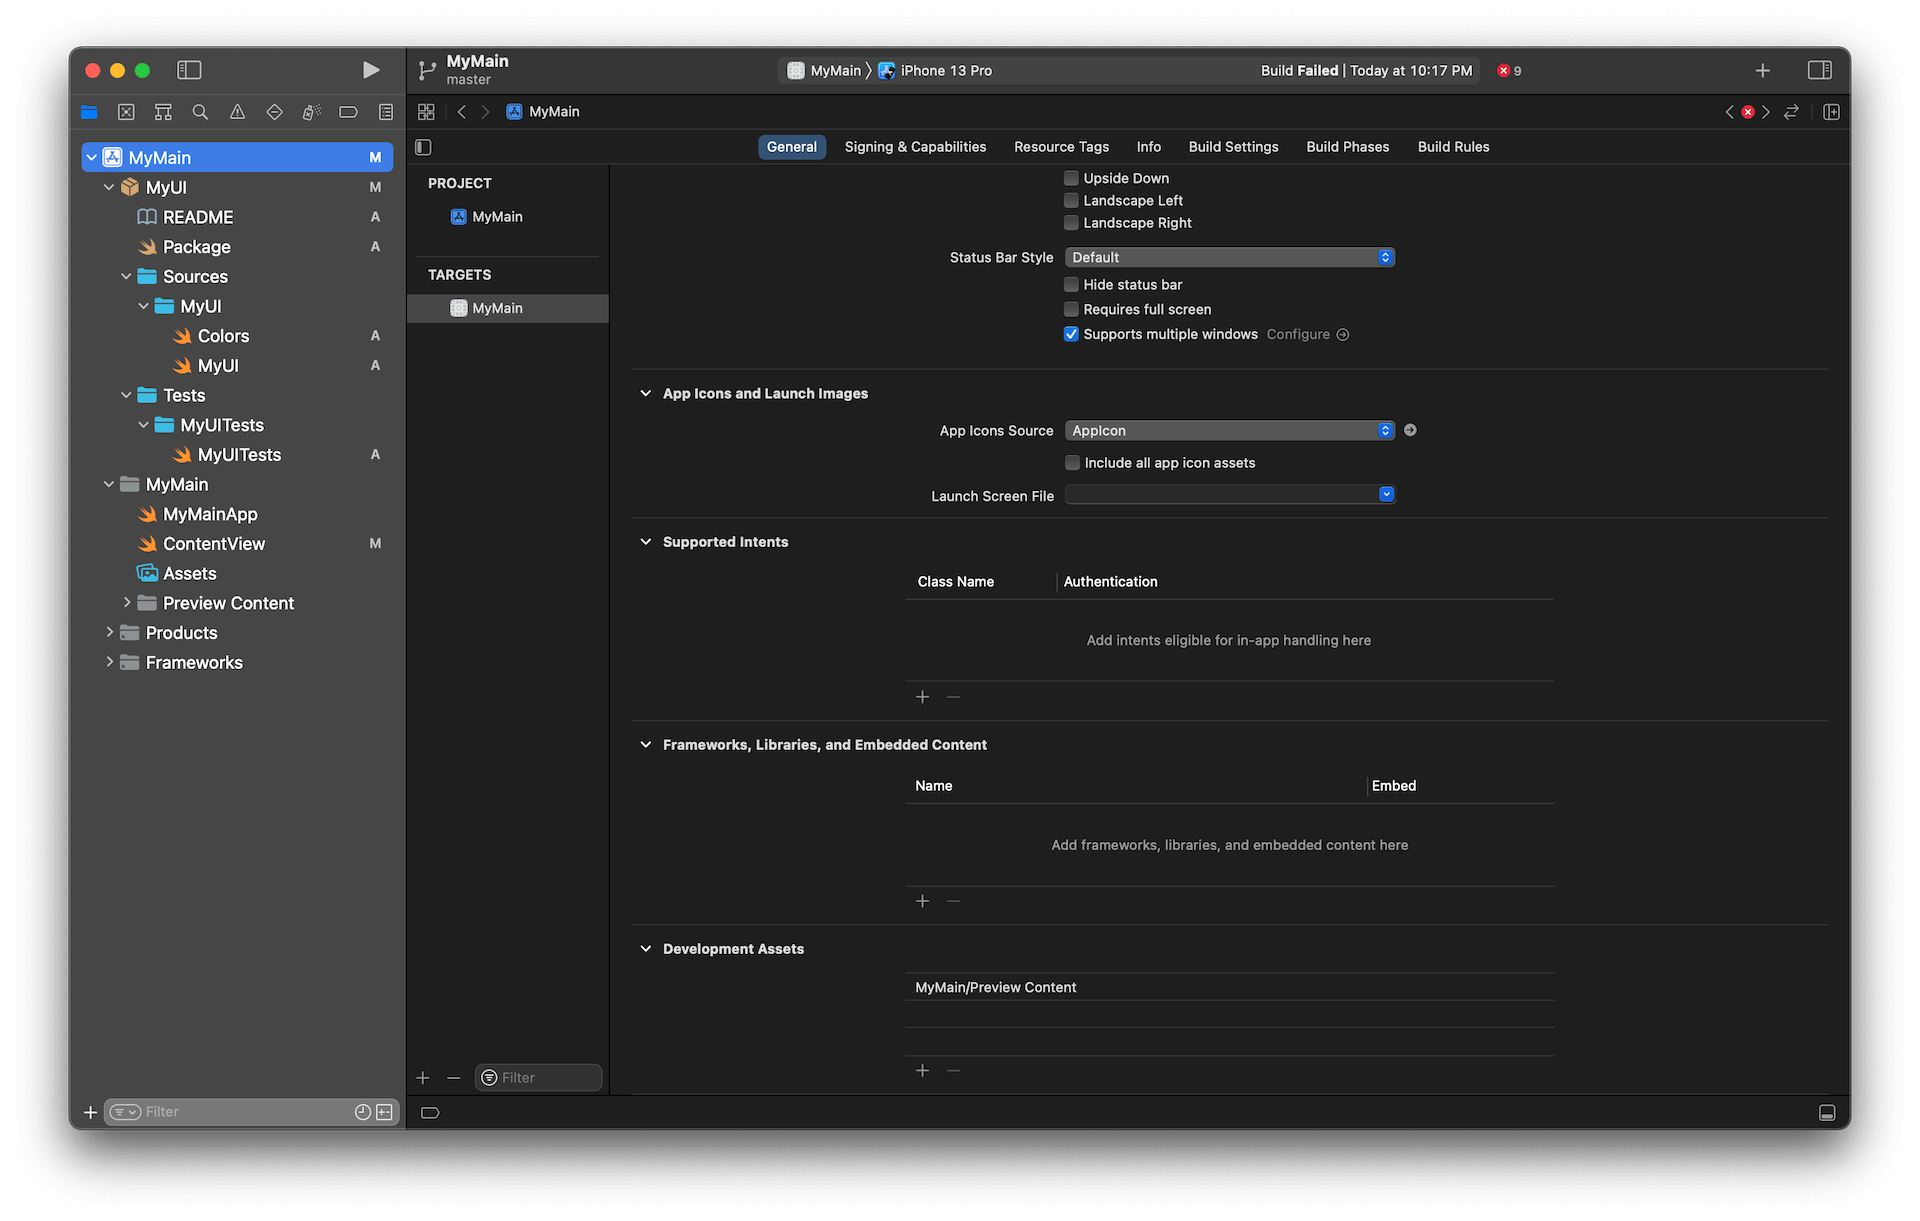
Select your project in the Project navigator, then select your app target and navigate to its General pane.
![]()
-
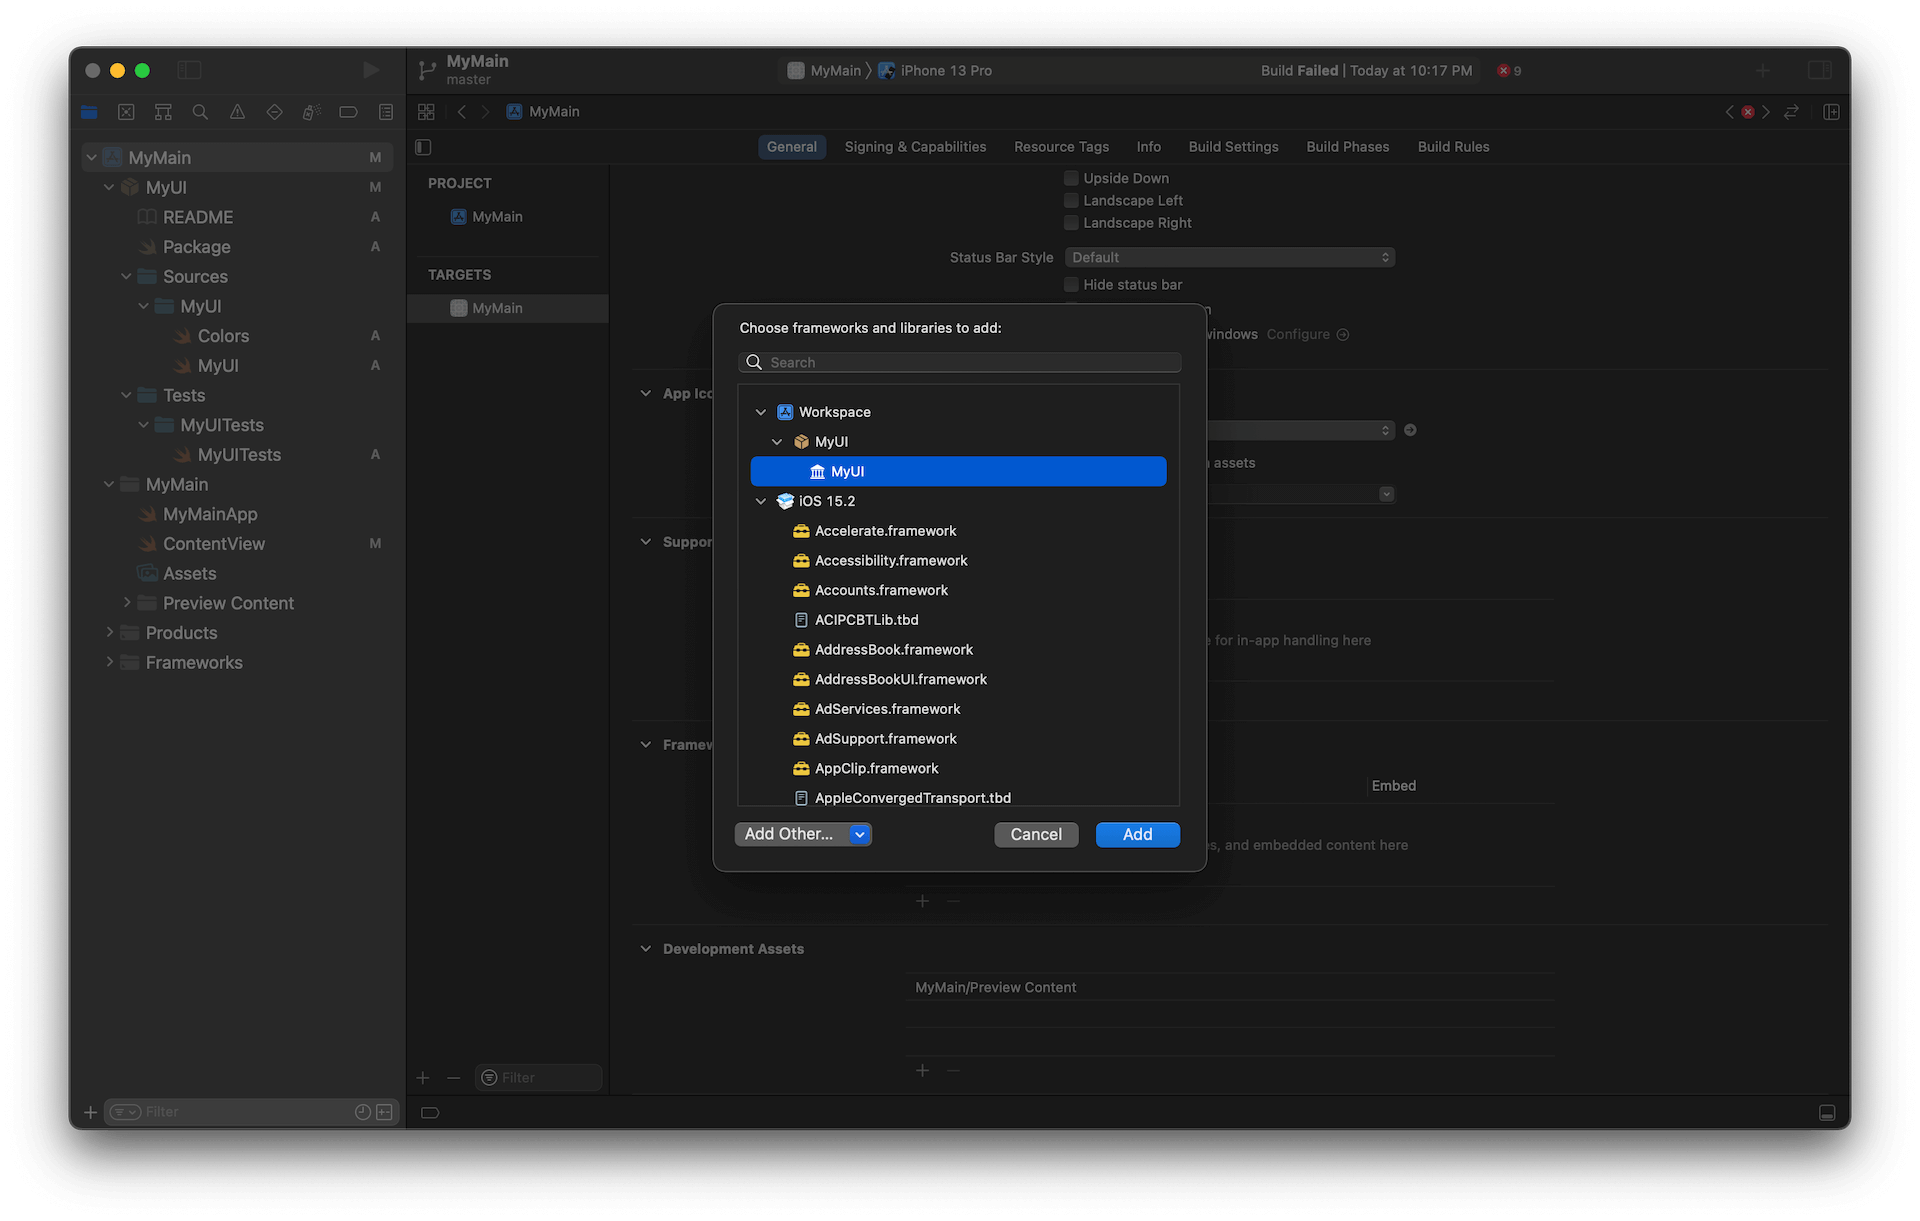
Click the + button in the "Frameworks, Libraries, and Embedded Content" section, select the local package's library product, and add it as a dependency.
![]()
-
Make sure your package shows up under the "Frameworks, Libraries, and Embedded Content" section.
![]()

Add import declarative.
Then you need to add the import directive just like other modules.
import SwiftUI
import MyUI

struct ContentView: View {
    var body: some View {
        VStack(spacing: 0) {
            Color.pink100
            Color.pink200
            Color.pink300
            Color.pink400
            Color.pink500
            Color.pink600
            Color.pink700
            Color.pink800
            Color.pink900
        }.ignoresSafeArea()

    }
}
Change access levels
Our code still failed at this point, but with a different error. It will show "'pink100' is inaccessible due to 'internal' protection level" error.
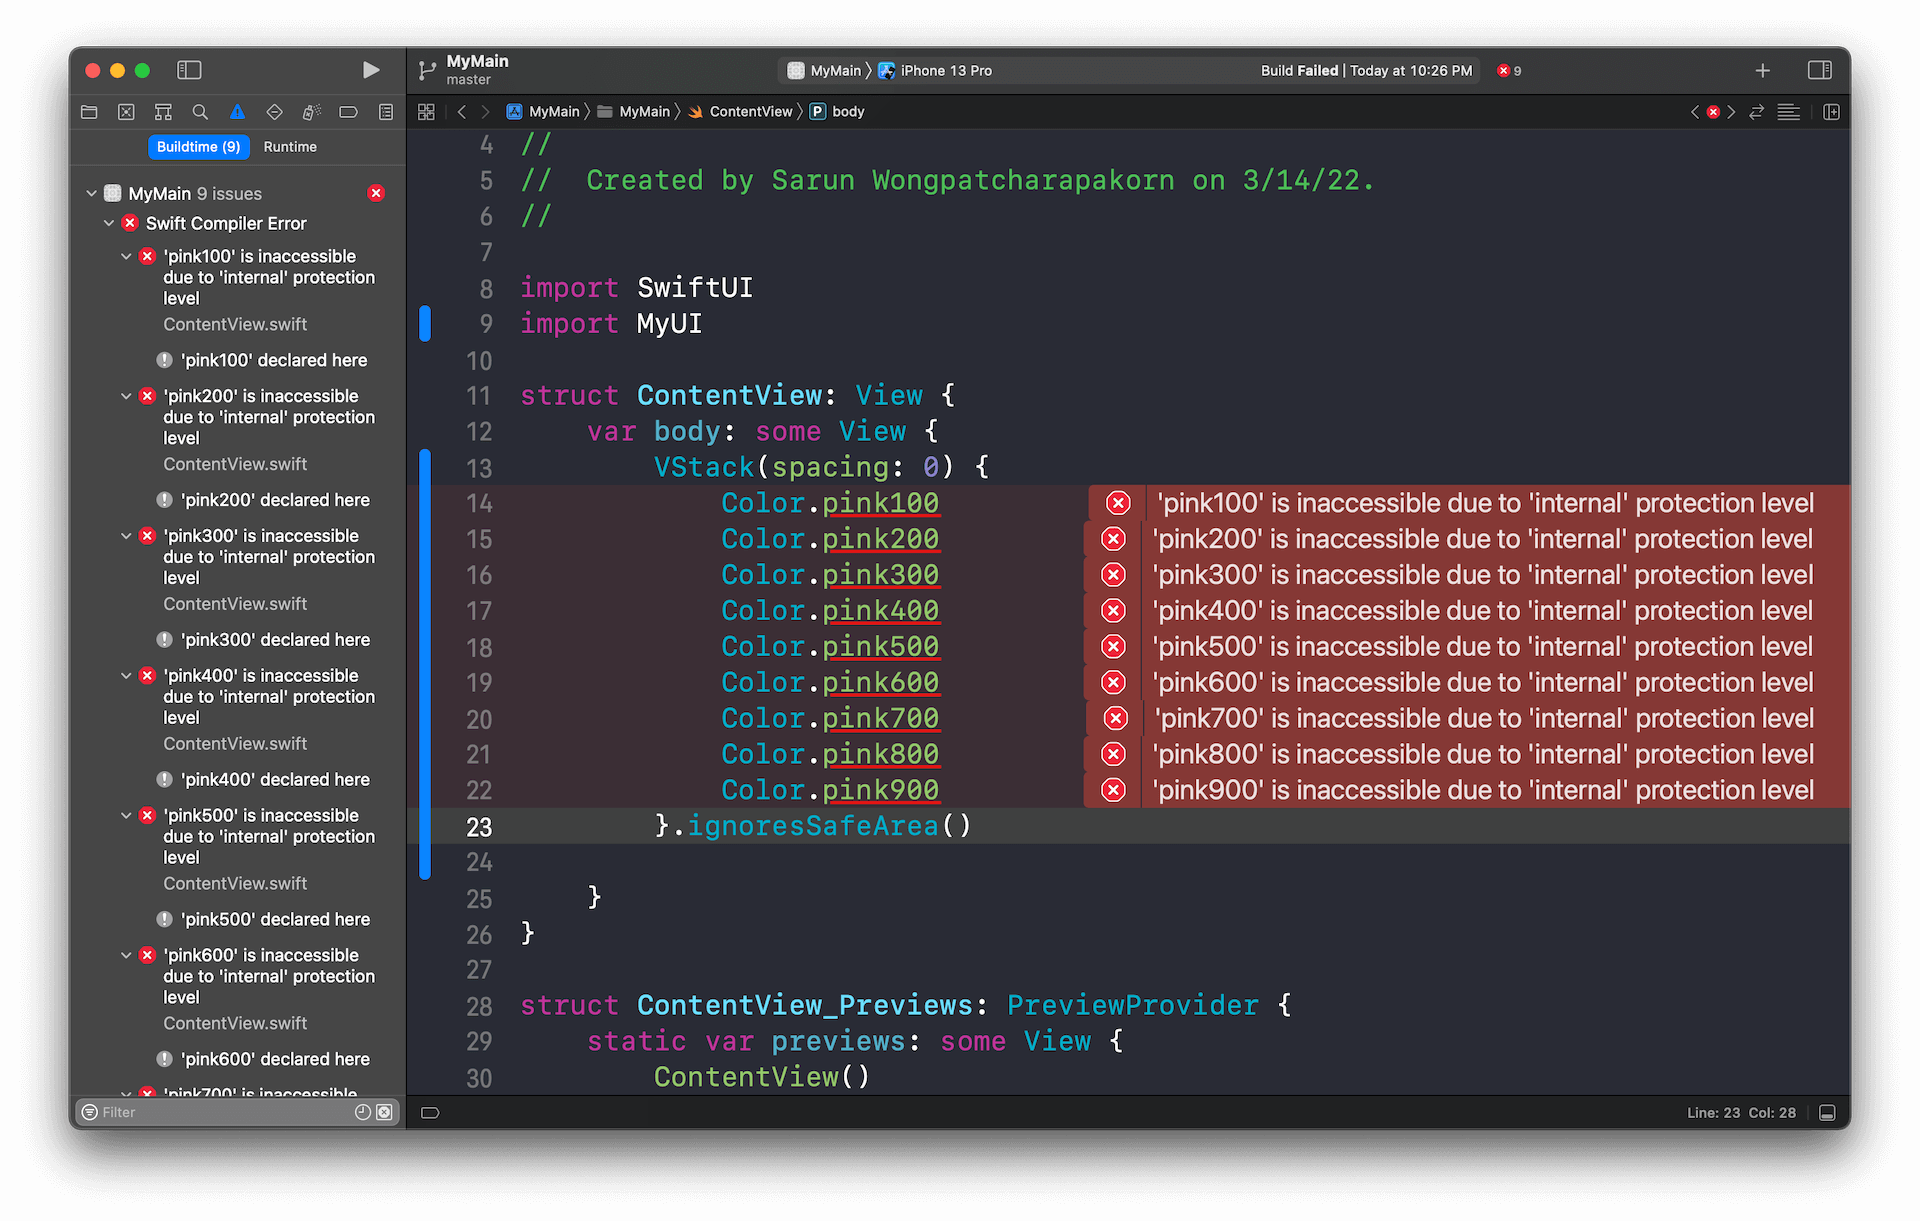
By default, the access level for entities within your code is internal.
Internal access enables entities to be used within any source file from their defining module, but not in any source file outside of that module.
This access level is convenient for a simple single-target app where the code is self-contained within the same module.
Since we extract our code into two separate modules, the main project can't see the Color extension from the MyUI module. So, we need to make our extension public.
Change the access level of the Color extension to public and rerun the main app. This time, it will build successfully.
public extension Color {
    init(hex: UInt, alpha: Double = 1) {
        self.init(
            .sRGB,
            red: Double((hex >> 16) & 0xff) / 255,
            green: Double((hex >> 08) & 0xff) / 255,
            blue: Double((hex >> 00) & 0xff) / 255,
            opacity: alpha
        )
    }

    // MARK: - Pink
    static let pink100 = Color(hex: 0xf8bbd0)
    static let pink200 = Color(hex: 0xf48fb1)
    static let pink300 = Color(hex: 0xf06292)
    static let pink400 = Color(hex: 0xec407a)
    static let pink500 = Color(hex: 0xe91e63)
    static let pink600 = Color(hex: 0xd81b60)
    static let pink700 = Color(hex: 0xc2185b)
    static let pink800 = Color(hex: 0xad1457)
    static let pink900 = Color(hex: 0x880e4f)
}
And this is the final step. You just finished modularizing your app.

You can easily support sarunw.com by checking out this sponsor.
AI Grammar: Correct grammar, spell check, check punctuation, and parphrase.
Conclusion
Breaking part of your app into a module is straightforward with Swift Package. It only contains five steps, as we learned in this article.
And we can start to see the benefit of modular programming with just a simple app like this. Our MyUI becomes self-contain; we can focus only on the UI element in that module, and business logic from the main app can't leak into our UI.
The best part is you can incrementally migrate your code into module file by file. So, you can do it at your own pace.
Read more article about Development, Swift Package, Module, iOS, or see all available topic
Enjoy the read?
If you enjoy this article, you can subscribe to the weekly newsletter.
Every Friday, you'll get a quick recap of all articles and tips posted on this site. No strings attached. Unsubscribe anytime.
Feel free to follow me on Twitter and ask your questions related to this post. Thanks for reading and see you next time.
If you enjoy my writing, please check out my Patreon https://www.patreon.com/sarunw and become my supporter. Sharing the article is also greatly appreciated.
Become a patron Buy me a coffee Tweet ShareHow to add Lint rules in Flutter
As your team and project grow, you might need to enforce some coding rules to make your code go the same direction. Luckily, adding custom lint rules in Flutter is very easy. Let's learn how to do it.
How to use Proxyman with Flutter
If you use Proxyman with a Flutter app, you might not see any traffic from your Flutter Project. Here is how to fix it.