How to render text with a color gradient in SwiftUI
Table of Contents
We have learned in a previous article how easy it is to create a gradient color view in SwiftUI. This article will explore how to render text with color gradients.
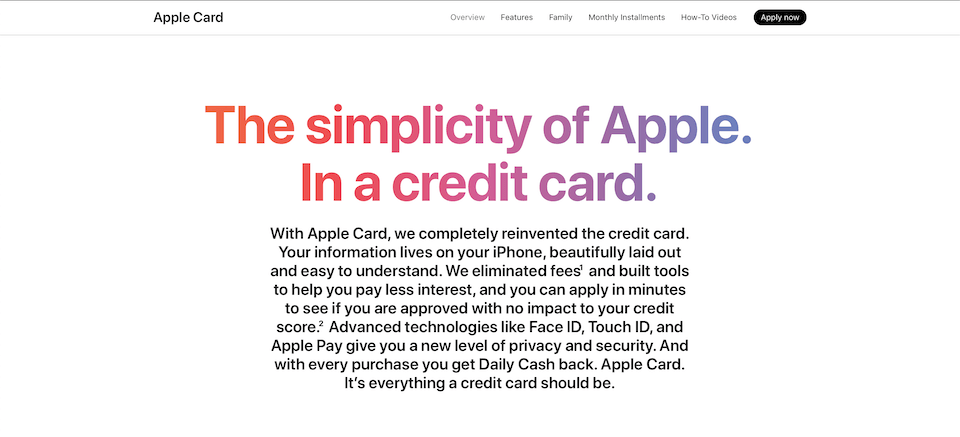
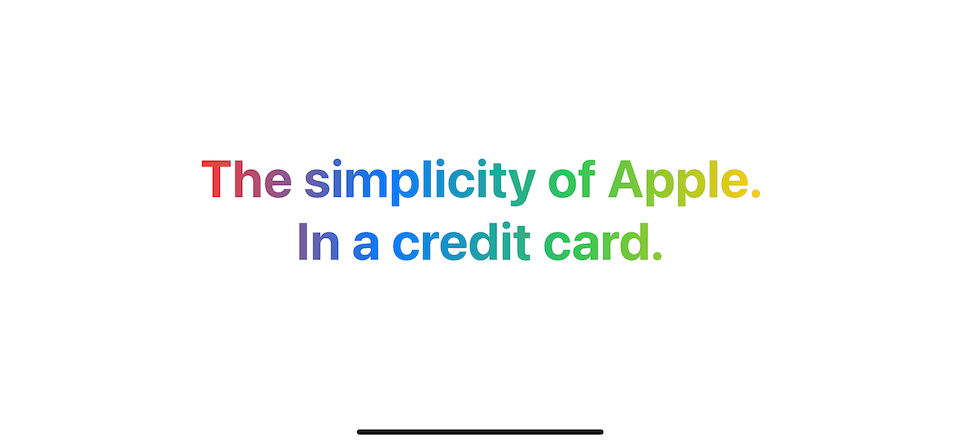
We want to replicate the following text style. Here is an example from https://www.apple.com/apple-card.
There are two ways to do this.
- Gradient using a mask (Pre iOS 15).
- Gradient using
foregroundStylemodifier (iOS 15).
Gradient using a mask (Pre iOS 15)
The first method is straightforward. It replicates how we normally do it in a design tool.
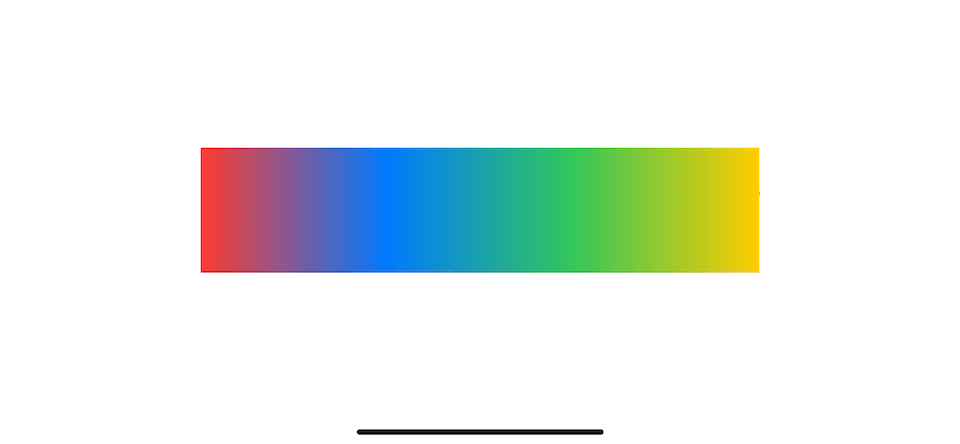
First, we create a gradient with the colors that we want.
struct ContentView: View {
    var body: some View {
        LinearGradient(
            colors: [.red, .blue, .green, .yellow],
            startPoint: .leading,
            endPoint: .trailing
        )
    }
}
Then we apply .mask to it. Mask will apply the alpha channel of the given view to the masked view. In other words, we only see our gradient view where the text (mask) is rendered.
LinearGradient(
    colors: [.red, .blue, .green, .yellow],
    startPoint: .leading,
    endPoint: .trailing
)
.mask(
    // 1
    Text("The simplicity of Apple.\nIn a credit card.")
        .font(Font.system(size: 46, weight: .bold))
        .multilineTextAlignment(.center)
)
1 Alpha channel of text is applied to the linear gradient. So, only a portion of the gradient view that sits behind the text is visible.
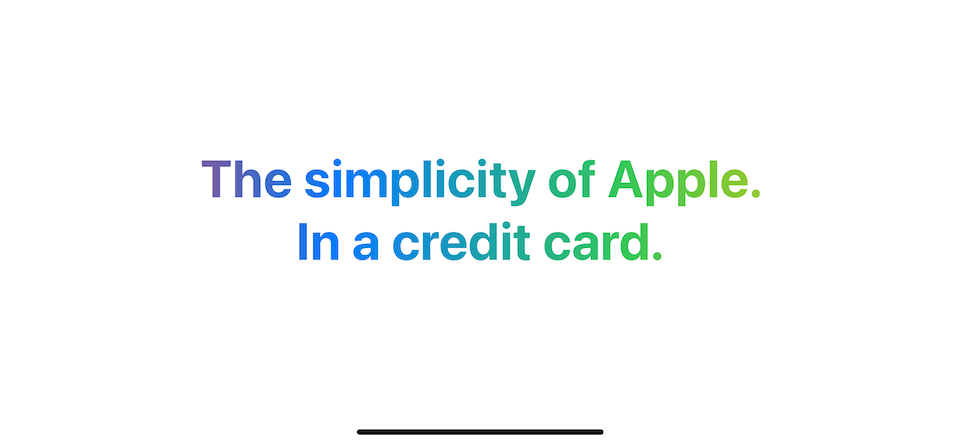
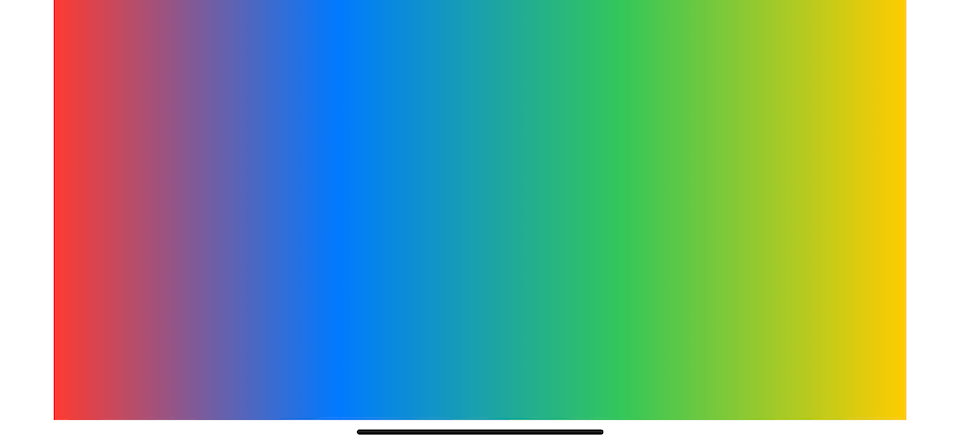
The problem
Render gradient text this way has one problem. The color gradient doesn't share the same starting and ending points with text. As a result, you will barely see red and yellow colors in our text since it is located on the leading and trailing edge of the screen.
If this is the behavior you want, you can use a mask to produce a gradient effect. But if you or your designer wants gradient color to start and end at the bounds of the text, you need more work to do.
Solution
We need to make sure our mask uses the same bounds as our text view to solve this. This is a perfect use case for .overlay, a modifier that will layer the views that you specify in front of this modified view.
We use .overlay to put LinearGradient on top of our text view.
Text("The simplicity of Apple.\nIn a credit card.")
.font(Font.system(size: 46, weight: .bold))
.multilineTextAlignment(.center)
.overlay {
LinearGradient(
colors: [.red, .blue, .green, .yellow],
startPoint: .leading,
endPoint: .trailing
)
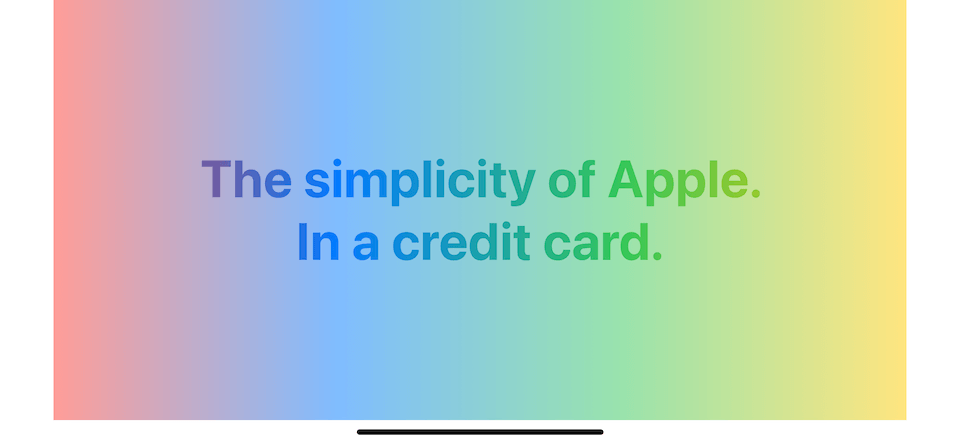
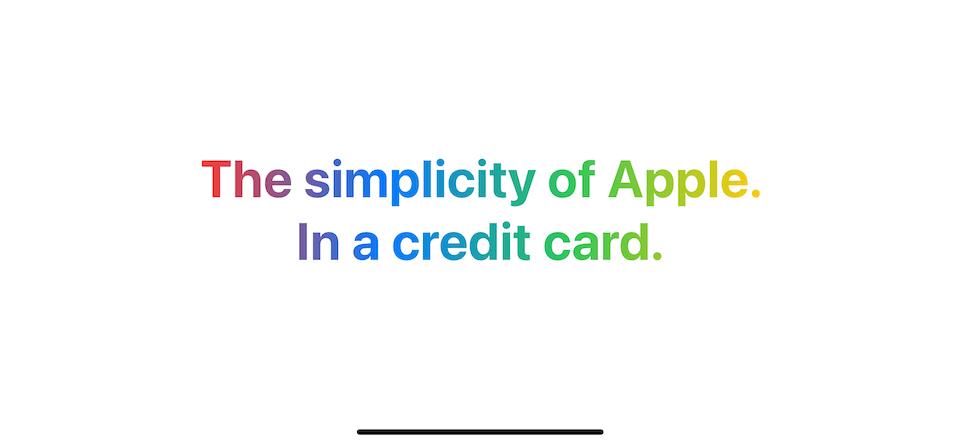
}This will produce a linear gradient that shares the same starting and ending point with the text.
Now that we can make our gradient color start and end along with the text, we need to repeat what we did in the [previous section](#gradient-with-mask-(pre-ios-15). We need to apply a mask over a linear gradient.
Text("The simplicity of Apple.\nIn a credit card.")
    .font(Font.system(size: 46, weight: .bold))
    .multilineTextAlignment(.center)
    .overlay {
        LinearGradient(
            colors: [.red, .blue, .green, .yellow],
            startPoint: .leading,
            endPoint: .trailing
        )
        .mask(
            Text("The simplicity of Apple.\nIn a credit card.")
                .font(Font.system(size: 46, weight: .bold))
                .multilineTextAlignment(.center)
        )
    }
We can see red and yellow colors with this method.
Improvement
As you can see, we need to repeat our text view two times. We create one to set a bound for a gradient and one as a mask.
This is hard to use, but we can make it more usable with the help of a view modifier.
Since text view already has foregroundColor(_:), I will name our new modifier foregroundLinearGradient.
extension Text {
    public func foregroundLinearGradient(
        colors: [Color],
        startPoint: UnitPoint,
        endPoint: UnitPoint) -> some View
    {
        self.overlay {
            LinearGradient(
                colors: colors,
                startPoint: startPoint,
                endPoint: endPoint
            )
            .mask(
                self
            )
        }
    }
}
This modifier is the same implementation as before. We still need two text views as depicted by two self.
Creating a view modifier makes it easier to use. We can use it like this.
Text("The simplicity of Apple.\nIn a credit card.")
    .font(Font.system(size: 46, weight: .bold))
    .multilineTextAlignment(.center)
    .foregroundLinearGradient(
        colors: [.red, .blue, .green, .yellow],
        startPoint: .leading,
        endPoint: .trailing
    )
You can easily support sarunw.com by checking out this sponsor.
Offline Transcription: Fast, privacy-focus way to transcribe audio, video, and podcast files. No data leaves your Mac.
Gradient using foregroundStyle (iOS 15)
If you only focus on iOS 15, you can skip all the hard work we do so far and use the new modifier, foregroundStyle.
Foreground style will set a view's foreground elements to use a given style. You can use any style that conforms to the ShapeStyle protocol as a view's foreground. Luckily LinearGradient is also conforming to ShapeStyle. So, we can pass it as an argument for .foregroundStyle.
Text("The simplicity of Apple.\nIn a credit card.")
    .font(Font.system(size: 46, weight: .bold))
    .multilineTextAlignment(.center)
    .foregroundStyle(
        LinearGradient(
            colors: [.red, .blue, .green, .yellow],
            startPoint: .leading,
            endPoint: .trailing
        )
    )
The result is exactly the same as our previous method.
Read more article about SwiftUI, Gradient, Text, or see all available topic
Enjoy the read?
If you enjoy this article, you can subscribe to the weekly newsletter.
Every Friday, you'll get a quick recap of all articles and tips posted on this site. No strings attached. Unsubscribe anytime.
Feel free to follow me on Twitter and ask your questions related to this post. Thanks for reading and see you next time.
If you enjoy my writing, please check out my Patreon https://www.patreon.com/sarunw and become my supporter. Sharing the article is also greatly appreciated.
Become a patron Buy me a coffee Tweet ShareHow to parse ISO 8601 date in Swift
Learn how to parse ISO 8601 date with ISO8601DateFormatter.
Review Github PR with a web-based editor
If you prefer to review pull requests with an editor but hate the clone or checkout process, you can enjoy the review process without the hassle with new github.dev web-based editor.