How to use different fonts for different languages in an iOS application
Table of Contents
You can add and use a custom font in an iOS app. We learn that in How to add custom fonts to iOS app. Using custom fonts is a simple task if your main audience uses Latin alphabet because those are glyphs that most fonts usually support. Things work differently for languages that have their own glyphs.
To understand the problem, let's see it in an example. I will use the Thai language as an example since it has its own glyphs.
Experiments
Let's see the behavior when using a custom font with a non-Latin glyph to understand the problem. Throughout the article, I will use the Thai language as an example of a non-Latin text.
I created a helper function that returns a label with a preview text using a font specified for testing purposes.
func previewFont(_ font: UIFont) -> UILabel {
    let label = UILabel()
    // 1
    label.text = "English with Thai อยู่ที่เรียนรู้"
    // 2
    label.layer.borderColor = UIColor.systemBlue.cgColor
    label.layer.borderWidth = 1
    label.font = font

    return label
}
1 Our preview text contains both English and Thai languages.
2 I show a blue border so you can see the frame of the label. This is used as an easy way to detect line-height between fonts.
We will conduct two experiments to observe the behavior of how a custom font works with non-Latin glyphs.
Using font with unsupported glyphs
Each font has a set of support glyphs. If a text contains unsupported glyphs, iOS will use a default fallback font for particular glyphs. To test this out, we will use Andada Pro, which supports only Latin alphabets.

Set an Andada Pro font for a label with a text in both Thai and English, "English with Thai อยู่ที่เรียนรู้".
// 1
let andadaFont = UIFont(name: "AndadaPro-Regular", size: 24)!
// 2
let systemThaiFont = UIFont(name: "Thonburi", size: 24)!

// 3
contentStackView.addArrangedSubview(previewFont(andadaFont))
// 4
contentStackView.addArrangedSubview(previewFont(systemThaiFont))
1 Initialize custom font.
3 Add preview label to a stack view.
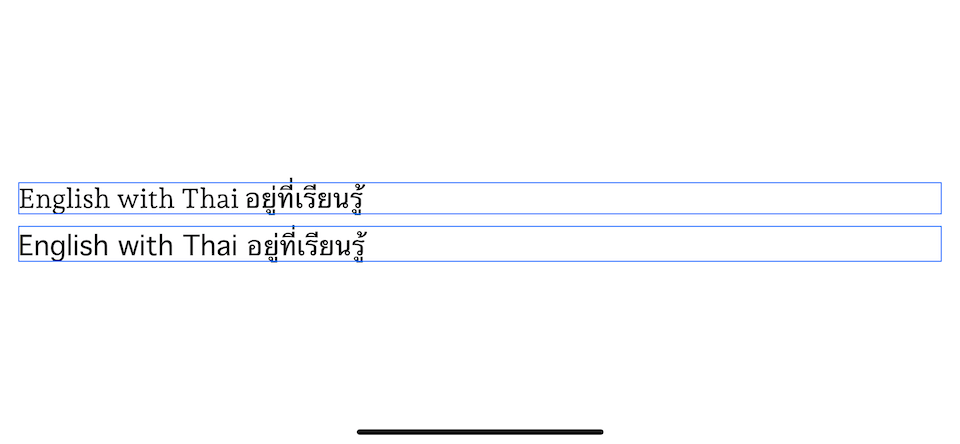
Andada Pro font only supported Latin glyphs, but our label contained text in both Latin and Thai glyphs. As you can see, Thai glyphs still render just fine, even the lack of Thai glyphs in Andada Pro font. That's because iOS has a list of default fallback fonts for each glyph. For Thai, the default fallback font is Thonburi font.
To demonstrate this, I initialize the Thonburi font (2) and put it in another label for comparison (4).

Line height of the fallback font isn't taking into consideration
I want to highlight here that the line-height of the fallback font isn't taken into account. Line height still follows the one you set. In this case, it is the one from Andada Pro font.
As you can see, the second label with Thonburi font has a larger ling height, hence a larger frame.
The line-height of Thai supported font is usually higher since Thai alphabets include vowels and tone marks beyond cap height.

Using custom Thai font
Thai fallback font is good enough most of the time, but if your audiences or clients are Thai, it is not a surprise they would require/appreciate custom Thai font.
Things get more complicated for non-Latin supported fonts since most of them are packed with Latin glyphs. So, if you use a custom Thai font, you probably stick with its Latin glyphs, which you probably don't want. I will use Prompt font as an example for custom Thai font. It contains both Thai and Latin glyphs.

let andadaFont = UIFont(name: "AndadaPro-Regular", size: 24)!
let systemThaiFont = UIFont(name: "Thonburi", size: 24)!
// 1
let customThaiFont = UIFont(name: "Prompt-Regular", size: 24)!

contentStackView.addArrangedSubview(previewFont(andadaFont))
contentStackView.addArrangedSubview(previewFont(systemThaiFont))
// 2
contentStackView.addArrangedSubview(previewFont(thaiFont))
1 Initialize a custom Thai font.
2 Add preview label to a stack view.
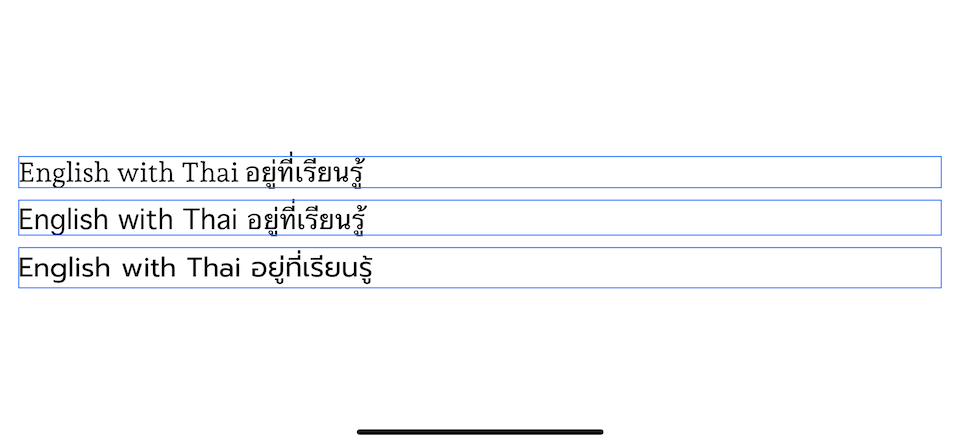
Since Prompt font supports both Latin and Thai glyphs, English and Thai text are rendered using Prompt font. When using a custom font in other languages, you have no choice but to use non-system Latin font.

You can easily support sarunw.com by checking out this sponsor.

AI Grammar: Correct grammar, spell check, check punctuation, and parphrase.
Problem
The problem we are trying to solve here is finding a way to set different fonts for different languages.
Here is the result we want—a label with Andada Pro font for English text and Prompt font for Thai text.

Solution
The key to the problem lies in our first experiment, which is iOS will use a fallback font for glyphs not supported by the selected font.
We can't directly specify a font for each language, but we can specify fallback fonts when glyphs are not found. In other words, we can have our own list of fallback fonts.
To specify a list of fallback fonts, we use the font descriptor attribute, .cascadeList.
let andadaFont = UIFont(name: "AndadaPro-Regular", size: 24)!
let customThaiFont = UIFont(name: "Prompt-Regular", size: 24)!

// 1
let andadaFontDescriptor = andadaFont.fontDescriptor
let customThaiFontDescriptor = customThaiFont.fontDescriptor

// 2
let andadaFontWithThaiFallbackDescriptor = andadaFontDescriptor.addingAttributes([
    .cascadeList: [
        customThaiFontDescriptor
    ]
])

// 3
let andadaFontWithThaiFallback = UIFont(descriptor: andadaFontWithThaiFallbackDescriptor, size: 24)

contentStackView.addArrangedSubview(previewFont(andadaFont))
contentStackView.addArrangedSubview(previewFont(customThaiFont))
contentStackView.addArrangedSubview(previewFont(andadaFontWithThaiFallback))
1 First, we get font descriptor from our custom fonts.
2 We add customThaiFontDescriptor as a fallback font for andadaFontDescriptor by put it in a .cascadeList array.
3 Initialize a font from our modified font descriptor and set this newly created font to a label.
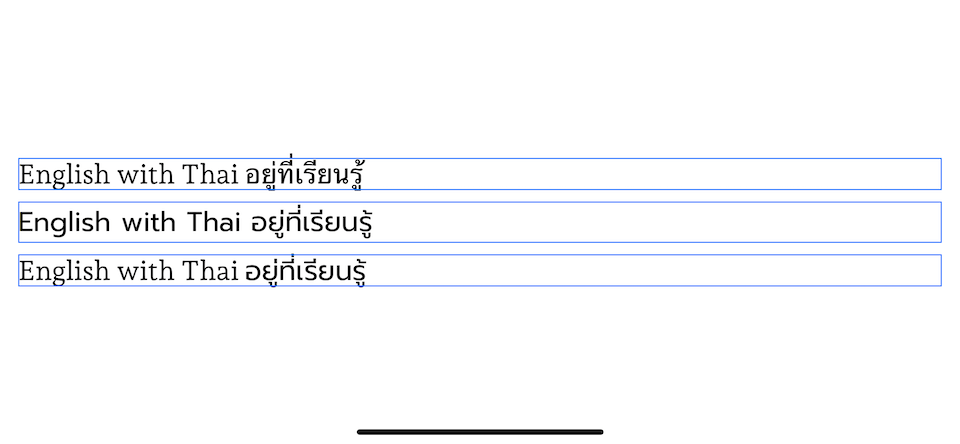
The font created with the modified font descriptor will use Andada Pro font. Once it finds a glyph that Andada Pro does not support, it will fall back to the font specified in .cascadeList. In this case, it is a Prompt font.
You can easily support sarunw.com by checking out this sponsor.

AI Grammar: Correct grammar, spell check, check punctuation, and parphrase.
Caveat
Our solution makes it possible to render different fonts for a different set of glyphs, but one problem remains. A line height of the label still uses the main font and doesn't consider a line-height of fallback fonts. This is the behavior we saw in the first experiment, and I can't find a way to mitigate this. The only hack I can think of right now is to adjust the line height multiplier manually. If you know a better way, please let me know on Twitter @sarunw (My direct message is always open).
Read more article about Development, Font, or see all available topic
Enjoy the read?
If you enjoy this article, you can subscribe to the weekly newsletter.
Every Friday, you'll get a quick recap of all articles and tips posted on this site. No strings attached. Unsubscribe anytime.
Feel free to follow me on Twitter and ask your questions related to this post. Thanks for reading and see you next time.
If you enjoy my writing, please check out my Patreon https://www.patreon.com/sarunw and become my supporter. Sharing the article is also greatly appreciated.
Become a patron Buy me a coffee Tweet ShareHow to use custom fonts in WKWebView
Learn how to use local custom fonts that bundle with your application in WKWebView. It isn't hard, but not very obvious how to do it.
How to initialize NSViewController programmatically without nib
Initializing an NSViewController without nib isn't straightforward as UIViewController. Trying to do so would result in a runtime error. Let's learn how to do that.