Custom Layout in SwiftUI
Table of Contents
SwiftUI has many built-in layout containers like HStack, VStack, and Grid, which should cover most standard design layouts.
But not all apps are created equal. Some apps might require an exceptional design to fit a specific use case.
Before iOS 16, you might need to rely on GeometryReader or preferences to customize a layout, but those methods usually look like a workaround resulting in a hard-to-read code.
In iOS 16, we finally have an official way to create a custom layout in SwiftUI. Let's see how easy it is to do that.
How to create a custom layout in SwiftUI
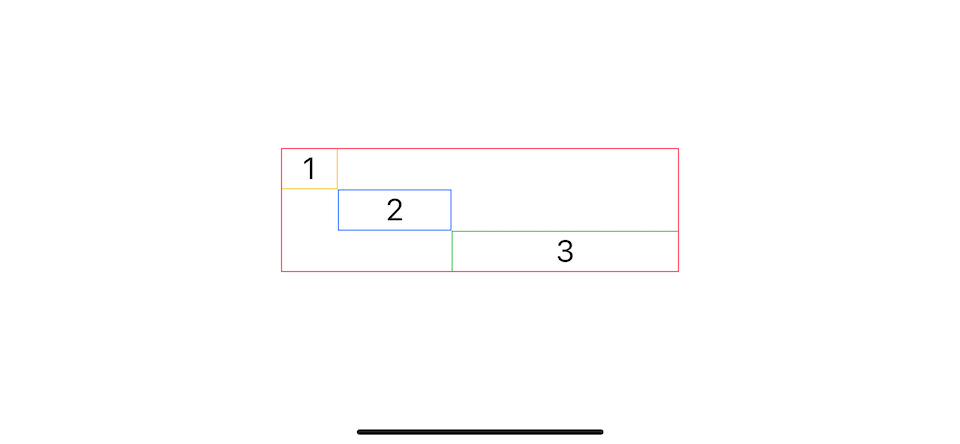
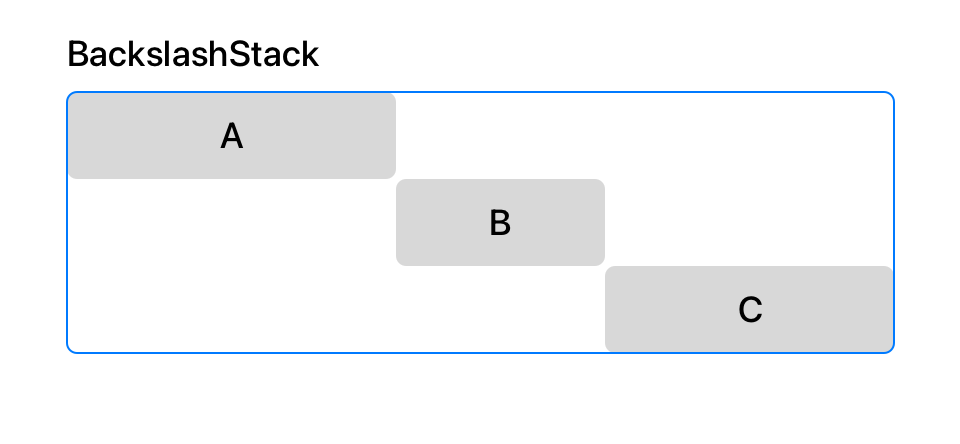
In this article, I will create a new layout called BackslashStack which will layout subviews from the top-left to bottom-right, i.e., backslash (\).
The final result, we can use this layout the same way as a built-in one by providing a ViewBuilder with the list of subviews to arrange:
BackslashStack {
    Text("1")
        .frame(width: 50)
        .border(.yellow)
    Text("2")
        .frame(width: 100)
        .border(.blue)
    Text("3")
        .frame(width: 200)
        .border(.green)
}
.border(.pink)
.font(.title)
Result:
To create a custom layout, you need to do the followings:
- Create a new
Layout. - Calculate the size of the newly created layout container.
- Position subviews in that layout container.
You can easily support sarunw.com by checking out this sponsor.
AI Grammar: Correct grammar, spell check, check punctuation, and parphrase.
Create a new Layout
Start by creating a new type that conforms to the Layout protocol.
There are two required methods:
sizeThatFits(proposal:subviews:cache:), which return the size of our newly created layout view.placeSubviews(in:proposal:subviews:cache:), where we assigns positions to the layout's subviews.
struct BackslashStack: Layout {
    func sizeThatFits(proposal: ProposedViewSize, subviews: Subviews, cache: inout ()) -> CGSize {
        // Calculate and return the size of the layout container.
    }

    func placeSubviews(in bounds: CGRect, proposal: ProposedViewSize, subviews: Subviews, cache: inout ()) {
        // Tell each subview where to appear.
    }
}
Let's implement these two methods one by one.
Calculate layout container size
The first method we need to implement is sizeThatFits(proposal:subviews:cache:). We need to calculate and report how large the layout container is.
To be able to calculate the container size, the method provided us two things.
- Available space that the container is given. We get this from the
proposalparameter. - The size of the container's subviews. We can access this information through the subview proxy getting from the
subviewsparameter.
Proposed view size
You get an available size from the proposal parameter. This is the size proposed for our container.
In this example, we set the container's parent frame to .frame(width: 100, height: 100).
BackslashStack {
    Text("Hello, World!")
    Text("Hello, World! 2")
    Text("Hello, World! 3")
}
.frame(width: 100, height: 100)
We can read this value from proposal.width and proposal.height.
func sizeThatFits(proposal: ProposedViewSize, subviews: Subviews, cache: inout ()) -> CGSize {
    print(proposal.width)
    // 100
    print(proposal.height)
    // 100

    // ....
}
Getting the size of the container's subviews
We can get the size of a subview the same way as the container's parent asking for our BackslashStack size in the sizeThatFits(proposal:subviews:cache:) method.
Instead of sizeThatFits(proposal:subviews:cache:) method, we ask the size via subview proxy method, sizeThatFits(_:).
We proposed size to subview proxy and will get back a concrete size of that subview.
let subviewSizes = subviews.map { proxy in
  return proxy.sizeThatFits(.unspecified)
}
We have three ways to ask for subview size.
- The
zeroproposal; respond with the layout's minimum size. - The
infinityproposal; respond with the layout's maximum size. - The
unspecifiedproposal; respond with the layout's ideal size.
For BackslashStack, the container width and height are equal to all the width and height of all subviews combined.
BackslashStack's width = A.width + B.width + C.width
BackslashStack's height = A.height + B.height + C.height
Here is our implementation of sizeThatFits(proposal:subviews:cache:) for BackslashStack.
func sizeThatFits(proposal: ProposedViewSize, subviews: Subviews, cache: inout ()) -> CGSize {
    // 1
    let subviewSizes = subviews.map { proxy in
        return proxy.sizeThatFits(.unspecified)
    }

    // 2
    let combinedSize = subviewSizes.reduce(.zero) { currentSize, subviewSize in
        return CGSize(
            width: currentSize.width + subviewSize.width,
            height: currentSize.height + subviewSize.height)
    }

    // 3
    return combinedSize
}
1 Ask for ideal size for all subviews by proposed .unspecified size to sizeThatFits(_:) method.
2 Calculate the size of the layout container by combining the width and height of all subviews.
3 Return that size that we just calculated.
We are halfway done here.
This is the result if we try to use BackslashStack right now.
BackslashStack {
    Text("Lorem")
        .border(.yellow)
    Text("eveniet facilis")
        .border(.blue)
    Text("possimus eaque adipisci ")
        .border(.green)
}
.border(.pink)
I apply the border to each subview and container view for you to see the outlines of each view.
As you can see, the container size is correct. It is a combination of all three subviews.
The last thing we need to do is align our subviews. Right now, all subviews are aligned at the center of the container view. That's because we didn't assign a position to them. And that's what we will do next.
Position subviews
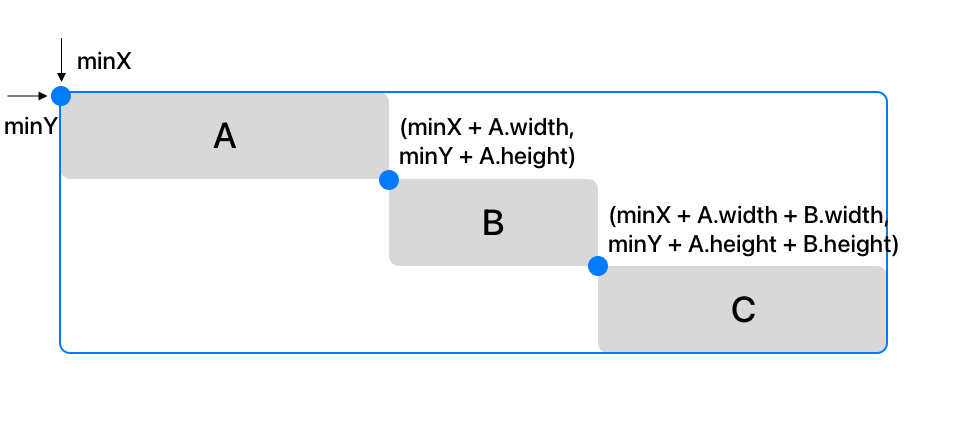
Now that we have the container's size, the only thing left is to lay out its subview in that space. We do this in placeSubviews(in:proposal:subviews:cache:) method.
For our case, what we do in this method are:
Calculate each subview's size since each subview's position is related to the previous subview's size.
Place the first subview in the upper left corner.
Place the next subview at the bottom right corner of the previous subview.
Continue doing step 3 until all subviews are placed.
The way we assign a position to a subview is by calling place(at:anchor:proposal:) method on a subview proxy (LayoutSubview).
Here is what our BackslashStack implementation looks like.
func placeSubviews(in bounds: CGRect, proposal: ProposedViewSize, subviews: Subviews, cache: inout ()) {
    // 1
    let subviewSizes = subviews.map { proxy in
        return proxy.sizeThatFits(.unspecified)
    }

    // 2
    var x = bounds.minX
    var y = bounds.minY

    // 3
    for index in subviews.indices {
        let subviewSize = subviewSizes[index]
        let sizeProposal = ProposedViewSize(
            width: subviewSize.width,
            height: subviewSize.height)

        // 4
        subviews[index]
            .place(
                at: CGPoint(x: x, y: y),
                anchor: .topLeading,
                proposal: sizeProposal
            )

        // 5
        x += subviewSize.width
        y += subviewSize.height
    }
}
1 We ask for the ideal size of each subview, just like in the previous section.
2 We declare x and y coordinate for the current subview that we want to position. There is a chance that the origin doesn't start from zero, so you should use minX and minY instead.
3 We go over each subview and get their ideal size, create ProposedViewSize out of that ideal size, and then assign it via place(at:anchor:proposal:) method.
4 place(at:anchor:proposal:) method required three parameters:
· X-Y Coordinate of a subview.
· Anchor of a subview that wants to attach to that coordinate. In this case, we want the top leading of a subview on the point.
· Proposed size of a subview. We want subviews to take their ideal size in this case.
5 After positioning each subview, we prepared x and `y' coordinates for the next subview.
With this last change, our layout is completed.
Try using BackslashStack again.
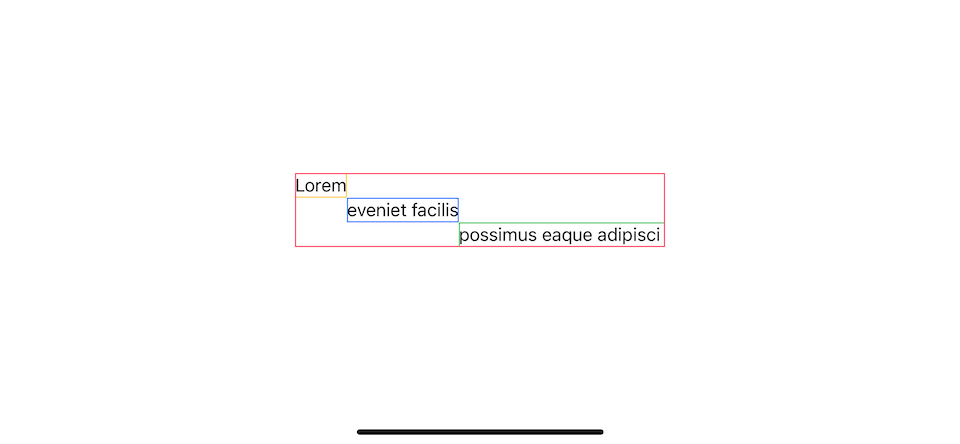
BackslashStack {
    Text("Lorem")
        .border(.yellow)
    Text("eveniet facilis")
        .border(.blue)
    Text("possimus eaque adipisci ")
        .border(.green)
}
.border(.pink)
This is the result you get.
You can easily support sarunw.com by checking out this sponsor.
AI Grammar: Correct grammar, spell check, check punctuation, and parphrase.
Conclusion
In this article, we learn how to make a custom container layout in SwiftUI. As you can see for a simple layout, we only need to implement two protocol methods.
In sizeThatFits(proposal:subviews:cache:), we return the size of a layout by consult its subviews.
In placeSubviews(in:proposal:subviews:cache:), we position subviews within that space.
One thing to note about coordination space in the layout is that there is a chance that the origin doesn't start from zero, so you should use minX and minY instead.
Read more article about SwiftUI, iOS 16, WWDC22, Layout, or see all available topic
Enjoy the read?
If you enjoy this article, you can subscribe to the weekly newsletter.
Every Friday, you'll get a quick recap of all articles and tips posted on this site. No strings attached. Unsubscribe anytime.
Feel free to follow me on Twitter and ask your questions related to this post. Thanks for reading and see you next time.
If you enjoy my writing, please check out my Patreon https://www.patreon.com/sarunw and become my supporter. Sharing the article is also greatly appreciated.
Become a patron Buy me a coffee Tweet ShareHow to save enum in UserDefaults using Swift
Enumeration is a type that I think is perfect for representing options for users, but we can't save it directly to UserDefaults. Let's learn how to read/write enum to UserDefaults.
How to save enum with associated value in UserDefaults using Swift
Let's learn how to read/write enum with associated value to UserDefaults.