SwiftUI TabView
Table of Contents
What is SwiftUI TabView
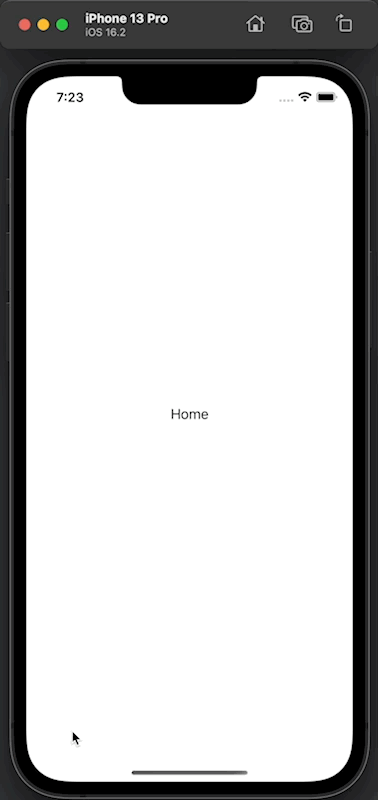
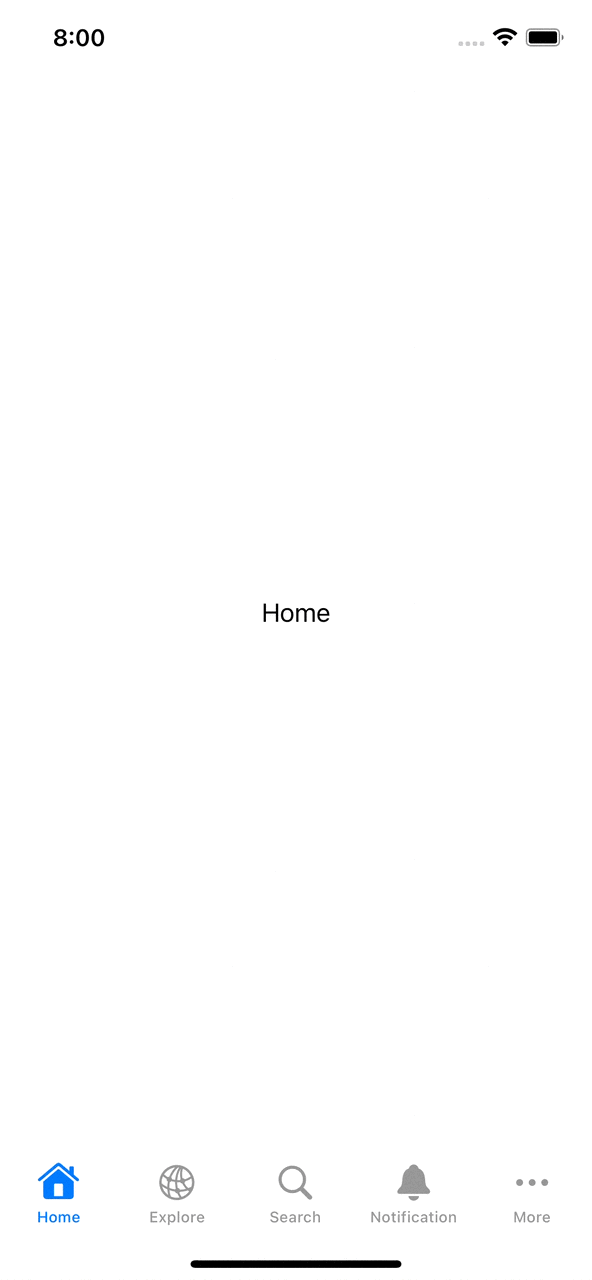
TabView or Tab bars is a container view that provides an easy way to navigate between multiple child views.
You can access each view in a tab view from a tab item, which sits at the bottom of the screen.
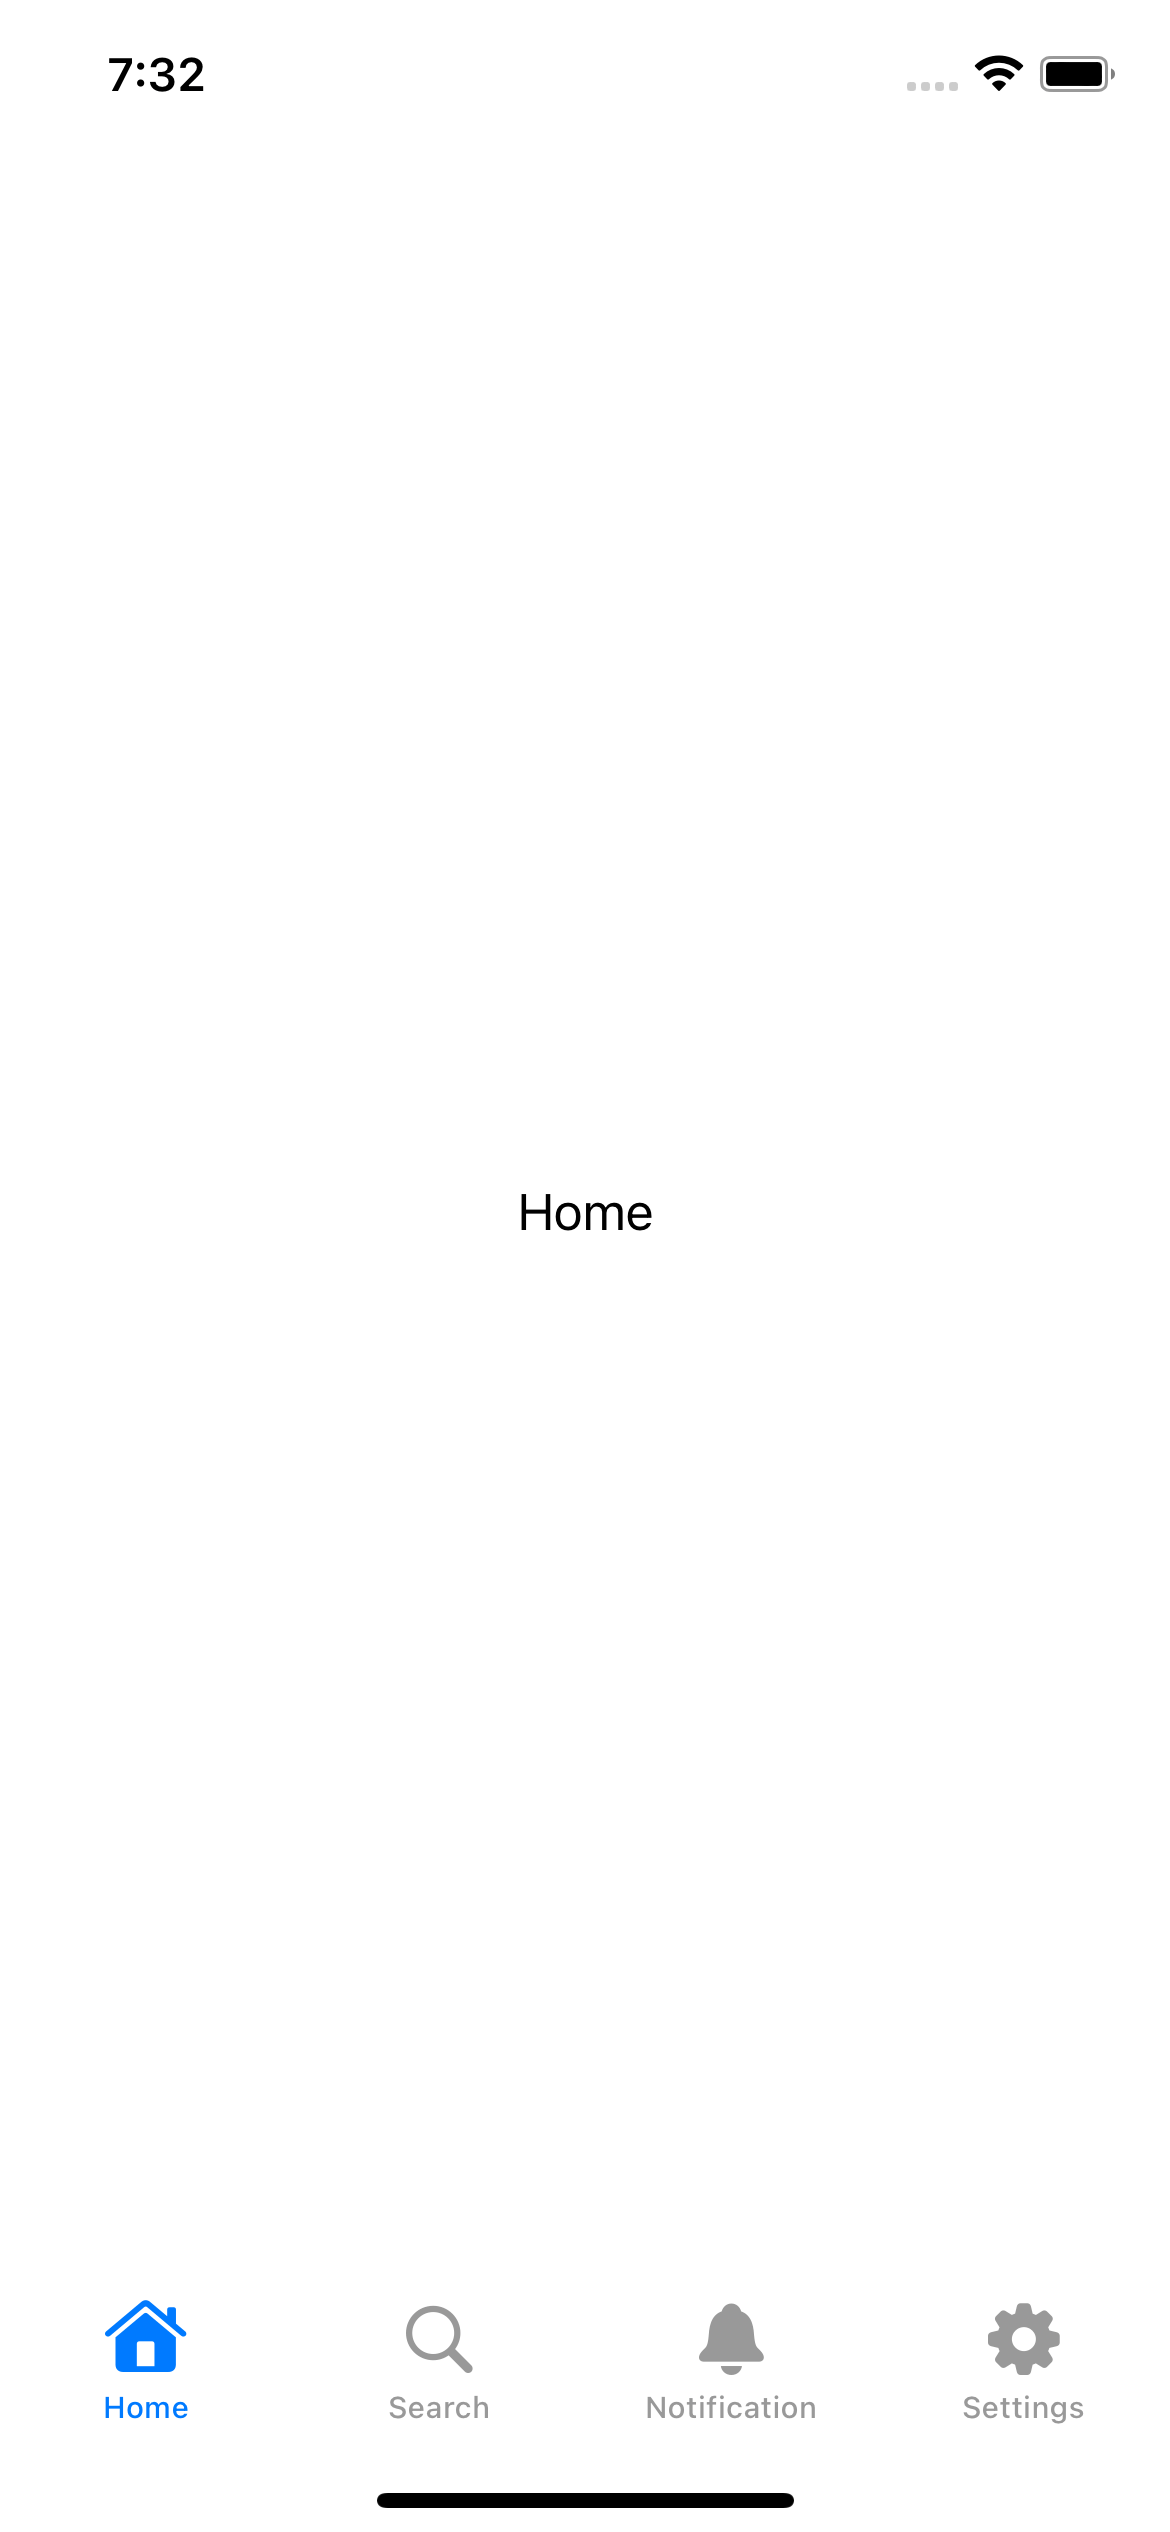
Here is what a SwiftUI tab view looks like. As you can see, we can switch between "Home", "Seach", "Notification", and "Settings" by selecting a tab item at the bottom of the screen.

You can easily support sarunw.com by checking out this sponsor.
Offline Transcription: Fast, privacy-focus way to transcribe audio, video, and podcast files. No data leaves your Mac.
How to create a TabView
To use a tab view, you put views that you want into a TabView. Each of these child views becomes a tab in a tab view.
struct ContentView: View {
    var body: some View {
        TabView {
            Text("Home")
            Text("Search")
            Text("Notification")
            Text("Settings")
        }
    }
}
With this code, you would get a working tab view. You just don't see a tab item since we didn't specify its content.
You can switch between each tab by tapping at the bottom area of the screen. The tab item is there, but it doesn't have visible content.
Tab Item
You need to attach information that will be used in a tab item to each view.
We can do that by applying the tabItem(_:) to each view. We can set a tab bar item's label using this modifier.
I use Label as a tab item's content.
struct ContentView: View {
    var body: some View {
        TabView {
            Text("Home")
                .tabItem {
                    Label("Home", systemImage: "house")
                }
            Text("Search")
                .tabItem {
                    Label("Search", systemImage: "magnifyingglass")
                }
            Text("Notification")
                .tabItem {
                    Label("Notification", systemImage: "bell")
                }
            Text("Settings")
                .tabItem {
                    Label("Settings", systemImage: "gearshape")
                }
        }
    }
}
TabView uses the information from a tabItem(_:) to populate its tab items.
That's all you need to do to create a tab view in SwiftUI.
Next, let's learn about some of its behavior.
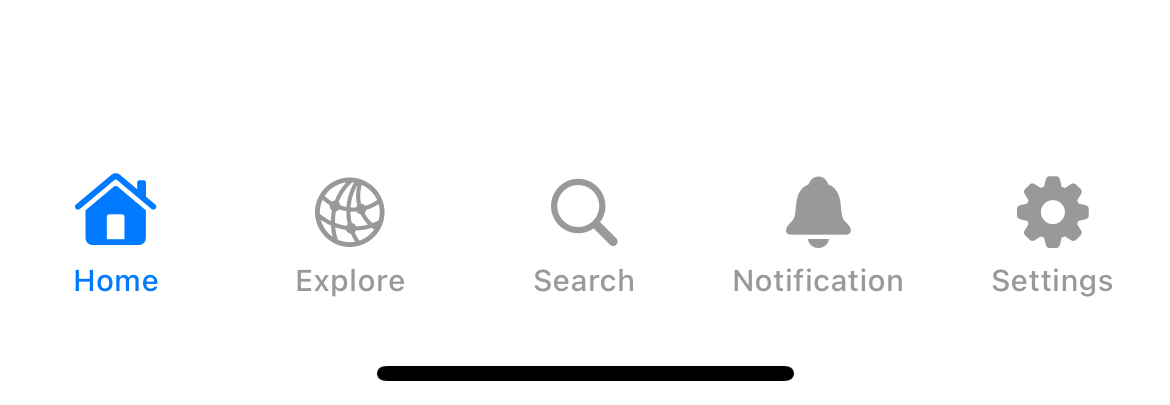
Maximum number of tab items.
Tab view can show a maximum of five tab items.
struct ContentView: View {
    var body: some View {
        TabView {
            Text("Home")
                .tabItem {
                    Label("Home", systemImage: "house")
                }
            Text("Explore")
                .tabItem {
                    Label("Explore", systemImage: "network")
                }
            Text("Search")
                .tabItem {
                    Label("Search", systemImage: "magnifyingglass")
                }
            Text("Notification")
                .tabItem {
                    Label("Notification", systemImage: "bell")
                }
            Text("Settings")
                .tabItem {
                    Label("Settings", systemImage: "gearshape")
                }
        }
    }
}
Here is how it looks.
More than five tab items
If you provide more than five tab items, SwiftUI will do the followings:
- Change the last tab item to "More".
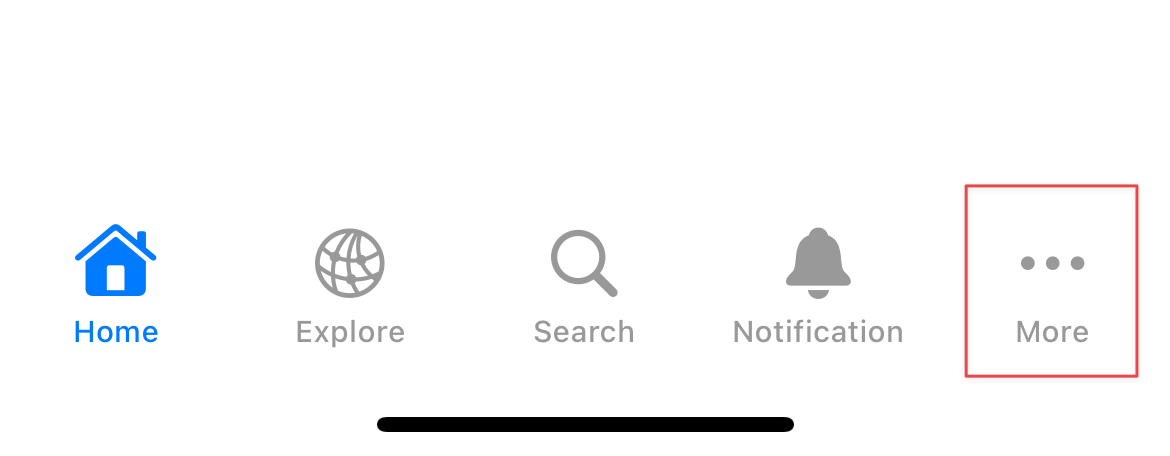
- Put tabs that can't be shown into the "More" tab. Selecting the More tab will present a list of all remaining tab items.

- Selecting an extra tab will push that view into a navigation stack.
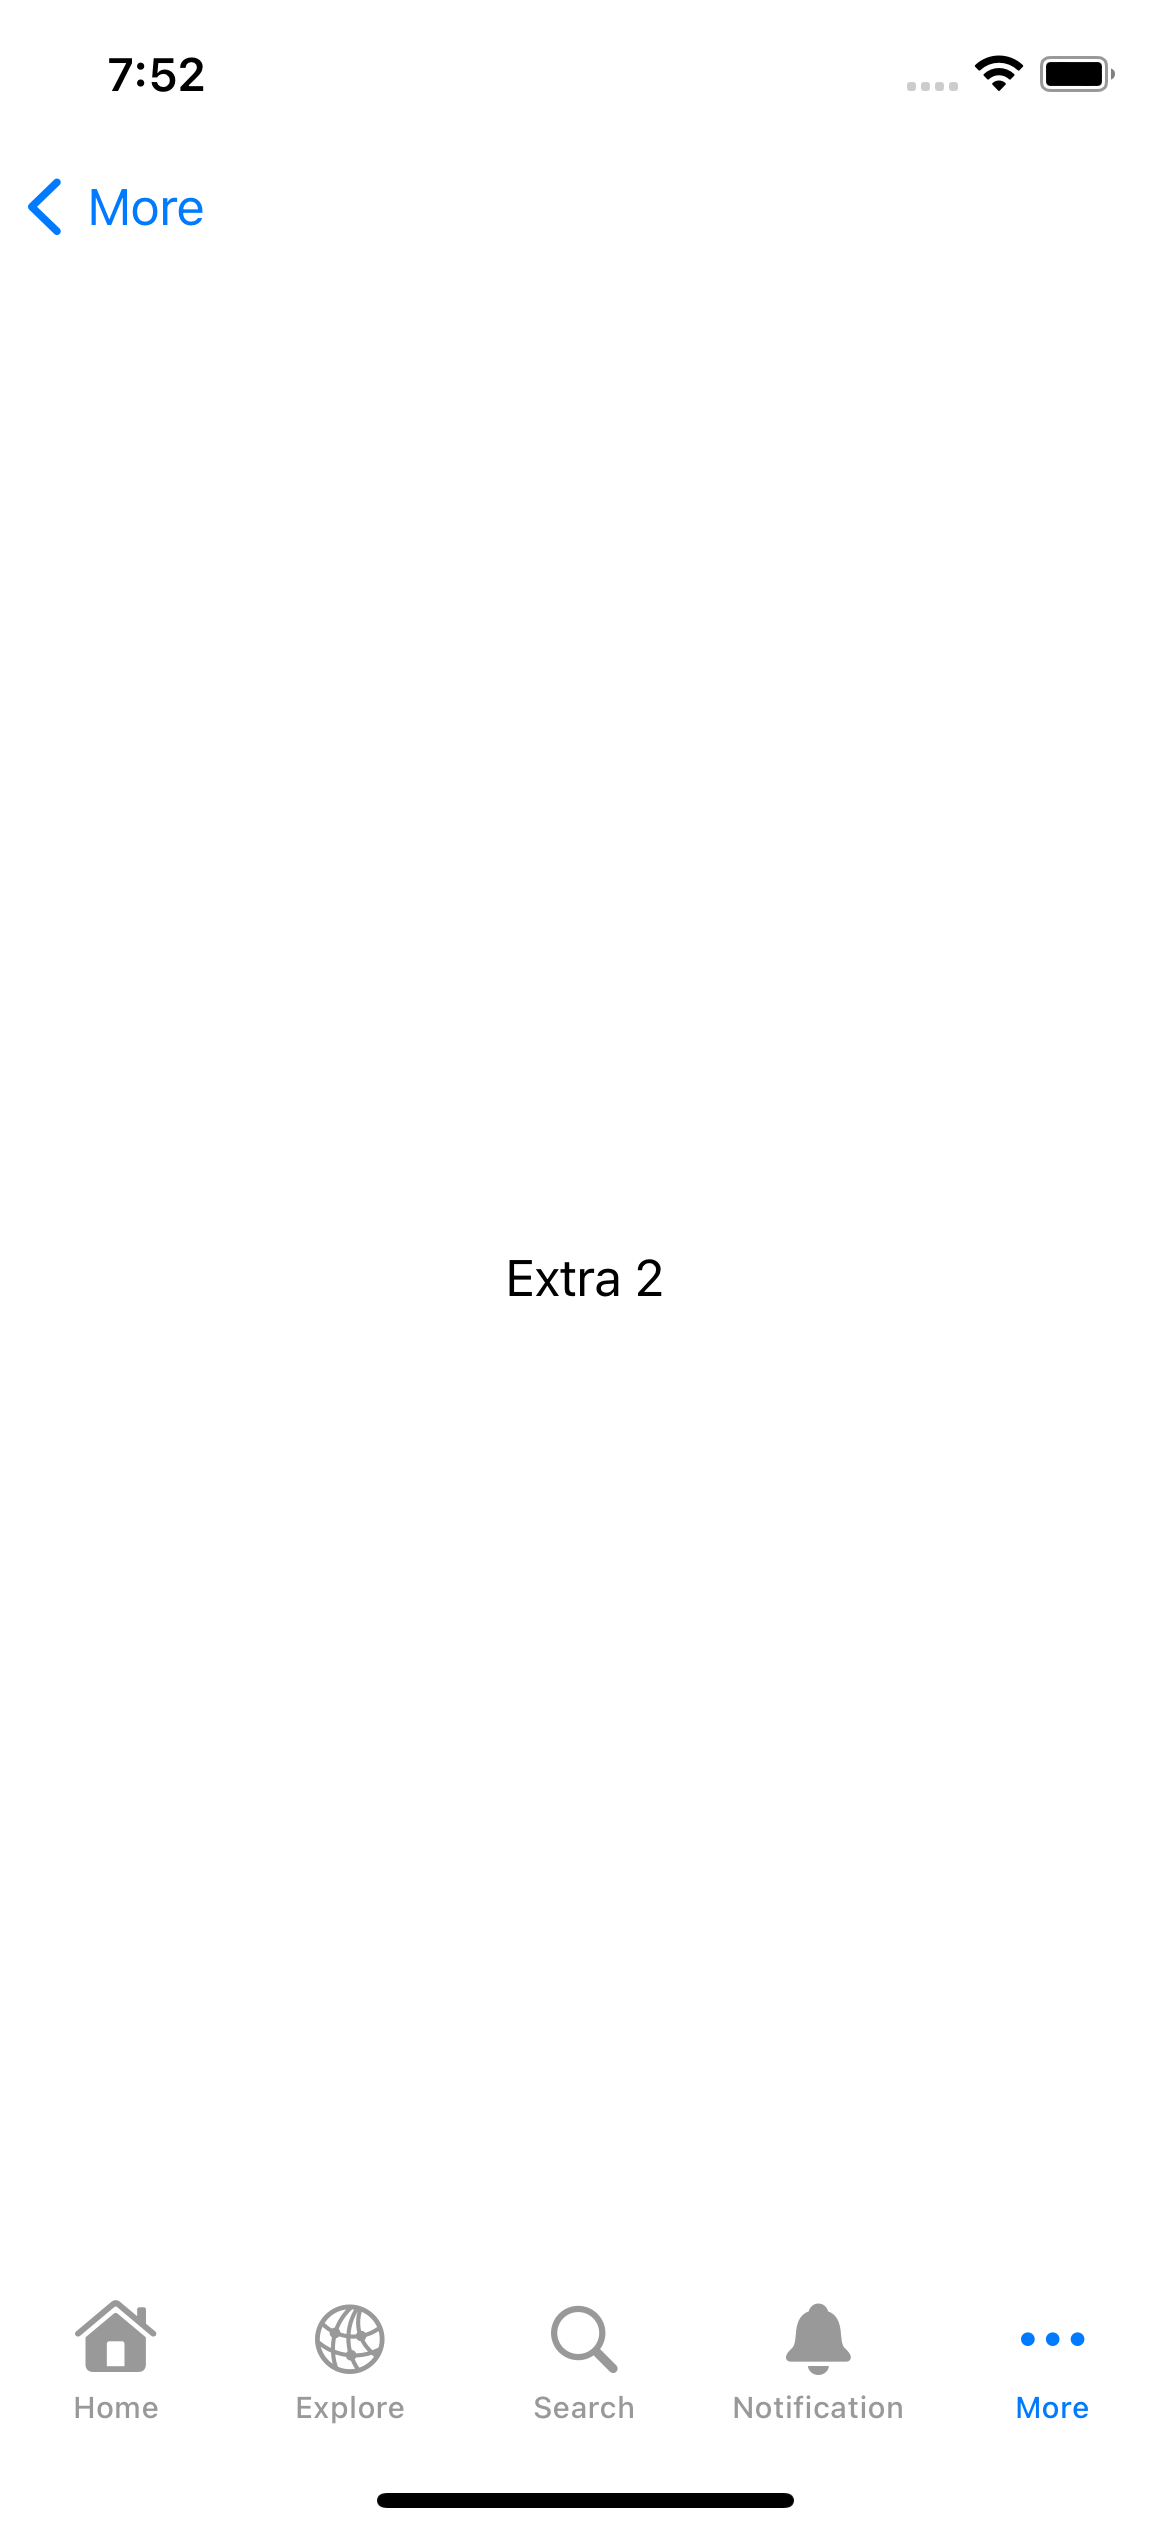
Here is an example of a tab view that contains eight tabs.
struct ContentView: View {
    var body: some View {
        TabView {
            Text("Home")
                .tabItem {
                    Label("Home", systemImage: "house")
                }
            Text("Explore")
                .tabItem {
                    Label("Explore", systemImage: "network")
                }
            Text("Search")
                .tabItem {
                    Label("Search", systemImage: "magnifyingglass")
                }
            Text("Notification")
                .tabItem {
                    Label("Notification", systemImage: "bell")
                }
            // The following tabs will be grouped under the More tab.
            Text("Settings")
                .tabItem {
                    Label("Settings", systemImage: "gearshape")
                }
            Text("Extra 1")
                .tabItem {
                    Label("Extra 1", systemImage: "1.circle")
                }
            Text("Extra 2")
                .tabItem {
                    Label("Extra 2", systemImage: "2.circle")
                }
            Text("Extra 3")
                .tabItem {
                    Label("Extra 3", systemImage: "3.circle")
                }
        }
    }
}
Due to the limited space, a tab view can only show five tabs simultaneously. So you should be mindful of the number of tabs.
As you can see, the more tabs you get, the harder you can reach them.
You can easily support sarunw.com by checking out this sponsor.
Offline Transcription: Fast, privacy-focus way to transcribe audio, video, and podcast files. No data leaves your Mac.
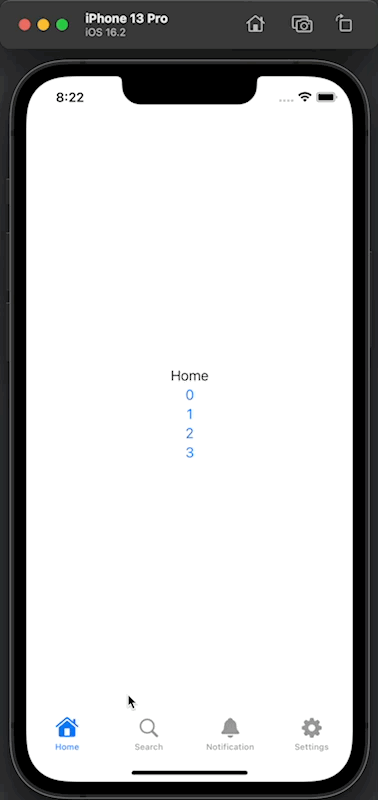
How to select a tab programmatically
As a view designed for navigation, there might be a time when you need to navigate or select a different tab programmatically.
You can do that by doing the following steps.
- Set the unique identifier for each tab. We can do that with the help of
tag(_:)modifier. - Create a variable to control the selected tab.
- Initialize
TabViewwith the initializer that accepts a selection binding,init(selection:content:).
Here is an example of a tab view where we can jump between tabs by tapping on the buttons.
struct ContentView: View {
    // 1
    @State private var selectedTabIndex = 0

    var body: some View {
        // 2
        TabView(selection: $selectedTabIndex) {
            VStack {
                Text("Home")
                Button("0") {
                    selectedTabIndex = 0
                }
                Button("1") {
                    selectedTabIndex = 1
                }
                Button("2") {
                    selectedTabIndex = 2
                }
                Button("3") {
                    selectedTabIndex = 3
                }
            }
            .tag(0) // 3
            .tabItem {
                Label("Home", systemImage: "house")
            }

            VStack {
                Text("Search")
                Button("0") {
                    selectedTabIndex = 0
                }
                Button("1") {
                    selectedTabIndex = 1
                }
                Button("2") {
                    selectedTabIndex = 2
                }
                Button("3") {
                    selectedTabIndex = 3
                }
            }
            .tag(1)
            .tabItem {
                Label("Search", systemImage: "magnifyingglass")
            }

            VStack {
                Text("Notification")
                Button("0") {
                    selectedTabIndex = 0
                }
                Button("1") {
                    selectedTabIndex = 1
                }
                Button("2") {
                    selectedTabIndex = 2
                }
                Button("3") {
                    selectedTabIndex = 3
                }
            }
            .tag(2)
            .tabItem {
                Label("Notification", systemImage: "bell")
            }

            VStack {
                Text("Settings")
                Button("0") {
                    selectedTabIndex = 0
                }
                Button("1") {
                    selectedTabIndex = 1
                }
                Button("2") {
                    selectedTabIndex = 2
                }
                Button("3") {
                    selectedTabIndex = 3
                }
            }
            .tag(3)
            .tabItem {
                Label("Settings", systemImage: "gearshape")
            }
        }
    }
}
1 Create a variable that keeps the selected tab. In this case, we use Int as a tag.
2 Create a TabView with an initializer that accepts the selection binding, TabView(selection: $selectedTabIndex).
3 Apply .tag() to each view.
We can control the selected tab by changing the value in the selectedTabIndex variable.
TabView will change the tab to the one that is tagged with the value matched selectedTabIndex's value.
Read more article about SwiftUI, TabView, or see all available topic
Enjoy the read?
If you enjoy this article, you can subscribe to the weekly newsletter.
Every Friday, you'll get a quick recap of all articles and tips posted on this site. No strings attached. Unsubscribe anytime.
Feel free to follow me on Twitter and ask your questions related to this post. Thanks for reading and see you next time.
If you enjoy my writing, please check out my Patreon https://www.patreon.com/sarunw and become my supporter. Sharing the article is also greatly appreciated.
Become a patron Buy me a coffee Tweet ShareTimer in SwiftUI
The ability to run some code periodically is an important task in iOS development. Let's learn how to do it in SwiftUI.
Computed property vs Method: Which one to use
A read-only computed property can use interchangeability with a method with no arguments. The question is, which one to use?