viewDidLoad() in SwiftUI
Table of Contents
What is viewDidLoad() equivalent in SwiftUI
If you come from the UIKit world, you might wonder what the viewDidLoad() equivalent method in SwiftUI is.
Too bad there is no direct replacement of viewDidLoad() in SwiftUI.
The closest SwiftUI's methods we have are onAppear() and onDisappear() which is equivalents to UIKit's viewDidAppear() and viewDidDisappear().
If you really want the behavior of viewDidLoad(), you have to implement it yourself. Luckily, the process is not that hard.
You can easily support sarunw.com by checking out this sponsor.

AI Grammar: Correct grammar, spell check, check punctuation, and parphrase.
viewDidLoad in SwiftUI
We can simulate viewDidLoad() behavior in SwiftUI using the onAppear modifier.
We need two behaviors from viewDidLoad().
- We need to know when a view is loaded. We can use an
onAppearaction in this case. It might not convey exact meaning, but I think this is the closest to the view loaded in UIKit. - We need to perform this action only once throughout the life of that view. Since we want to know whether it is the first time or not, we need to keep some kind of state in a view.
@Statevariable is perfect for an internal change that means to use locally within the view.
As an example, I will try to implement viewDidLoad() in a SpyView.
struct SpyView: View {
    // 1
    @State private var viewDidLoad = false

    var body: some View {
        Text("Spy")
            // 2
            .onAppear {
                print("onAppear")
                if viewDidLoad == false {
                    // 3
                    viewDidLoad = true
                    // 4
                    // Perform any viewDidLoad logic here.
                    print("viewDidLoad")
                }
            }
    }
}
1 First, we create @State variable to remember whether we perform onAppear action yet.
2 We use onAppear modifier to detected whether view did appear/loaded.
3 If viewDidLoad is false, that mean this is the first time onAppear method get called.
4 We then change viewDidLoad to true and perform any logic that belong in viewDidLoad in this block.
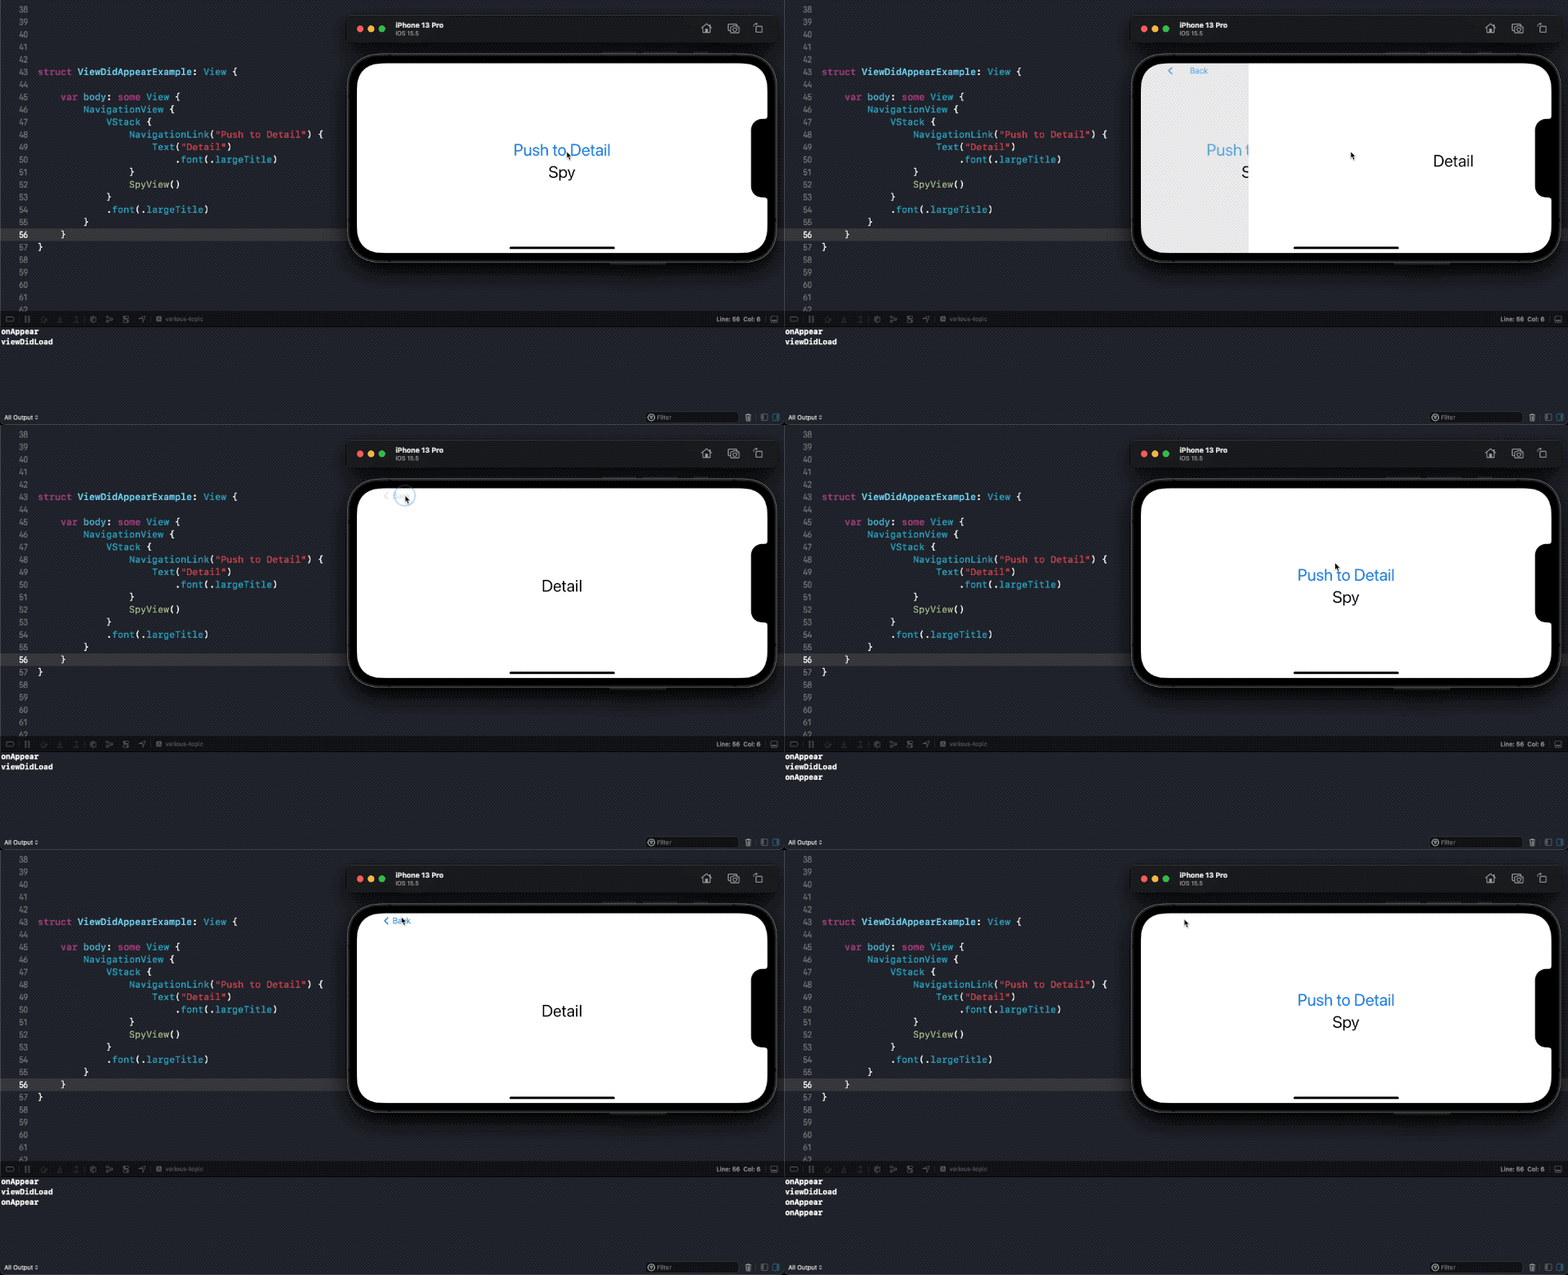
To test this, I put the SpyView in a navigation view. Go to the detail view, and back would trigger the onAppear action.
var body: some View {
    NavigationView {
        VStack {
            NavigationLink("Push to Detail") {
                Text("Detail")
                    .font(.largeTitle)
            }
            SpyView()
        }
        .font(.largeTitle)
    }
}
On the app loaded, you will see both "onAppear" and "viewDidLoad" in the debug console.
But the subsequent disappear and reappear of the view won't trigger code inside the viewDidLoad's block.

You can easily support sarunw.com by checking out this sponsor.

AI Grammar: Correct grammar, spell check, check punctuation, and parphrase.
Turn viewDidLoad into a view modifier
Having to implement the above logic every time might be cumbersome. If you plan to use a lot of this, it might be better to turn this into a view modifier.
I will create the onViewDidLoad modifier out of the previous logic.
First, let's create a new ViewModifier. We can copy most of the code from our previous example.
struct ViewDidLoadModifier: ViewModifier {
    @State private var viewDidLoad = false
    let action: (() -> Void)?

    func body(content: Content) -> some View {
        content
            .onAppear {
                if viewDidLoad == false {
                    viewDidLoad = true
                    action?()
                }
            }
    }
}
Then, we create a View extension for ease of use. I replicate the signature of onApepar here.
extension View {
    func onViewDidLoad(perform action: (() -> Void)? = nil) -> some View {
        self.modifier(ViewDidLoadModifier(action: action))
    }
}
That's all you need to do to create a reusable viewDidLoad modifier. Here is how you use it.
var body: some View {
    NavigationView {
        VStack {
            NavigationLink("Push to Detail") {
                Text("Detail")
                    .font(.largeTitle)
            }
            Text("Spy")
                .onAppear {
                    print("onAppear")
                }
                .onViewDidLoad {
                    print("viewDidLoad")
                }
        }
        .font(.largeTitle)
    }
}Read more article about SwiftUI or see all available topic
Enjoy the read?
If you enjoy this article, you can subscribe to the weekly newsletter.
Every Friday, you'll get a quick recap of all articles and tips posted on this site. No strings attached. Unsubscribe anytime.
Feel free to follow me on Twitter and ask your questions related to this post. Thanks for reading and see you next time.
If you enjoy my writing, please check out my Patreon https://www.patreon.com/sarunw and become my supporter. Sharing the article is also greatly appreciated.
Become a patron Buy me a coffee Tweet ShareFor loop in SwiftUI using ForEach
When creating an app, there is a time when you want to create a repetitive view or a collection of views from an array of data. We can do that in SwiftUI with ForEach.
How to check if String is Number in Swift
Learn different ways to check if a string is a number.