How to use layoutMarginsGuide in UIKit
Table of Contents
When you lay out views in UIKit, you might add some arbitrary padding around your content.
This padding makes the content easier to read, and it lines the content up with other system components, like the back button and the navigation bar items.
NSLayoutConstraint.activate([
    label.leadingAnchor.constraint(equalTo: view.leadingAnchor, constant: 16),
    label.trailingAnchor.constraint(equalTo: view.trailingAnchor, constant: -16),
    label.topAnchor.constraint(equalTo: view.safeAreaLayoutGuide.topAnchor),
])
16-point padding is just a guess
On an iPhone 17, this looks right. The label starts exactly where the large title starts.
Run the same code on an iPhone 18 Pro Max, and the label starts 4 points before the title. Here are both, zoomed in on the top-left corner. The red line marks where the title starts:
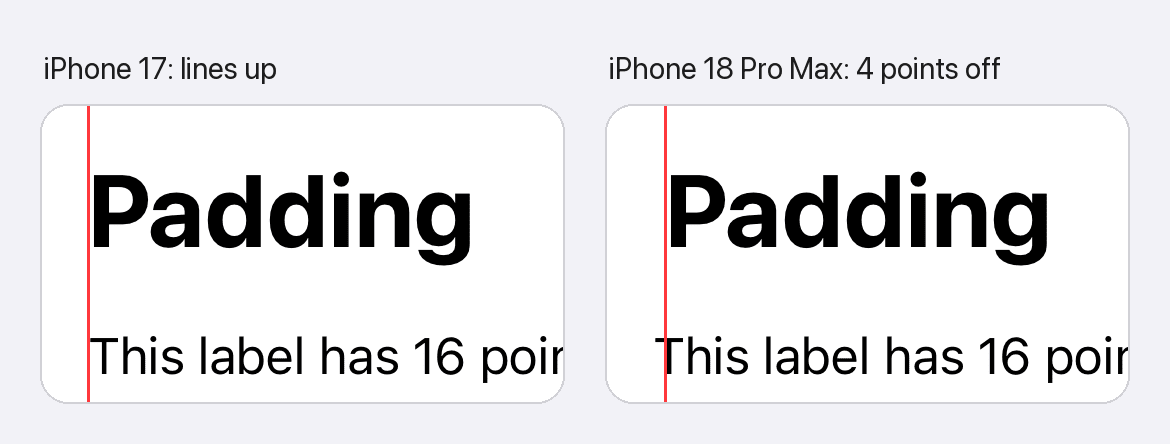
The system doesn't use the same padding on every device, and the number changes when you turn the device. A fixed 16 only matches some of them.
You can easily support sarunw.com by checking out this sponsor.

AI Grammar: Correct grammar, spell check, check punctuation, and parphrase.
Use layoutMarginsGuide instead
Instead of guessing, let the system pick the padding for you.
Every UIView has a layoutMarginsGuide. Think of it as a box inside the view, inset from each edge by the right padding for the current device. This padding is called the layout margins.
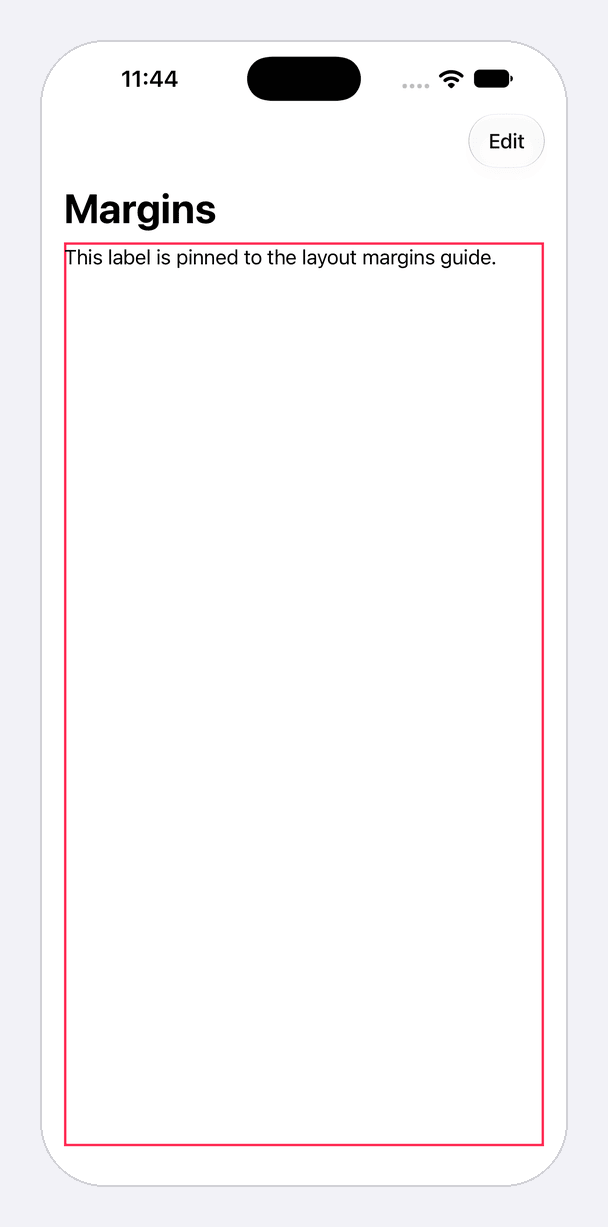
For a view controller's main view, the system sets the layout margins to match the navigation bar. So in portrait, anything you pin to this box lines up with the large title and the bar buttons.
Pin your content to the guide instead of to the view's edges:
let margins = view.layoutMarginsGuide

NSLayoutConstraint.activate([
    label.leadingAnchor.constraint(equalTo: margins.leadingAnchor),
    label.trailingAnchor.constraint(equalTo: margins.trailingAnchor),
    label.topAnchor.constraint(equalTo: margins.topAnchor),
])
The guide stays inside the safe area
The guide never goes into the safe area. It starts at the edge of the safe area, then adds a little extra space. That extra space is the margin.
Turn an iPhone 18 Pro Max to landscape. The Dynamic Island side has a 62-point safe area, and the margin is 16 points. So the guide starts 62 + 16 = 78 points from the edge of the screen.
One thing to watch out for: if you read layoutMargins in code, you get the whole distance from the edge of the view, safe area included:
view.layoutMargins.left // 78: the 62-point safe area plus the 16-point marginIgnoring the safe area
The guide stays inside the safe area because insetsLayoutMarginsFromSafeArea is true by default. If you set it to false, the guide ignores the safe area:
view.insetsLayoutMarginsFromSafeArea = falseNow the guide starts 16 points from the edge of the screen, behind the Dynamic Island. It also starts at the very top of the screen, so the label ends up behind the navigation bar:
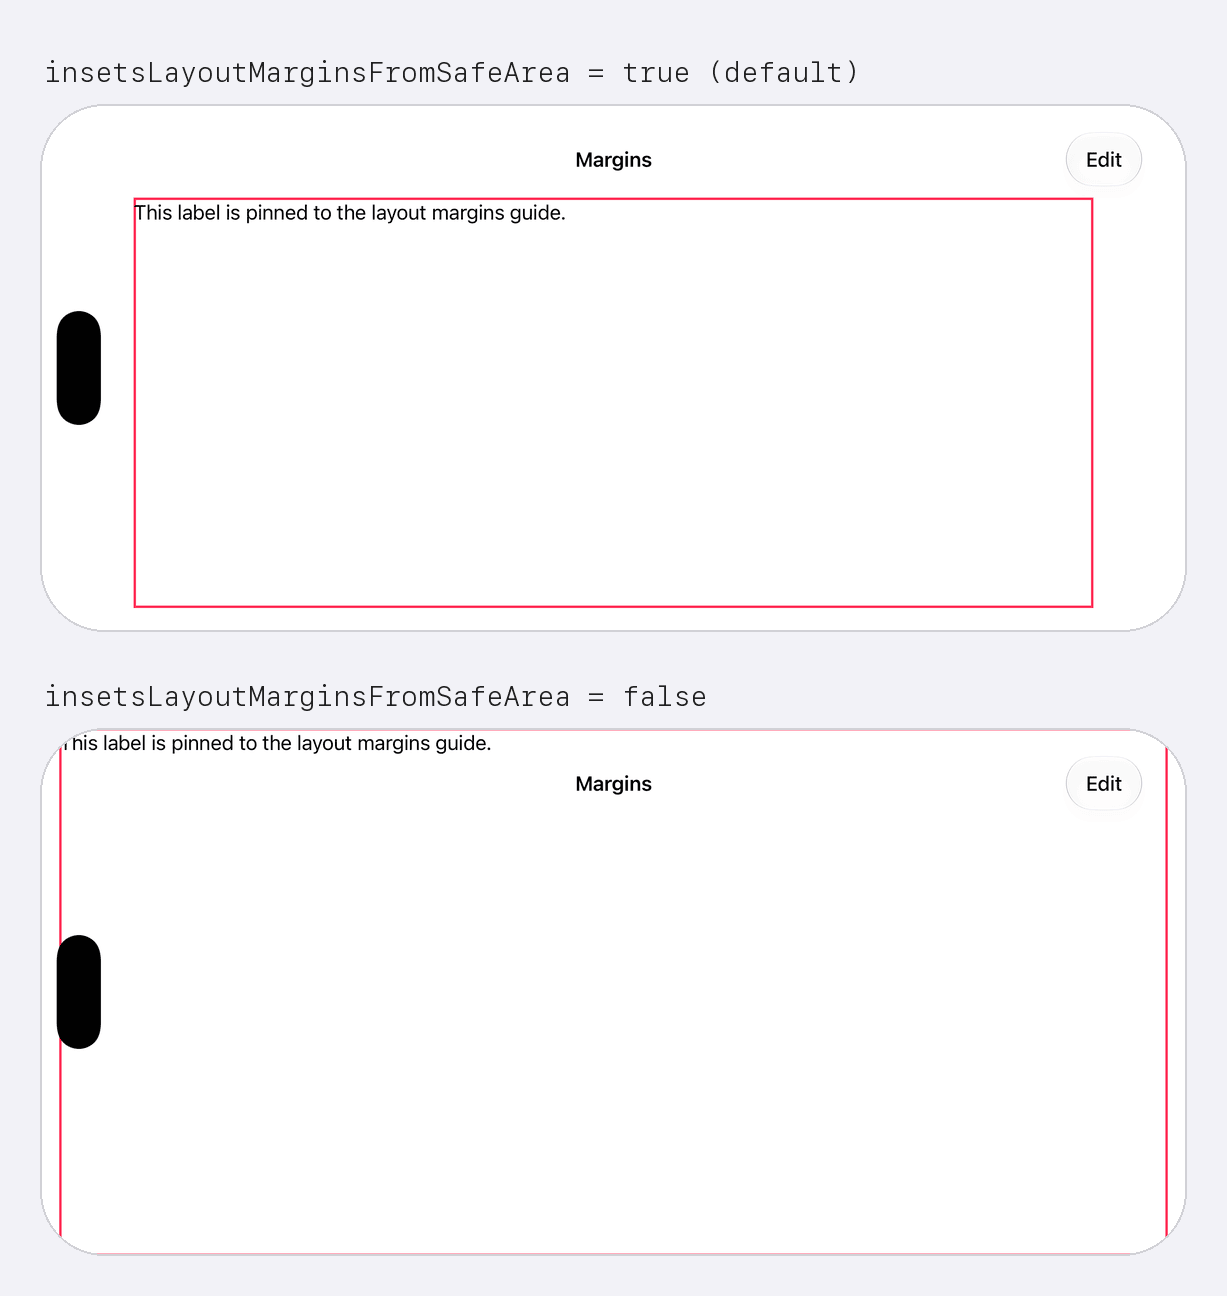
Keep the default unless you have a reason to change it.
The margins change with the device
The margin isn't the same everywhere. Here are the left and right margins I measured on iOS 27 simulators:
| Device | Portrait | Landscape |
|---|---|---|
| iPhone 18 Pro | 16 / 16 | 16 / 16 |
| iPhone 18 Pro Max | 20 / 20 | 16 / 16 |
| iPad Pro 13-inch | 20 / 20 | 20 / 20 |
| iPhone Duo, closed | 20 / 0 | 0 / 20 |
On a closed iPhone Duo, the margin next to the vertical bar is 0. The guide still stays clear of the bar, because the bar is part of the safe area. It just gets no extra space on that side.
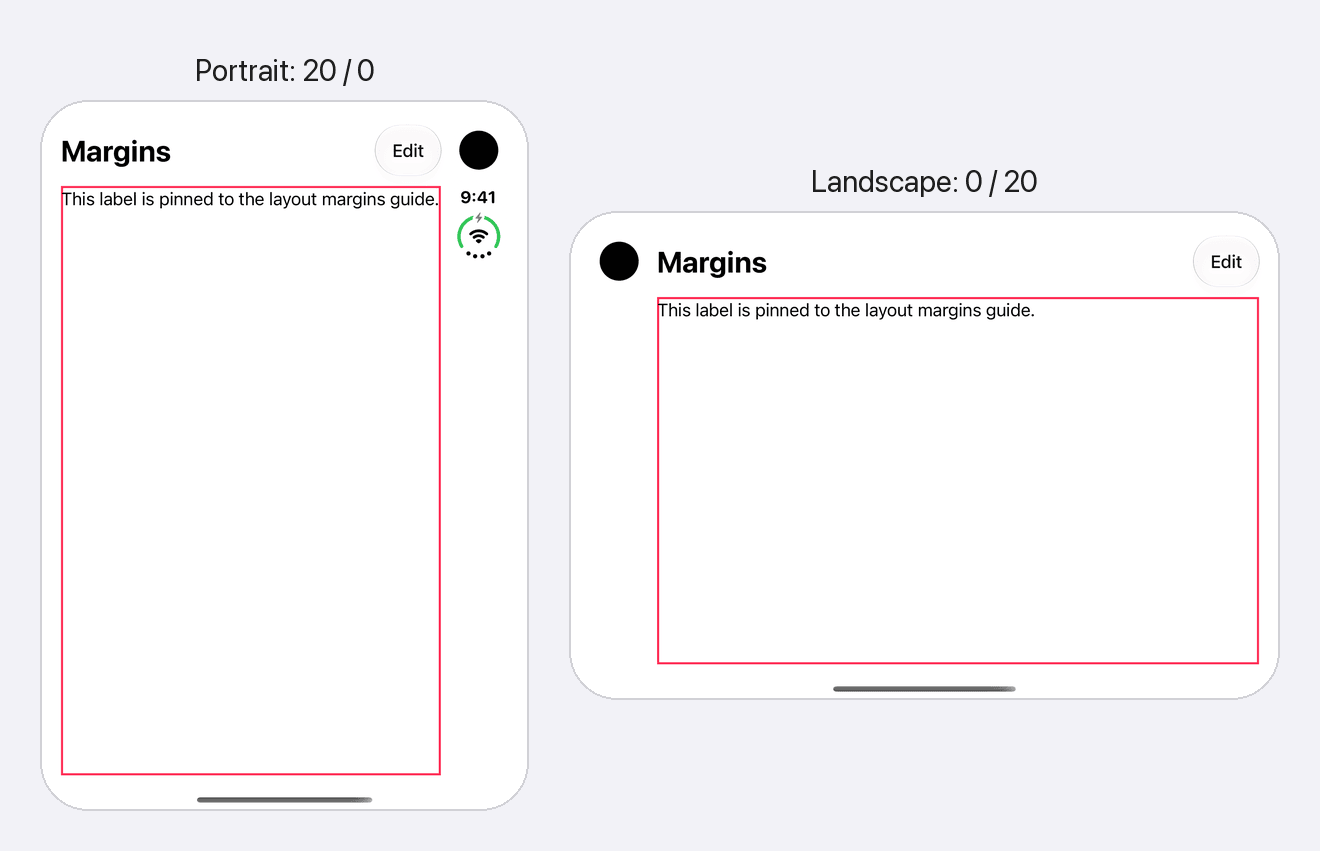
That's the point of the guide. You don't have to know these numbers. Pin to the guide, and your content follows the system on every device.
Changing the margins
To use your own margins, set layoutMargins:
view.layoutMargins = UIEdgeInsets(top: 0, left: 32, bottom: 0, right: 32)A view controller's main view has a floor, though. The system won't let its margins go below systemMinimumLayoutMargins. On an iPhone 18 Pro Max, I set the margins to 4 and still got 20.
To go below the minimum, turn it off on the view controller:
viewRespectsSystemMinimumLayoutMargins = false
view.layoutMargins = UIEdgeInsets(top: 0, left: 4, bottom: 0, right: 4)
With that, the margins were 4.
Subviews get their own margins
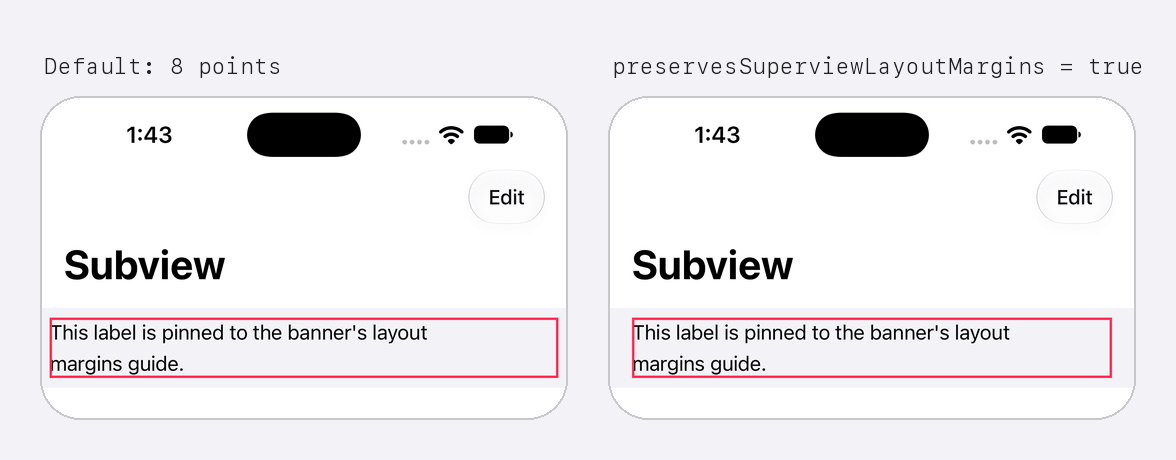
The system margins only apply to a view controller's main view. Other views start with 8 points on each side, and they don't get the main view's margins.
So if you pin content to the layoutMarginsGuide of a subview, it won't line up with the navigation bar. To pass the margins down, set preservesSuperviewLayoutMargins:
banner.preservesSuperviewLayoutMargins = trueWith this, a full-width subview on the iPhone 18 Pro Max got 20 on each side, the same as the main view.
What about SwiftUI?
SwiftUI didn't have an equivalent of layoutMarginsGuide for a long time. iOS 27.1 adds one, contentMargins(for: .container), and it puts content in the same place as the UIKit guide. You can read more in Matching layout margins in SwiftUI.
You can easily support sarunw.com by checking out this sponsor.
AI Grammar: Correct grammar, spell check, check punctuation, and parphrase.
Summary
layoutMarginsGuidegives you the system margins, so your content lines up with the system on every device.- The guide stays inside the safe area, and the margin is extra space on top of it.
layoutMarginsreports the two added together. - Only a view controller's main view gets the system margins. Use
preservesSuperviewLayoutMarginsto pass them down to a subview.
Read more article about UIKit, iOS, or see all available topic
Enjoy the read?
If you enjoy this article, you can subscribe to the weekly newsletter.
Every Friday, you'll get a quick recap of all articles and tips posted on this site. No strings attached. Unsubscribe anytime.
Feel free to follow me on Twitter and ask your questions related to this post. Thanks for reading and see you next time.
I also make short videos and visual guides on Patreon. Some things are easier to see than to read, like how an API looks and moves on a real screen. If you like to learn that way, come and watch. Sharing the article is also greatly appreciated.
Become a patron Tweet Sharesome View? without parentheses in Swift 6.4
Swift 6.4 lets us write some View? and any P? without wrapping the type in parentheses. Here is why the short form used to fail, what works now, and the one case that still needs them.