A better way to ask for a one-time user's location with the Location Button
Table of Contents
Privacy is a core of Apple products. It isn't a surprise if users would concern about their privacy. As a developer, asking for user's sensitive data at an inappropriate time or not enough clear context might get rejected. In iOS 15, Apple introduces a new way of asking for user location, Location Button. Let's see what problem this button is trying to solve and how.
The problems
The location button provides a better way to ask for a one-time user location. This is suit for an app that asking for user location isn't a core feature of an app, but a nice addition, e.g., get current user location to show nearby store, send current location to a friend over messaging app.
Asking for a one-time location is troublesome with the current implementation in the following areas:
One-shot
The problem of asking for any kind of location permission, in general, is you only have one chance to do it. Once a user decided to tap "Don't Allow", you are almost done. The subsequent request of user location goes in vain. The only way to recover is to direct a user to the setting and unchanged the selection (which is unlikely to happen).
Users will only see the location dialog only once. Their decision sticks there even after the app is uninstalled.
Begging for Don't Allow
"Allow Once", which requests the least authorization, should get the least constraint. But that is not the case. It is an option that gets the worst treatment. The "Allow Once" authorization is temporary and expires when your app is no longer in use, reverting to CLAuthorizationStatus.notDetermined. This means the authorization request dialog will pop up again next time you ask for the user's location.
As you can see, Allow once is the most problematic option. If you manage to get user location after presenting the prompt, imaging having to do that every time you need a one-time location. It just a matter of time because users decided to end their suffering and tap the "Don't Allow" button.
Conclusion
Apple introduced the "Allow Once" option in iOS 13 as a temporary authorization. You can call it the "decided later" option since it defers the real permission that the app asked for, and that is the problem.
That's why the experience of asking for one-time permission is really painful. The current authorization request dialog doesn't design for this kind of permission, and "Allow Once" is just a name for "Decided Later".
We don't have a proper way to request for one-time user location. We called requestWhenInUseAuthorization() and used decided later as a way to ask for a one-time location. And that is why we have the new way of asking for a one-time location, the Location Button.
You can easily support sarunw.com by checking out this sponsor.
Translate your app In 1 click: Simplifies app localization and helps you reach more users.
Location Button
It is a matter of time for a user to disallow sharing user location with the current implementation. So, we need a new way of asking for a one-time user location, which is the purpose of the Location Button.
Key different
The current way is designed as a way to grant long-term user location. That's why it is designed with more restrictions. Asking for a one-time user location is more casual, and the location button treats it as such.
Here are a few behavior differences.
New dialog
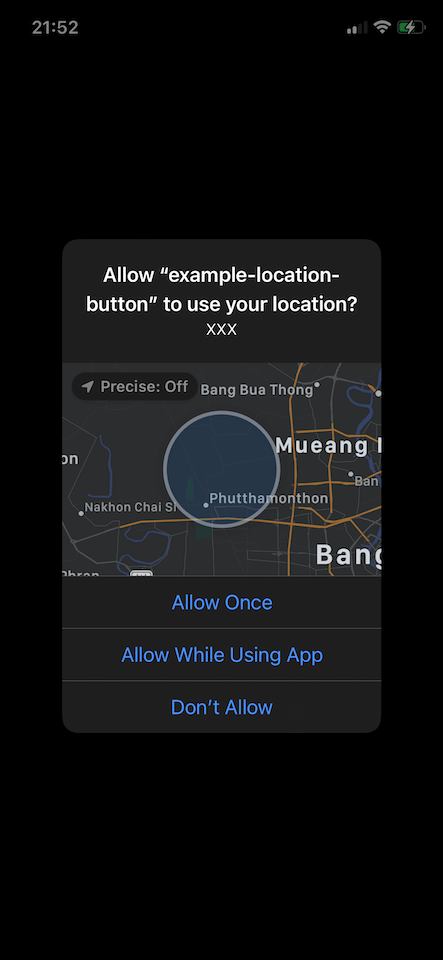
Users will present with a new dialog after they tap the location button.

No need to put privacy description
You don't need to put privacy string (NSLocationWhenInUseUsageDescription) in Info.plist. Here is the description the dialog will use.
When you share your location with this app, a blue location indicator will appear in the status bar.
You can ask it again and again
Normally, the location permission popup won't show again if the user selects the "Don't Allow" option, but that isn't the case for the location button. The one-time location permission popup can present regardless of the old API decision (It still show even user selected "Don't Allow" before).
As you can see, a user has two options for this one-time location permission, OK and Not Now. The good news is the option is "Not Now" not "Don't Allow", that means even user choose to select "Not Now" option, the next time they tap the location button, the popup will show again. You have an unlimited opportunity with the location button!
One time grant
If a user selects the "OK" option, the choice will be remembered and not ask again. This is better than the previous implementation where users got asked again and again even they grant it before.
If a user has been granted any location authorization before, the button will work without asking again.
And that's all behavior different and why Apple introduced this new button, let's put it into use.
How to use
You can think of a location button like a normal button with a few restrictions.
Here are how we create the location button in UIKit and SwiftUI.
UIKit
import CoreLocationUI

let locationButton = CLLocationButton()
locationButton.label = .currentLocation
SwiftUI
import CoreLocationUI
LocationButton(.currentLocation, action: {

})
Tap the button, and it will present this dialog. Once user tap "OK", authorization status will change to .authorizedWhenInUse. It is that easy.
The location button asks for user location without needing you to call something like requestWhenInUseAuthorization in your code. But what the location button does is asking for authorization. You still need to do the rest, which is asking for user location.
import UIKit
import CoreLocation
import CoreLocationUI

class ViewController: UIViewController {
    let locationManager = CLLocationManager()

    override func viewDidLoad() {
        super.viewDidLoad()
        locationManager.delegate = self

        let locationButton = CLLocationButton()
        locationButton.label = .currentLocation
        locationButton.addTarget(self, action: #selector(getCurrentLocation), for: .touchUpInside)

        ...
    }

    @objc func getCurrentLocation() {
        self.locationManager.requestLocation() // 1
    }
}

extension ViewController: CLLocationManagerDelegate {
    func locationManager(_ manager: CLLocationManager, didUpdateLocations locations: [CLLocation]) {
        // Use location
    }
}
<1> You still need to request for user location in the button's action.
Customization
Since the location button is meant to do one specific task, asking for a one-time user location, it is no surprise Apple will enforce some restrictions on it, e.g., label. Here are four properties you can customize on the location button.
Label
You have six label options to choose from. All of them convey the same purpose, asking for the current location.
.none. A style that doesn’t display a text label. This will only hide the label only if we provide a button's icon..currentLocation. A button label with the text "Current Location"..sendCurrentLocation. A button label with the text "Send Current Location"..sendMyCurrentLocation. A button label with the text "Send My Current Location"..shareCurrentLocation. A button label with the text "Share Current Location"..shareMyCurrentLocation. A button label with the text "Share My Current Location".
UIKit
let locationButton = CLLocationButton()
locationButton.label = .currentLocation
SwiftUI
LocationButton(.currentLocation, action: {})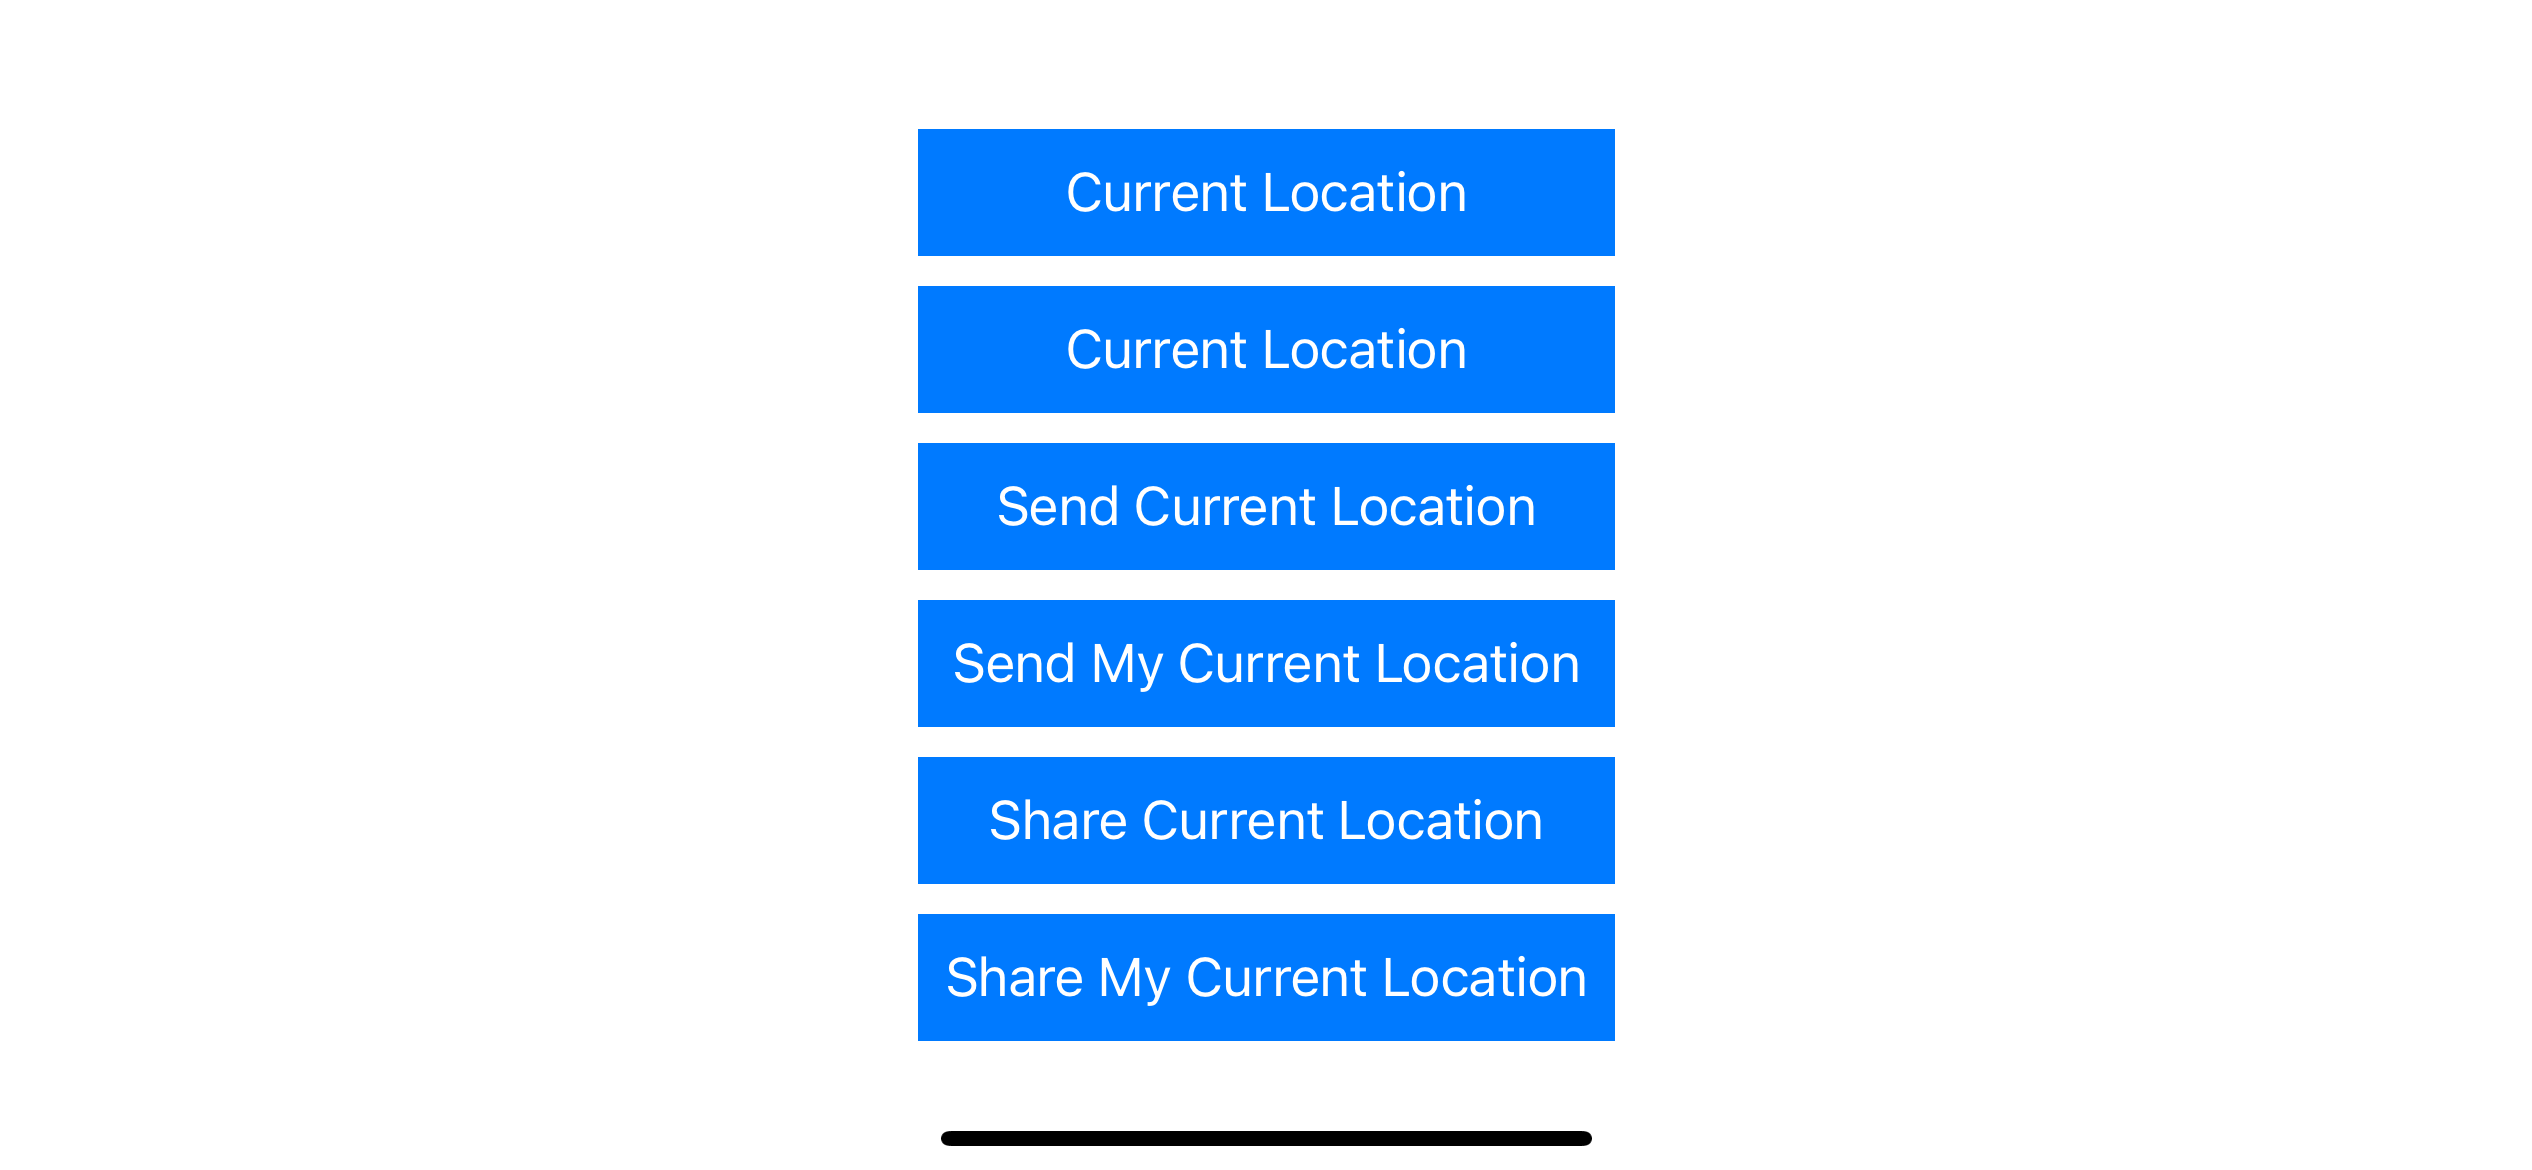
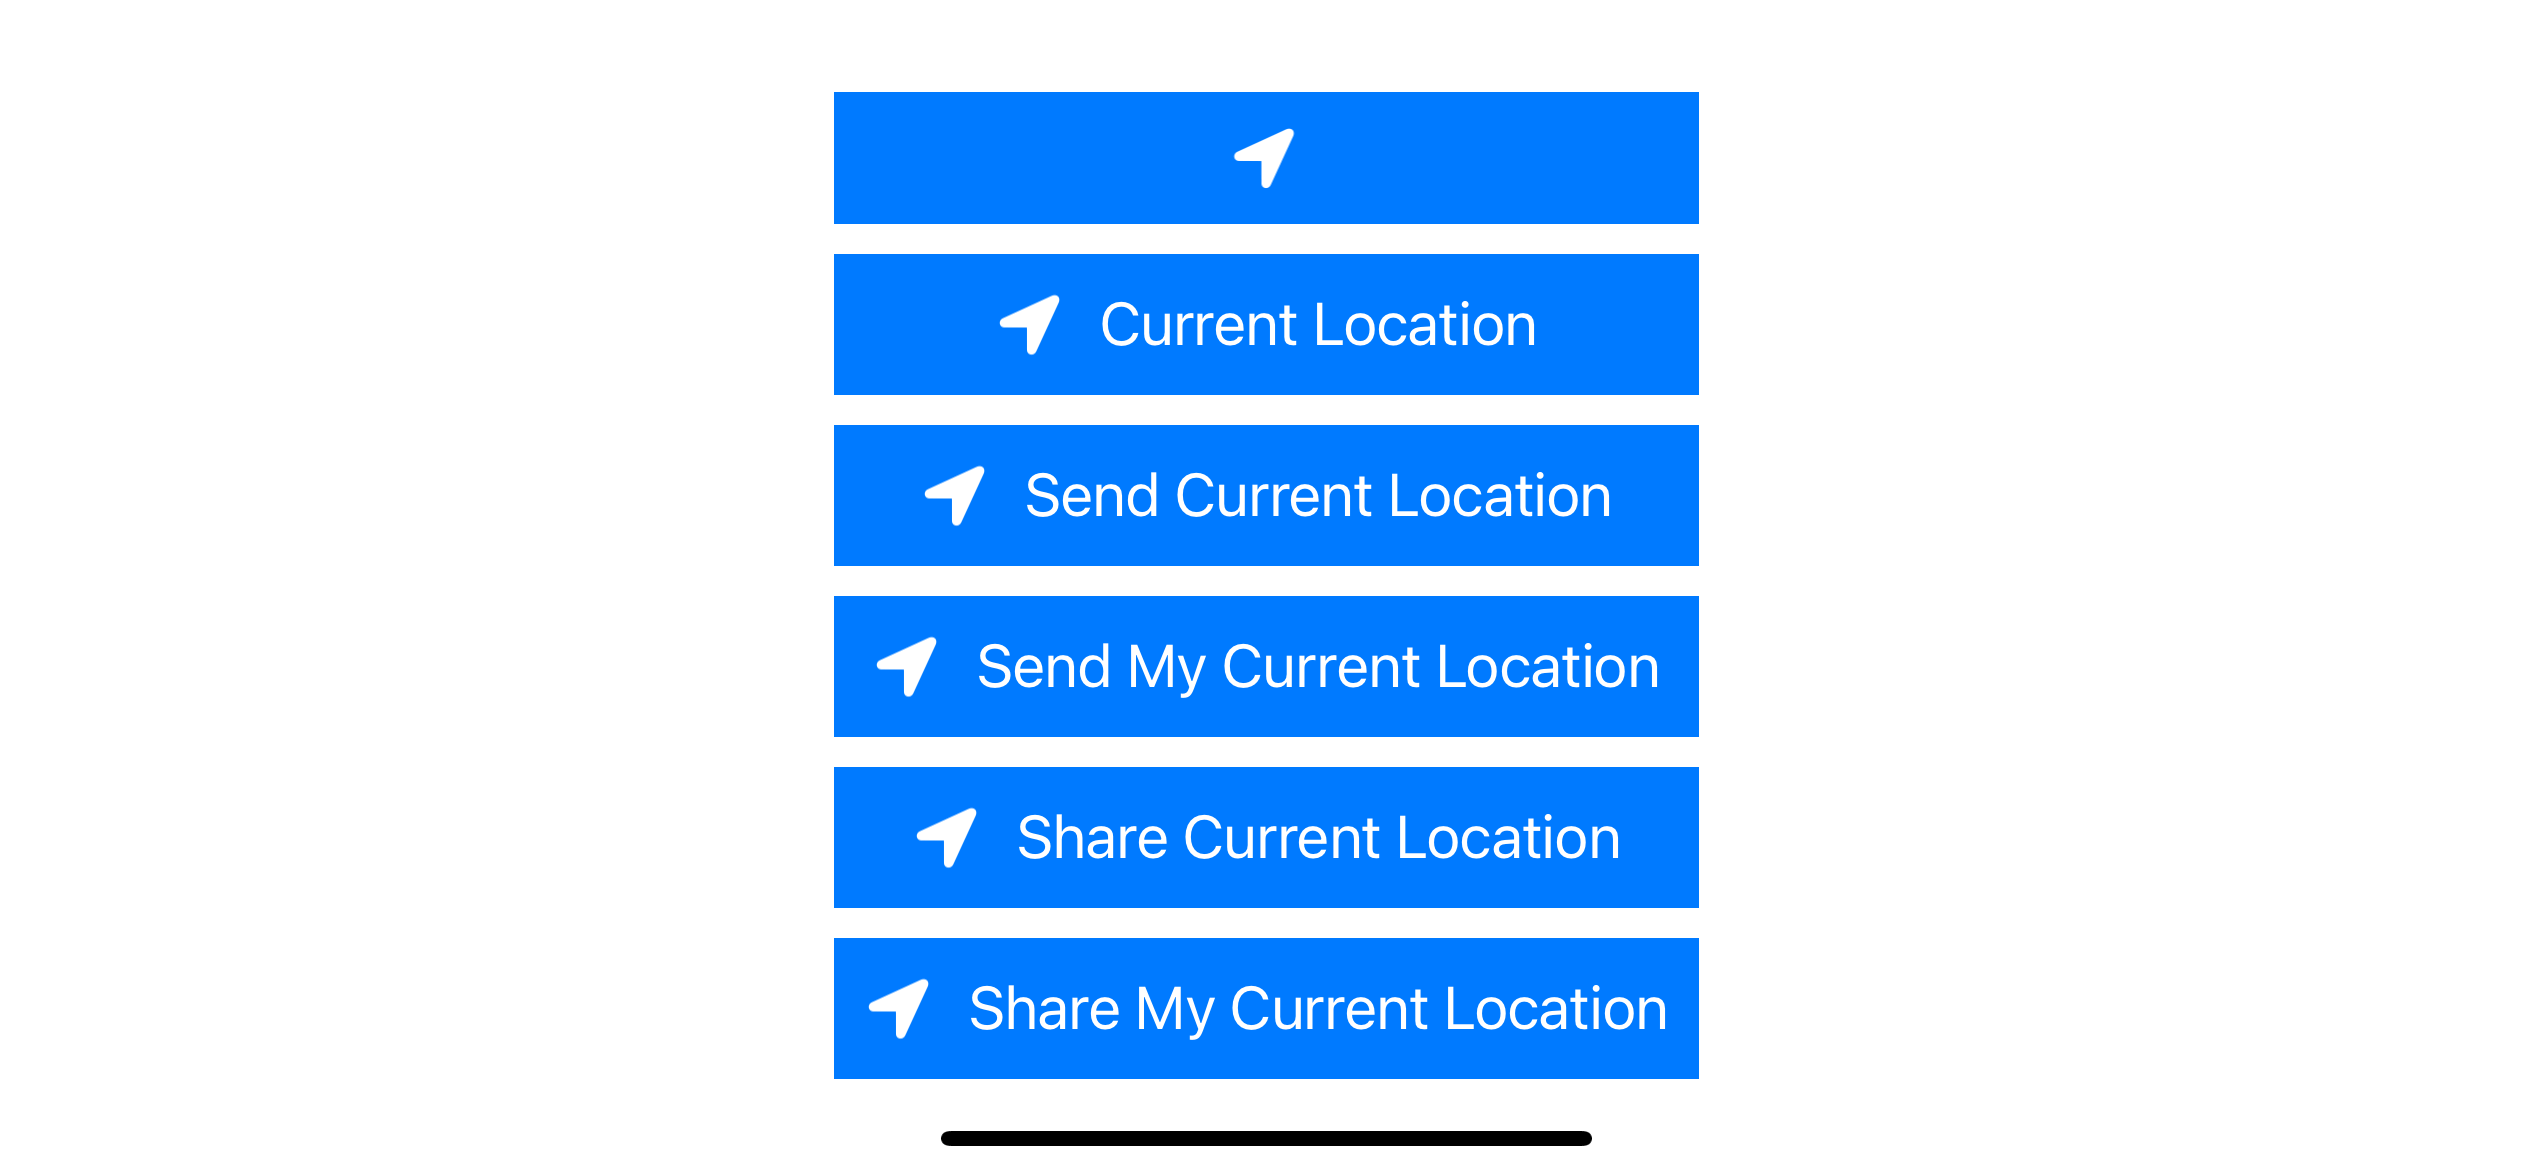
Icon
You have three icon options to choose from. .none, .arrowFilled, and .arrowOutline.
UIKit
let locationButton = CLLocationButton()
locationButton.icon = .arrowFilled
SwiftUI
// arrowOutline
LocationButton(action: {})
    .labelStyle(.iconOnly)

// arrowFilled
LocationButton(action: {})
    .labelStyle(.iconOnly)
    .symbolVariant(.fill)
SwiftUI use combination of .labelStyle and .symbolVariant to control icon style. The default .labelStyle is .titleAndIcon.
Font Size
UIKit
let locationButton = CLLocationButton()
locationButton.label = .currentLocation
locationButton.icon = .arrowFilled
locationButton.fontSize = 20
SwiftUI
LocationButton(.currentLocation, action: {})
    .font(.system(size: 20))
Both label and icon are adapt according to fontSize.
Corner Radius
UIKit
let locationButton = CLLocationButton()
locationButton.label = .currentLocation
locationButton.cornerRadius = 10
SwiftUI
LocationButton(.currentLocation, action: {})
    .cornerRadius(10)
Label Color
UIKit
let locationButton = CLLocationButton()
locationButton.tintColor = UIColor.systemPink
SwiftUI
LocationButton(.currentLocation, action: {})
    .foregroundColor(Color.pink)
Background Color
UIKit
let locationButton = CLLocationButton()
locationButton.backgroundColor = UIColor.systemPink
SwiftUI
LocationButton(.currentLocation, action: {})
    .tint(Color.pink)
Even the things we can customize are limited. I think you can make a style that matches your design. Here are a few variations.
// Circular button
let square = CGRect(x: 0, y: 0, width: 50, height: 50)
let button = CLLocationButton(frame: square)
button.icon = .arrowFilled
button.cornerRadius = 25

let button = CLLocationButton()
button.icon = .arrowFilled
button.label = .shareMyCurrentLocation
button.cornerRadius = 10
button.backgroundColor = UIColor.systemPink

let button = CLLocationButton()
button.icon = .arrowOutline
button.label = .sendCurrentLocation
button.backgroundColor = UIColor.systemIndigo
button.tintColor = UIColor.systemPink
button.fontSize = 40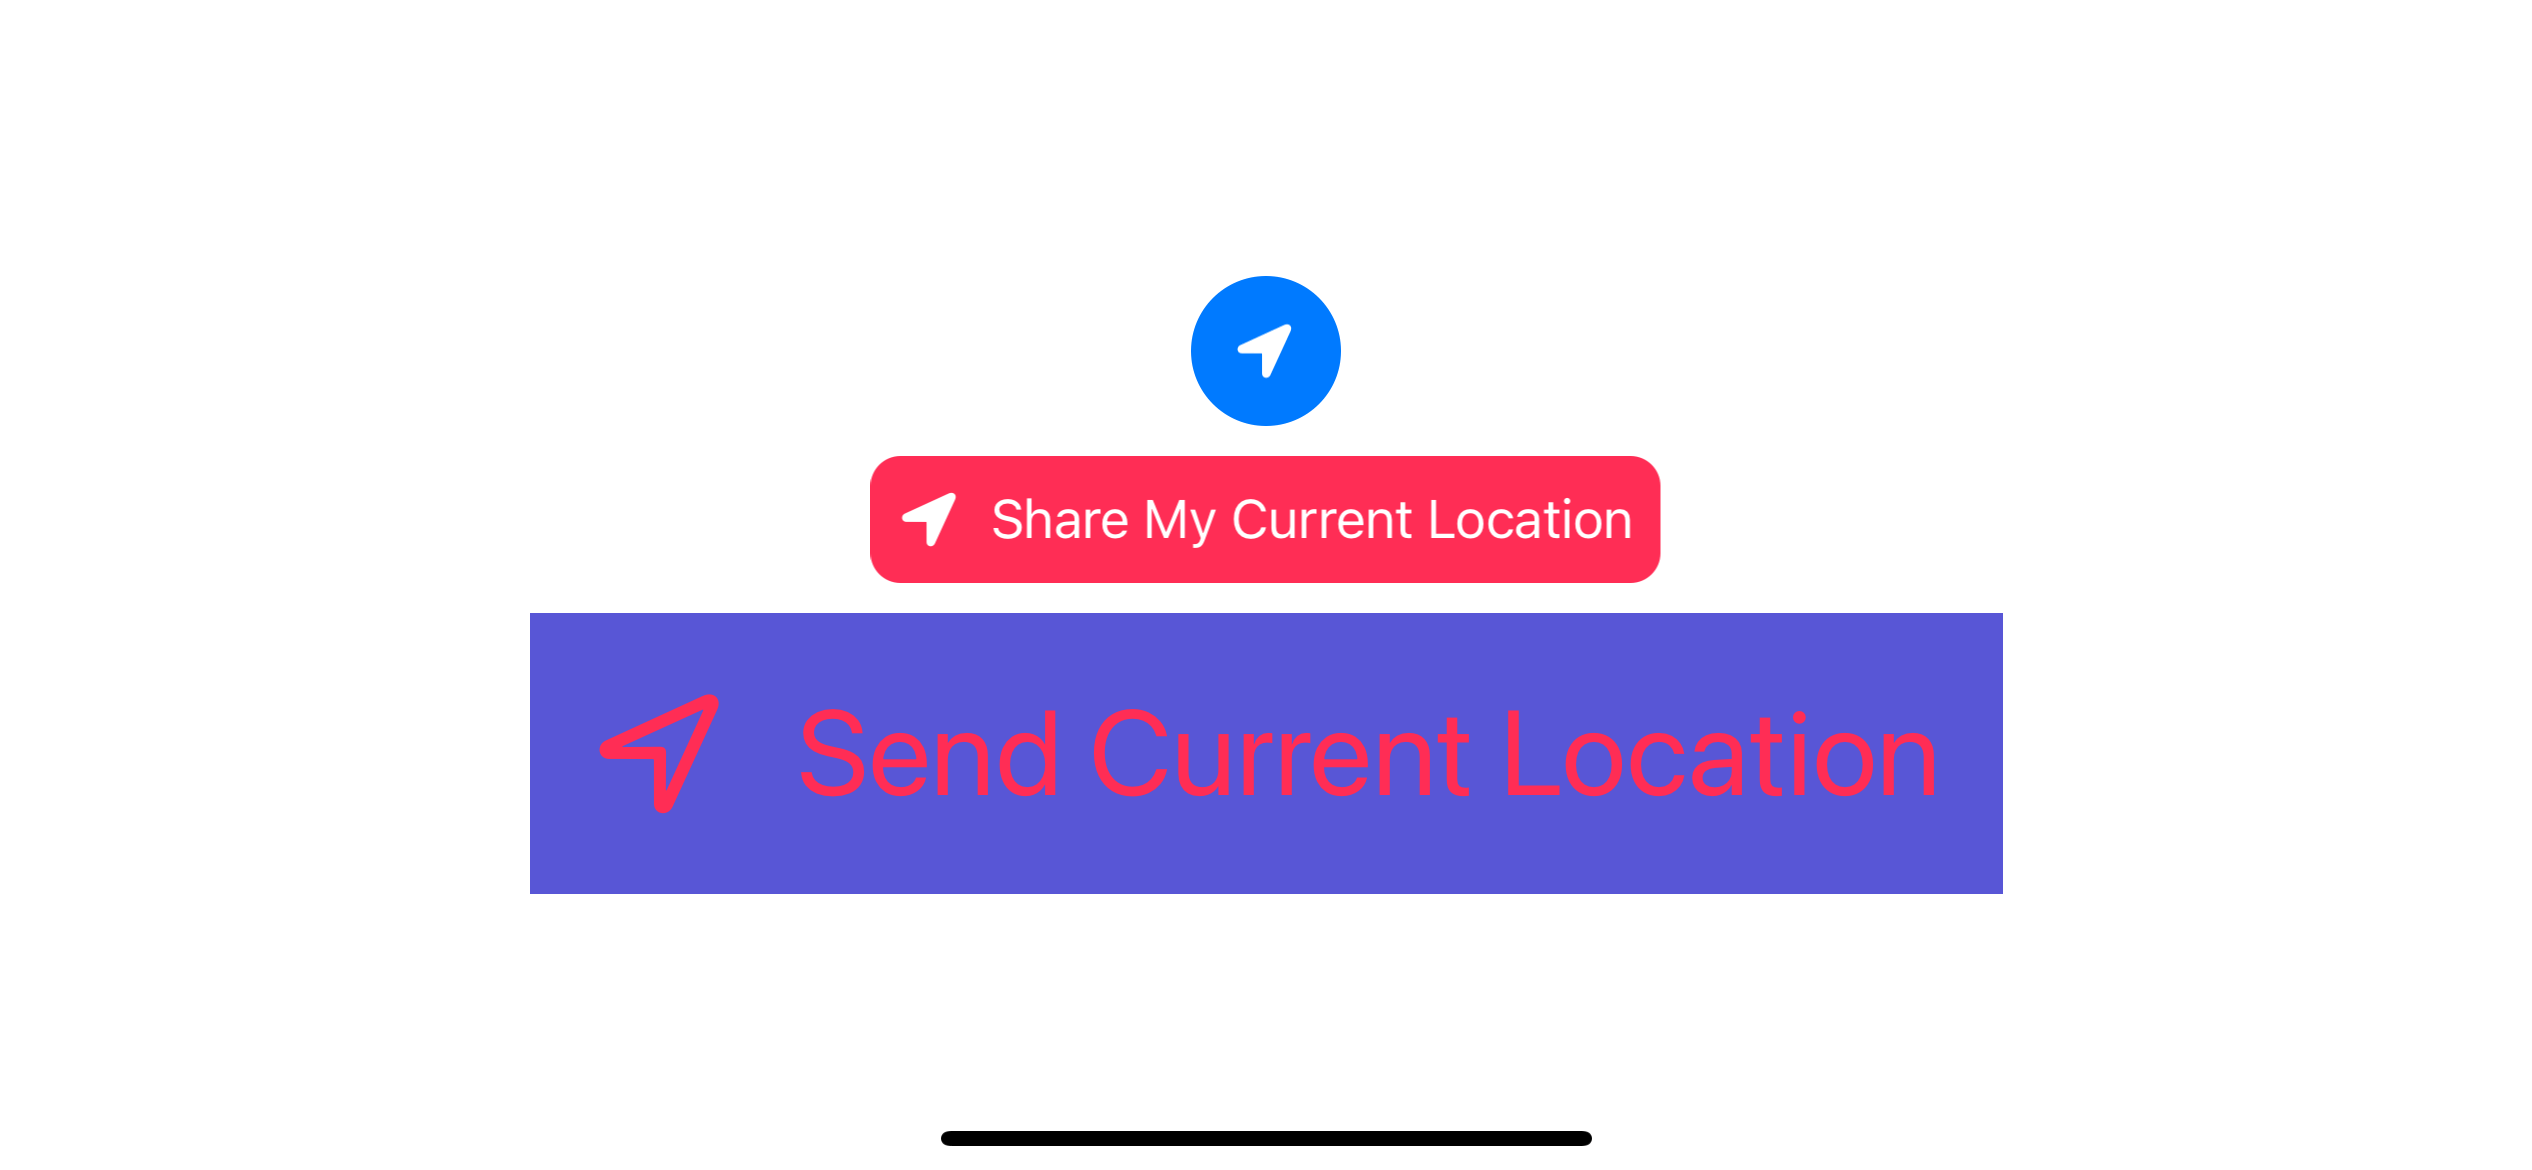
You can easily support sarunw.com by checking out this sponsor.
Translate your app In 1 click: Simplifies app localization and helps you reach more users.
Caveat
Even Apple provides ways to customize the button. There are non-obvious serious rules right here. You can't customize your button in a way that make it in an unreadable state. The result of violating the rules is your button will be unusable!!! (The authorization one-time location request dialogs won't show up)
There are three areas you should keep in mind, button size, alpha, and contrast ratio between label and button background.
You will get the following log message in debug console if you violate the rules.
#locationButton rendering failed due to inappropriate sizes
#locationButton rendering failed due to Insufficient Alpha
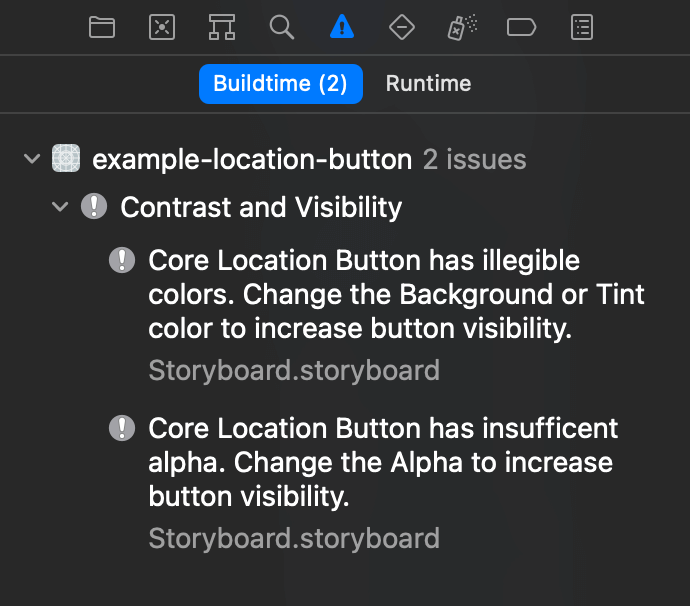
#locationButton rendering failed due to contrastRatio between tintColor and backgroundColor insufficient If you design your button in interface builder, you can see outstanding issues in Issue Navigator.
There are no clear rules of when the button would be unusable. For example, making a circular button with the following parameters will result in the size warning, but you can still get a location permission popup when tap.
let square = CGRect(x: 0, y: 0, width: 50, height: 50)
let button = CLLocationButton(frame: square)
button.icon = .arrowFilled
button.cornerRadius = 25

// #locationButton failed due to inappropriate sizes
But try to add the button.alpha = 0.5, and you will get two more errors. And also make your location button unfunctional.
let square = CGRect(x: 0, y: 0, width: 50, height: 50)
let button = CLLocationButton(frame: square)
button.icon = .arrowFilled
button.cornerRadius = 25
button.alpha = 0.5
#locationButton failed due to inappropriate sizes
#locationButton failed due to insufficient contrastRatio between tintColor and backgroundColor
#locationButton failed due to Insufficient AlphaConclusion
So, the rule of thumbs here is making your button readable as much as you can and if you see any warnings, make sure you test if the button is still working.
Read more article about iOS 15, CoreLocation, Button, or see all available topic
Enjoy the read?
If you enjoy this article, you can subscribe to the weekly newsletter.
Every Friday, you'll get a quick recap of all articles and tips posted on this site. No strings attached. Unsubscribe anytime.
Feel free to follow me on Twitter and ask your questions related to this post. Thanks for reading and see you next time.
If you enjoy my writing, please check out my Patreon https://www.patreon.com/sarunw and become my supporter. Sharing the article is also greatly appreciated.
Become a patron Buy me a coffee Tweet SharePreview a device in landscape orientation with previewInterfaceOrientation
New in iOS 15, SwiftUI has finally support preview in landscape orientation. Let's find out how to do it.
How to share an iOS distribution certificate
Learn how to create, export, and import certificate without any third-party tools.