Custom Back button Action in SwiftUI
Table of Contents
There is no easy way to perform a custom action when the navigation view Back button is pressed.
I think that's because Apple wants the behavior of a navigation view for every app in the ecosystem to be the same.
That means if you want a custom action for the back button, you have to opt out of the default back button.
And that's what we are going to do in this article.
Custom Back button Action in SwiftUI
To have a custom back button action, you need to do two things.
Remove the default Back button
To remove the default back button, you apply .navigationBarBackButtonHidden(true) to the view that you want to hide the back button.
In the following example, we set .navigationBarBackButtonHidden(true) to a DetailView. So, when it gets pushed to a navigation stack, it won't have the back button.
struct DetailView: View {
    var body: some View {
        Text("Detail View")
            .navigationBarBackButtonHidden(true)
            .navigationTitle("Detail Title")
    }
}
Recreate a Back button
A back button is just a button. To recreate it, we just need to create a normal button and position it on the leading edge of a navigation bar.
We can do that with a help of toolbar(content:) and ToolbarItem(placement: .navigationBarLeading).
struct DetailView: View {
    var body: some View {
        Text("Detail View")
            .navigationBarBackButtonHidden(true)
            .navigationTitle("Detail Title")
            // 1
            .toolbar {
                // 2
                ToolbarItem(placement: .navigationBarLeading) {
                    Button {
                        // 3
                        print("Custom Action")
                    } label: {
                        // 4
                        HStack {
                            Image(systemName: "chevron.backward")
                            Text("Custom Back")
                        }
                    }
                }
            }
    }
}
1 We use toolbar(content:) to add a new toolbar item.
2 We position this to .navigationBarLeading, which is the same position as the default back button.
3 This is where we implement a custom action.
4 We try replicating the default back button with an arrow image and text.
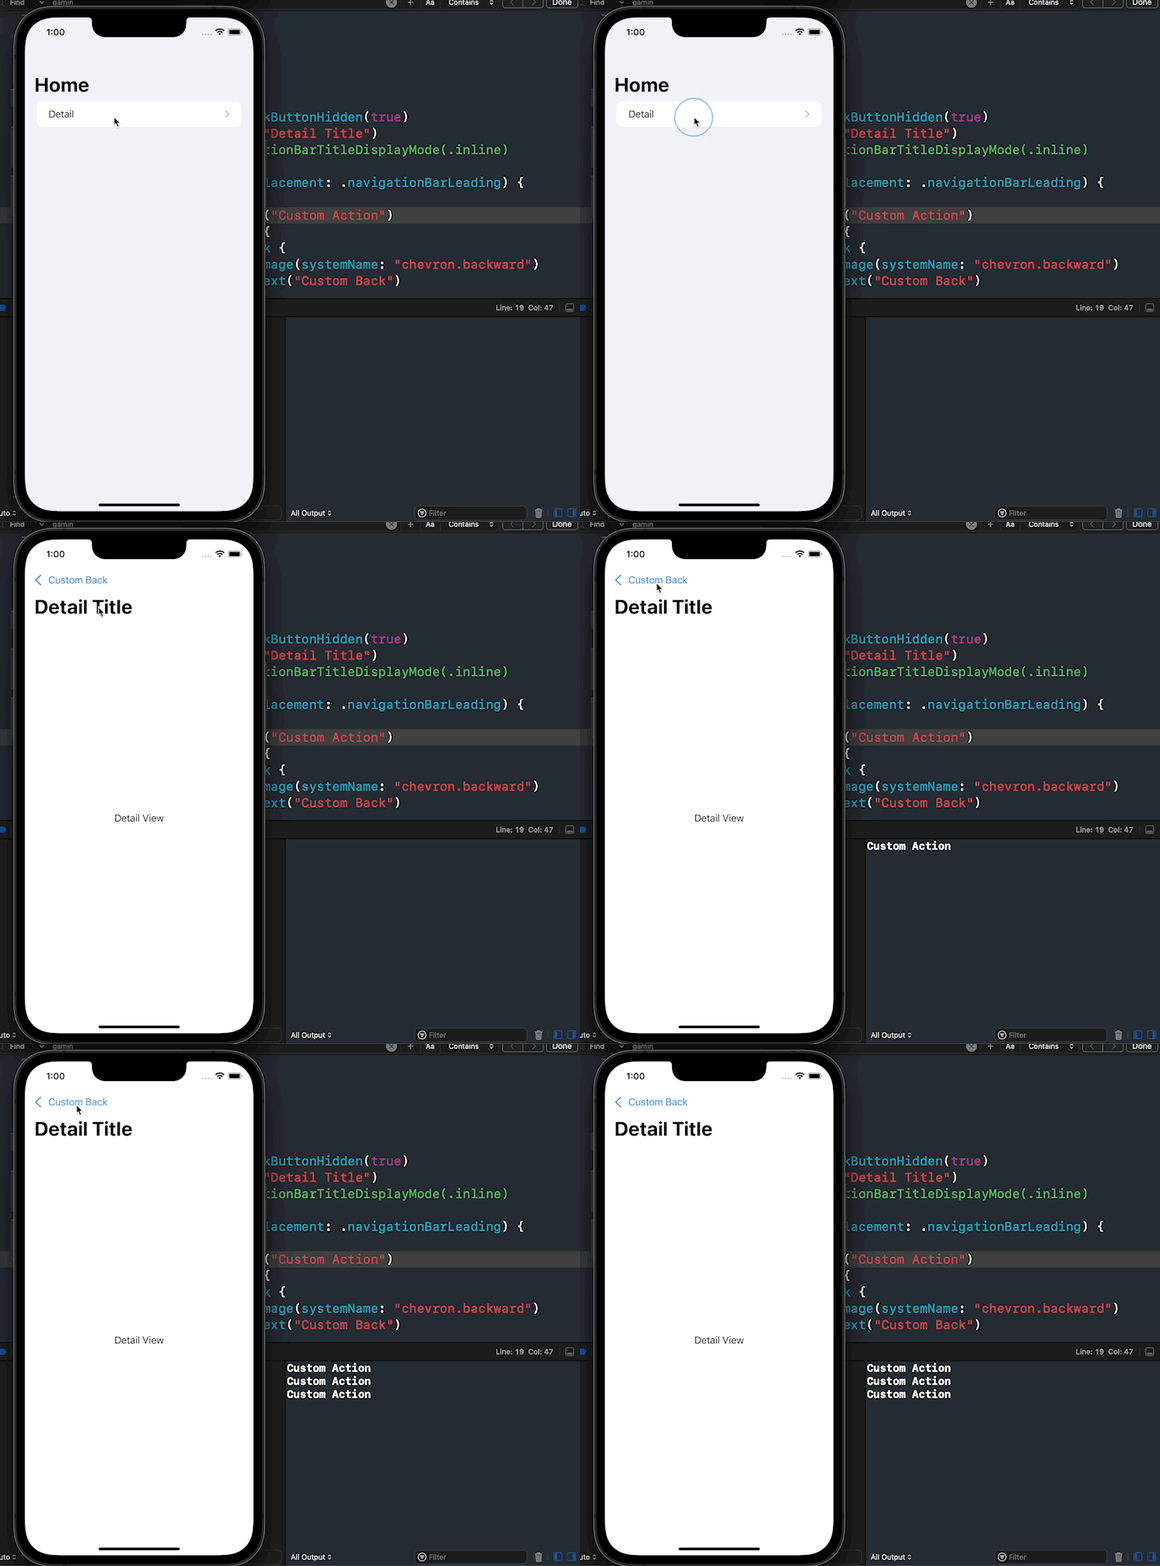
Here is the example of the code above. As you can see, the default back button is replaced with our own implementation.

You can easily support sarunw.com by checking out this sponsor.

Screenshot Studio: Create App Store screenshots in seconds not minutes.
Caveat
Once you hide the default back button, all the back button functions are gone.
- Tapping on your custom back button won't pop the view out of a navigation stack.
- Swiping from the leading edge to go back is also disabled.
You can easily support sarunw.com by checking out this sponsor.

Screenshot Studio: Create App Store screenshots in seconds not minutes.
How to dismiss the view
If you want to dismiss the view, you can use either DismissAction or PresentationMode based on the minimum iOS version you supported.
iOS 15: DismissAction
struct DetailView: View {
    // 1
    @Environment(\.dismiss) private var dismiss

    var body: some View {
        Text("Detail View")
            .navigationBarBackButtonHidden(true)
            .navigationTitle("Detail Title")
            .toolbar {
                ToolbarItem(placement: .navigationBarLeading) {
                    Button {
                        print("Custom Action")
                        // 2
                        dismiss()
                    } label: {
                        HStack {
                            Image(systemName: "chevron.backward")
                            Text("Custom Back")
                        }
                    }
                }
            }
    }
}
1 Declare the dismiss environment value.
2 Then call dismiss() to perform the dismissal.
iOS 13-14: PresentationMode
DismissAction was introduced in iOS 15. For the older versions, we need to use PresentationMode.
struct DetailView: View {
    // 1
    @Environment(\.presentationMode) var presentationMode

    var body: some View {
        Text("Detail View")
            .navigationBarBackButtonHidden(true)
            .navigationTitle("Detail Title")
            .toolbar {
                ToolbarItem(placement: .navigationBarLeading) {
                    Button {
                        print("Custom Action")
                        // 2
                        presentationMode.wrappedValue.dismiss()
                    } label: {
                        HStack {
                            Image(systemName: "chevron.backward")
                            Text("Custom Back")
                        }
                    }
                }
            }
    }
}
1 Declare the presentationMode environment value.
2 Then call presentationMode.wrappedValue.dismiss() to perform the dismissal.
Read more article about SwiftUI, Back Button, or see all available topic
Enjoy the read?
If you enjoy this article, you can subscribe to the weekly newsletter.
Every Friday, you'll get a quick recap of all articles and tips posted on this site. No strings attached. Unsubscribe anytime.
Feel free to follow me on Twitter and ask your questions related to this post. Thanks for reading and see you next time.
If you enjoy my writing, please check out my Patreon https://www.patreon.com/sarunw and become my supporter. Sharing the article is also greatly appreciated.
Become a patron Buy me a coffee Tweet ShareHow to use SwiftUI in Storyboard using UIHostingController subclass
We can create a view controller that represents a SwiftUI view by subclassing a UIHostingController. Let's learn how to do it.
How to manage Safe Area insets in Flutter
Learn what Safe area insets are and how to utilize it.