Navigation in SwiftUI
Table of Contents
Part 4 in the series "Building Lists and Navigation in SwiftUI". We will explore a NavigationView, UINavigationController equivalent in SwiftUI.
What is Navigation
When we talk about navigation in the iOS world, it usually refers to navigation between views in a stack-based manner where the next view is pushed to the navigation stack and pop out when you leave that screen.
If you have experience in UIKit or iOS, you should become familiar with this kind of navigation. Here is the example of navigating in the Settings app, where we navigate from Settings > General > Auto-lock.
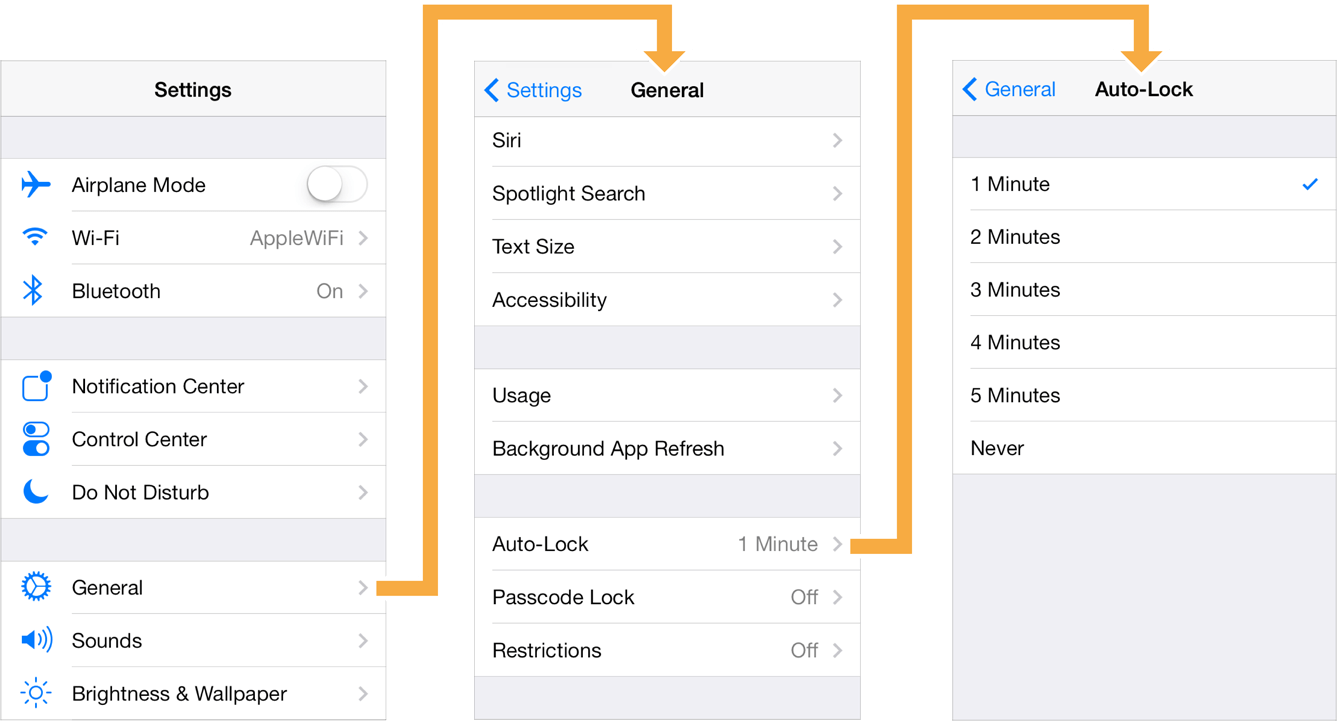
Push
The navigation view starts with only one view in a stack. In this case, the Settings view.
[Settings] Bottom of the stackTap on General will push General view into a stack.
[General] push to the top of the stack
[Settings]
The navigation view conveys the sense of navigation between views by slide the new view from the right edge of the screen.
Pop
The navigation view provides a way to navigate back (pop current view out of the stack) by showing the back button on the screen's upper left.
[General]
[Settings]
Tap back button will pop General view out and present the one below, in this case, Settings view.
[General] pop out of the stack

[Settings]
The view that manages this kind of navigation in UIKit is UINavigationController, and this equivalent to NavigationView in SwiftUI.
You can easily support sarunw.com by checking out this sponsor.
Offline Transcription: Fast, privacy-focus way to transcribe audio, video, and podcast files. No data leaves your Mac.
What is NavigationView
NavigationView is a view for presenting a stack of views and expose a way to navigate between those views. It is a UIKit's UINavigationController equivalent in SwiftUI.
Even though I put navigation and list together in this series of posts, NavigationView doesn't require a list to be able to work. It can work with any content view.
Creation
You create NavigationView like other container views that we see earlier, which accepts a view builder as an argument.
public init(@ViewBuilder content: () -> Content)Non-scrollable Content
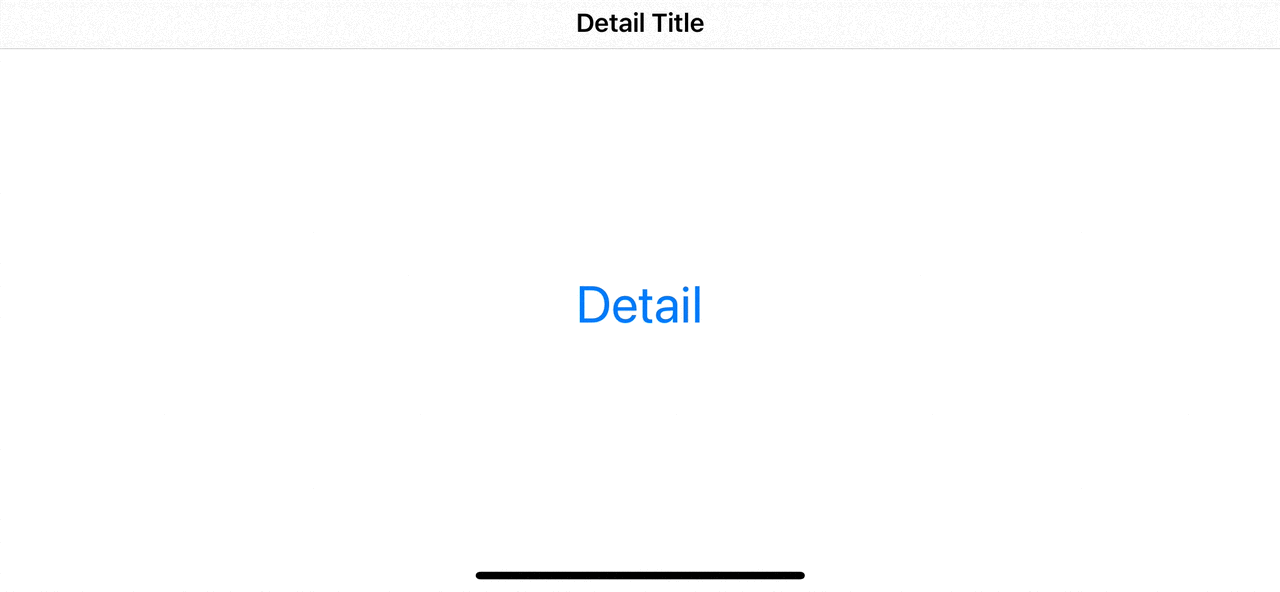
Let's start by initializing our navigation view with a simple text view. As I mentioned, NavigationView doesn't need to work with a list view or scrollable content.
struct ContentView: View {
    var body: some View {
        NavigationView {
            Text("Detail")
                .font(.largeTitle)
        }
    }
}
Run the code above, and this is what you get.
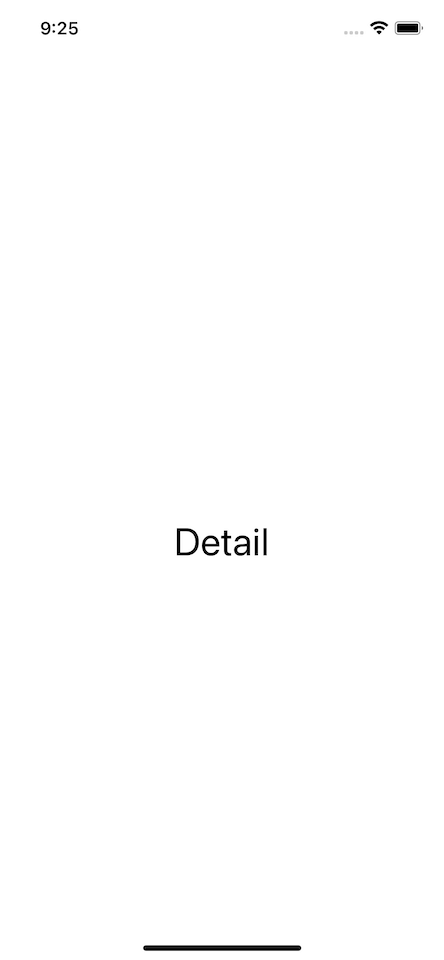
It might look like a regular view, but our text view already manipulates by the navigation view. Try to rotate the device, and you will see the top bar appearing.

List Content
Using a list view as a content view makes no difference for a navigation view.
struct ContentView: View {
    var body: some View {
        NavigationView {
            List {
                Text("First")
                Text("Second")
                Text("Third")
                Text("Fourth")
                Text("Fifth")
                Text("Sixth")
                Text("Seventh")
                Text("Eighth")
                Text("Ninth")
                Text("Tenth")
            }.font(.largeTitle)
        }
    }
}
Result:
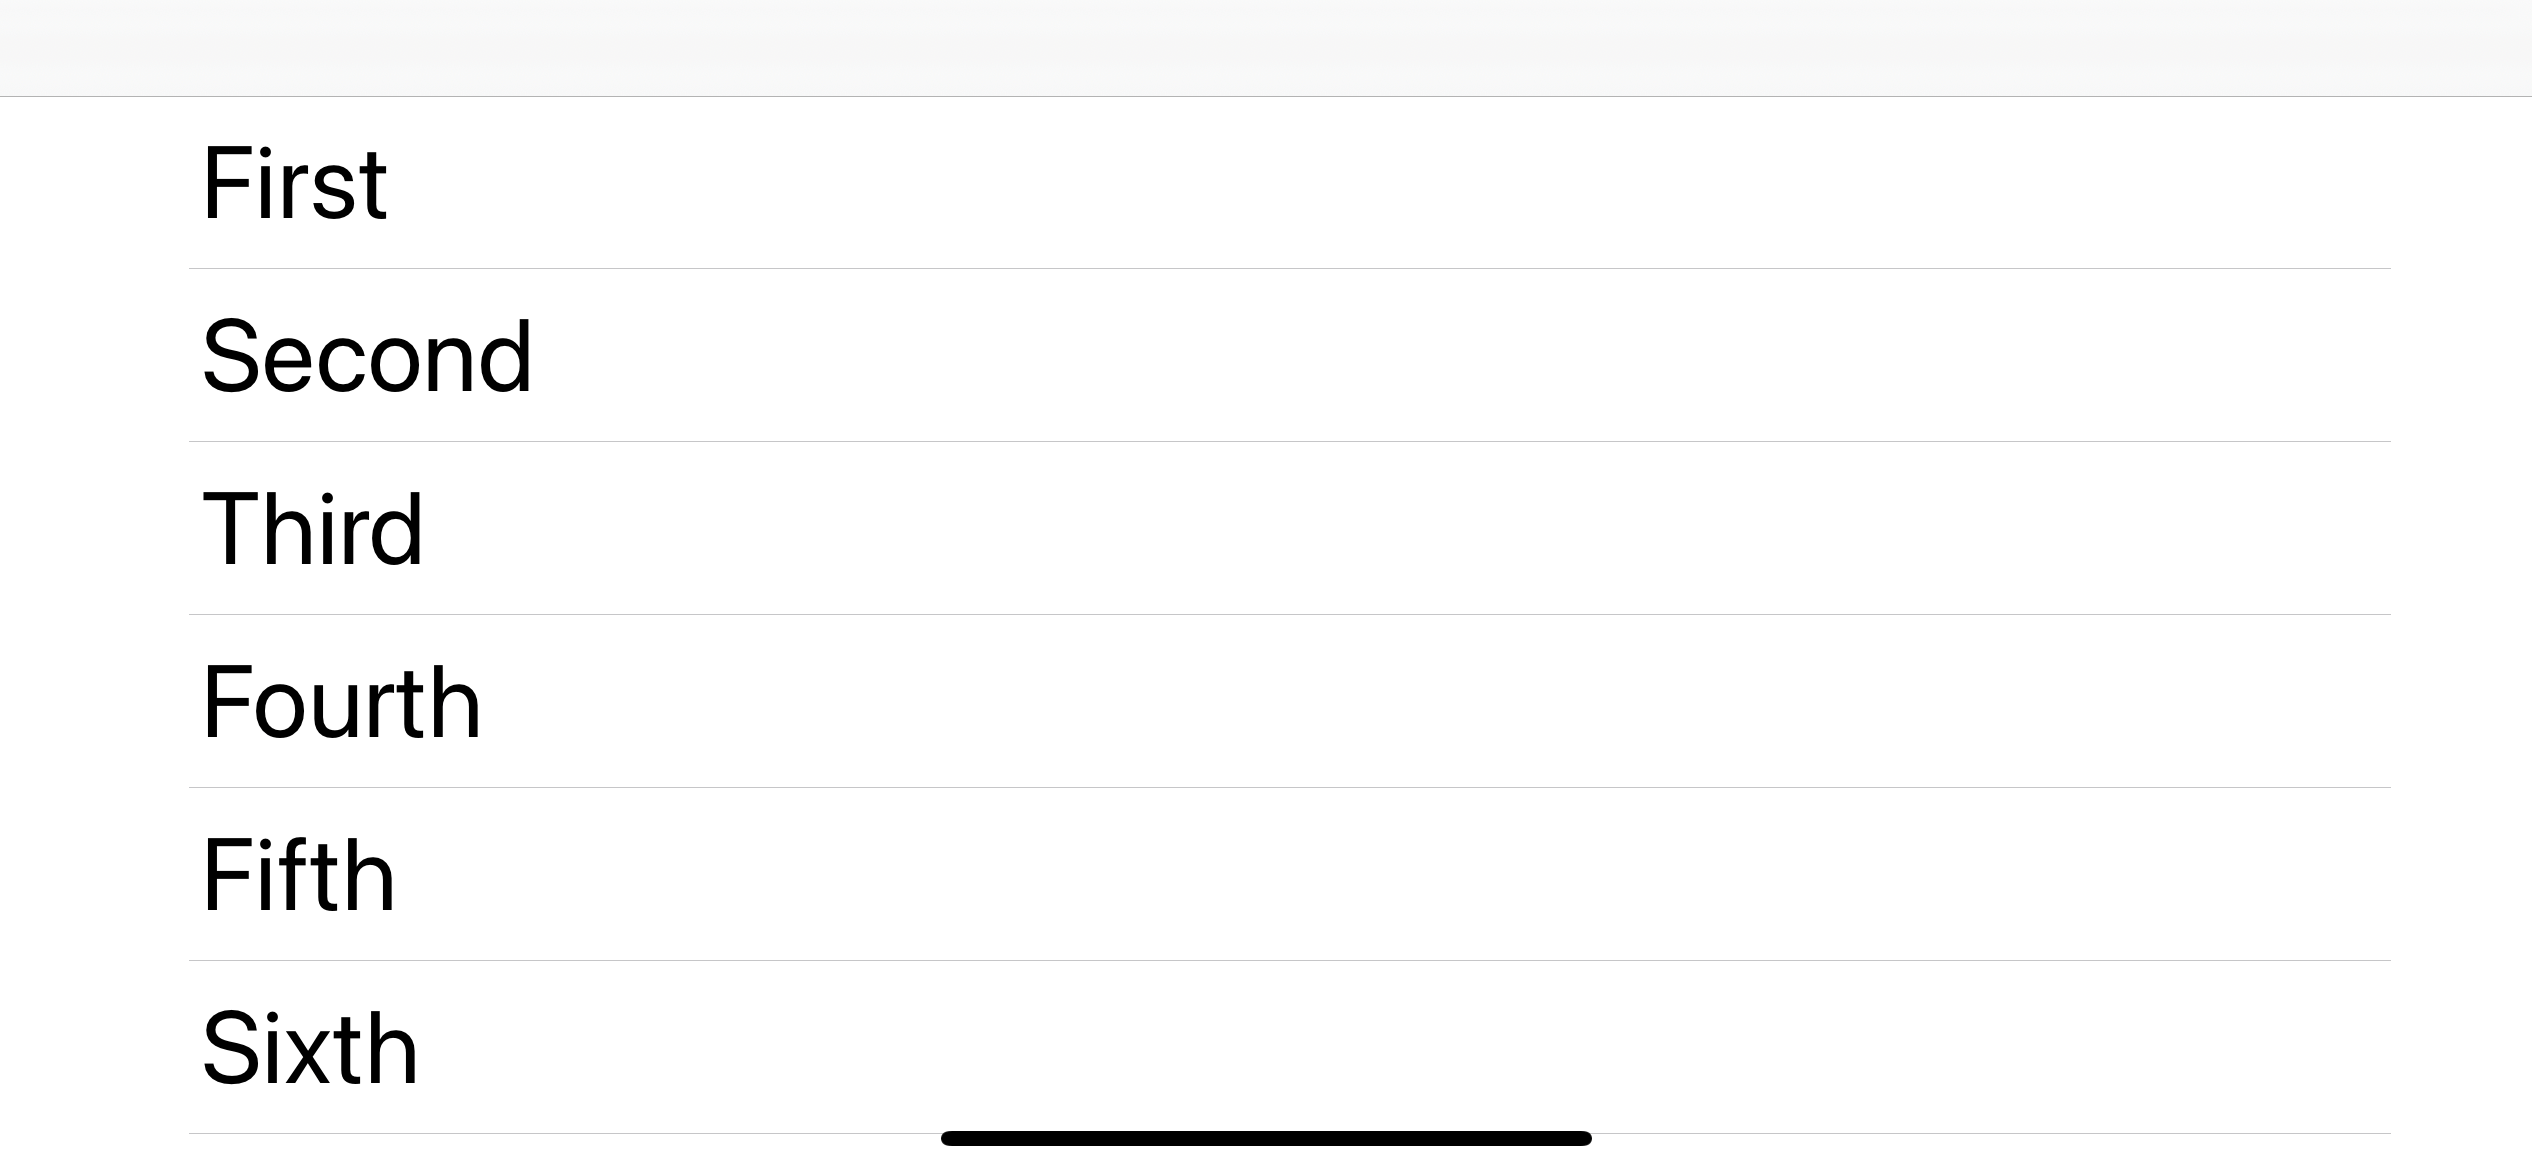
NavigationView alone can't do anything more than putting a bar over the content. Its need another helper view to facilitating the transition between view. We will pay a visit to this helper view later. Let's explore a bit more on what else we can do with NavigationView other than showing an empty navigation bar.
Customization
The only difference that we see so far for navigation view is the top bar in the landscape. But NavigationView can adapt its appearance to many view modifiers from its content. I will show you some of them.
Navigation Title
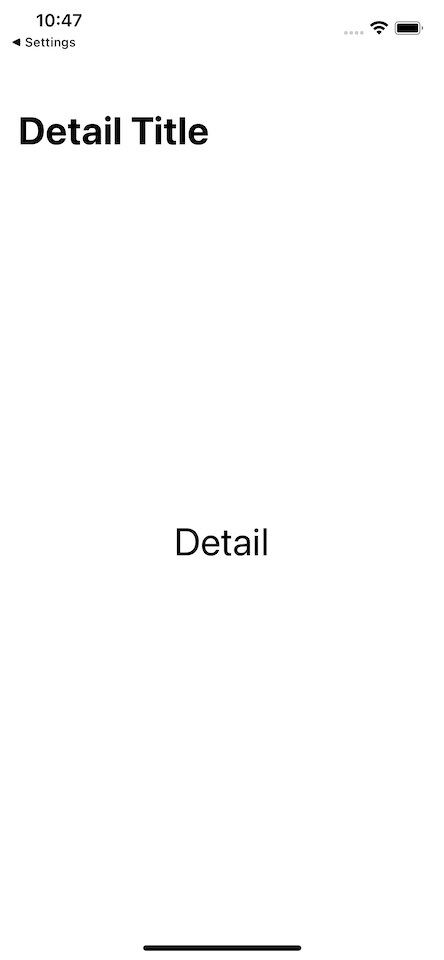
Without a title of the current view, it quite lost the purpose of being a navigation view. To set a navigation title, you specify the title you want to the navigation view's content.
struct ContentView: View {
    var body: some View {
        NavigationView {
            Text("Detail")
                .font(.largeTitle)
                .navigationTitle("Detail Title") // <1>
        }
    }
}
<1> We add .navigationTitle to the content view, not NavigationView.
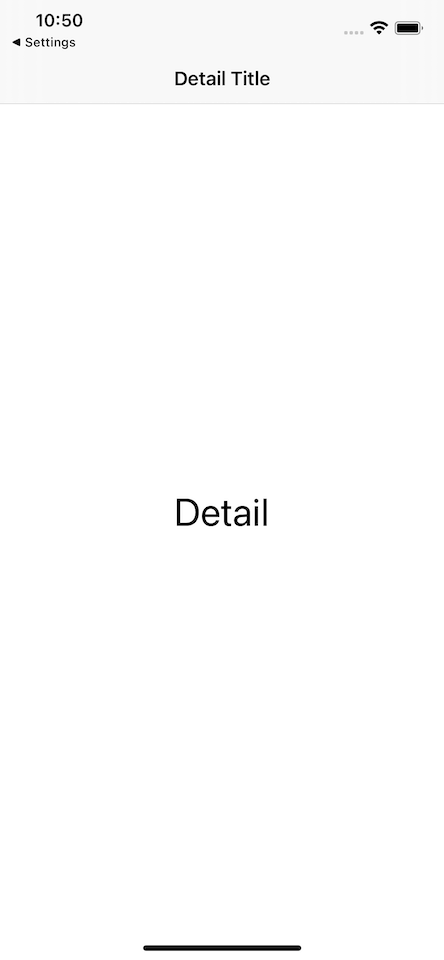
Navigation Title Style
By default, the title that we set via .navigationTitle is present in a large style. You can change this with .navigationBarTitleDisplayMode view modifier.
In the following example, we set title display style to .inline.
struct ContentView: View {
    var body: some View {
        NavigationView {
            Text("Detail")
                .font(.largeTitle)
                .navigationTitle("Detail Title")
                .navigationBarTitleDisplayMode(.inline) // <1>
        }
    }
}
<1> We change title bar style with .navigationBarTitleDisplayMode.
There are more view modifiers that NavigationView can react with, such as
navigationBarHidden, which hides the navigation bar.navigationBarBackButtonHidden, which hides the navigation bar back button.toolbar, which adds a navigation bar button to the navigation bar.
How to navigate to another view
To push new views into a stack and presenting them, NavigationView needs a companion view, NavigationLink.
NavigationLink is a view that controls a navigation presentation. There are a few variations of how to initialize this view, but all of them required two important arguments: source view and destination view.
- Source view is any view that will trigger the transition.
- Destination view is the view that will push into the stack and present over the current view.
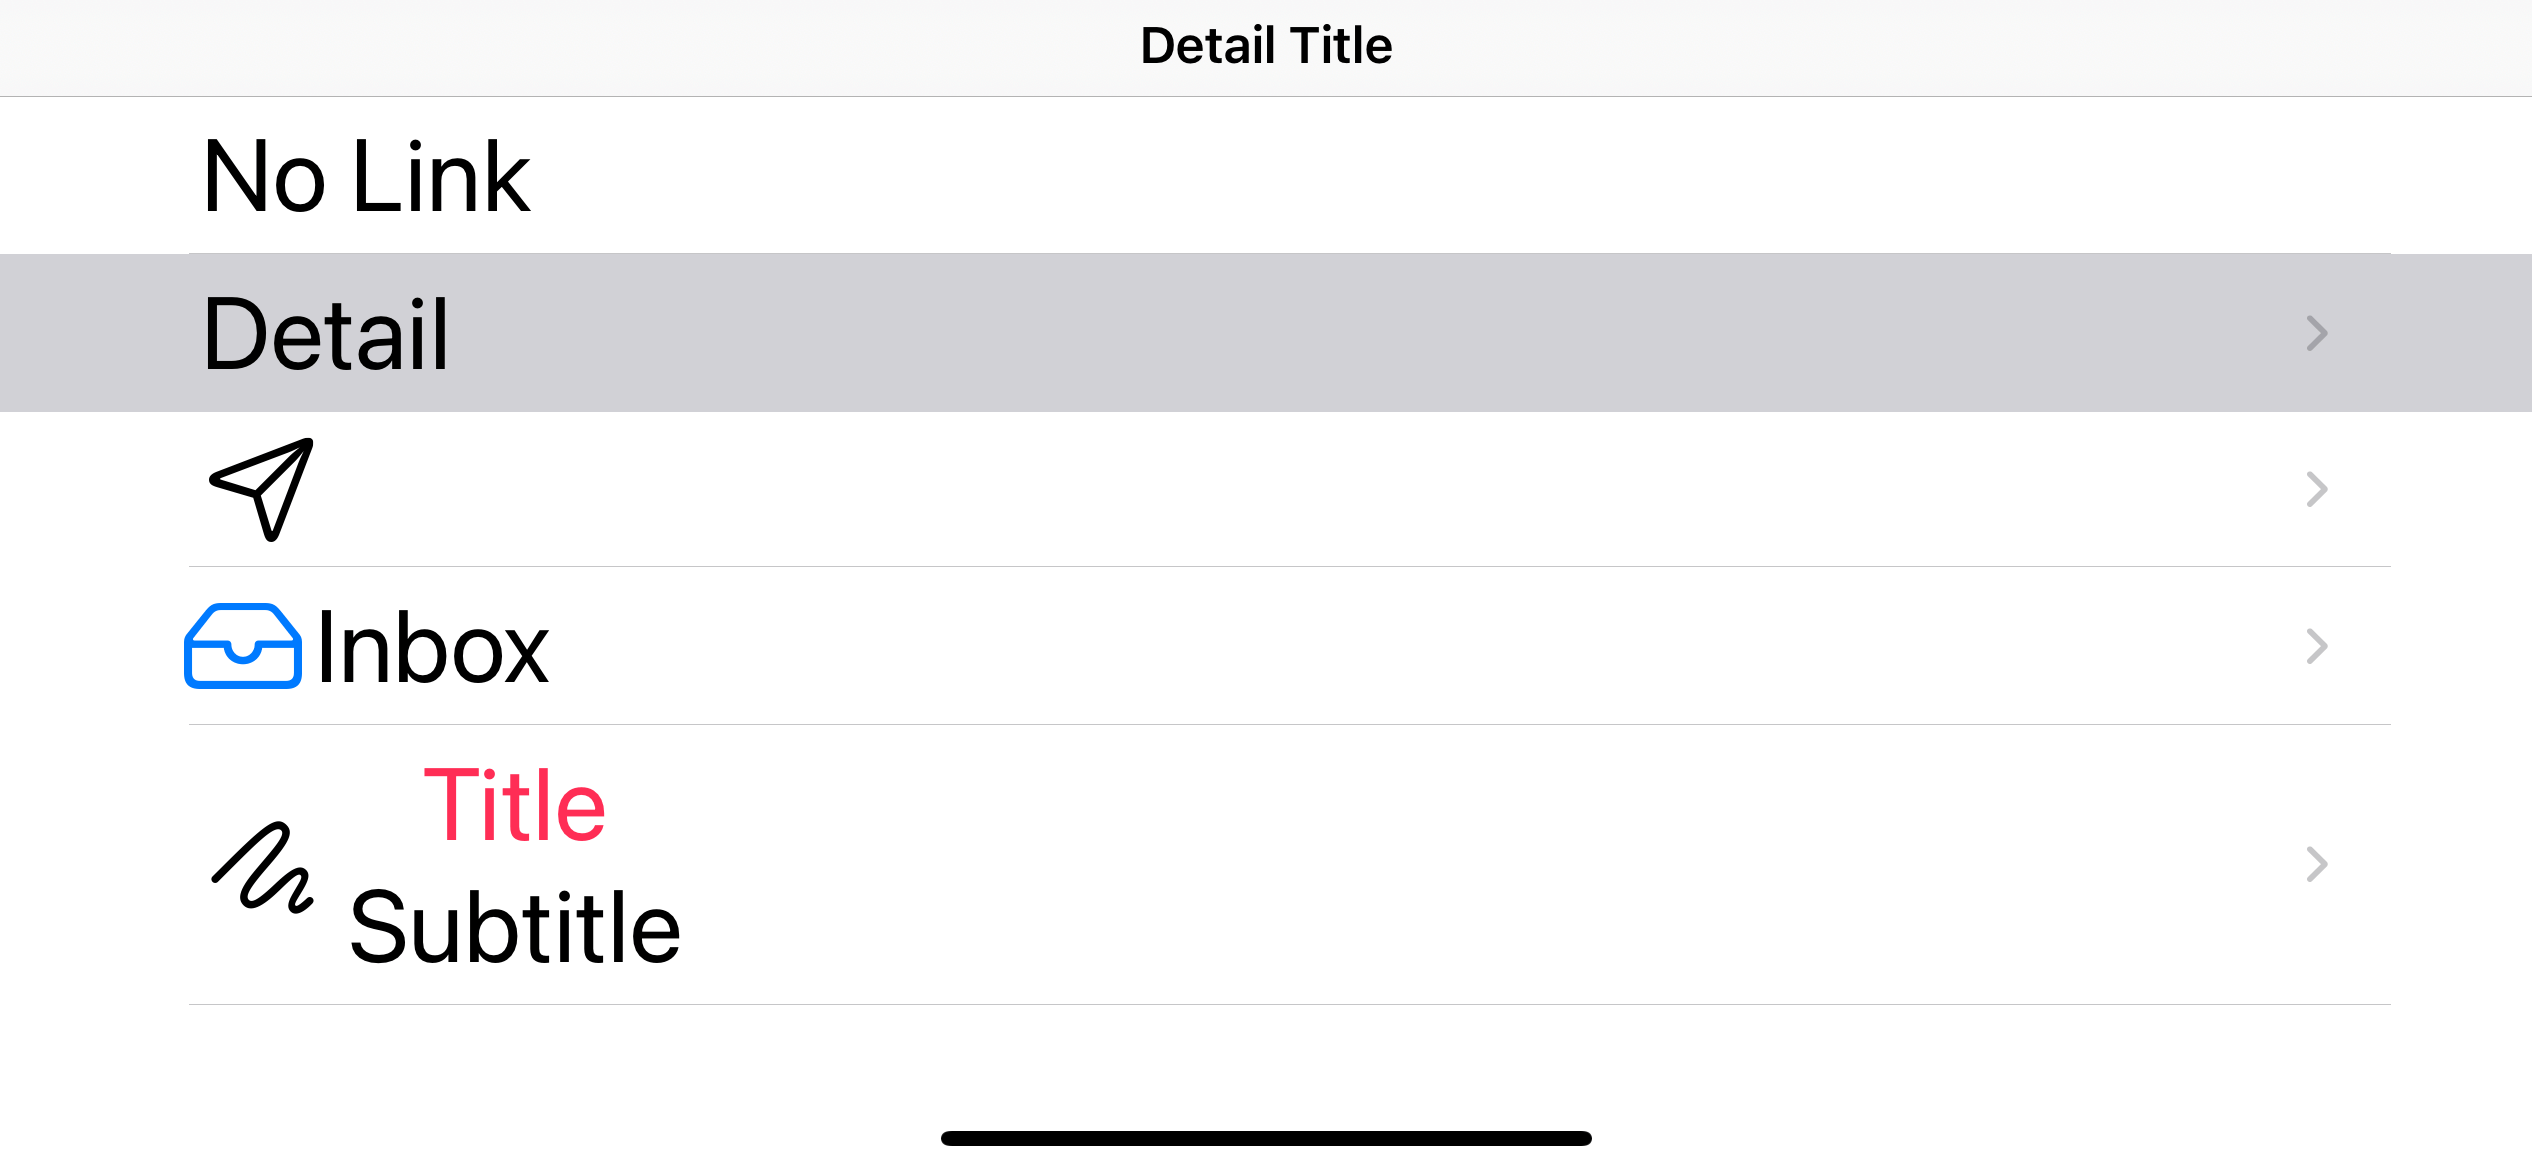
Source View
Source view can be any view. In the following example, we have a source view, which is Text, Image, Label, and a custom view. I will put NavigationLink into VStack, ScrollView, and List as examples.
Non Scrollable Content
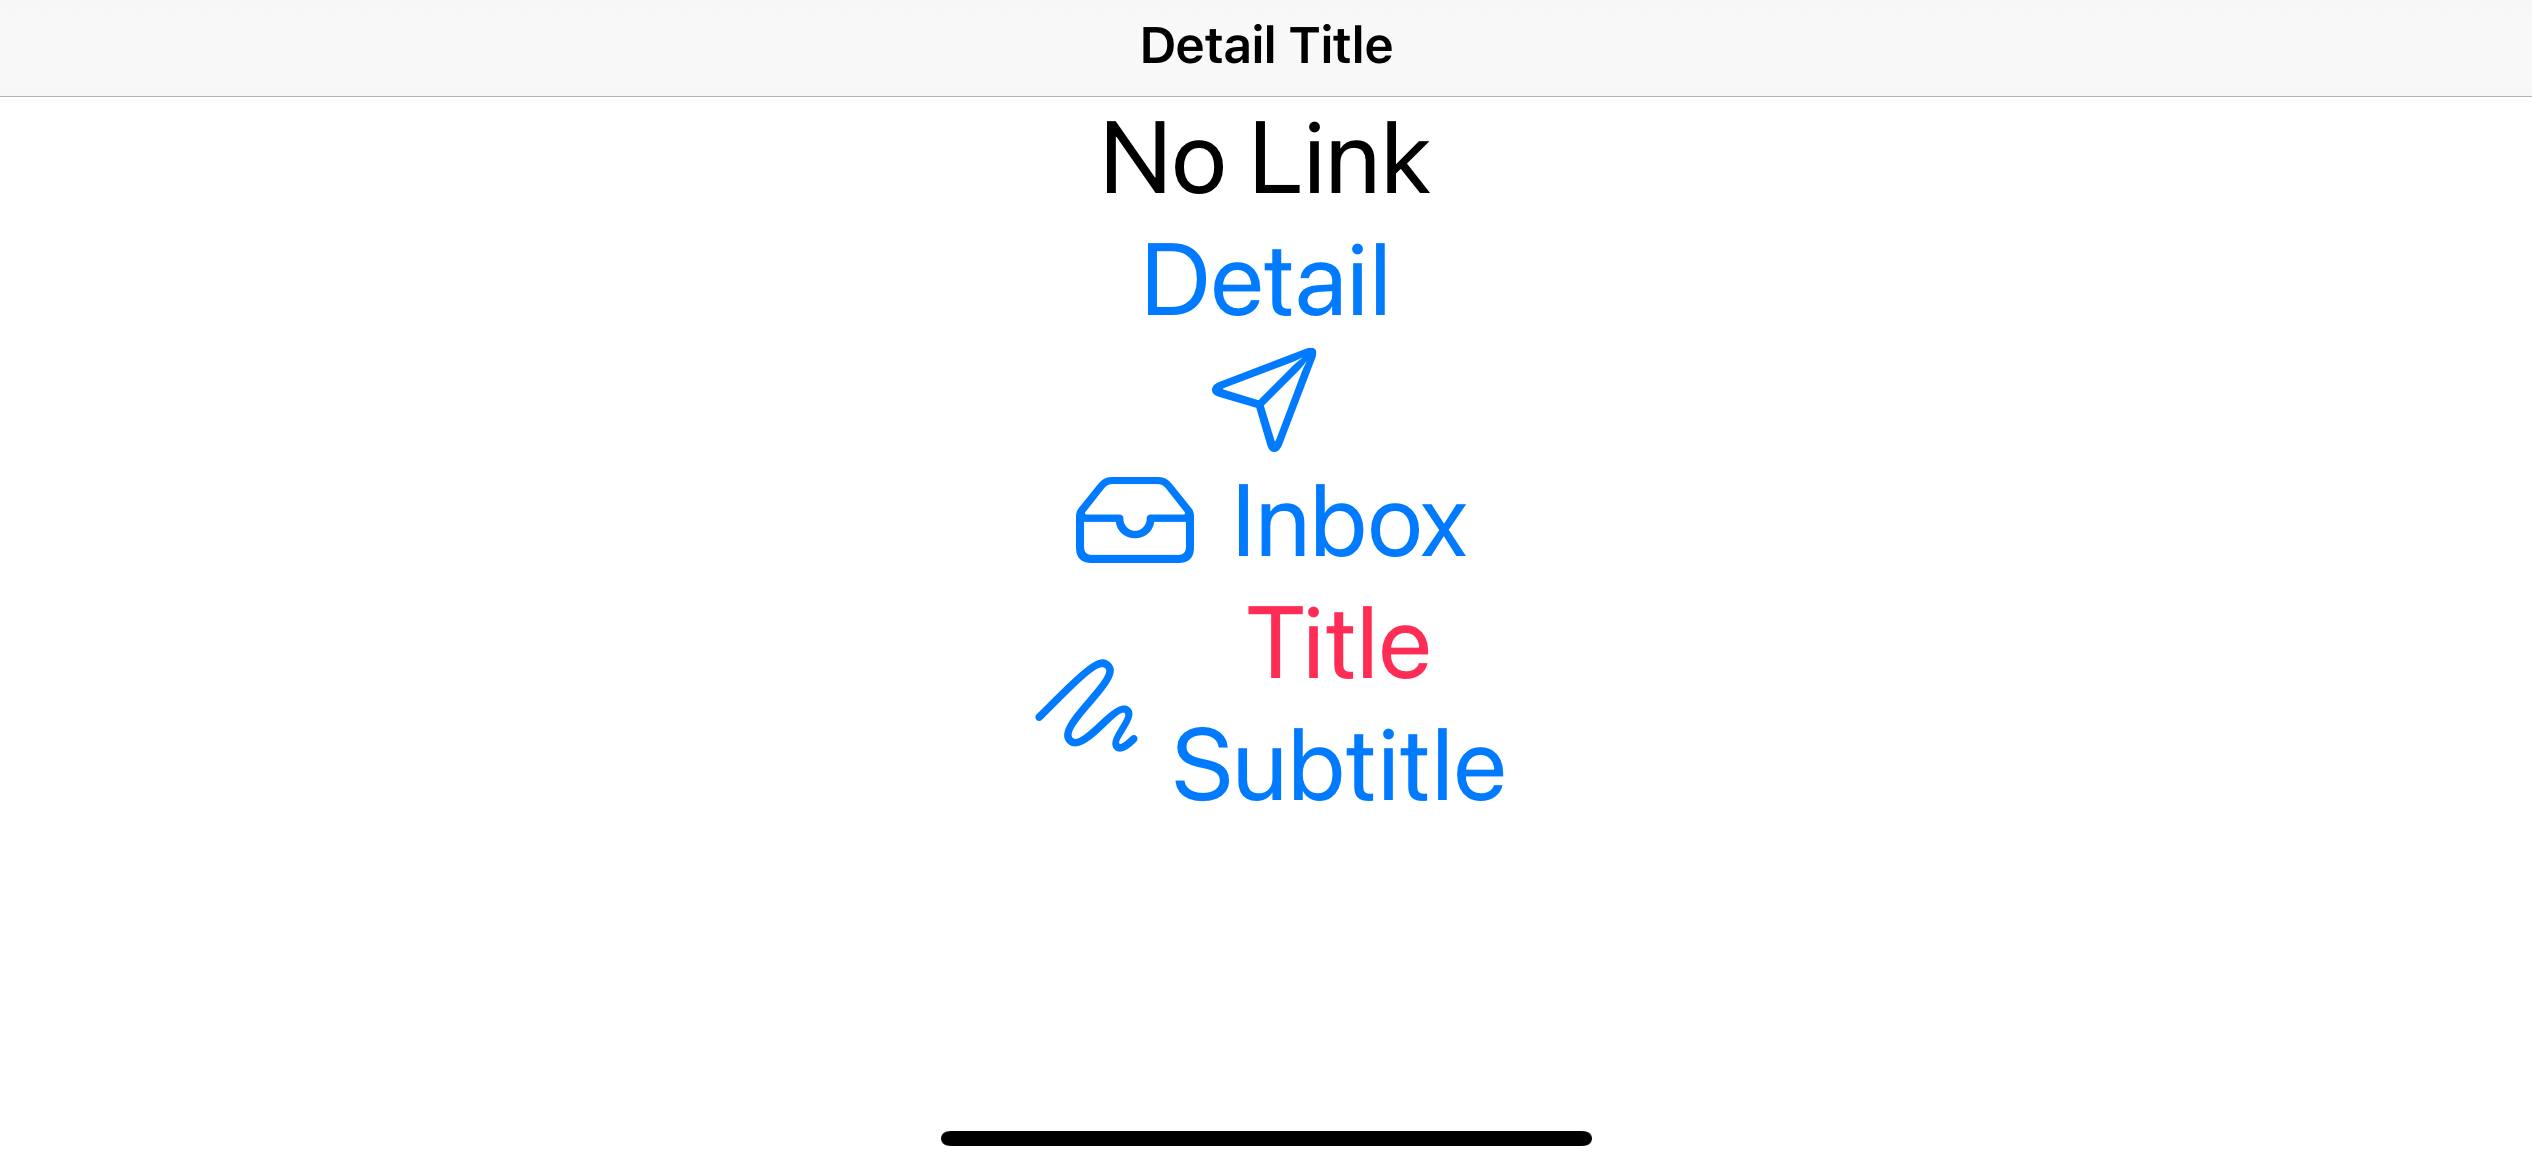
First, we put NavigationLink under a non-scrollable list, VStack.
struct ContentView: View {
    var body: some View {
        NavigationView {
            VStack {
                Text("No Link") // <9>
                NavigationLink(
                    destination: Text("Detail"), // <1>
                    label: {
                        Text("Detail") // <5>
                    })
                NavigationLink(
                    destination: Text("Paper Plane"), // <2>
                    label: {
                        Image(systemName: "paperplane") // <6>
                    })
                NavigationLink(
                    destination: Text("Inbox"), // <3>
                    label: {
                        Label("Inbox", systemImage: "tray") // <7>
                    })
                NavigationLink(
                    destination: Text("Custom"), // <4>
                    label: {
                        HStack { // <8>
                            Image(systemName: "scribble")
                            VStack {
                                Text("Title")
                                    .foregroundColor(.pink)
                                Text("Subtitle")
                            }
                        }
                    })
            }
            .font(.largeTitle)
            .navigationTitle("Detail Title")
            .navigationBarTitleDisplayMode(.inline)
        }
    }
}
<1, 2, 3, 4> All NavigationLink will navigate to a new Text view with different text based on the source view.
<5> The first source view is a simple Text view.
<6> The second source view is an Image view.
<7> The third source view is a Label view.
<8> The last source view is a custom view.
<9> I put a text view with no NavigationLink for your comparison.
Result:
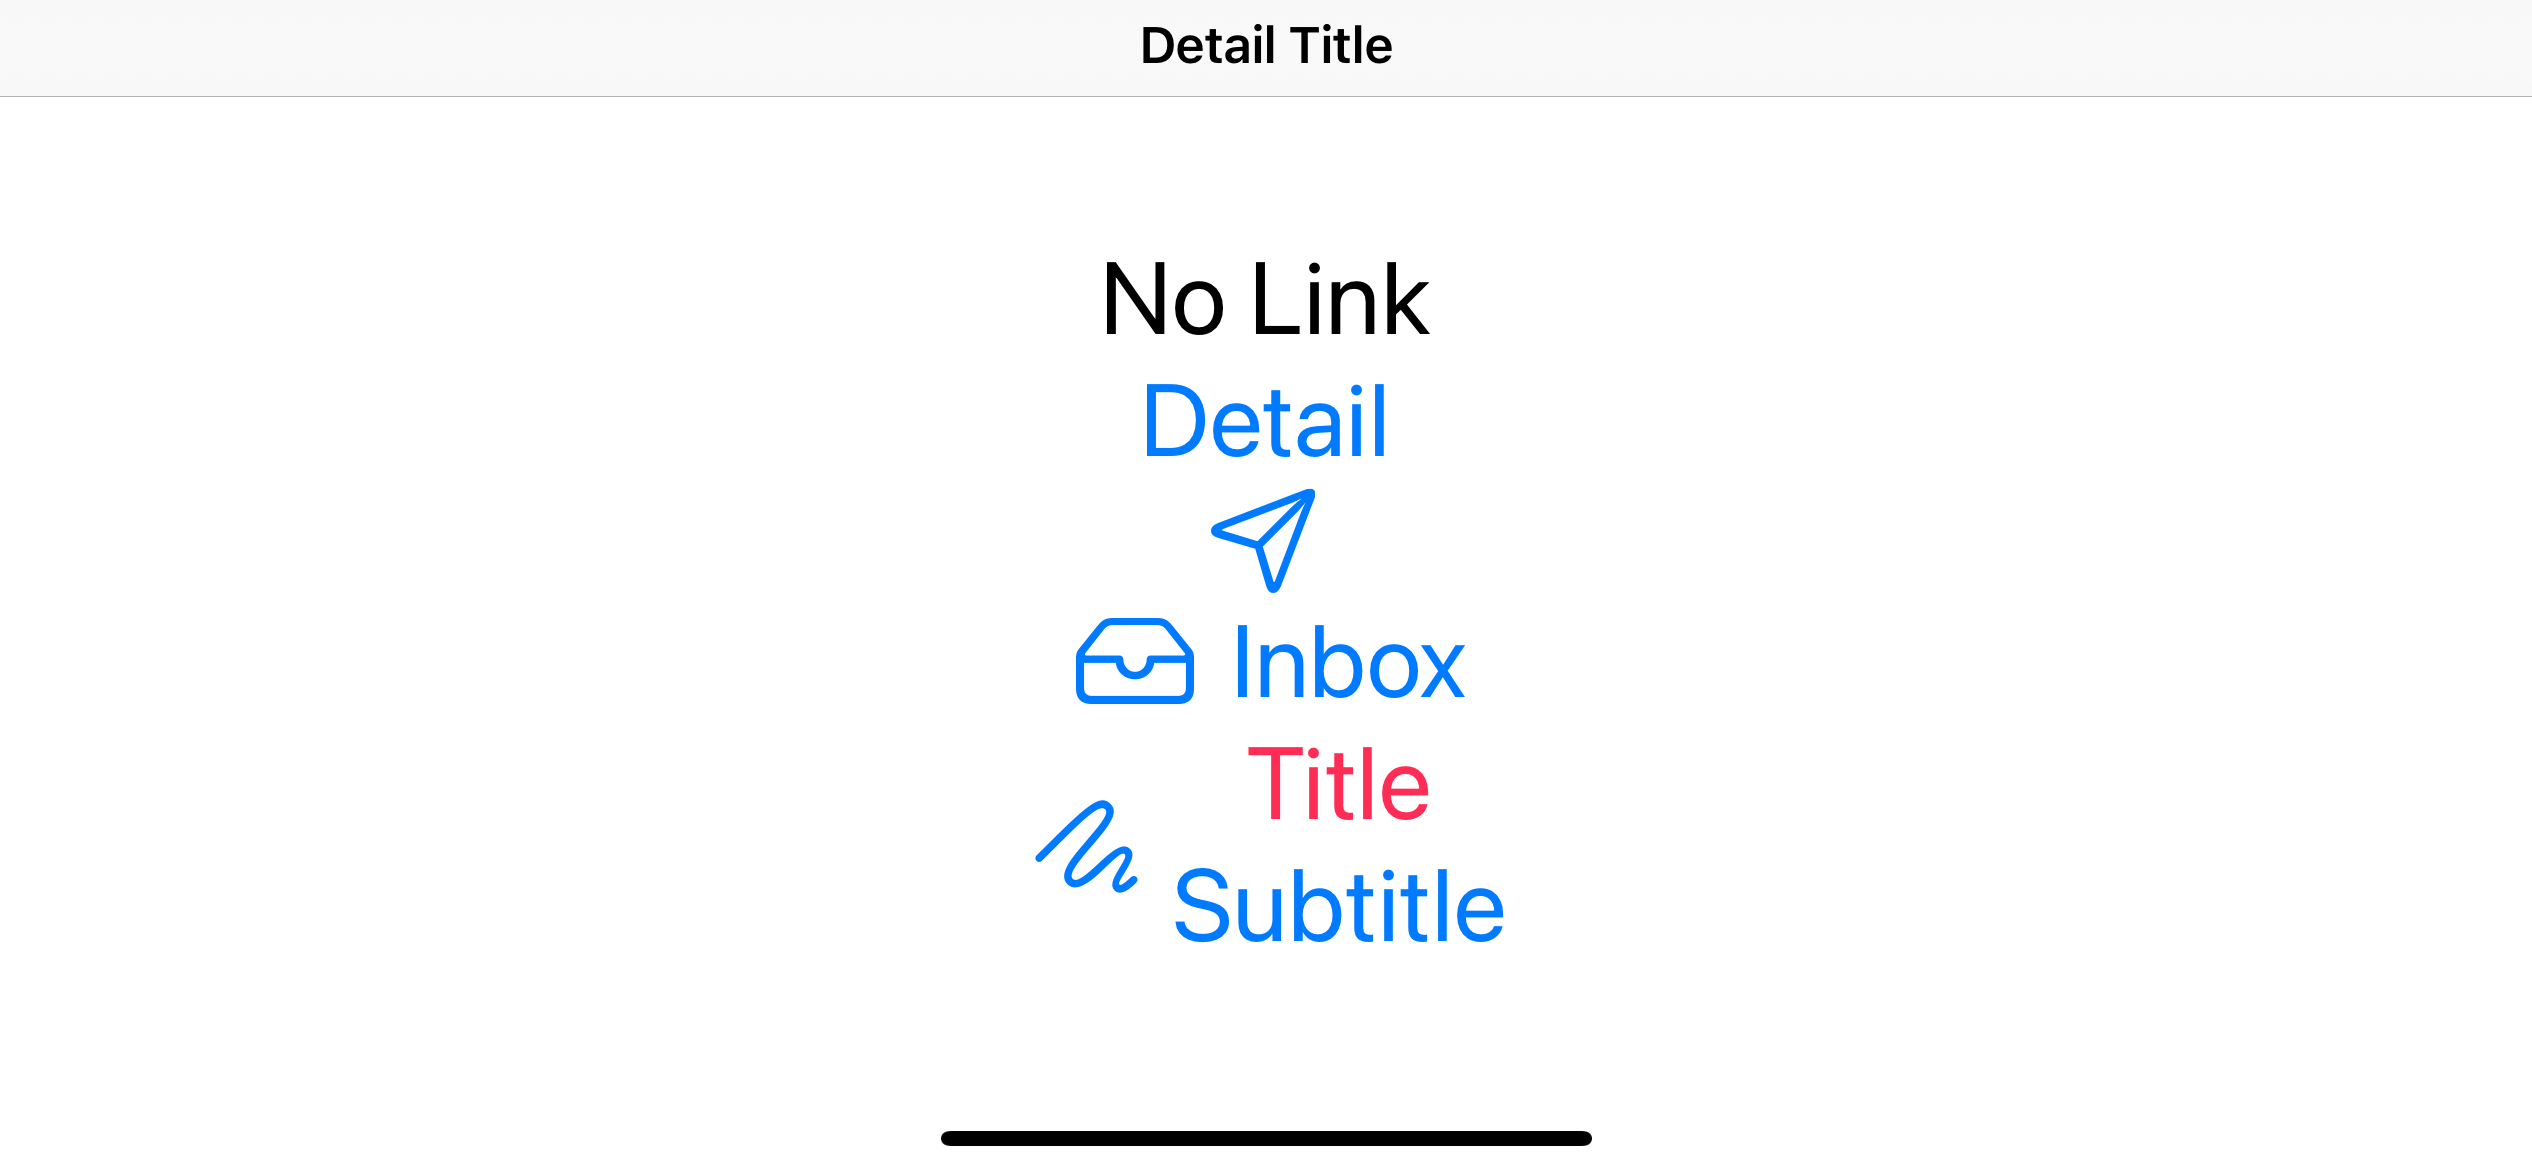
Here is our view in action.
As you can see, NavigationLink changes our source view appearance (Turn them into a button-like view) and add an action to transition to the destination view.
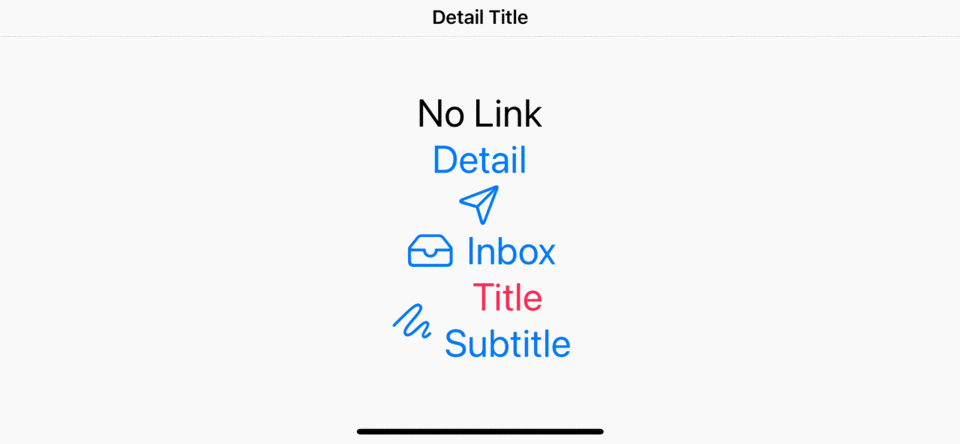
ScrollView
Let's change VStack to ScrollView this time.
struct ContentView: View {
    var body: some View {
        NavigationView {
            ScrollView { // <1>
                Text("No Link")
                NavigationLink(
                    destination: Text("Detail"),
                    label: {
                        Text("Detail")
                    })
                NavigationLink(
                    destination: Text("Paper Plane"),
                    label: {
                        Image(systemName: "paperplane")
                    })
                NavigationLink(
                    destination: Text("Inbox"),
                    label: {
                        Label("Inbox", systemImage: "tray")
                    })
                NavigationLink(
                    destination: Text("Custom"),
                    label: {
                        HStack {
                            Image(systemName: "scribble")
                            VStack {
                                Text("Title")
                                    .foregroundColor(.pink)
                                Text("Subtitle")
                            }
                        }
                    })
            }
            .font(.largeTitle)
            .navigationTitle("Detail Title")
            .navigationBarTitleDisplayMode(.inline)
        }
    }
}
<1> Everything is the same. We only change VStack to ScrollView.
Result:
Here is our view in action.
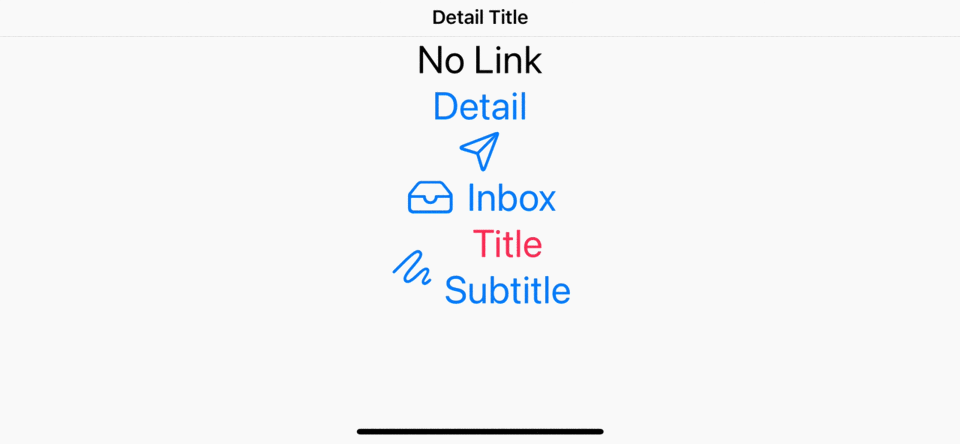
The behavior seems to be the same as VStack. The only difference is our content view is now scrollable, but that is coming from the ScrollView, not NavigationView or NavigationLink.
List
Let's change ScrollView to List and see what happens.
struct ContentView: View {
    var body: some View {
        NavigationView {
            List { // <1>
                Text("No Link")
                NavigationLink(
                    destination: Text("Detail"),
                    label: {
                        Text("Detail").font(.largeTitle)
                    })
                NavigationLink(
                    destination: Text("Paper Plane"),
                    label: {
                        Image(systemName: "paperplane")
                    })
                NavigationLink(
                    destination: Text("Inbox"),
                    label: {
                        Label("Inbox", systemImage: "tray")
                    })
                NavigationLink(
                    destination: Text("Custom"),
                    label: {
                        HStack {
                            Image(systemName: "scribble")
                            VStack {
                                Text("Title")
                                    .foregroundColor(.pink)
                                Text("Subtitle")
                            }
                        }
                    })
            }

            .navigationTitle("Detail Title")
            .navigationBarTitleDisplayMode(.inline)
        }
    }
}
<1> We change container view to List.
Result:
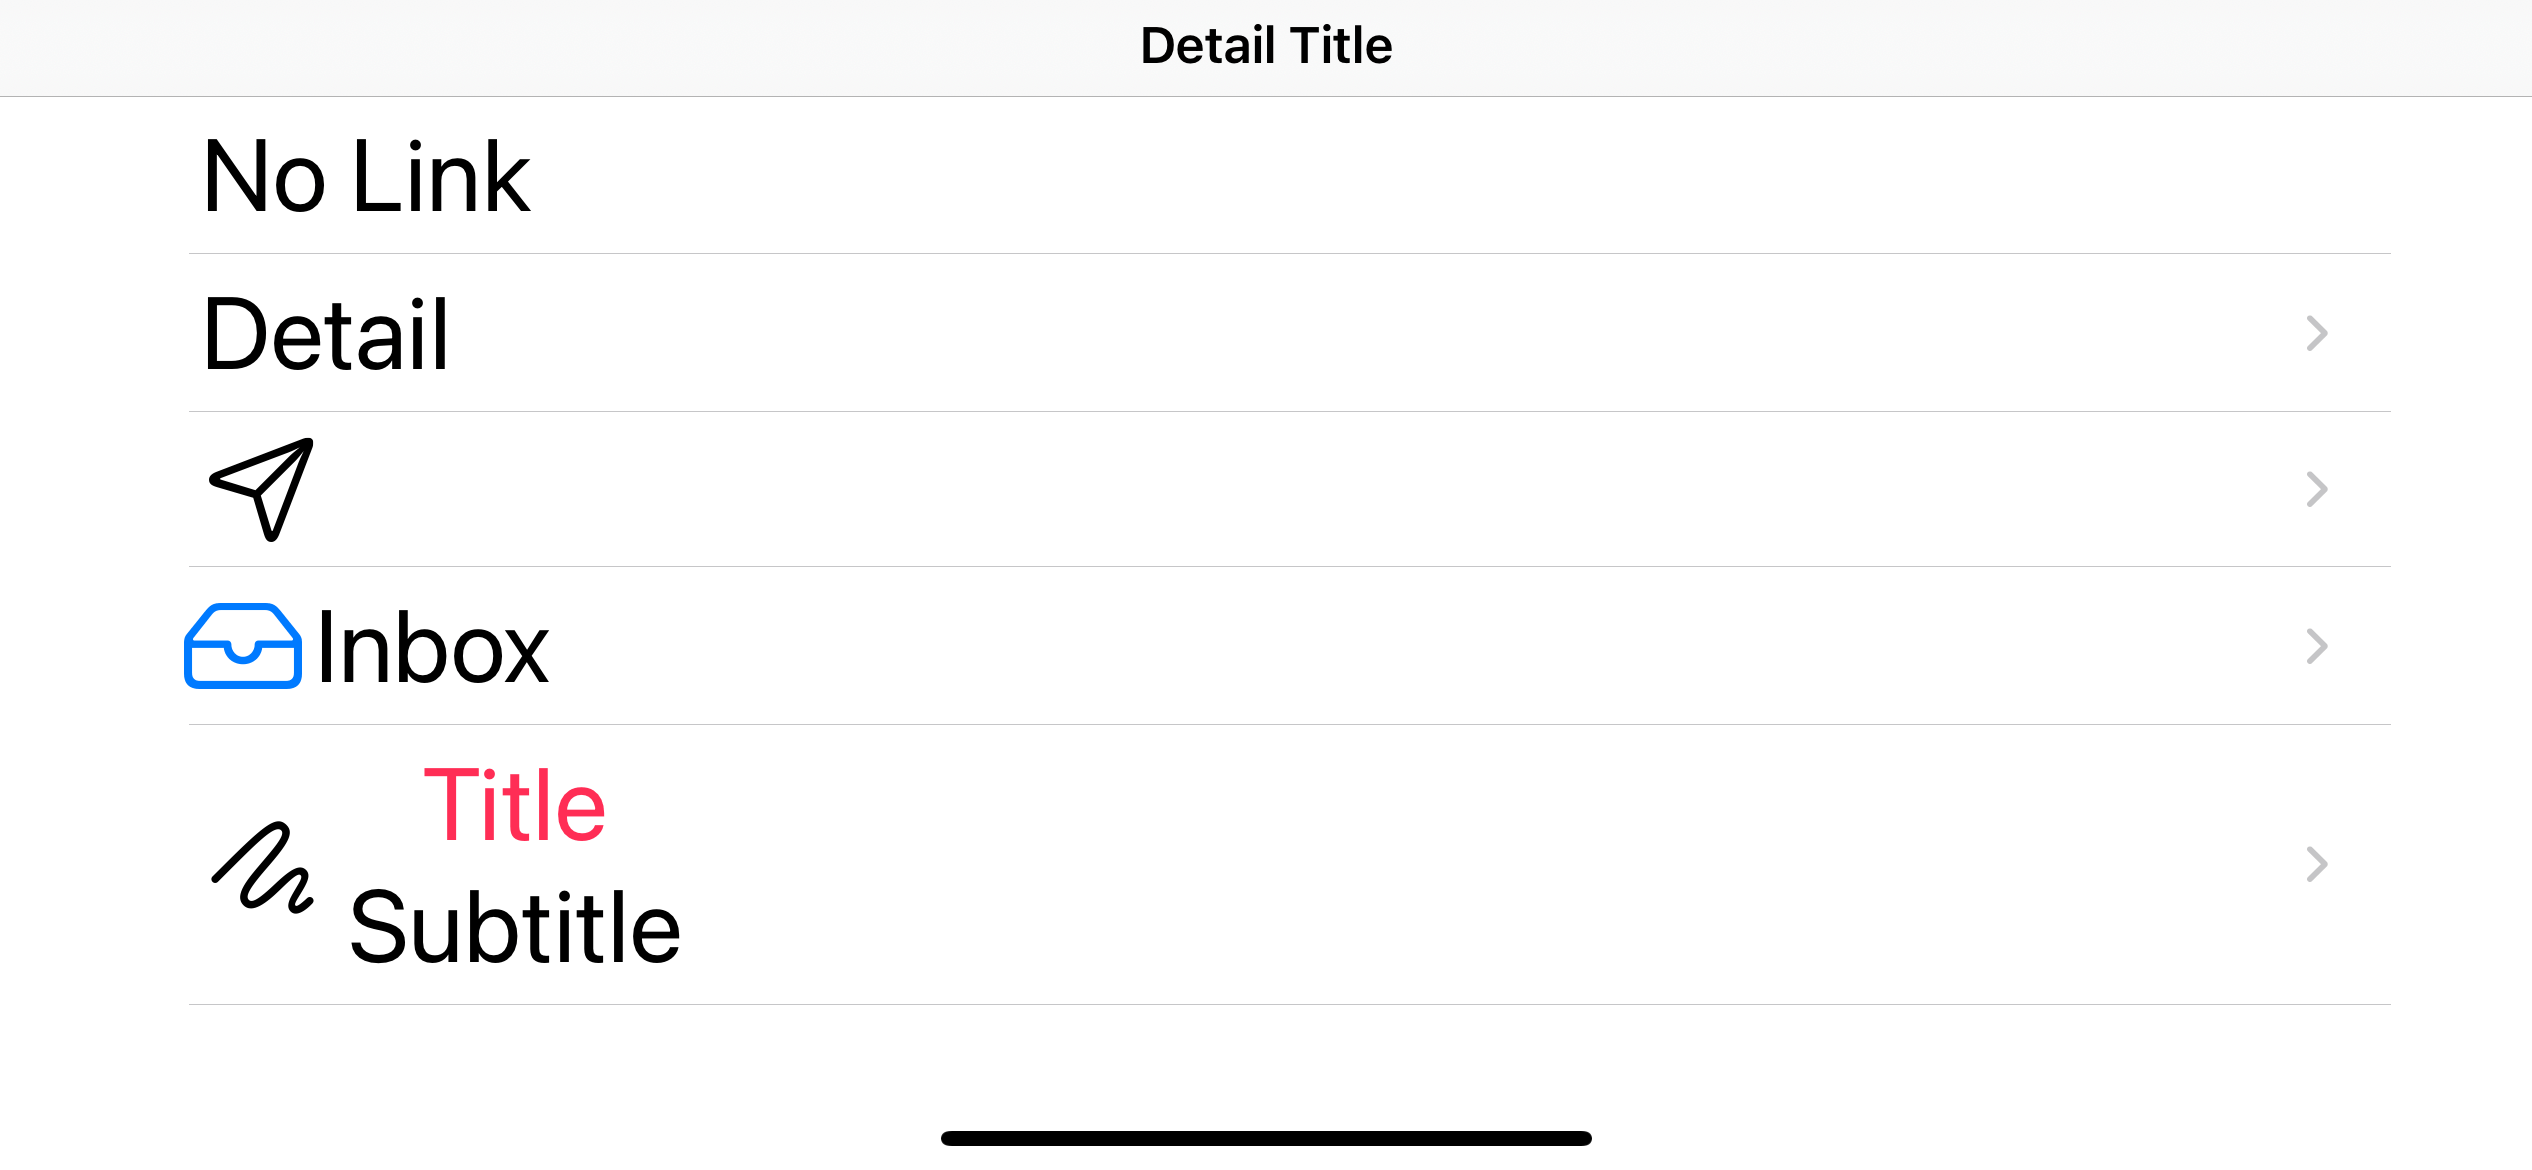
Here is our view in action.
There is a difference in the appearance here. Instead of changing the source view to a button-like view, NavigationLink doesn't touch the content but adds a disclosure indicator (A chevron-shaped control) to the end of the cell content. And also highlights the cell when tap.
Destination view
The destination view is a new view that we want to present on our navigation view. In our previous example, we use a Text view, but it can by any view.
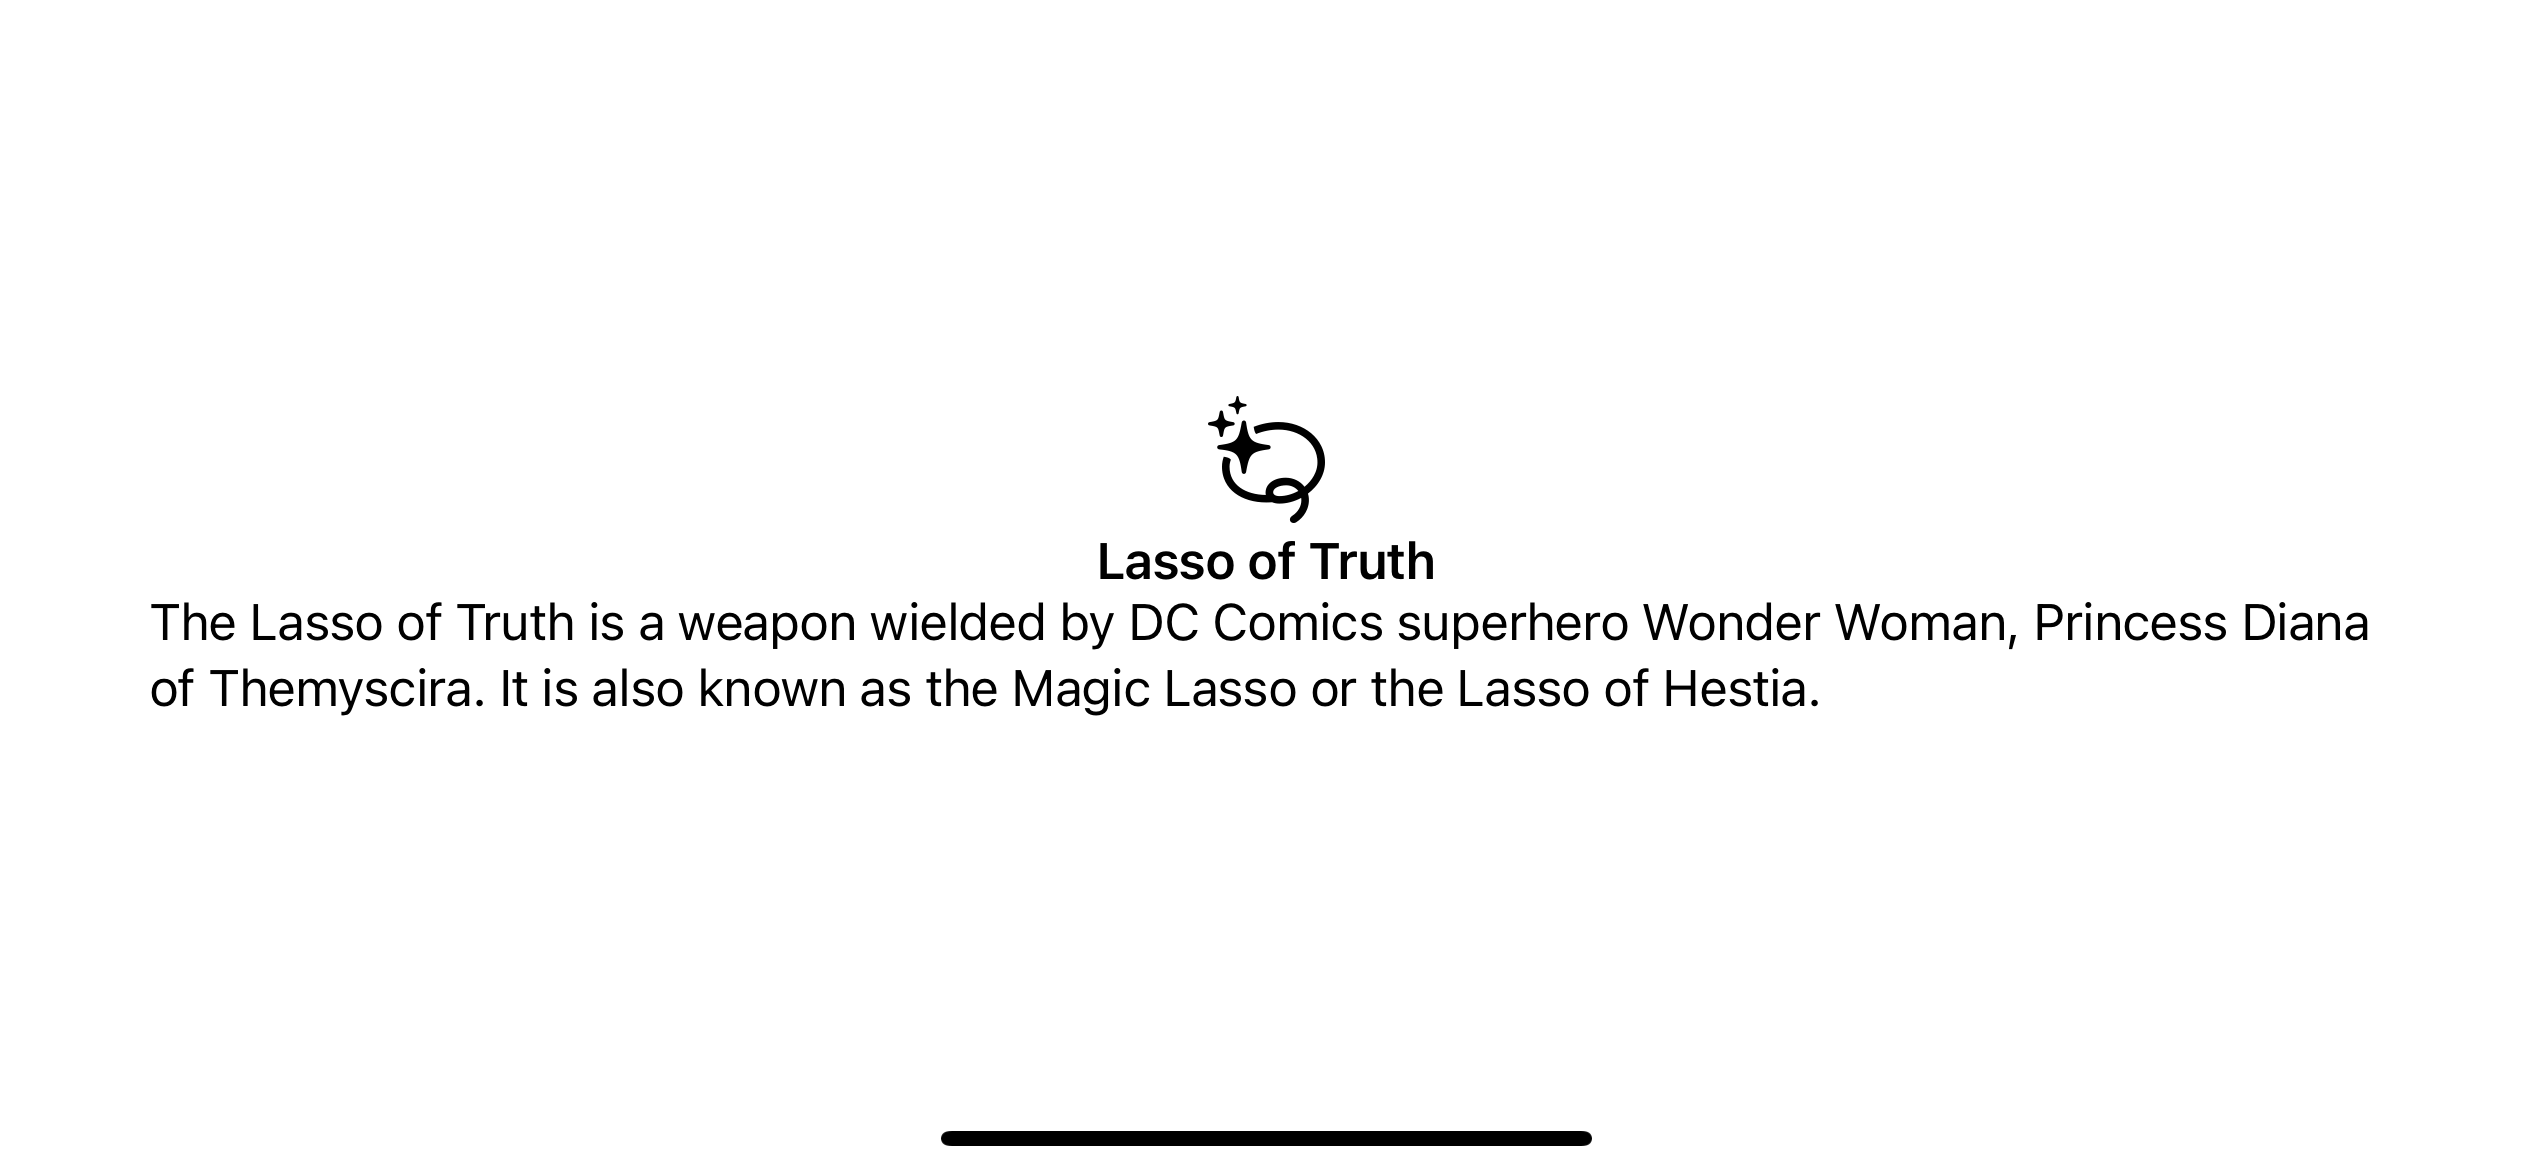
To demonstrate this, let's create a new custom view that we will use as the destination view.
struct CustomDestinationView: View {
    var body: some View {
        VStack {
            Image(systemName: "lasso.sparkles")
                .font(.largeTitle)
            Text("Lasso of Truth")
                .font(.headline)
            Text("The Lasso of Truth is a weapon wielded by DC Comics superhero Wonder Woman, Princess Diana of Themyscira. It is also known as the Magic Lasso or the Lasso of Hestia.")
                .font(.body)
        }
        .navigationTitle("Lasso of Truth") // <1>
    }
}
<1> We add .navigationTitle("Lasso of Truth") here which won't show up if the view isn't presented under NavigationView.
Run the view alone, and the navigation title won't show up. You will see in the next section how this modifier effect under NavigationView.
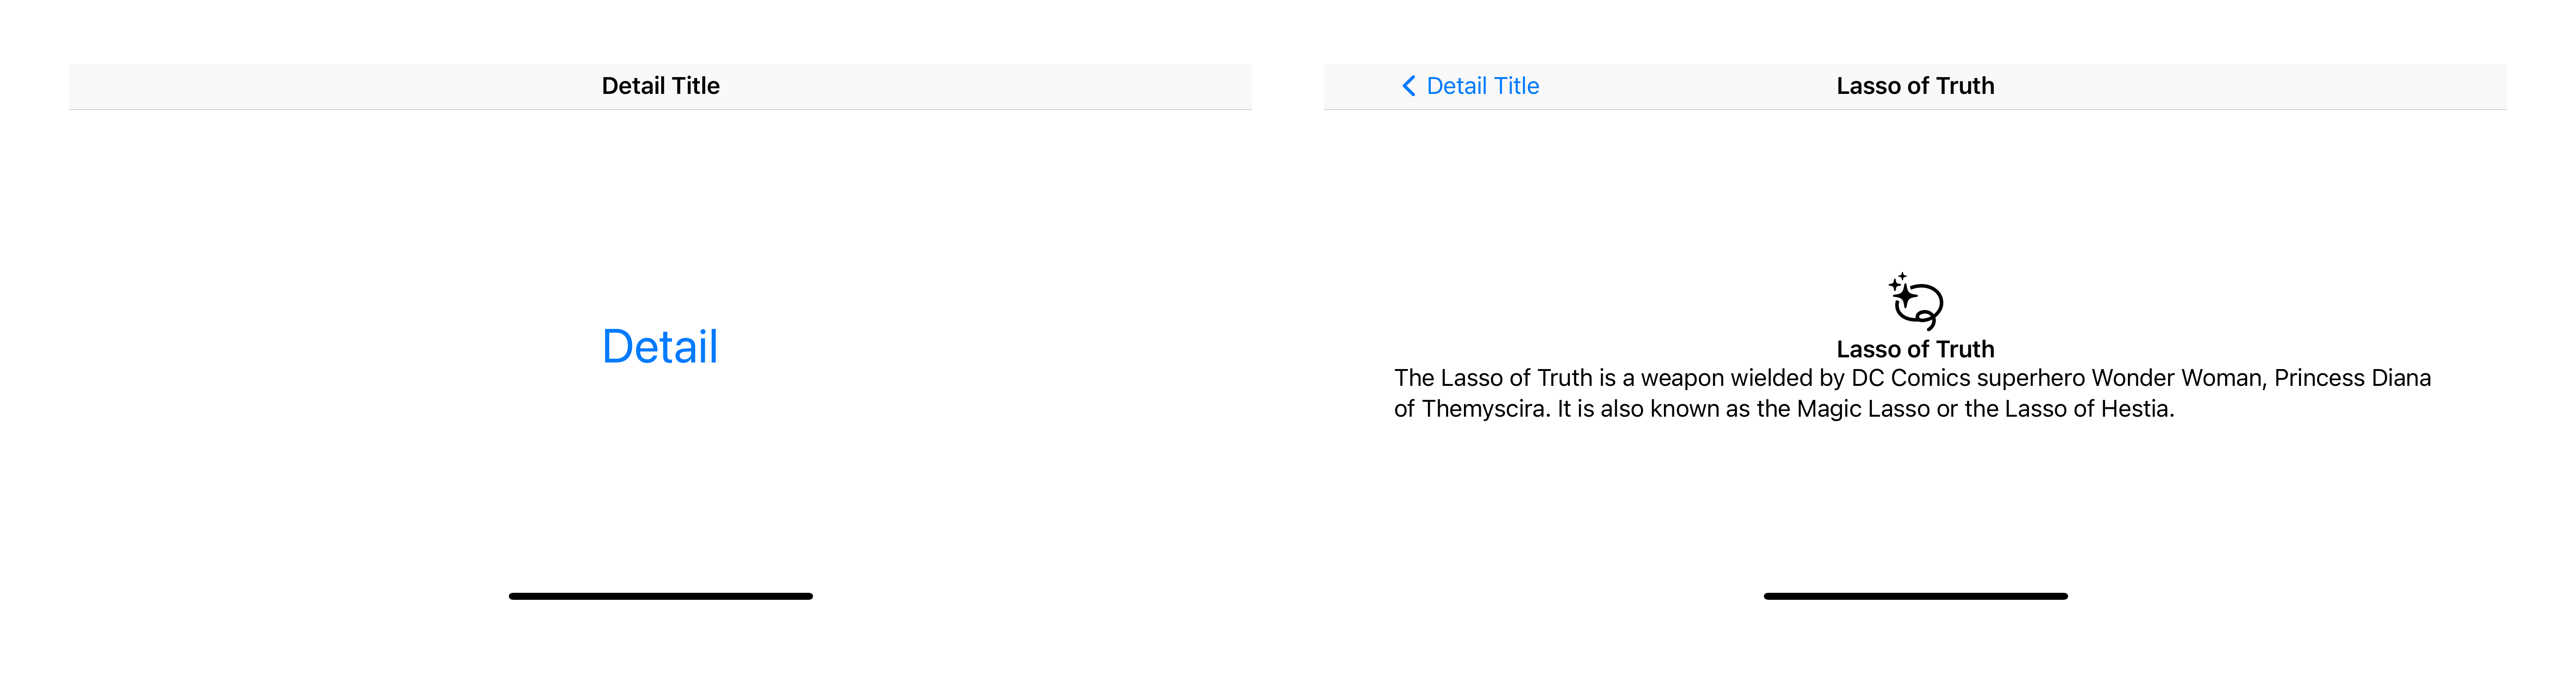
Let's use CustomDestinationView as our destination view.
struct ContentView: View {
    var body: some View {
        NavigationView {
            NavigationLink(
                destination: CustomDestinationView(), // <1>
                label: {
                    Text("Detail")
                }
            )
            .font(.largeTitle)
            .navigationTitle("Detail Title")
            .navigationBarTitleDisplayMode(.inline)
        }
    }
}
<1> We use CustomDestinationView as the destination view.
Result:
You can see that once we navigate to the destination view, the navigation view pickup .navigationTitle("Lasso of Truth") from the destination and show up on the navigation top bar.
NavigationLink without NavigationView
What will happen if we use NavigationLink without NavigationView?
struct ContentView: View {
    var body: some View {
        NavigationLink(
            destination: CustomDestinationView(),
            label: {
                Text("Detail")
            }
        )
        .font(.largeTitle)
        .navigationTitle("Detail Title")
        .navigationBarTitleDisplayMode(.inline)
    }
}
NavigationLink will present the source view in a disabled-like state (gray out), and we can't interact with the source view. In short, NavigationLink can't operate outside NavigationView.

You can easily support sarunw.com by checking out this sponsor.
Offline Transcription: Fast, privacy-focus way to transcribe audio, video, and podcast files. No data leaves your Mac.
Conclusion
This is the end of the "Building Lists and Navigation in SwiftUI" series. We start by learning how to create a list view. It can be static, dynamic, scrollable, and non-scrollable. Then in this article, we explore NavigationView and its companion view, NavigationLink. These two work together to perform the navigation between views.
Even I put "List and Navigation" together in the series, you might notice that they don't have anything related. NavigationView can operate on any view. And a List view can also work without NavigationView. The only related thing is a NavigationLink aware of the List view and apply different appearance and interaction to the cell.
I tried to break down the list and navigation components for you to get a clearer picture of what they are and how they work together as one unit. I didn't cover much in detail for each element, such as navigating between view programmatically and making a split view from a NavigationView. Those are topics I will cover in future posts.
Read more article about SwiftUI, List, Navigation, NavigationView, or see all available topic
Enjoy the read?
If you enjoy this article, you can subscribe to the weekly newsletter.
Every Friday, you'll get a quick recap of all articles and tips posted on this site. No strings attached. Unsubscribe anytime.
Feel free to follow me on Twitter and ask your questions related to this post. Thanks for reading and see you next time.
If you enjoy my writing, please check out my Patreon https://www.patreon.com/sarunw and become my supporter. Sharing the article is also greatly appreciated.
Become a patron Buy me a coffee Tweet ShareGetting Started with Tuist
A brief introduction to Tuist, a command-line tool that helps you generate Xcode projects.
Record iOS Simulator video as mp4 and GIF with Xcode
Xcode 12.5 brings many great updates and features. One of them is the ability to record a video of the app directly from the Simulator app.